In order to help you find the documents that you need, the Nuxeo Platform features several options to access, create and edit documents.
Browsing Content
Side Menu
The side menu offers two different tabs. Clicking on elements on the left will open a side panel (also called Drawer) with the content of the tab selected: browsing options are on the first left column, content to browse on the second and content to view on the main area. This new pattern allows to start browsing without changing the context of work. The side menu displays all the domain structure from the root. It enables you to easily access any space in the application structure.
Dashboard
Every user has a personal dashboard that displays information he finds relevant and help him have a global view of the application's activity.
The dashboard is composed of a set of boxes that display either a list of documents matching a criteria (all the workspaces the user can access, the last documents he modified, the last documents that have been published...), or possibly a piece of information either from the Platform or from external websites.
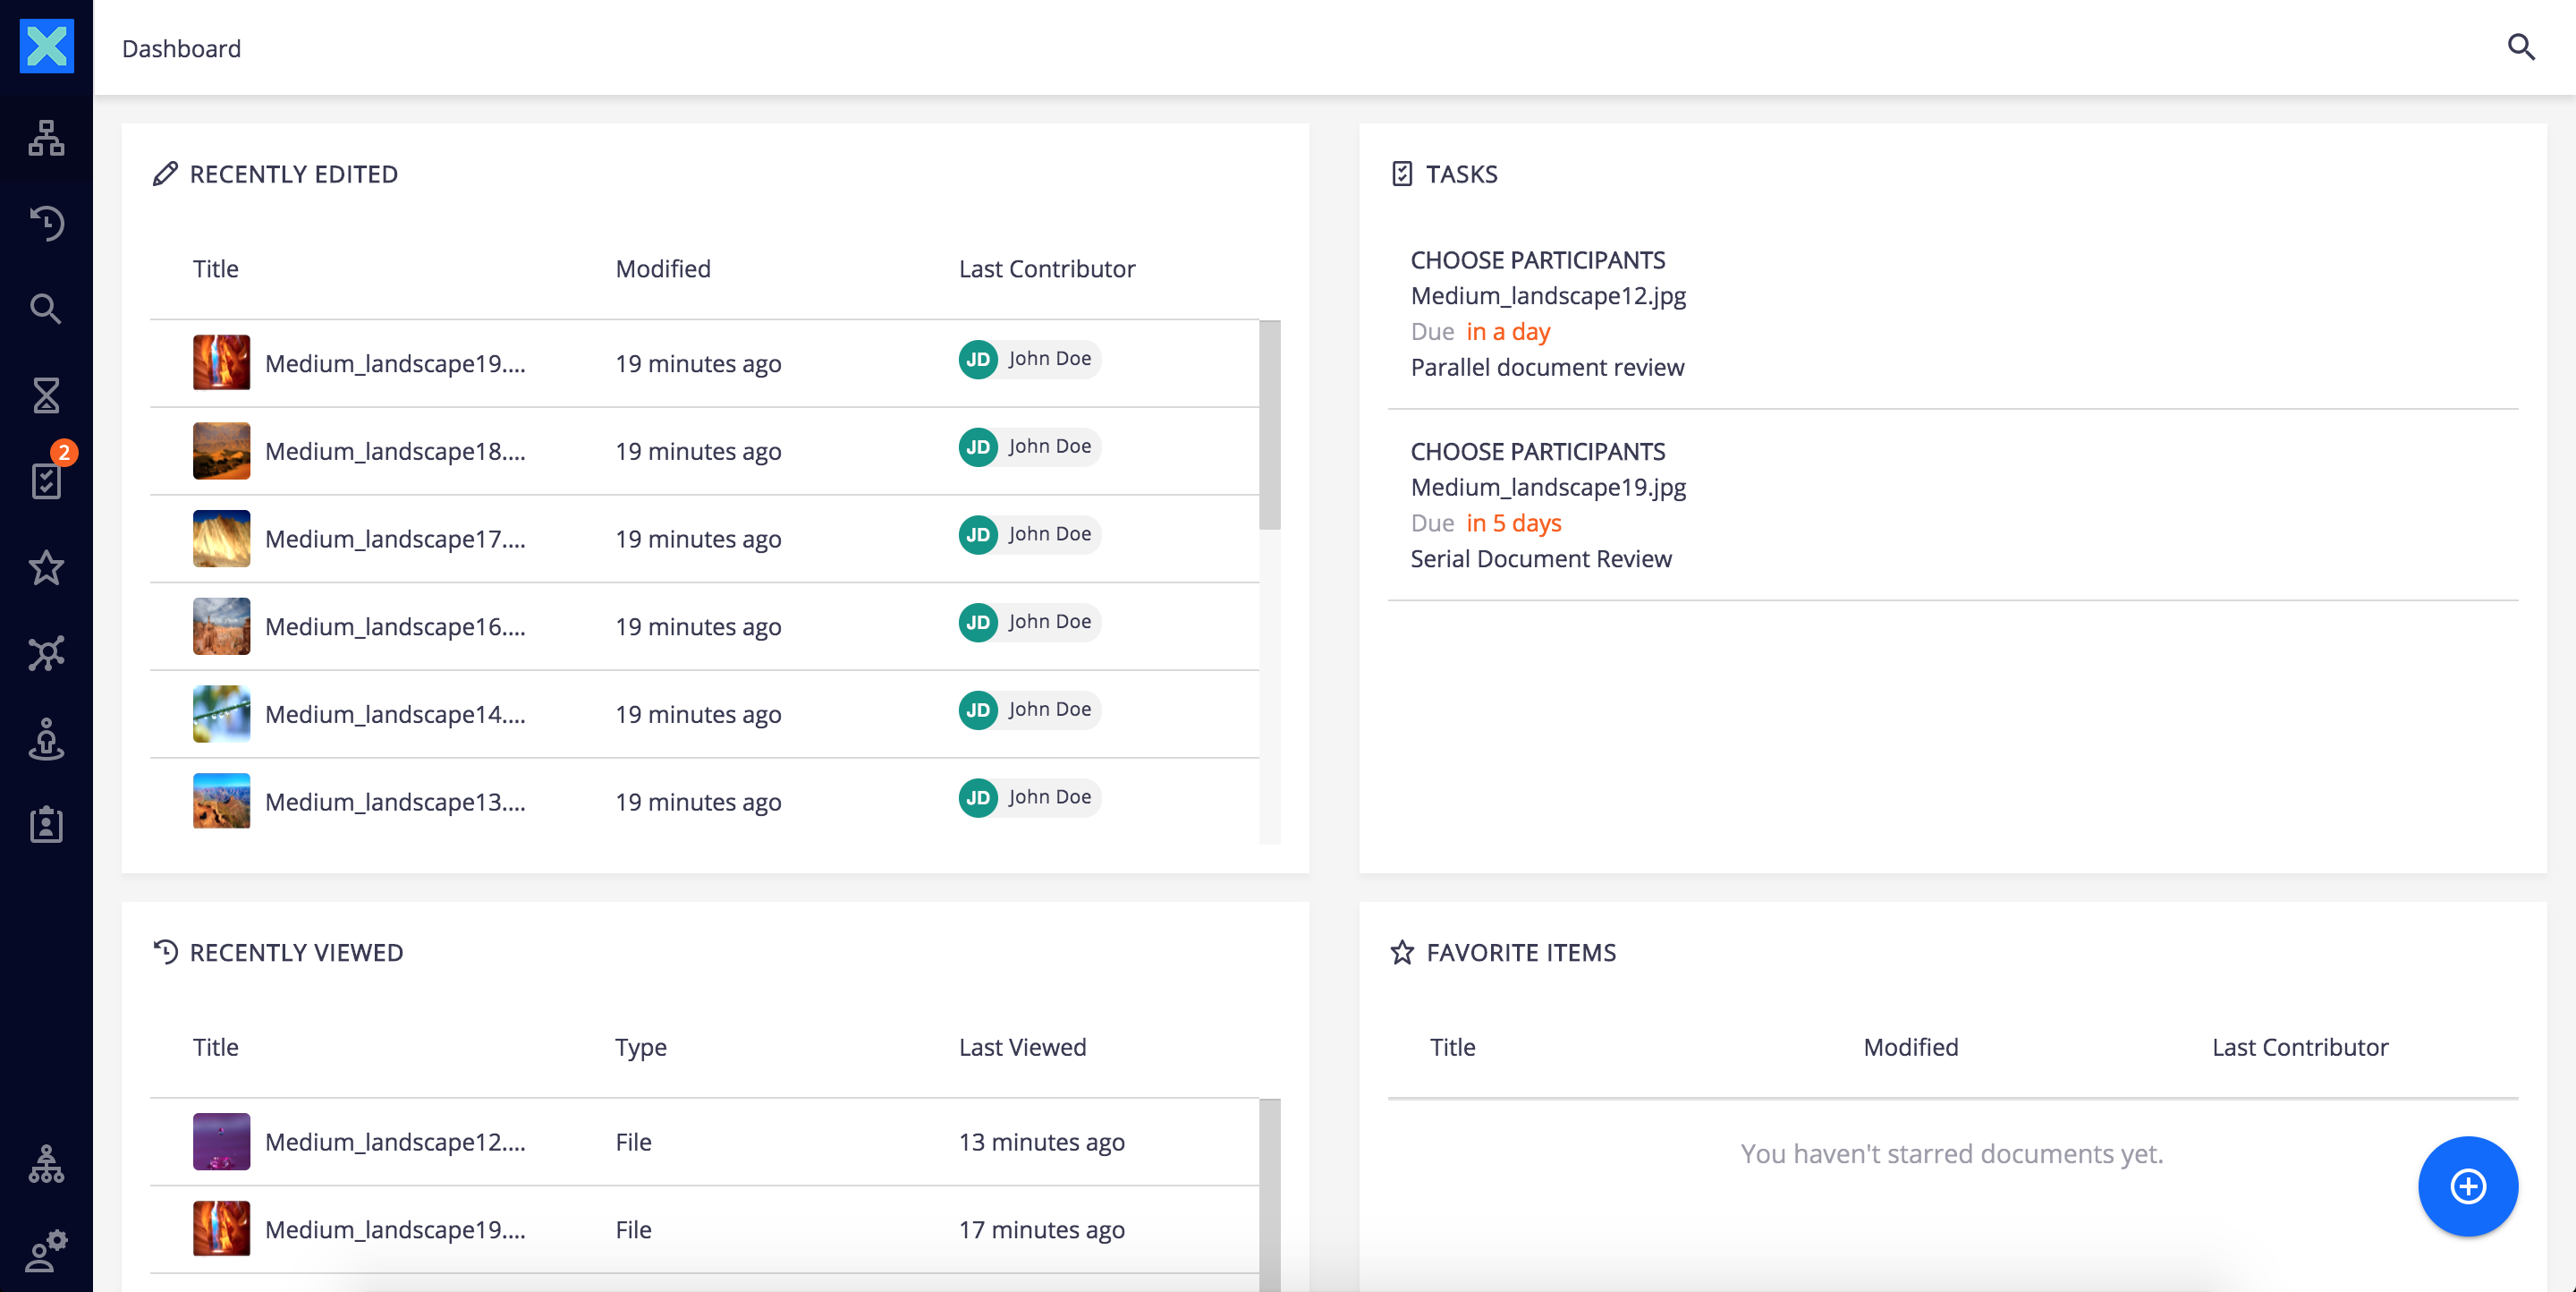
To access your dashboard, click on the icon on the top left hand corner of your platform.
Browsing Lists of Documents
Users can change the way content is presented in the folderish repositories (workspaces, folders, sections) and search results.They can also change the displayed information.
Changing View Mode
Two views of the content lists are available on the top right corner of your workspace
Table View
 (default view): This view displays the title of the documents with a small icon (that depends on the type of document or main attachment type) and a set of metadata in a table
Grid View
 : This view displays a thumbnail of documents. For folders, the thumbnail of the first item in the folder is displayed.
Changing Displayed Information
Lists of documents, whether in grid view or thumbnail view, show some information about the documents, like their title, the last contributor, their lifecycle state, etc. Users can change the information displayed, i.e. the columns for the list view or the information below the document thumbnail in thumbnail view.
To change the information displayed in content views, click on the icon ![]() . A pop-up is displayed: select the information that you want to be displayed among the list.
. A pop-up is displayed: select the information that you want to be displayed among the list.

Once it's done click on Close.
The information displayed on content views can be filtered with filters at the top of every columns.
Access Keys
Some actions or features are accessible using access keys:
- c: Create
- d: Dashboard
- s: Search
- shift + /: Search
Creating Content
Creating a Document Using the Create Button
Creating a document using the button ![]() enables you to select the type of document you want to create among all Nuxeo Platform's document types.
enables you to select the type of document you want to create among all Nuxeo Platform's document types.
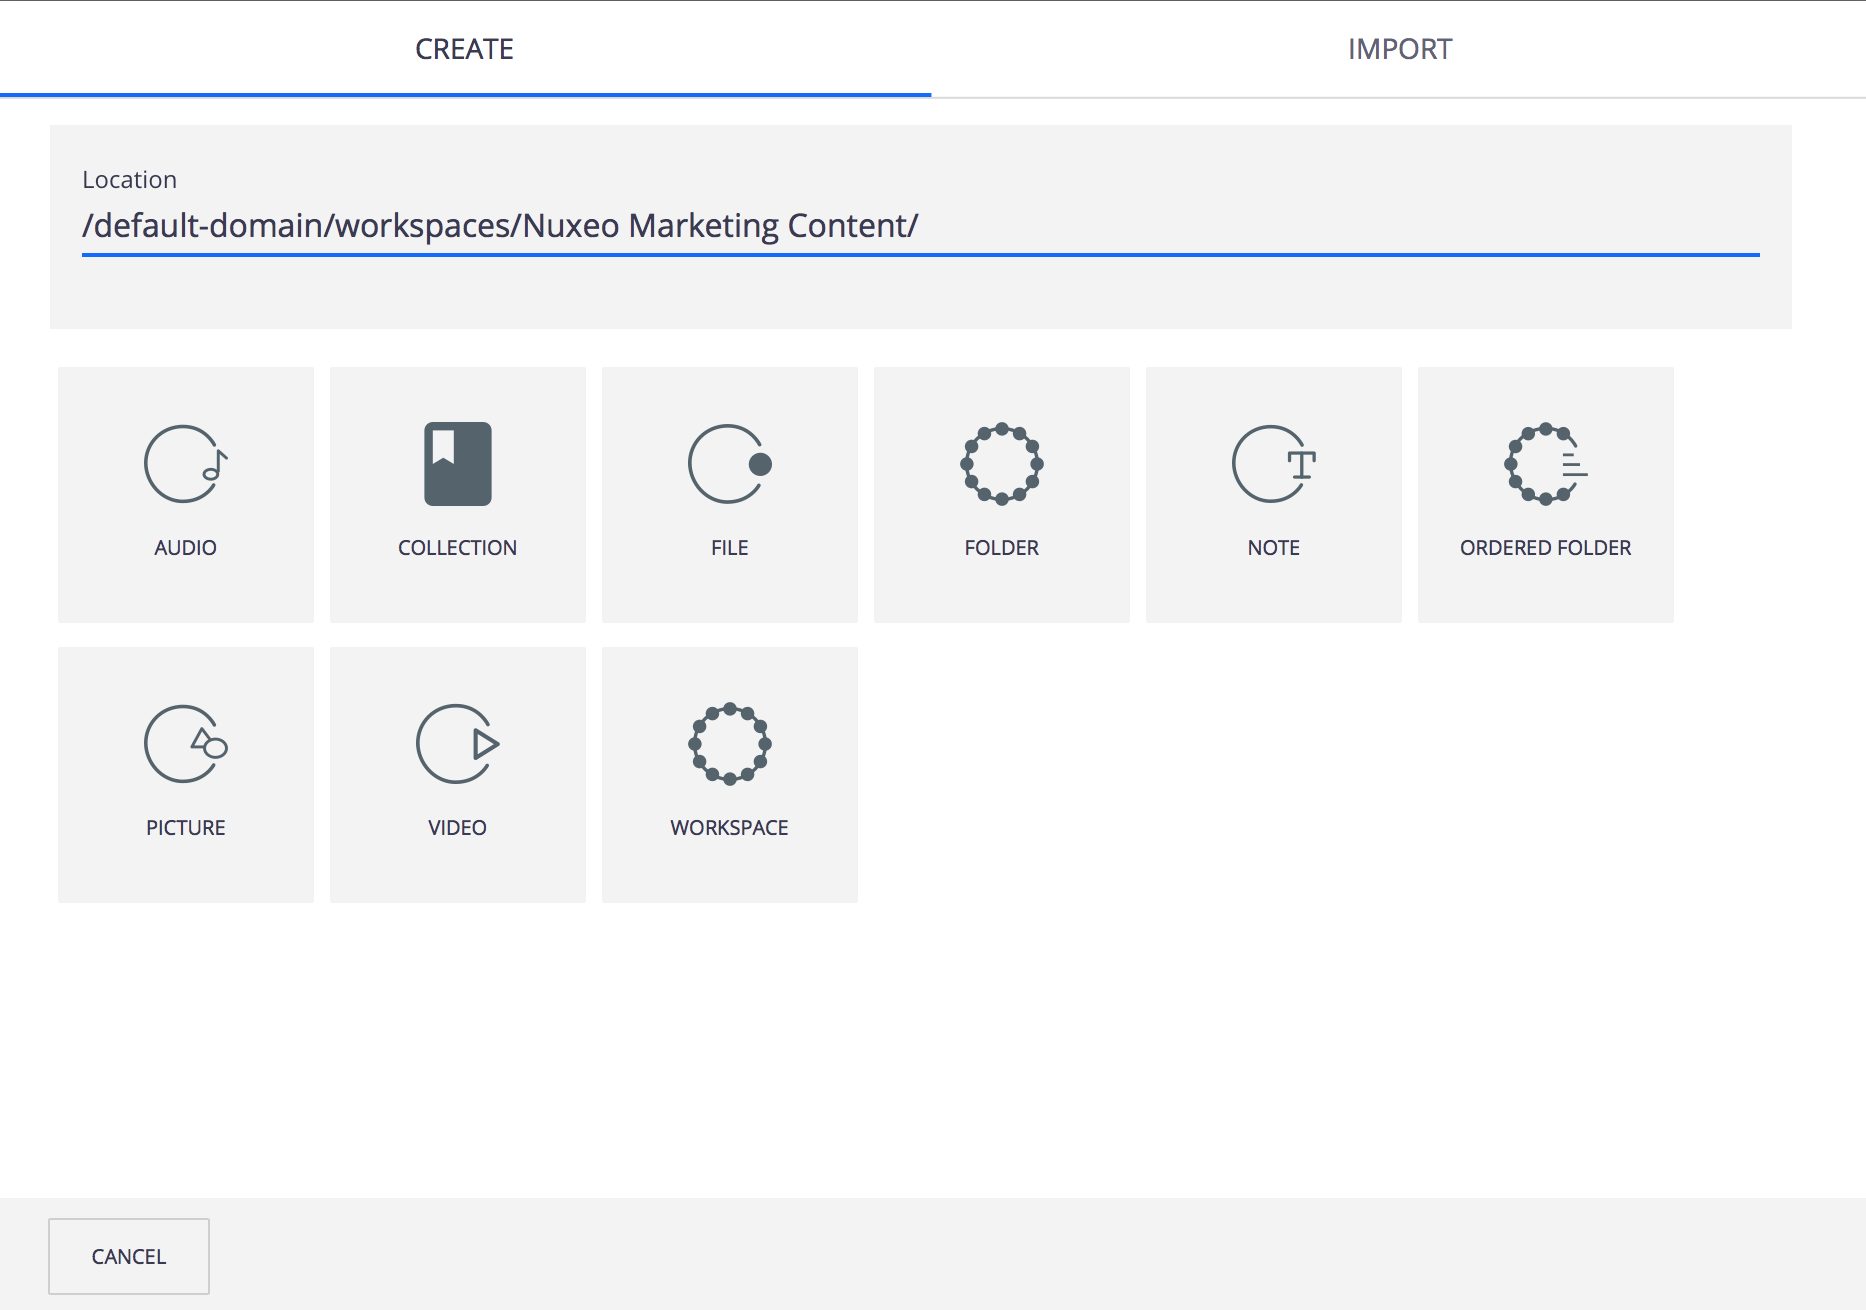
To create a document using the Create button:
- Click on the button
 and click on the desired document.
 - Fill in the document's creation form and click on the Create button.
The View tab of the document is displayed.
Importing Documents Using Drag and Drop
Drag and drop is based on the HTML 5 standard and is available on all browsers that support the HTML 5 Drag and drop, without extension. Basically, this includes all browsers supported by the Nuxeo Platform and the Web UI:
- Google Chrome
- Microsoft Edge
- Mozilla Firefox
- Safari 11+
- Safari Mobile
- Chrome Android
See the complete requirements.
You can use drag and drop to easily import content into a workspace or just to create one document at a time. Two types of import are available:
- Quick import, that enables to quickly create documents in workspace
- Import with properties, that enables to fill in metadata of the document(s) before they are created in the workspace
Quick Import of Documents
To import content into Nuxeo, drag an item from your computer and drop it into a workspace. The document is then automatically created in the workspace and its title is the name of the original file, and no properties are filled in.
- You can drag and drop one or more files of any type in Nuxeo, directly in the workspace concerned.
- You can also drag and drop one or more files of any type from the Import tab of the creation popup. On this popup you can also edit the location of your import.
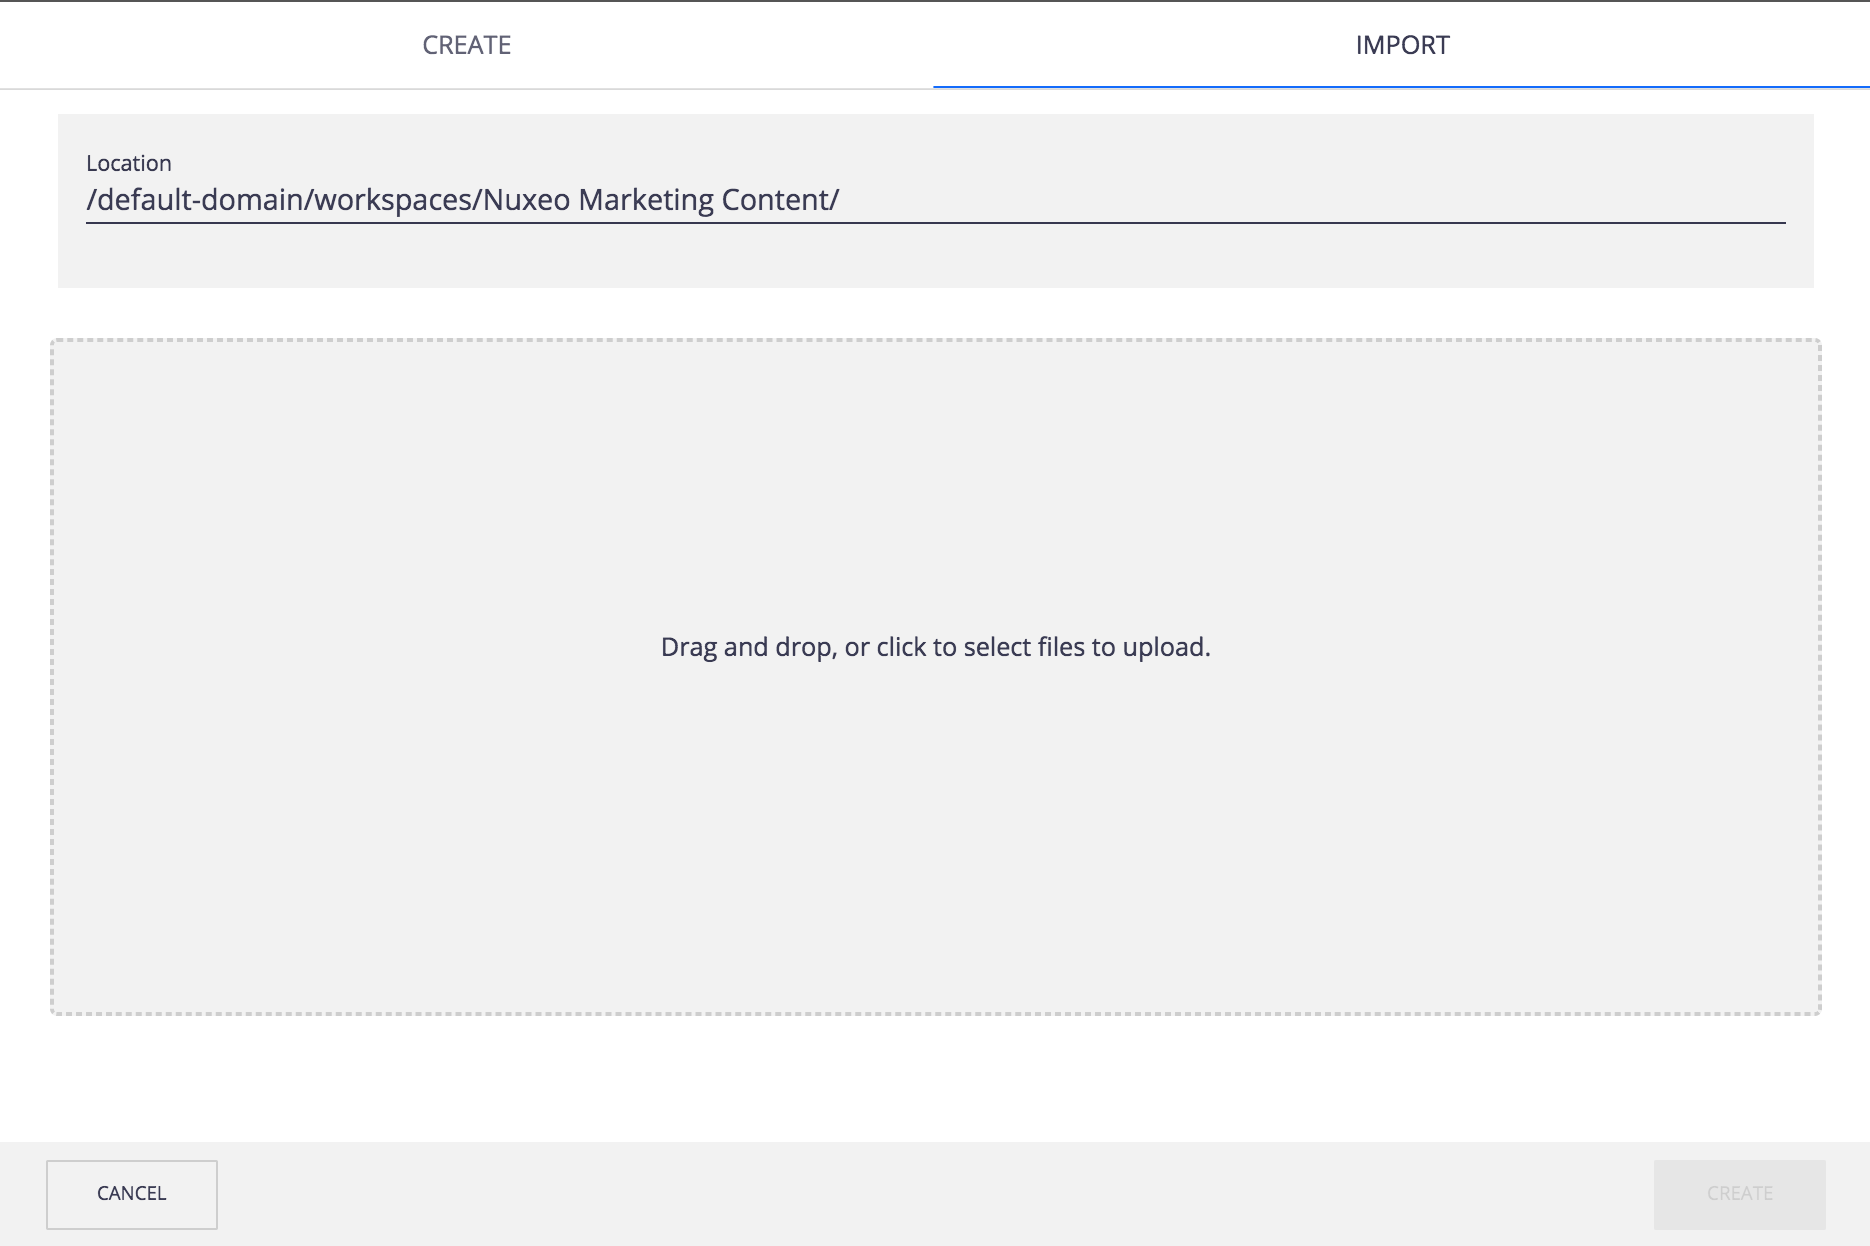
Import with Properties
It is possible to do a drag and drop import of documents with an additional step to fill in some properties. This prevents you from editing the documents after the import is done.
To import documents with metadata:
Drag your file from your desktop to the workspace main area in the browser. The file is uploaded. When the upload is done, the creation popup on the Import tab is displayed.
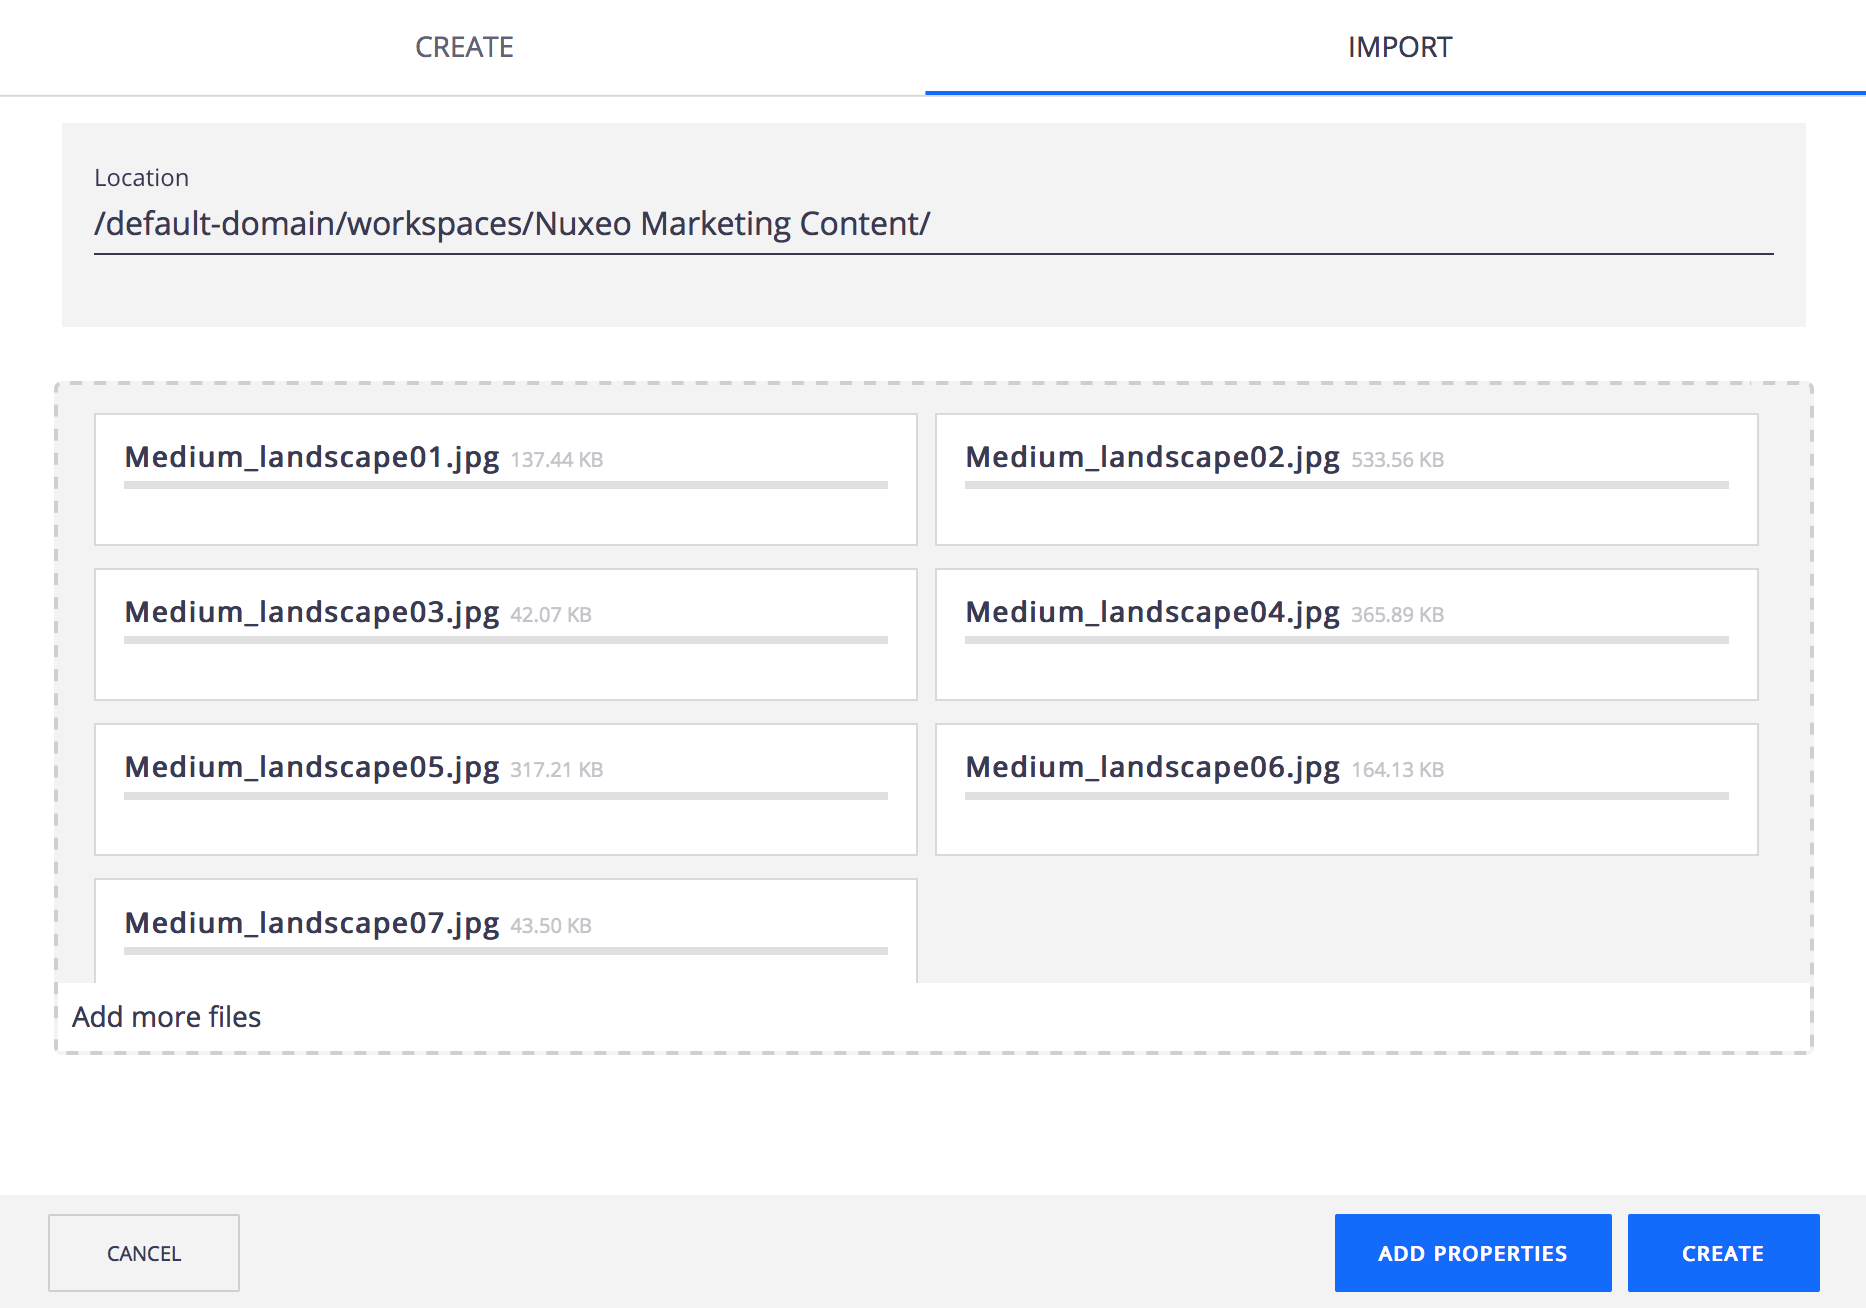
Click on ADD PROPERTIES.
- Fill in the properties that you need and then decide if you want to EDIT NEXT or APPLY TO ALL your modifications.
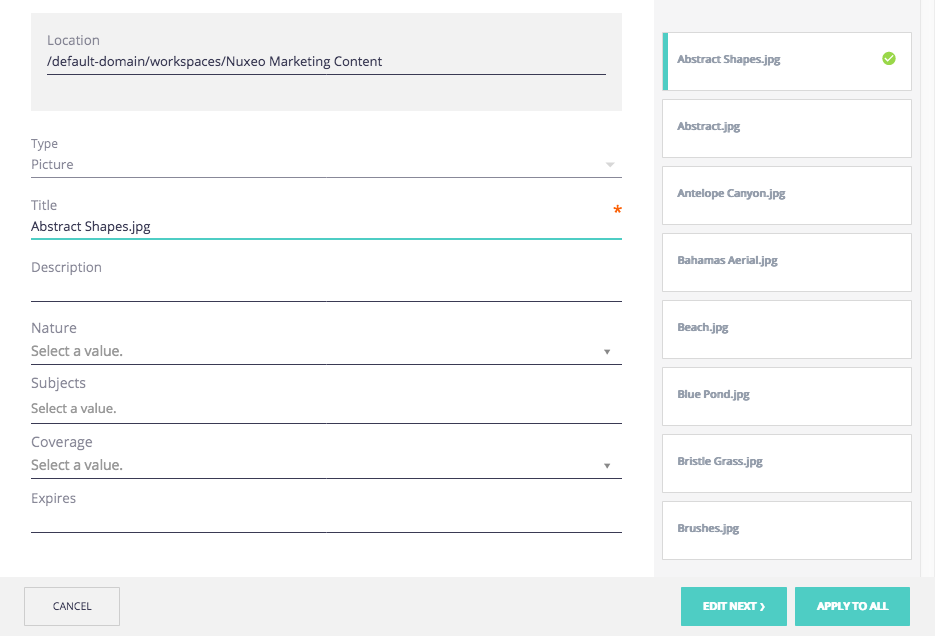
- Once it's done click on CREATE.
The file is created with the filled in properties.
Creating Content Using Nuxeo Drive
You can very easily import document by moving them from a desktop folder to a Nuxeo Drive folder, or creating office files directly in a Nuxeo Drive folder. Read the Nuxeo Drive documentation for more information.
Automated Metadata Extraction
The Nuxeo Platform enables to extract information from the uploaded files attached to a document and automatically fill in the document metadata at creation time. This enables you to leverage metadata existing outside the Nuxeo Platform to automatically categorize documents, preventing users from editing document to report these metadata. Automated metadata extraction is activated by default on Nuxeo DAM: The IPTC legend, copyright and source are used to automatically fill in the description, rights and source metadata of pictures.
Read the Binary Metadata documentation for more information.
Editing Content
Editing a document means modifying its content (i.e. the attached file of a file document, the text of a note, etc.), or simply editing the title, description or any property of the document.
Editing Properties
Properties of the documents, aka metadata, help the document to be more accurately referenced. Some properties are automatically filled in by the system, but most of them need to be filled in by users. When you create a document (file, note, workspace, section, or any other document type), its properties are empty.
The Nuxeo Platform uses Dublin Core metadata by default, although not all of them are necessarily displayed to the user by default. Dublin Core metadata are:
| Field | Description |
|---|---|
| Nature | Nature of the document. Values come from the nature vocabulary. |
| Subjects | Topic(s) of the document. Values come from the I10nsubjects vocabularies. |
| Rights | Information about the reproduction rights of the document. Rights informations often encompass Intellectual Property Rights and Copyright. |
| Source | The references of the resource from which the document's content is derived (totally or partially). |
| Coverage | Information about the geographic reach of the document. Values come from the I10ncoverage vocabulary. |
| Created at | Date automatically filled in by the system when the document is created. |
| Last modified at | Date automatically filled in by the system when the document is modified. |
| Format | Format of the document, if any is preferred. |
| Language | Language used in the document. |
| Expire on | Date on which the document stops being valid. Click on the calendar icon to select a date. This date is not indexed in the system. It is just in indication for users but it is not processed by the application. |
| Author | User who created the document. This field is automatically filled in by the system. |
| Contributors | Users who modified the document. This field is automatically filled in by the system. |
| Last contributor | Last user who modified the document. This field is automatically filled in by the system. |
Although properties are not mandatory, filling them in will make your documents easier to find using Nuxeo search engine.
To edit a property:
- Click on the Edit button in the document actions toolbar

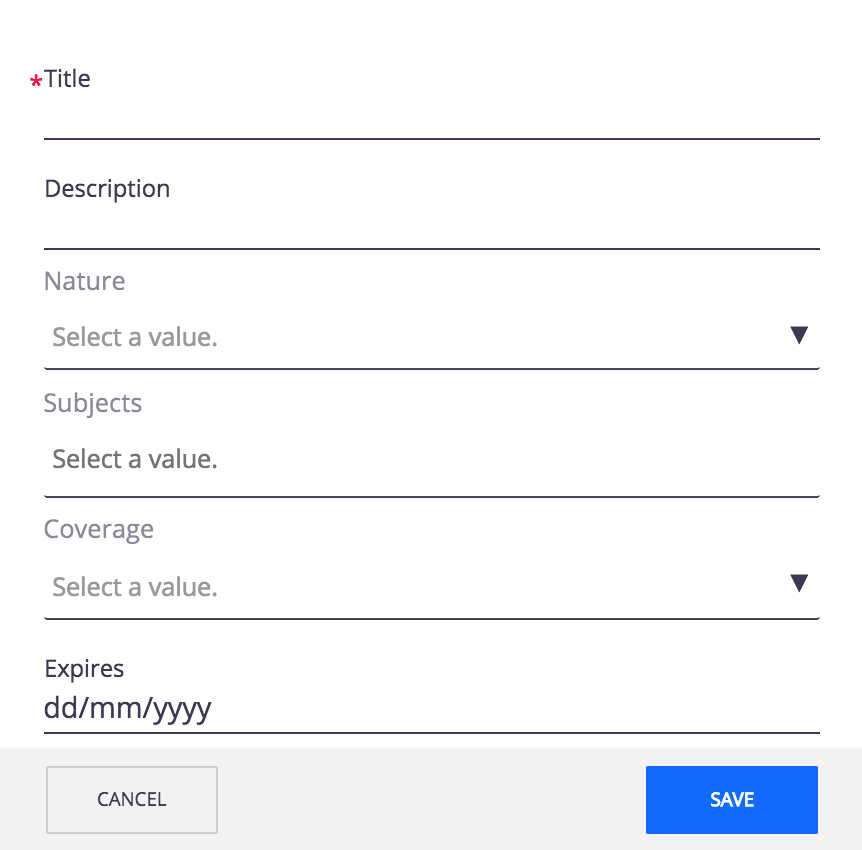
- Edit the metadata that you want.
- Once it is done, click on SAVE
Exporting Content
Users can export documents on their computer. It is possible to export:
- One document at a time
- An entire workspace, folder, section
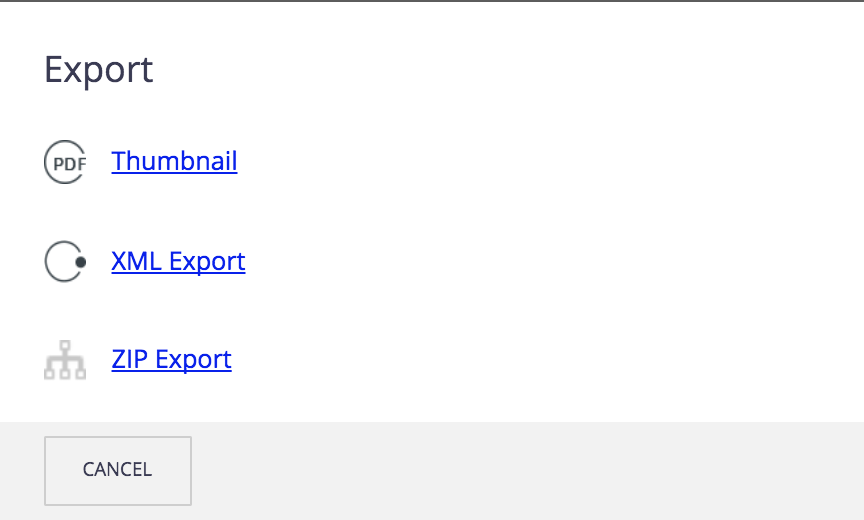
Exports Available
From a Folder
- The XML export is a low level export that enables users to either get the XML definition of the document or get a folder for each exported document that contains:
- document.xml file holding the document's metadata and various information such as the applied access rights,
- A .blob file that holds the binary content of the document. This blob is referenced in the document.xml file;
- The ZIP export enables you to export a whole workspace, section or folder in a zipped XML folder. This export is only available on folderish documents.
From a Document
- The PDF export enables you to get a PDF version of your document. This export is only available on non-folderish documents.
- The ZIP Export enables you to get a zipped folder with the documents' main attachment (.pdf, .doc files). This export is only available on non-folderish documents.
- The XML export is a low level export that enables users to either get the XML definition of the document or get a folder for each exported document that contains:
- document.xml file holding the document's metadata and various information such as the applied access rights,
- A .blob file that holds the binary content of the document. This blob is referenced in the document.xml file;
The exports are available by clicking on the export button ![]() .
.
Low-Level Exports
XML export is a low level export that enables users to get a set of information on documents in an XML file. This export type is useful for debugging, and as such, is mainly intended to administrators. You can export:
- A single document
- The structure of a folder
XML Export of a Single Document
The XML export of a document enables users to get a folder for the exported document that contains:
- A document.xml file holding the document's various information (the applied access rights, the document's metadata, its path)
- A .blob file that holds the binary content of the document. This blob is referenced in the document.xml file
To get the XML export of a document, from the document, click on the icon ![]() and select ZIP Export.
and select ZIP Export.
When you unzip it, you get a folder named from the document, that contains a document.xml file and .blob for each attachment of the document.
XML Export of a Folder
It is possible to export a whole workspace, section or folder in a zipped XML folder. This specific export enables users to import the folder back, with the same access rights definition.
To get the XML export of a folder, from the folder (or workspace or section), click on the icon ![]() and select ZIP Export on the popup window.
and select ZIP Export on the popup window.
When you unzip it, you get a folder named from the document, that contains a document.xml file and .blob for each attachment of the document.
Downloading Content
Users can download documents on their computer. It is possible to download:
- One document at a time
- An entire workspace, folder, section
From a Document
- Go to the document you want to download
- Click on the Download button
 under the preview of your document.
Your document is downloaded on your computer.
under the preview of your document.
Your document is downloaded on your computer.
From a Folder
- Go to the folder/workspace that you want
- Select several documents A top bar is displayed with document actions
- Click on the download button
 The documents are downloaded as a .zip on your computer.
Deleting Content
Only users with "Edit" or "Manage everything" permissions can delete documents from a space.
From Workspace View
To delete one or several documents, select them in your workspace and click on the delete icon ![]() in the selection toolbar.
in the selection toolbar.
From Document View
On the document itself you can decide to delete the file of your document by clicking on the Delete icon ![]() next to its title and add a new one.
next to its title and add a new one.
Versioning
Document versions enable you and other users to easily revert to a specific version of the document if needed, without having to edit the document. The Nuxeo Platform offers both automatic and manual versioning of documents.
Every document holds a version number, which is a piece of information about the evolution of the document. A version number (V.v) is composed of a major version number (V) and a minor version number (v). When a document is created, its version number can be 0.0, 0.1 or 1.0 depending on automatic versioning rules. Minor version increment are typically used for secondary changes. Major version increment is usually reserved to significant modifications. When a document is edited without a new version being created, the version number is suffixed with a + (0.1+ for instance), to indicate that the version was modified since it was created.
Automatic Versioning
Two automatic versioning behaviors are applied by default: one for files (and associated document types) and one for notes.
Files and other document types with schema
file:file, like pictures, are created in version 0.0. A new minor version is automatically created when you edit a document that was last modified by another user. This minor version holds the modifications of the previous contributor, so that no data is lost. Your changes are applied on top of this version, the version number becoming for instance 0.1+. When you edit a document that was last edited by yourself, no version is automatically saved. You can however decide to manually create a new version of the document.For notes, a new version is created for every modification, whether you are the last contributor of the note or not. The created version holds the your changes. When they are created, notes have a version number of 0.1.
This automatic versioning applies in case of:
- Modification of the main file or its attachments using drag and drop
- Manual edit of the attachments
- Modification of the document (main file, properties, attachments) via bulk edit
The following actions don’t trigger the automatic versioning of the document:
- Tagging the document
- Adding the document to a collection
- Changing the relations of the document
- Commenting the document
Manual Versioning
You can decide to manually create a new version of the document.
In case of a file document types the automatic version is done first and then the manual version. So if you edit the document and select the option “Increment major version”, a minor version is created and then a major version: the minor version is the automatic one holding the previous contributor’s work, and the major one is the manual version with your modifications. If you select “Increment minor version”, two minor versions are created following the same principle. And if you chose “Skip version increment”, only the automatic versioning behavior is applied and the document version number is 0.1+ for instance.
For notes, if you use the Edit form, only the manual versioning rules applied. Selecting “Increment major version” save your changes in a major version, “Increment minor version” saves them in a minor version and choosing “Skip version increment” doesn’t create a new version and the version number is +ed (0.1+ for instance).
To create a new version of your document:
- Go on the View tab of the desired document.
- In the top right section of metadata, click on Create Version.
- Select the version that you want and click on Create Version to confirm.

Nuxeo Drive Versioning Policy
When you edit a document, either from your Nuxeo Drive folder or using the online editing, a new version is automatically created on the Platform and the version number is updated:
- If you are not the last contributor of the document
- Or if your last edit is more than an hour ago
Then, if your document's version was 1.0 before modification for instance, it automatically becomes 1.1+ after you edited it from the Nuxeo Drive folder and the 1.1 is archived as it is created. Otherwise, a simple modification is done on the document and logged in the document's History.
See the page How to Customize Nuxeo Drive Versioning Policy to change this behavior.
Document Actions
The document actions toolbar displays all the actions available for the current document.

Share a Document
The button ![]() gives you the permanent link to the document concerned, in order to easily share it.
gives you the permanent link to the document concerned, in order to easily share it.
Alerts
Alerts are emails automatically sent to users when an event occurs in a space to enable you to follow the activity of a document or a space.
When you follow a document or a space activity, you get an email when the events below happen:
- Creation: you get an email when some content is created in the space
- Modification: you receive an email every time the space or its content is edited
- Workflow changed: you receive an email for each action that happens during a review (start, abandon, document approval, document rejection)
- Approval workflow started: you receive an email every time an approval workflow is started
- Comments moderation: you receive an email when a comment is approved on a site
Publish: you receive an email when a document is published in the specified section
The publish event is available in sections only. The other events are available in workspaces only.
Lock / Unlock
When you need to work on a document for some time, you don't want other users to edit it at the same time and disturb your own work. This is typically the case where you lock the document by clicking the icon ![]() .
.
A locked document remains visible to other users but only the locker and users with Manage everything permission can edit it. Other users can see the document locked through the icon ![]() . A tooltip indicates who locked the document and when.
. A tooltip indicates who locked the document and when.
Users with Management everything permission can unlock document on other users' behalf so a document does not remains locked during the locker's vacation and blocks other user's work, for instance.