Overview
The Nuxeo Development Sandbox is built on top of Docker containers and Kubernetes pods. Today, we use Openshift to support our Development Sandbox environments.
The primary focus of the Development Sandbox is to provide our customers with a self-service environment that enables them to easily build and deploy applications during the development process.
The Development Sandbox only provides support for MongoDB installations. PostgreSQL/RDS is not supported in these environments.
The Nuxeo Development Sandbox is meant purely for Development. It does not support large data storage or data backups and should never be used to store production data.
Environments
During the application development process, the Development Sandbox provides an easy place to test new configurations and changes in a development environment instead of Pre-Production or Production where the Nuxeo Cloud team manages all deployments and changes.
A standard Development Sandbox project provides customers with 2 sandbox environments that can be managed via the OpenShift console:
- Development Environment (DEV): Initial environment for exploration of updates that is the primary location for implementing and developing changes.
- Test Environment (UAT): Secondary environment for validation of updates that may require additional manual or user testing efforts.
The DEV & UAT Environments share a MongoDB and Elasticsearch server, but each has its own MongoDB database and ElasticSearch index.
Prerequisites
To set up a Development Sandbox, the Nuxeo Cloud Team needs:
- A GitHub project URL for custom development
- Git SSH key to be included as part of the Development Sandbox CI/CD chain to deploy custom packages. Please refer to the GitHub Documentation Page.
Customers who purchase the Dev Sandbox are required to set up their own GitHub project/repository to support any custom code development integrations.
OpenShift Web Console
Access to the OpenShift Console is managed by Nuxeo through Okta. A Nuxeo Okta account is required to log in.
https://openshift.prod.nuxeo.io
Build and Deploy your Application
Principals
If you have pushed changes to the Nuxeo Studio project and/or to the project GitHub repository, you will need to build and deploy these changes to one or both of the Sandbox environments.
To do so, you can use the preconfigured CI/CD deployment pipeline. Basically, the deployment pipeline checks out the master branch of the GitHub repository containing the marketplace package module, runs a Maven build, generates the marketplace package zip, and then deploys it to either the Dev or Test environment.
For both Dev and Test environments, the pipeline is aligned with the master branch of the GitHub repository, so it's not possible to deploy a specific branch to the Dev environment and another branch to Test.
Process
To start the pipeline, go to Builds > Pipelines, choose the default one and click on Start Pipeline.
It takes a few minutes to complete the deployment (depending on test coverage). At the end of the deployment, you can click on the yellow Input Required message asking if you want to deploy the application to the UAT environment too.
- If you are asked to log in, please log in with Okta. Then select I’m a Nuxeo Customer.
- Answering Proceed will deploy the application to the UAT environment.
- Answering Abort will only deploy the application to the Dev environment.
Release the Application
Principals
If you wish to save the current state of the application to make it available to users as a stable version, and still continue the development process, you can perform a release of the application. This will create a release, e.g. a 1.0.0 version of your changes which can then be deployed to Pre-Production and Production by the cloud team, and still allow you to continue developing the application against the master branch, to then release subsequent versions (e.g. 1.1.0 or 2.0.0).
To do this, customers will use the preconfigured release pipeline. It will first ask you to choose the release scope (patch, minor, major), then check out the master branch of the GitHub repository, uses the Nuxeo Devtools python release script to prepare and perform a release (automatically detecting the version to release depending on the release scope you select), and then deploys the release artifacts to a Nexus repository embedded in the OpenShift project.
Process
To start the pipeline, go to Builds > Pipelines > release-pipeline and click on Start Pipeline. The pipeline takes around 30 minutes to complete.
At the beginning of the build, you can click on the yellow Input Required message, asking you to choose the increment version release scope (patch: 1.2.3 => 1.2.4 / minor: 1.2.3 => 1.3.0 / major: 1.2.3 => 2.0.0).
- Answering Abort cancels the release.
- Answering Release releases the application with the selected release scope.
At the end of the build, a new tag with the release version is automatically created (available in GitHub in Releases > Tags), and the pom.xml file of the master branch of the GitHub repository is automatically updated with the next SNAPSHOT version in a post-release commit.
Standard Operations on Dev Sandbox
Access the Nuxeo Logs
- Go to Applications > Pods > Nuxeo server pod suffixed by (projectname)-dev-interactive or (projectname)-uat-interactive > Logs.
- Alternatively, you can use the Openshift command line interface, also called OC CLI.
Access the Database Logs
- Either from Applications > Pods > Mongo pod > Logs or Terminal. Enter
mongoto get into shell. The databases for both Dev and UAT exist in the pod. Use the correct database and run mongo commands.
Edits to the Nuxeo Configuration
If you want to make changes to the application configuration from the nuxeo.conf file, for instance to set org.nuxeo.dev property to true.
- Go on Resources > Config Map > (projectname)-(environment)-custom-bindings > Actions > Edit > Add the lines on the
nuxeo.conffile. - Never update directly on the Nuxeo server the
nuxeo.conffile because it will be lost if a new image is deployed.
nuxeo.conf file, and it will be deployed next time the pipeline is run or the pod can be deleted: Applications > Pods > Nuxeo server pod suffixed by (projectname)-dev-interactive or (projectname)-uat-interactive > Actions > Delete, so a new pod is deployed with the config changes.
Install a Nuxeo Package
- Go to Applications > Deployments > (projectname)-dev-interactive or (projectname)-uat-interactive > Environment > Edit
NUXEO_PACKAGESvalue with your package name. - Alternatively Applications > Deployments > (projectname)-dev-interactive or (projectname)-uat-interactive > Actions > Edit YAML and your package in the value of
NUXEO_PACKAGES.
Deploy a Nuxeo Studio Project
- Make a dependency on your Nuxeo package to the version of the Nuxeo Studio project.
- Update the
org.nuxeo.devproperty totrueon thenuxeo.conffile and hot reload on the instance with the Nuxeo Browser Extension.
Drop the Database and Index
If you want to drop the database and Elasticsearch index (for instance if you want to clean the data, or if you have pushed changes about a Document Type or a schema), go to Builds > Pipelines, and select the reset pipeline on the target environment.
You will be ask to confirm the environment that you would like to reset (Dev or UAT) and then if you are sure that you want to drop all the data.
Run nuxeoctl Command
Within the nuxeo pod’s console you can access to the nuxeoctl command.
nuxeoctl will be removed after a new deployment: Use Config Map instead.
Update the Git Repo and SSH Key
To start making these changes you will need the following:
- The GitHub URL for the new repository.
- The SSH key to access the Git repository (see GitHub documentation).
Git Repo
In the Openshift project, go to Builds > Pipelines > click on the default pipeline > Actions > Edit Yaml
You will find the current configuration including the Git Repo Name (PROJECT_GIT_REPO), Branch (PROJECT_GIF_REF) and SSH secret (GITHUB_SSH_KEY_NAME).
Update the value for PROJECT_GIT_REPO to configure the new repository and make sure you have the right branch set.
SSH Key
In the Openshift project: go to Resources > Secrets > click on the github-ssh link > click on Reveal Secret.
To update the SSH key, it must be converted into a base64 string. You can use a tool like https://www.base64encode.org/ to convert the SSH Key into a base64 encoded string.
In the Openshift project, go to Resources > Secrets > click on the github-ssh link > Actions > Edit Yaml > update the value of ssh-privatekey by copy/pasting the new base64 encoded SSH private key to replace the previous key.
Build and Deploy an Application with a Targeted HotFix
LTS 10.10 Builds
Customers may want to deploy an application with a targeted hotfix so that they know which hotfix has been applied and is being validated in the application. If the latest hotfix version is always acceptable the standard base image “nuxeo:10.10” is acceptable rather than something like “nuxeo:10.10-HF29”.
The steps to build an image with a specific hotfix version are below:
- In Openshift, go to Builds > select the base-image-build > Configuration,
- Click on the Actions button in upper right-hand corner > Edit,
- In the base-image-build select Edit and choose the correct build image from the image tag dropdown - in this example we will select 10.10-HF28,
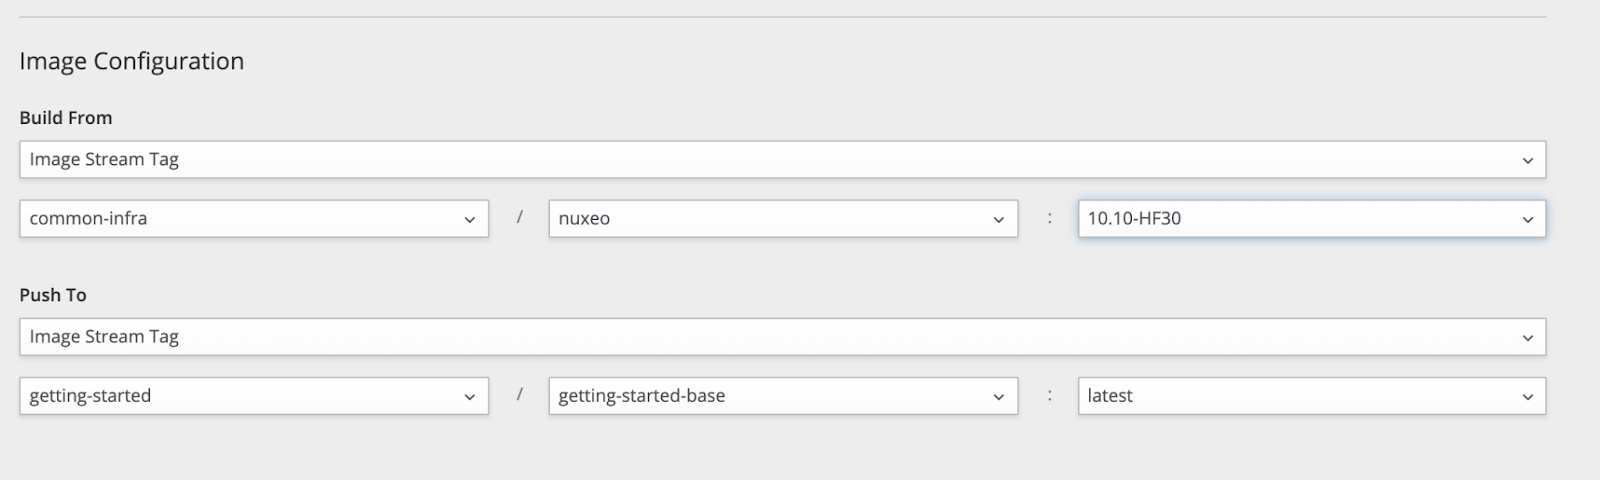
- Hit Save then Start Build - this will create the new base image in the project which the customer can then use to run the pipeline.
Note: The Deployment Environment Variable “Nuxeo_Install_Hotfix” should be set to False.

LTS 2021 Builds
LTS 2021 customers will follow the same steps as a 10.10 except for the image tag selection dropdown will be used to select the correct 2021.x image.
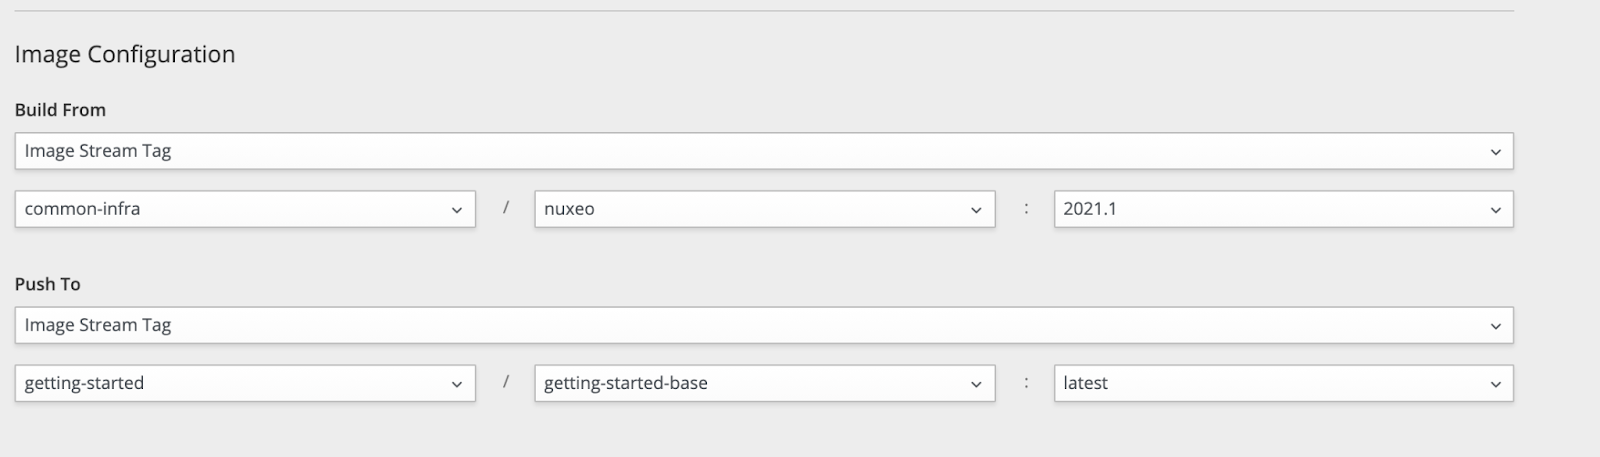
Some additional items that should be considered when building an LTS 2021 image are below:
- no package variable is required
- no templates variable is required
- no nuxeo.conf included in the build
- no environment specific config in the deploys
- all configurations have been pushed into the package
Deploying Additional Services
If additional services are required, please create a Jira support ticket and request the additional service. Some example services that are supported include:
- Kafka
- SAML Integrations
Troubleshooting
If something goes wrong with a deployment or the environment:
Check the logs: For every build or deployment, you can click on View logs located on the left side of the running pipeline. The View logs button will redirect you to the Jenkins console output.
- Build > Pipelines > View logs
- Or Applications > Routes > Open the Jenkins URL
Check the global logs and pod(s) status.
To do this, go to Monitoring: You can see all the warning and error events on the right.Start a new build. Within a containerized deployment, issues with pulling packages from remote sources may time out. Starting a new build, will re-try the pull request and possibly create a successful build.
If the issue continues, users can submit a Jira support ticket asking for assistance from the Nuxeo Support and Cloud teams. The ticket should contain the following:
- Screenshot of the error
- Date and time the error occurred
These data points will help the Cloud team better identify and troubleshoot the issue to provide assistance.
Additional Troubleshooting
Pod Crash Looping
If the application startup completes and you get the "all components are started" message but the pod is still Crash Looping look at the event logs for the cause of the crash loop.
If it fails because of a readiness probe failure - go to Applications > Deployments > select Dev or UAT > Actions > Edit Yaml > Change the timeout seconds - initialDelaySeconds and timeoutSeconds.
When you save the changes, a new pod will be deployed automatically with the new changes.
Example updates are below:
- Increased the “initialdelayseconds'' from 60 to 120.
- Increase the “TimeoutSeconds” to 5 to 60.
Enable SMTP
In order to enable SMTP from the Development Sandbox you need to add the following to the pod’s nuxeo.conf.
Select Resources > ConfigMaps
Edit YAML on the interactive node and add
mail.transport.host=aws-smtp-relay.common-infra.svc
Redeploy the pod to reflect the new changes - Applications > Pods > select the pod > Actions > Delete.
Restarting the Pod
Sometimes restarting the pod is the best option for resolving issues. To do this from the Openshift console, go to the project – Applications > Pods > Jenkins > Actions > Delete.
This will complete the restart.
Enable Debug Logging
There are scenarios where increased logging is required to help debug an issue. In order to do this from the Openshift Console go to Resources > Configmaps > select the appropriate Environment config > Actions > Edit.
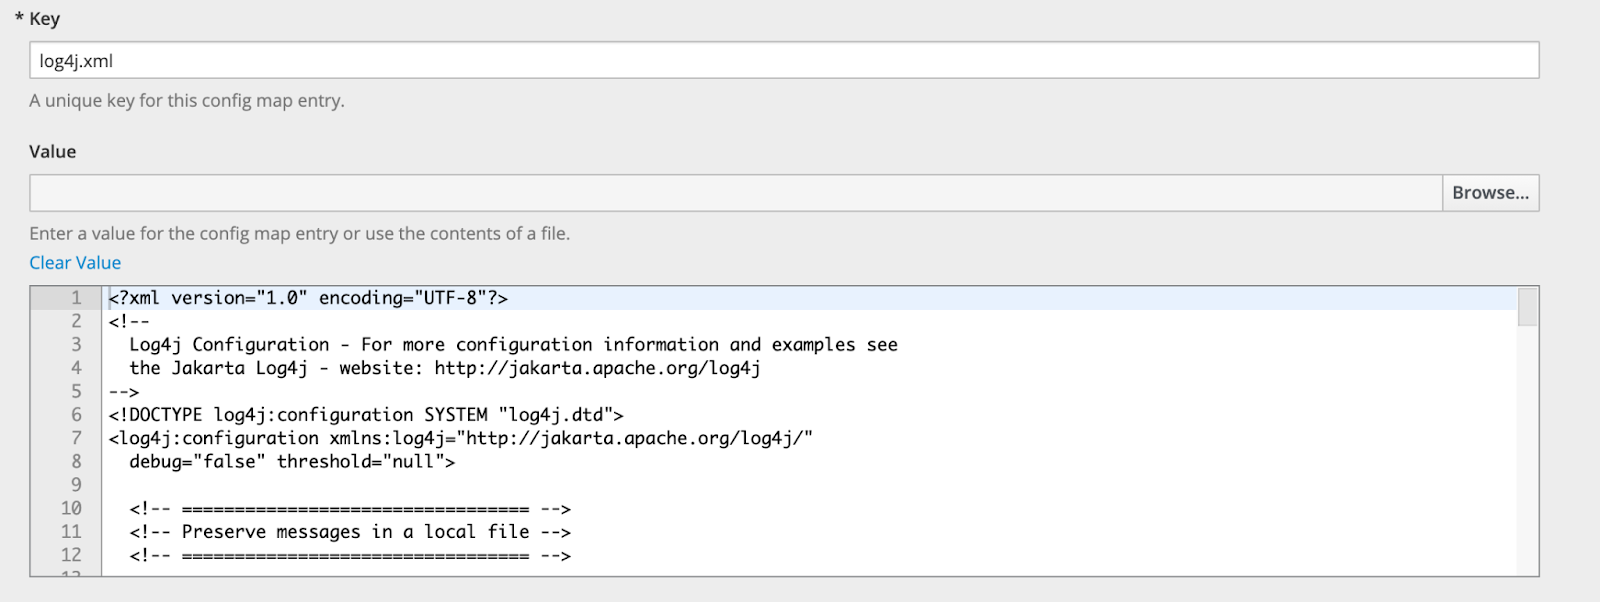
Replace the init.sh key with either log4j2.xml or log4j.xml.
Pod Never Starts / Health Check Fails
If this happens, change the health check to \runningstatus?info=probe&key=runtimeStatus
After the instance starts you should be able to see which component is causing the failure.