This tutorial shows you how to build a simple application base on the Polymer Starter Kit, which
will be able to read documents from a Nuxeo instance. You'll learn how to create a new element and gradually
improve it using both nuxeo-elements and nuxeo-ui-elements.
Requirements
- Node.js is a JavaScript runtime built on Chrome's V8 JavaScript engine. Almost every tool out there for client-side development is built with Node.js and distributed with npm, the package manager for Node.js. Make sure you download and install your OS-specific version first, according to the requirements described in the Nuxeo Elements repository.
- Bower is currently the tool for managing web application definition.
- Nuxeo CLI to scaffold your application as a Nuxeo Bundle and deploy it on a Nuxeo Server. Your application is hosted inside the Nuxeo Server as a bundle and uses it as a backend.
- Polymer CLI to scaffold your standalone application. Your application is hosted outside the Nuxeo Server and uses it as a service.
Scaffolding
As a Nuxeo Bundle
Install Nuxeo CLI and scaffold the project:
$ npm install -g nuxeo-cli
$ mkdir -p nuxeo-elements-sample && cd $_
$ nuxeo bootstrap polymer package
Nuxeo CLI will ask you several questions about the artifact name, etc.
Change current directory to
nuxeo-elements-sample-web:$ cd nuxeo-elements-sample-webStart the application and see what has been generated:
$ npm run serve
# or, if polymer-cli is installed globally
$ polymer serve
The produced application based on Polymer Starter Kit can also be extended using the Polymer CLI. And it helps you as a starting point for building web applications with Polymer and can be deployed like all Nuxeo Bundles.
Build the Nuxeo Bundle containing the Polymer Application:
$ mvn package
$ cp target/nuxeo-elements-sample-web-<VERSION>.jar <NUXEO_SERVER>/nxserver/bundles/
Do not hesitate to take a look at the others templates available with Nuxeo CLI, especially thePackage Generatorthat helps you package your bundles as a Nuxeo Package.
As a Standalone Polymer Application
After creating a folder to hold the application's code, scaffold it using Polymer CLI, base on Polymer Starter Kit (PSK for short):
$ npm install -g polymer-cli
$ mkdir -p nuxeo-elements-sample && cd $_
$ polymer init starter-kit
The produced application based on Polymer Starter Kit using Polymer CLI can help you as a starting point for building web applications with Polymer.
Serve your application and check out what has been generated.
$ polymer serveNote: the README.md includes detailed information about the generated application so it's a good starting point to understand its structure.
The produced application includes some sample elements and showcases Google's Material Design through the use of Paper Elements.
Let's plug this application into the Nuxeo instance and change the hardcoded users list with some actual data.
Create a New Element
Create a new element named
doc-readerto hold our logic, under thesrcdirectory. For simplicity, we can base our element in one of those already provided by PSK:src/my-doc-reader.html<link rel="import" href="../bower_components/polymer/polymer.html"> <link rel="import" href="shared-styles.html"> <dom-module id="doc-reader"> <template> <style include="shared-styles"> :host { display: block; padding: 10px; } </style> <div class="card"> <div class="circle">4</div> <h1>Doc Reader</h1> </div> </template> <script> Polymer({ is: 'doc-reader', }); </script> </dom-module>Plug our new element into
my-app.html, so that it is available from PSK's sidebar.Add a new entry to Drawer content:
Depending on your setup, links differ if you generated with Polymer CLI.src/my-app.html<a name="doc-reader" href="#/doc-reader">Document Reader</a>And to Main content as well:
src/my-app.html<doc-reader name="doc-reader"></doc-reader>Add our element to fragments under
polymer.jsonso that our element can be loaded lazily:polymer.json{ ... "fragments": [ ... "src/my-doc-reader.html", ... ], ... }App structure and lazy loadingFor more information about app structure and lazy loading, please check the Polymer Documentation.
Plug in Nuxeo Elements
Install Nuxeo elements through Bower:
# Install bower globally if it is not already done
$ npm install -g bower
# Add nuxeo-elements as a bower dependency
$ bower install --save nuxeo/nuxeo-elements
This adds
nuxeo-elementsas a dependency inbower.jsonand downloads the latest release from our GitHub repository intobower_components.Import the Nuxeo elements we need, in this case nuxeo-connection and nuxeo-document, into
doc-reader:src/my-doc-reader.html<link rel="import" href="../bower_components/nuxeo-elements/nuxeo-connection.html"> <link rel="import" href="../bower_components/nuxeo-elements/nuxeo-document.html">
Retrieve a Document
With Nuxeo Elements imports in place and a brand new element at our disposal, we must add the logic to connect to Nuxeo and retrieve a document.
Let's start by declaring a connection to Nuxeo. This connection will be shared by all Nuxeo data-driven elements so it should be one of the first elements you declare in your application, i.e. right at the start of the template:
<nuxeo-connection id="nxcon" url="http://localhost:8080/nuxeo" username="Administrator" password="Administrator"></nuxeo-connection>
There is now a connection to the Nuxeo instance. Note that you will need to define a Cross-Origin Resource Sharing (CORS)
configuration before going any further. Here's a sample configuration
file, that you should copy to NUXEO_HOME/nxserver/config/cors-config.xml:
<component name="org.nuxeo.corsi.demo">
<extension target="org.nuxeo.ecm.platform.web.common.requestcontroller.service.RequestControllerService" point="corsConfig">
<corsConfig name="foobar" supportedMethods="GET,POST,HEAD,OPTIONS,DELETE,PUT" exposedHeaders="Accept-Ranges,Content-Range,Content-Encoding,Content-Length">
<pattern>/nuxeo/.*</pattern>
</corsConfig>
</extension>
</component>
We can then add a nuxeo-document to our template, which is a data element responsible for retrieving documents from a
Nuxeo instance, either by path or id. This document relies on two REST API endpoints:
/api/v1/path and /api/v1/id. For now, let's just retrieve /default-domain:
<nuxeo-document id="doc" auto doc-path="/default-domain/" response="{{document}}"></nuxeo-document>
The property document is now bound to the response of our nuxeo-document. Because the auto property is set, /default-domain/
will be retrieved automatically. We can now add some other elements to our template to display any information we find
relevant from our document. For example:
<h2>Title: [[document.title]]</h2>
<p>ID: [[document.uid]]</p>
<p>Repository: [[document.repository]]</p>
<p>State: [[document.state]]</p>
<h3>Contributors:</h3>
<ul>
<template is="dom-repeat" items="[[document.properties.dc:contributors]]" as="contributor">
<li>[[contributor]]</li>
</template>
</ul>
Your application should now look something like this:

Retrieve Children
We now want to display the children of our current document. The most efficient way of doing it is by using a Page Provider,
which enables paginated queries. Nuxeo Elements provide one such data element which mediates the usage of page providers.
Let's import the nuxeo-page-provider in our element:
<link rel="import" href="../bower_components/nuxeo-elements/nuxeo-page-provider.html">
We then declare in our template a nuxeo-page-provider element:
<nuxeo-page-provider auto
provider="advanced_document_content"
params="[[_computeParams(document)]]"
current-page="{{children}}">
</nuxeo-page-provider>
Notice that the params attribute needs to be computed based on our document. Add the
following method to your element's prototype:
_computeParams: function (document) {
return document ? { ecm_parentId: this.document.uid } : {};
}
Now, every time our document is fetched, our page provider will automatically fetch the document's children, with the
result being bound to the children property, which is an array of documents. We can then improve our element's template
to display the children, as follows:
<h3>Children:</h3>
<ul>
<template is="dom-repeat" items="[[children]]" as="child">
<li>[[child.title]]</li>
</template>
</ul>
Which will make your app look like this:

Add UI Elements
Our element is now able to read document properties and children, but with a static document path, it's not very useful. We will now add a UI element that allows the user to pick a document path.
Let's install Nuxeo UI Elements through Bower:
$ bower install --save nuxeo/nuxeo-ui-elements
And now we must import the nuxeo-path-suggestion element, which is a UI element that allows the user to pick a valid document path and also features auto-completion:
<link rel="import" href="../bower_components/nuxeo-ui-elements/nuxeo-path-suggestion/nuxeo-path-suggestion.html">
We must now change the doc-path property of our nuxeo-document element so that it is bound to a new property
named targetPath:
<nuxeo-document id="doc" auto doc-path="[[targetPath]]" response={{document}}></nuxeo-document>
We have to update the element's prototype to declare this new property, which will hold /default-domain/ as the default
path:
properties: {
targetPath: {
type: String,
value: '/default-domain/'
}
},
And finally, we must update the template to declare nuxeo-path-suggestion two-way bound to targetPath:
<nuxeo-path-suggestion label="document path" value="{{targetPath}}"></nuxeo-path-suggestion>
From now on, as the user changes the path on the nuxeo-path-suggestion widget, the respective document will automatically be retrieved along with its children, which will update the interface.
Our element is now interactive and much more useful:

Revamp Children Listing
There are two elements that are perfect for listing documents: nuxeo-data-list and nuxeo-data-table. We will now use nuxeo-data-table to display our document's children along with their respective icons and last modified date.
Let's start by importing nuxeo-data-table into our element:
<link rel="import" href="../bower_components/nuxeo-ui-elements/nuxeo-data-table/iron-data-table.html">
The nuxeo-data-table accepts templates for each of its columns as content. We can add a nuxeo-data-table to our
element bound to the children property, and define templates for three columns, one for the child's icon, another for
the title and another one for the last modified date:
<h3>Children:</h3>
<nuxeo-data-table items=[[children]]>
<nuxeo-data-table-column name="Icon">
<template>
<iron-icon src="[[_thumbnail(item)]]">
</template>
</nuxeo-data-table-column>
<nuxeo-data-table-column name="Title">
<template>[[item.title]]</template>
</nuxeo-data-table-column>
<nuxeo-data-table-column name="Last Modified">
<template>[[item.lastModified]]</template>
</nuxeo-data-table-column>
</nuxeo-data-table>
We should also style the nuxeo-data-table so that it has an adequate height:
nuxeo-data-table {
height: 220px;
}
Finally, we must add a method to our element's prototype to retrieve a document's thumbnail, which will be used by the table that we've just added to the template:
_thumbnail: function (doc) {
if (doc && doc.uid) {
var baseUrl = this.$.nxcon.url;
return baseUrl + '/api/v1/id/' + doc.uid + '/@rendition/thumbnail';
}
}
Your app should look like this now:

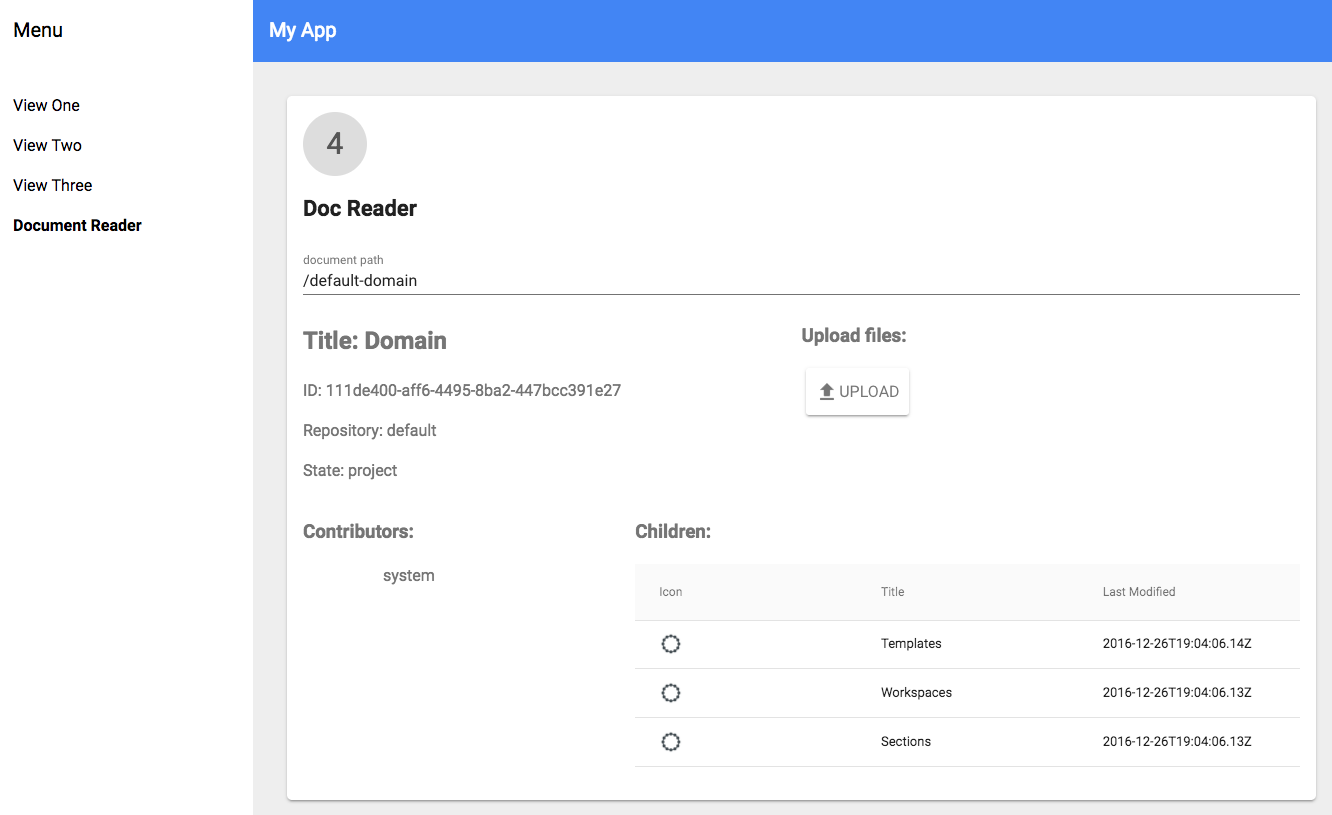
Upload Files
Our awesome app is now able to browse any folder and list its children. What would make it even more awesome would be to be able to upload files to the current folder. Thanks to our UI elements, this is easy to achieve.
Let's start by importing nuxeo-file into our element, which is a widget for uploading files:
<link rel="import" href="../bower_components/nuxeo-ui-elements/widgets/nuxeo-file.html">
We can now add it to our element's template, double-bound to a property named blob:
<h3>Upload files:</h3>
<nuxeo-file id="file" value="{{blob}}"></nuxeo-file>
By clicking the widget and selecting a file or dropping a file into it, the respective blob will automatically be uploaded into a batch in the server, and an object representing this file will be held by the blob property. For the sake of simplicity, we want to automatically import this file into the server as soon as it is uploaded. Therefore, we must declare blob in our elements prototype with an observer that will take care of importing the file:
properties: {
...,
blob: {
type: Object,
value: null,
observer: '_blobChanged'
}
},
The _blobChanged method will be called whenever the blob changes. We want it to execute the FileManager.Import operation on the batch in order to import the file as a document, using the Nuxeo Platform's File Manager. As this happens, we must fetch the current document again, which triggers the page-provider to fetch the children again as well, thus updating the interface. We must define the following observer in the element's prototype:
_blobChanged: function () {
if (this.blob) {
this.$.file.batchExecute('FileManager.Import', {
context: {
currentDocument: this.targetPath
}
}, { nx_es_sync: 'true' }).then(function () {
this.$.doc.get();
this.set('blob', null);
}.bind(this));
}
}
The final app should look like this:
For reference, here is the final code of the doc-reader element:
<link rel="import" href="../bower_components/polymer/polymer.html">
<link rel="import" href="shared-styles.html">
<!--nuxeo elements-->
<link rel="import" href="../bower_components/nuxeo-elements/nuxeo-connection.html">
<link rel="import" href="../bower_components/nuxeo-elements/nuxeo-document.html">
<link rel="import" href="../bower_components/nuxeo-elements/nuxeo-page-provider.html">
<!--nuxeo ui elements-->
<link rel="import" href="../bower_components/nuxeo-ui-elements/nuxeo-path-suggestion/nuxeo-path-suggestion.html">
<link rel="import" href="../bower_components/nuxeo-ui-elements/nuxeo-data-table/iron-data-table.html">
<link rel="import" href="../bower_components/nuxeo-ui-elements/widgets/nuxeo-file.html">
<dom-module id="doc-reader">
<template>
<style include="shared-styles">
:host {
display: block;
padding: 10px;
}
nuxeo-data-table {
height: 220px;
}
</style>
<nuxeo-connection id="nxcon" url="http://localhost:8080/nuxeo" username="Administrator" password="Administrator"></nuxeo-connection>
<nuxeo-document id="doc" auto doc-path="[[targetPath]]" response="{{document}}"></nuxeo-document>
<nuxeo-page-provider auto
                     provider="advanced_document_content"
                     params="[[_computeParams(document)]]"
                     current-page="{{children}}">
</nuxeo-page-provider>
<div class="card">
<div class="circle">4</div>
<h1>Doc Reader</h1>
<nuxeo-path-suggestion label="document path" value="{{targetPath}}"></nuxeo-path-suggestion>
<div class="horizontal layout">
<div class="flex">
<h2>Title: [[document.title]]</h3>
<p>ID: [[document.uid]]</p>
<p>Repository: [[document.repository]]</p>
<p>State: [[document.state]]</p>
</div>
<div class="flex">
<h3>Upload files:</h3>
<nuxeo-file id="file" value="{{blob}}"></nuxeo-file>
</div>
</div>
<div class="horizontal layout">
<div class="flex">
<h3>Contributors:</h3>
<ul>
<template is="dom-repeat" items="[[document.properties.dc:contributors]]" as="contributor">
<li>[[contributor]]</li>
</template>
</ul>
</div>
<div class="flex-2">
<h3>Children:</h3>
<nuxeo-data-table items=[[children]]>
<nuxeo-data-table-column name="Icon">
<template>
<iron-icon src="[[_thumbnail(item)]]">
</template>
</nuxeo-data-table-column>
<nuxeo-data-table-column name="Title">
<template>[[item.title]]</template>
</nuxeo-data-table-column>
<nuxeo-data-table-column name="Last Modified">
<template>[[item.lastModified]]</template>
</nuxeo-data-table-column>
</nuxeo-data-table>
</div>
</div>
</div>
</template>
<script>
Polymer({
is: 'doc-reader',
properties: {
targetPath: {
type: String,
value: '/default-domain/'
},
blob: {
type: Object,
value: null,
observer: '_blobChanged'
}
},
_computeParams: function (document) {
  return document ? { ecm_parentId: this.document.uid } : {};
},
_thumbnail: function (doc) {
  if (doc && doc.uid) {
    var baseUrl = this.$.nxcon.url;
    return baseUrl + '/api/v1/id/' + doc.uid + '/@rendition/thumbnail';
  }
},
_blobChanged: function () {
  if (this.blob) {
    this.$.file.batchExecute('FileManager.Import', {
      context: {
        currentDocument: this.targetPath
      }
    }, { nx_es_sync: 'true' }).then(function () {
      this.$.doc.get();
      this.set('blob', null);
    }.bind(this));
  }
}
});
</script>
</dom-module>