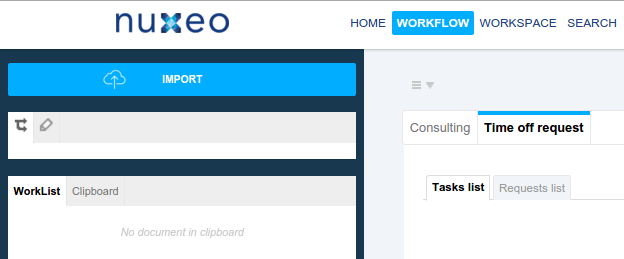
In Studio, we provide the Time Off Request template that sets up a workflow for scheduling time off. If you installed this template, you would see that it displays a new tab "Workflow" in which there are the tasks queues related to the time off workflow.


We provide some quick steps to follow using Extension points:
Activate Workflow tab Add the following extension:
<extension target="org.nuxeo.ecm.platform.actions.ActionService"
    point="actions">
   <action id="workflow_dashboard" link="view_workflow" label="label.main.tab.workflow"
      order="30" enabled="true">
      <category>MAIN_TABS</category>
   </action>
</extension>
Choose the document type of the tasks that are created When designing the workflow, you can choose the document type of the task on Tasks nodes. By default there is only one "TaskDoc". But you can contribute an other one in Studio, for example if you want the task to hold some business data of the document, so as to display it in the task listing (ex: when time off request was created, ...). To create another type of task, you can create a new document type, assign it the
Tasklifecycle, and thetaskfacet, and all the schemas you want the task to hold.Set additional data on the task object If at step two you chose another document type for the task, you might want to populate the additional metadata with some values.
Create a listener that listens to "Document created" events.
Update task properties in it. To do so, you can
either use the usual Update Property or Update Properties operations,
or the dedicated Workflow > Apply Mapping on Input Task operation, with the name of the mapping. A mapping can be contributed in the Advanced settings > XML Extensions feature:
<extension target="org.nuxeo.ecm.core.api.propertiesmapping.PropertiesMappingComponent"
 point="mapping">
<mapping name="taskMapping">
 <property path="common-asset:_destination">common-asset:_destination</property>
 <property path="common-asset:altTag">common-asset:altTag</property>
 <property path="common-asset:approvedCountries">common-asset:approvedCountries</property>
 <property path="common-asset:dateTaken">common-asset:dateTaken</property>
 <property path="common-asset:retouched">common-asset:retouched</property>
 <property path="dc:title">dc:title</property>
 <property path="dc:expired">dc:expired</property>
 </mapping>
</extension>
Create the content views for each specific tasks queues you want to see List of tasks in your dashboard are content views. Only the query is a bit different, with the NXQL keyword "
nt:type". Here is an example:nt:type = 'Task626' AND ecm:currentLifeCycleState != 'ended'The
nt:typevalue comes from the node id that generates the task you want to list. You can see it on the node editor general view. That way, you can do one content view per node if you want to separate the queues, or list severalnt:typein the same content view, or don't rely on it at all...To have a link to the originating document in the content view, you can add a document suggest widget bound to the property
nt:targetDocumentId(schema task)Configure the queues tabs
Finally, you want to display tabs with the content views inside. There is a specific convention to follow that will automatically match the tab and the content view, based on the content view ID, see the exemple below, better than a long paragraph:
<extension target="org.nuxeo.ecm.platform.actions.ActionService"
  point="actions">
  <!-- The action below is adding the "Time off workflow" sub tab of the Main "Workflow
    tab". -->
  <action id="timeOff_request" link="/incl/tabs/workflow_dashboard_tab.xhtml"
    label="tor.timeoffrequest" order="20">
    <category>WORKFLOW_DASHBOARD</category>
  </action>
  <action id="tor_hr_manager_approval" link="/incl/tabs/workflow_dashboard_sub_tab.xhtml"
    label="tor.hrmanagerapproval.label" order="50">
    <category>timeOff_request_sub_tab</category>
    <filter id="hr_manager">
      <rule grant="true">
        <group>
          hr_manager
        </group>
      </rule>
    </filter>
  </action>
  <!-- The action below is adding a tab that do contain a content view of tasks.
    The convention is : "id of action = id of content view" and category is: parent_tab_id_sub_tab" -->
  <action id="tor_manager_approval" link="/incl/tabs/workflow_dashboard_sub_tab.xhtml"
    label="tor.managerapproval.label" order="50">
    <category>timeOff_request_sub_tab</category>
    <filter id="hr_operational_managers">
      <rule grant="false">
        <condition>
          <group>
            hr_manager
          </group>
        </condition>
      </rule>
      <rule grant="true">
        <group>
          hr_operational_managers
        </group>
      </rule>
    </filter>
  </action>
</extension>