At the first step of this tutorial, we created a new document type, called documentationItem.
Now we decide that documentation items should be created in specific containers. This will enable us to add specific user actions, listing view and filters on this specific folder.
Creating a Folderish Document Type
In the Nuxeo Platform everything is a document. It means that folders or workspaces are just documents. They have metadata, a life cycle, etc. What makes them a folder is the facet "folderish". Any document that has this facet set up becomes a folderish document type and can have children.
Creating the document type
- In Studio > Content model > Document Types, click on New.
Fill in the creation popup and click on Next.
- Feature ID:
TechnicalDocumentationContainer - Extends: Nothing
- Label:
Technical Documentation Folder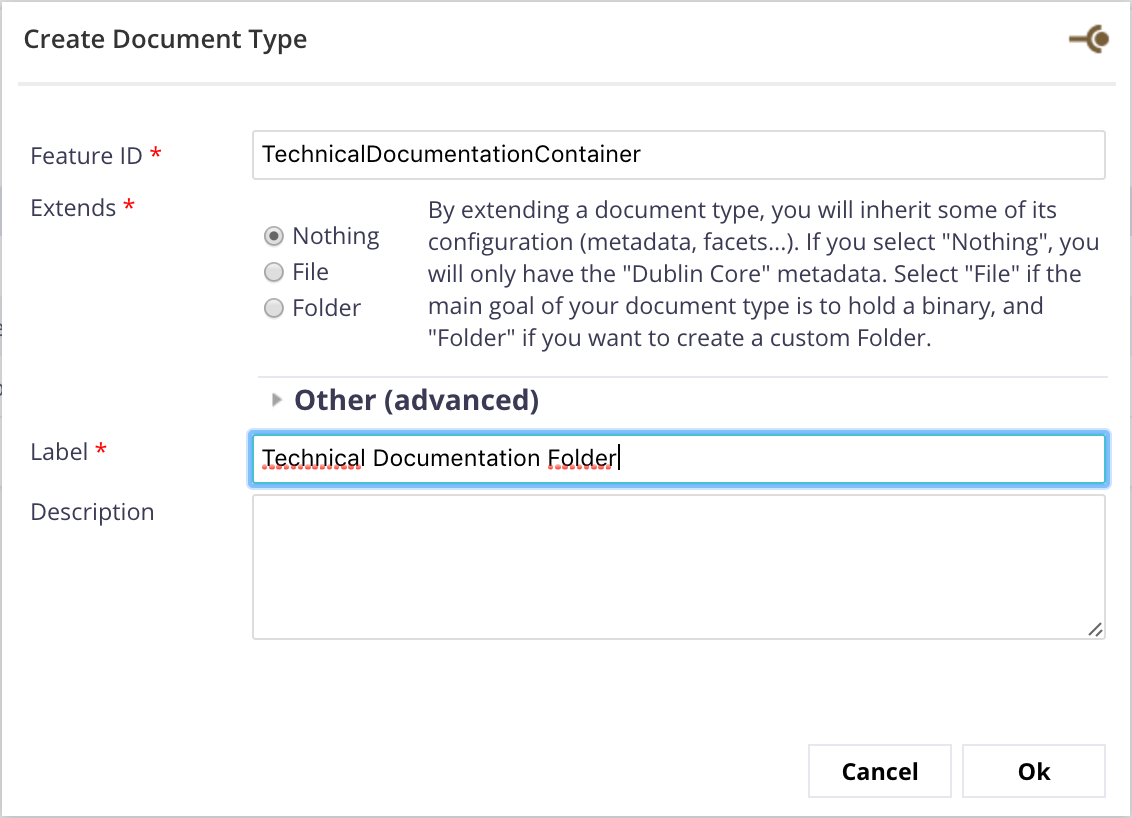

- Click on Next.
- Feature ID:
We could extend the Folder document type to inherit its folderish facet. But it would also mean inheriting any other facet and schema the Folder document type has. So we decide not to extend Folder and to manually choose the facets we want.
Making the document type folderish
- On the
TechnicalDocumentationContainerDefinition tab, choose the Collaboratives Spaces Category. - Choose a nice icon.
- In Facets, select the Document is folderish facet. It will automatically add an Accepted children type section. No children are selected by default. The Show Create Child Action box is checked.
- In this Accepted children type section, select
documentationItem.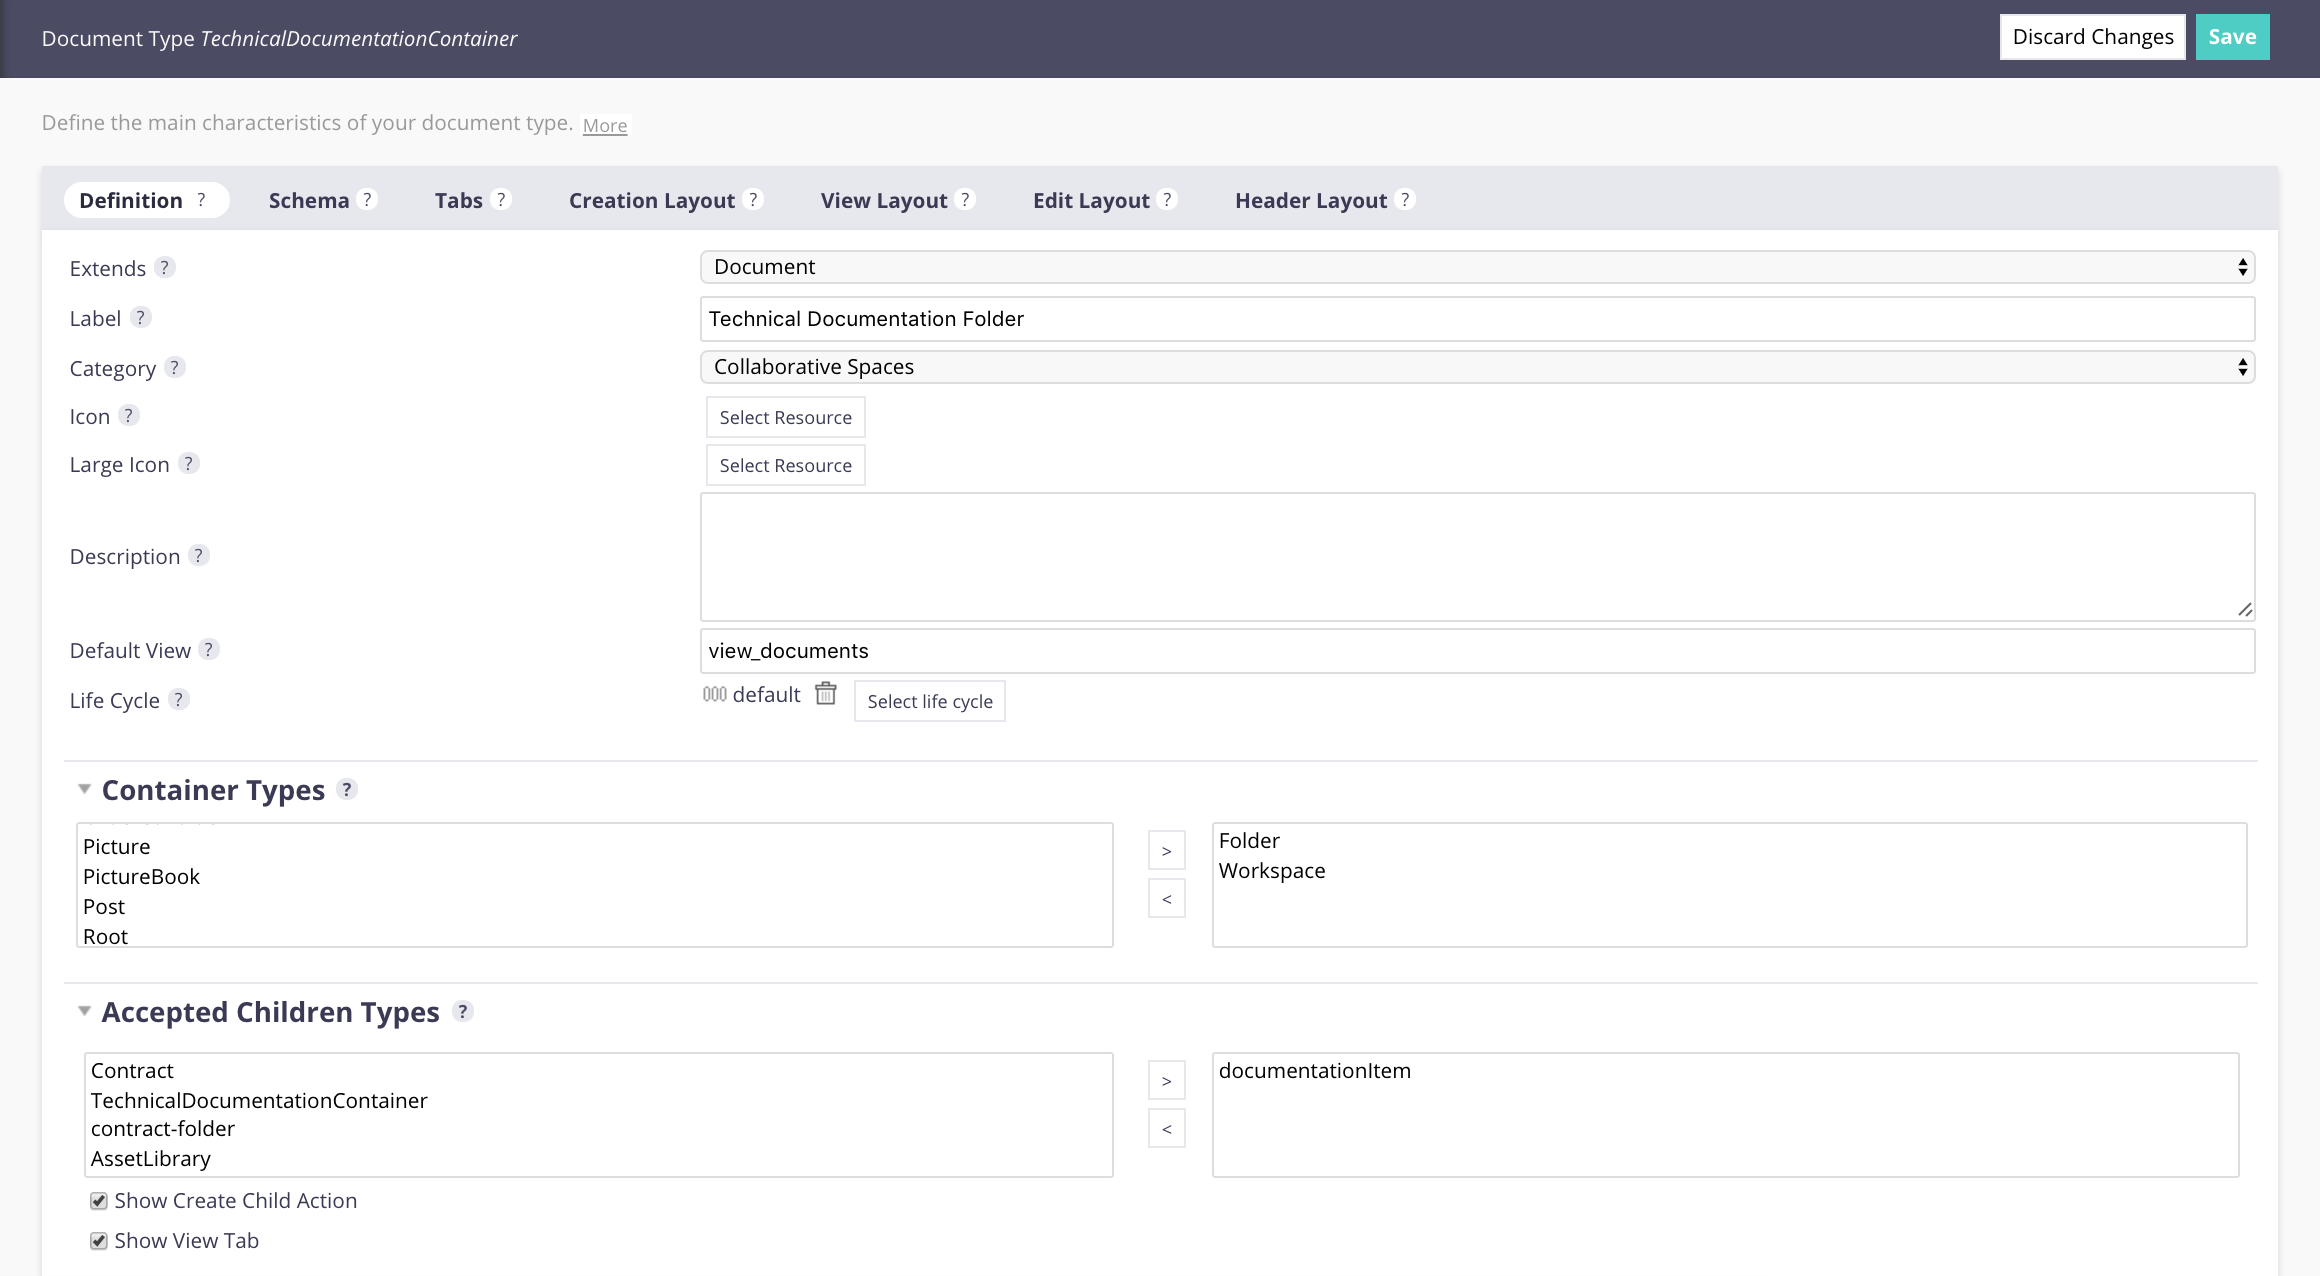

Read more:
Defining the folder layouts
For our container, we need very few metadata, a title and a description are enough.
- Click on the Creation Layout tab.
- Click on the icon
 of the WARNING rowand confirm deletion.
 - Repeat step 2 on the View and Edit layout tabs.
- Click on Save.
Restricting where documentationItem documents can be created
- Go to the
documentationItemDefinition tab. - In the Container Types, remove Folder and Workspace and add
TechnicalDocumentationContainer. - Click on Save. Documentation items can now be created in documentation containers only.
Testing your changes
- Redeploy your changes on your Nuxeo Platform.
- Create a technical documentation container in a workspace.
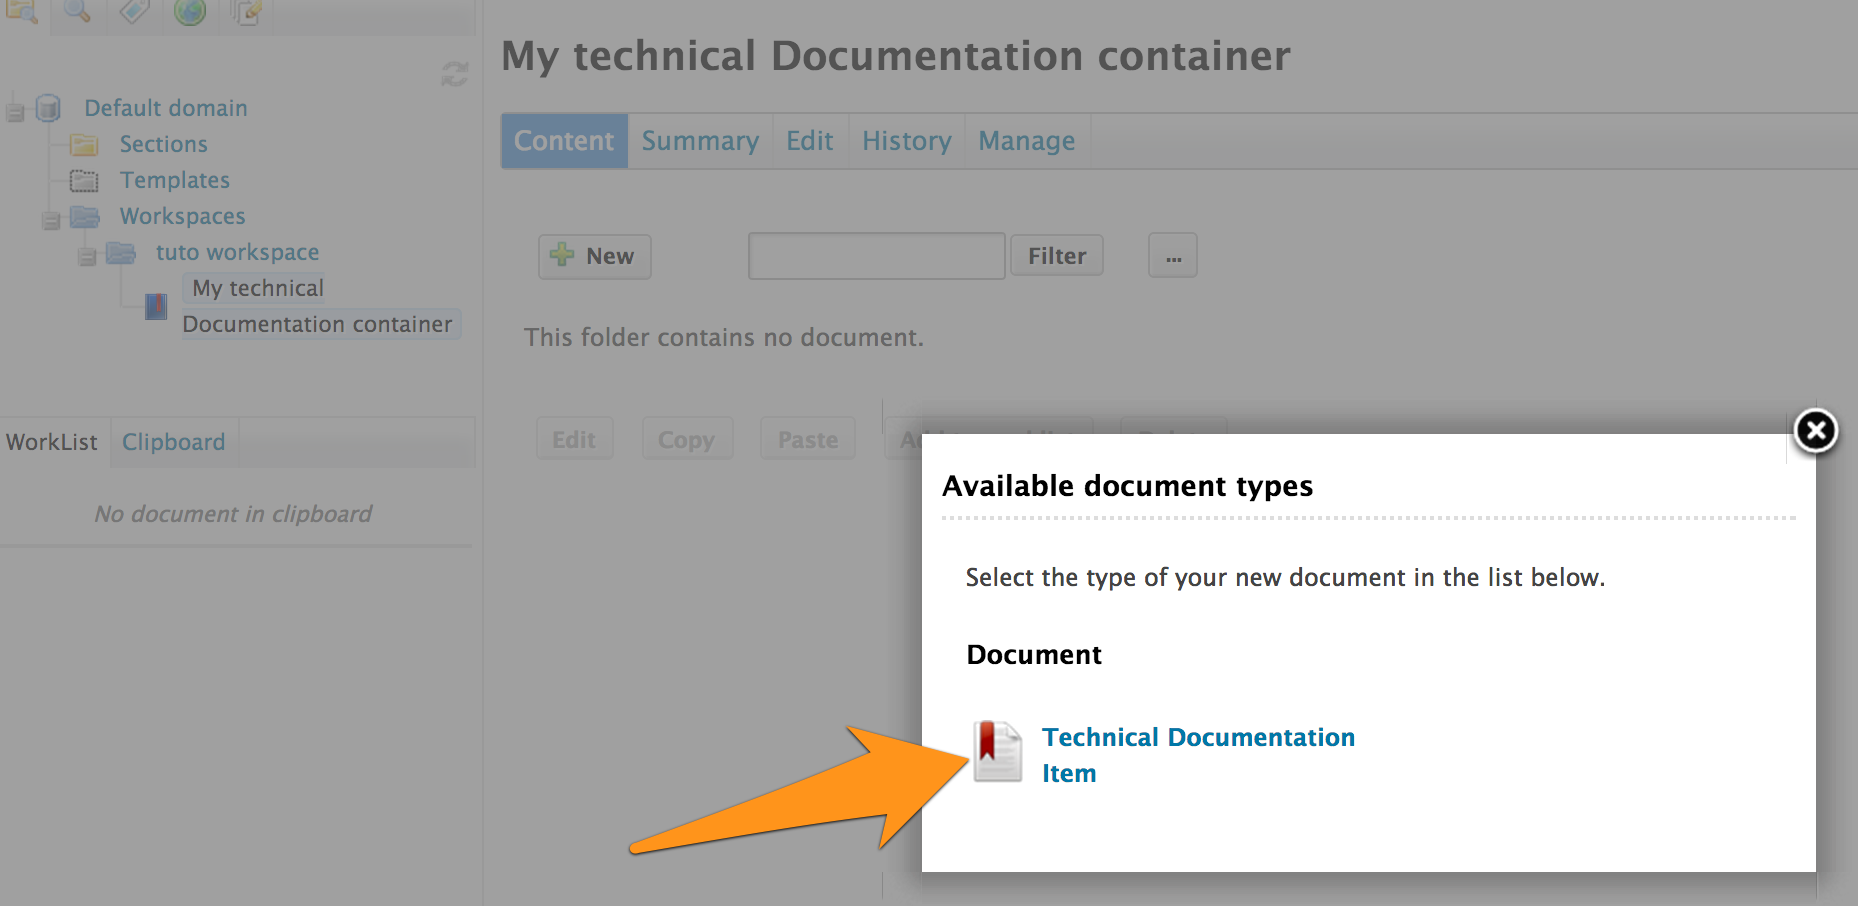
- In the container, create a new document.
You only see a documentation item.

Read more:
Adapting the Listing in a Folder
The information displayed in the Content tab of a documentation container are very generic. We want to display the documentationItem metadata.
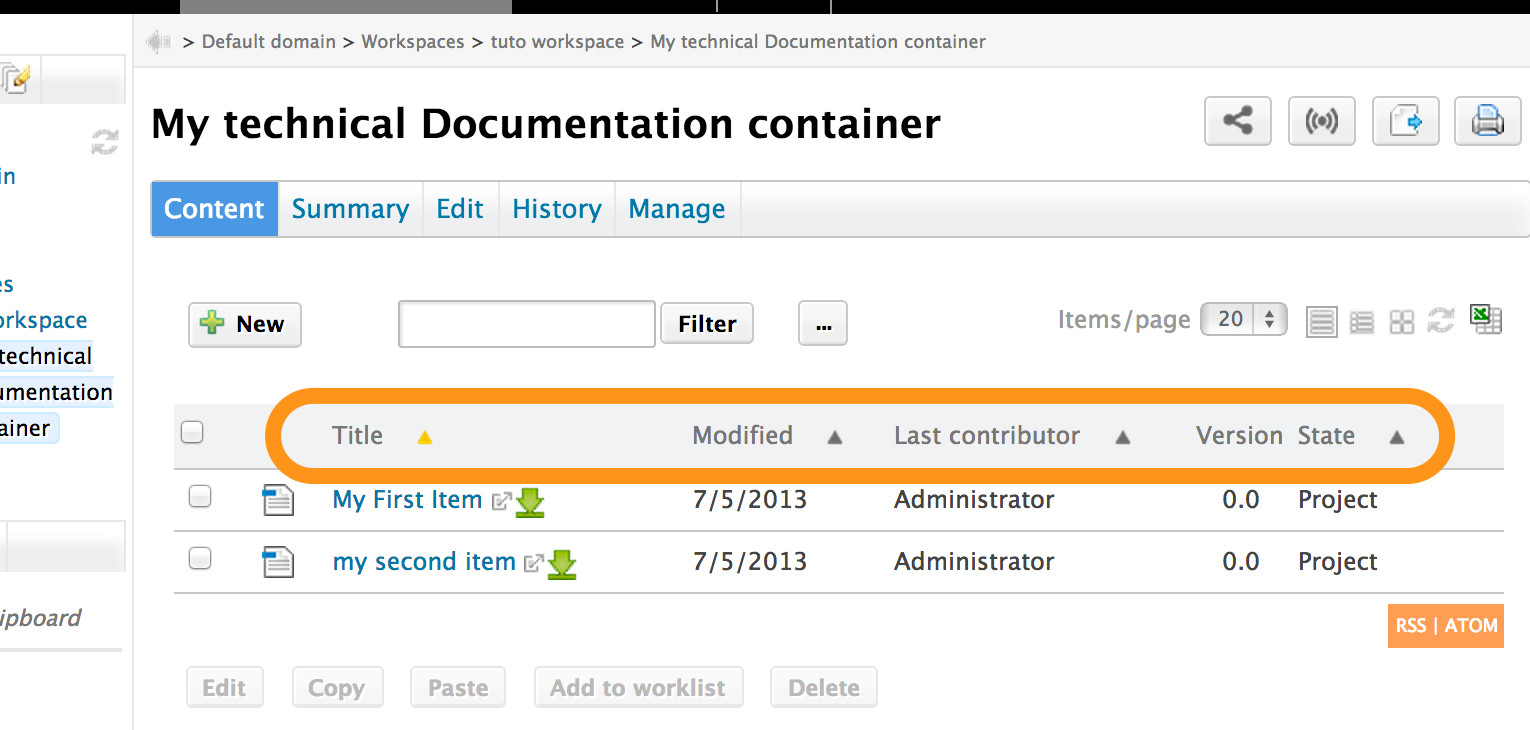

In Nuxeo, listings of documents are called Content Views. We will now see how to create a new content view and replace the default content view by our own.
Creating a new content view
- In Studio, go to Listings & Views > Content Views and click on New.
- Name it
TechnicalDocListing. - Click on Next.
Defining the query
We want the documentation container to display the list of its children. This is a common behavior for a folder. So we will keep the default query filter but add a query parameter to get every documents whose parent is the current document.
Edit the query filter to add a parameter
ecm:parentId= ?. You should get the filter below:ecm:mixinType != 'HiddenInNavigation' AND ecm:isVersion = 0 AND ecm:currentLifeCycleState != 'deleted' and ecm:parentId= ?In the Query parameter, click on Add and type the parameter below. It will define what to use as the value for
ecm:parentId= ?defined above.#{currentDocument.id}
Defining the filter search layout
We also want to be able to filter the documents inside our folder.
- In the Search layout part of the form, check Display the form as a filter.
- Choose if it should be displayed in a pop-up or a folding form, it is up to you.
- In the Search layout, drag and drop the "full text" built-in widget on the search layout so that we can filter by using the full text search.
- Drag the Nature metadata from the
dublincoreschema and drop it to the layout.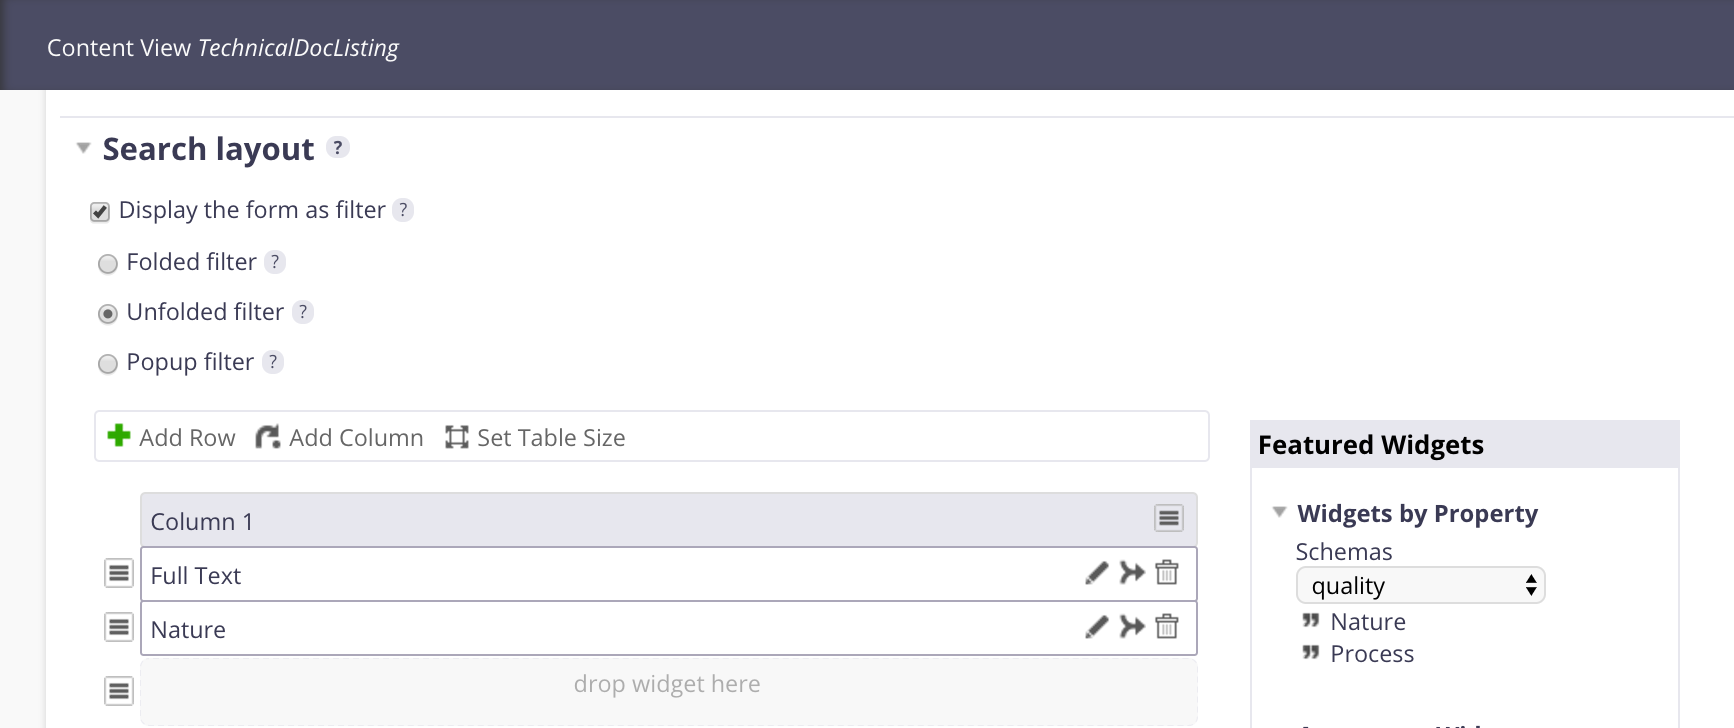

- Edit the Nature widget
- Select a Vocabulary widget type and choose the vocabulary
qualNat. - Keep the "=" operator.
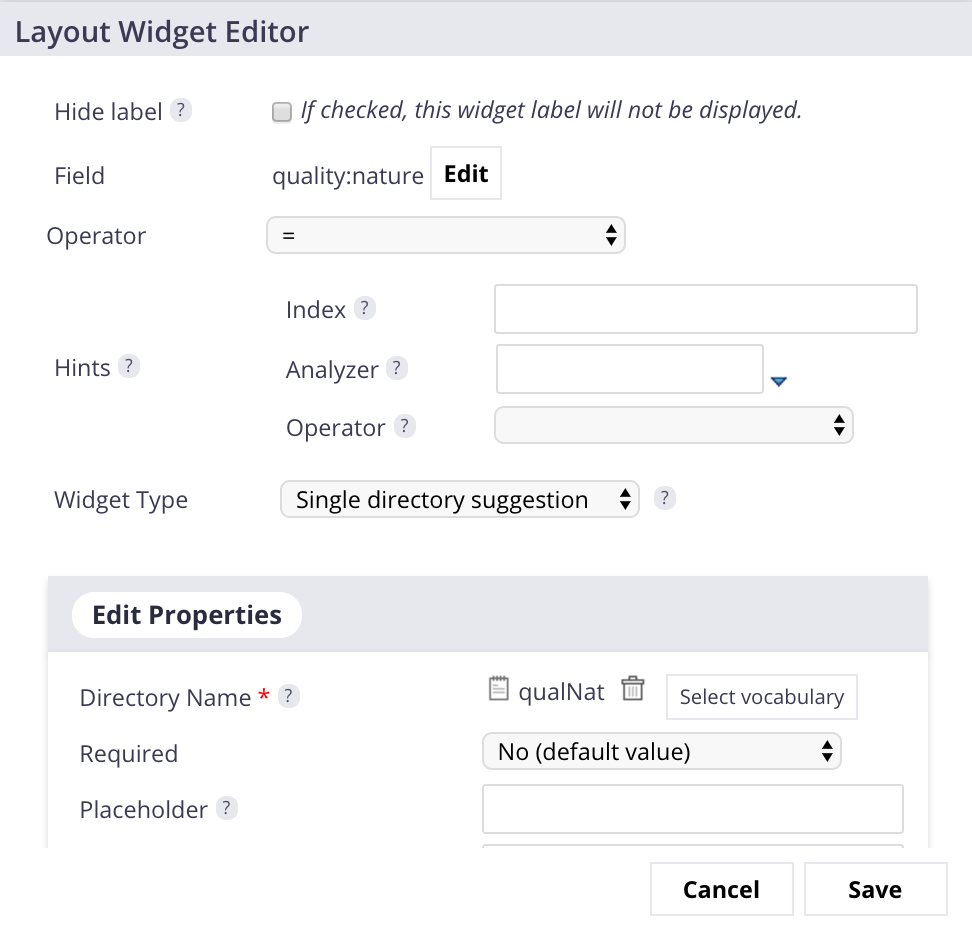

- Select a Vocabulary widget type and choose the vocabulary
- Click on Save.
Defining the Results layout
- Click on the Results tab.
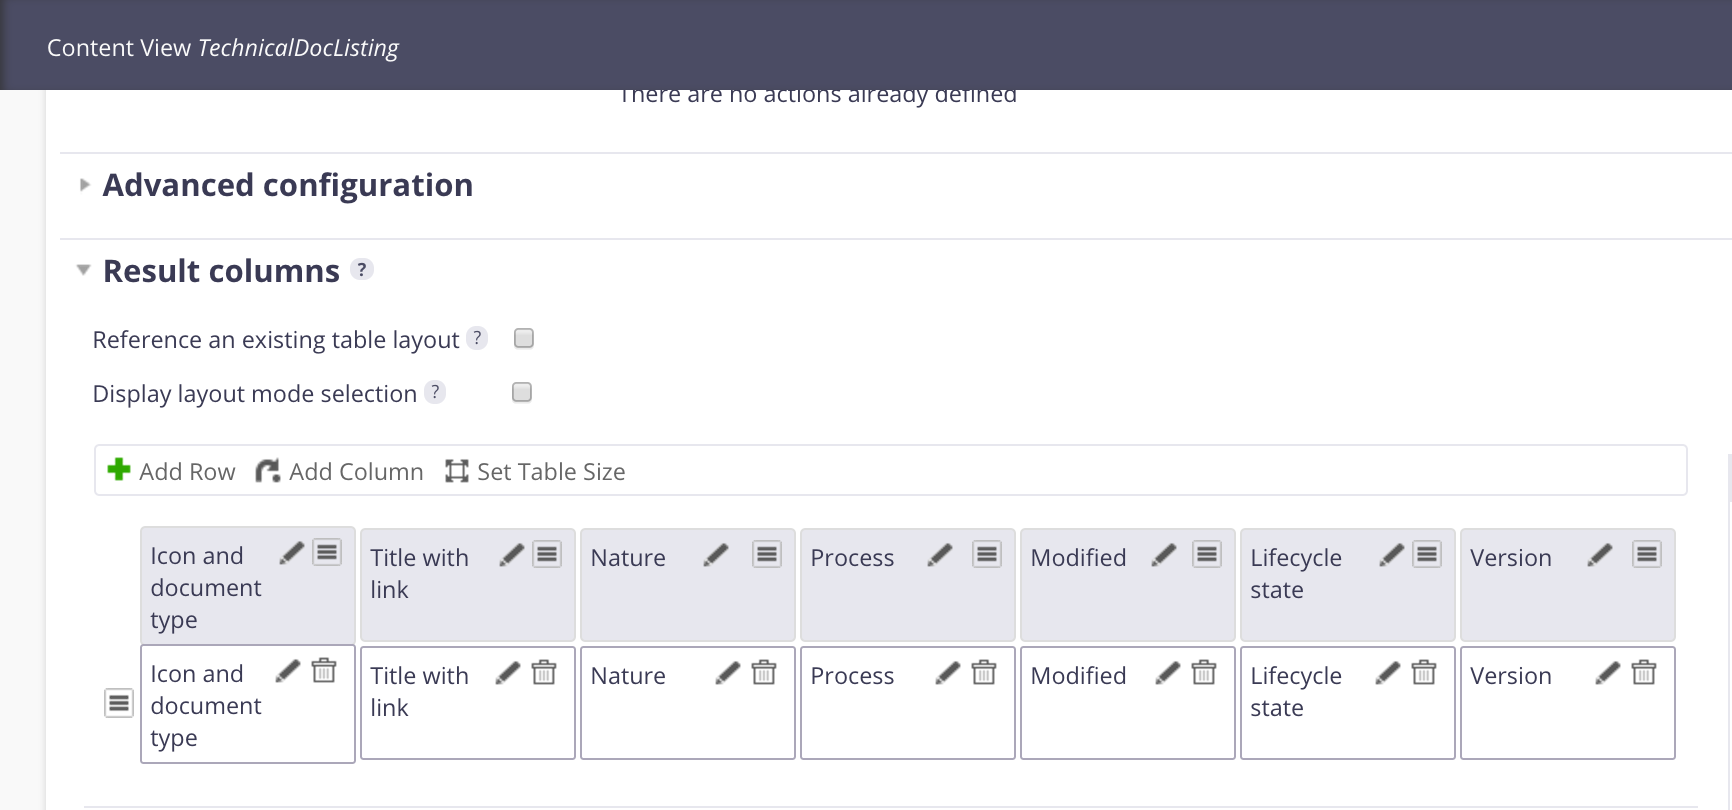
Drag the following built-in widgets into the results columns:
- Icon and document type
Title with link
Title with link widgetYou always need that widget if you want to be able to navigate to the documents displayed in the search results.
- Add the Nature metadata:
- Drag and drop it from the schema
dublincore. - Edit the widget to select the Vocabulary widget type and the
qualNatvocabulary.
- Drag and drop it from the schema
- Add the Process metadata:
- Drag and drop it from the schema
Quality. - Edit the widget to select the Chained vocabulary widget type and the
procQualvocabulary.
- Drag and drop it from the schema
- Add the Modified from the schema
dublincore. - Add two columns by clicking the Add column button.
- Drag the following built-in widgets:
- Lifecycle state
- Version
- Click on the icon
 to edit the columns labels. For instance you don't want a label for the Icon and document type column.

- Click on Save.
We now have a new content view available but we need to use it with the
TechnicalDocumentationContainer.
Using the new content view on the TechnicalDocumentationContainer document type
- In the Studio menu, click Content model > Document Types > TechnicalDocumentationContainer.
- Click on the Tabs tab.
- Click on the Content Views sub-tab
- In the Main content field select the content view
TechnicalDocListing.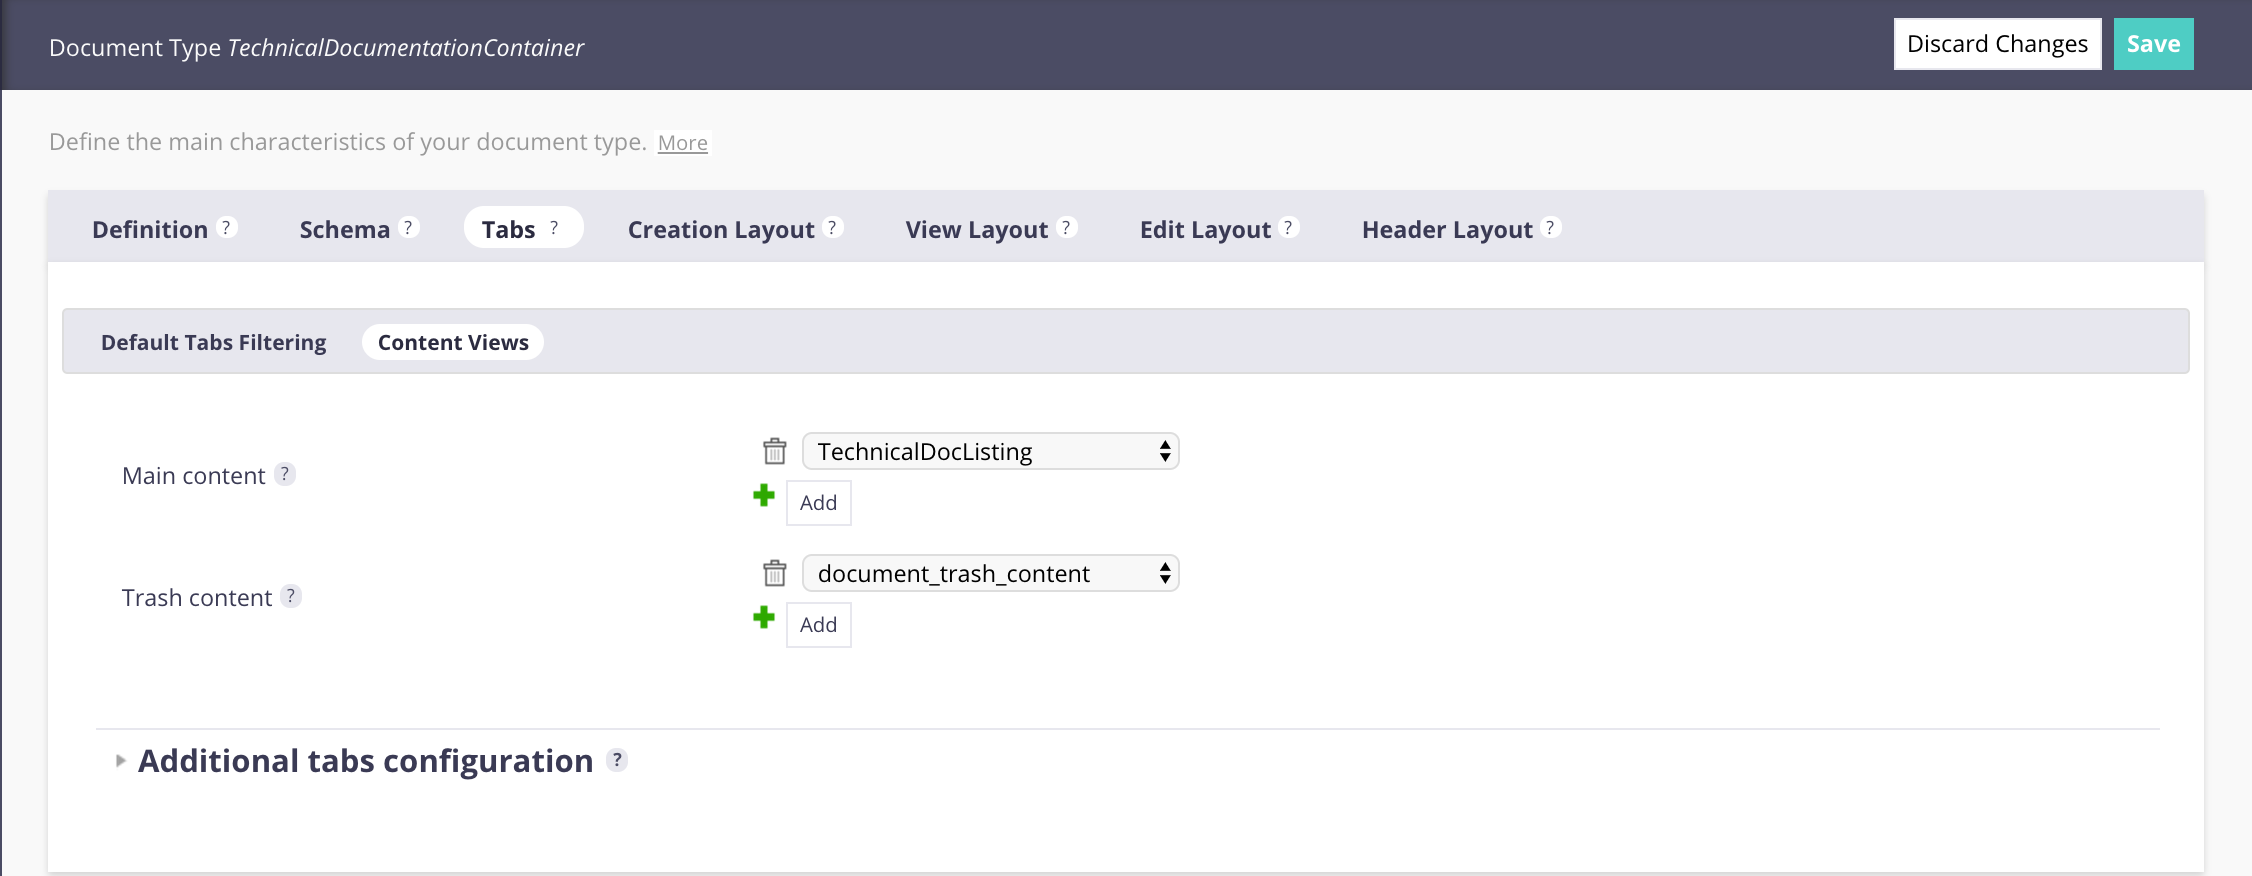

- Click on Save.
Testing your changes
- Deploy your changes on your Nuxeo Platform.
- Go on the documentation folder created sooner and enjoy the result: If you deploy the filter, you will see that you can filter documents by Nature.
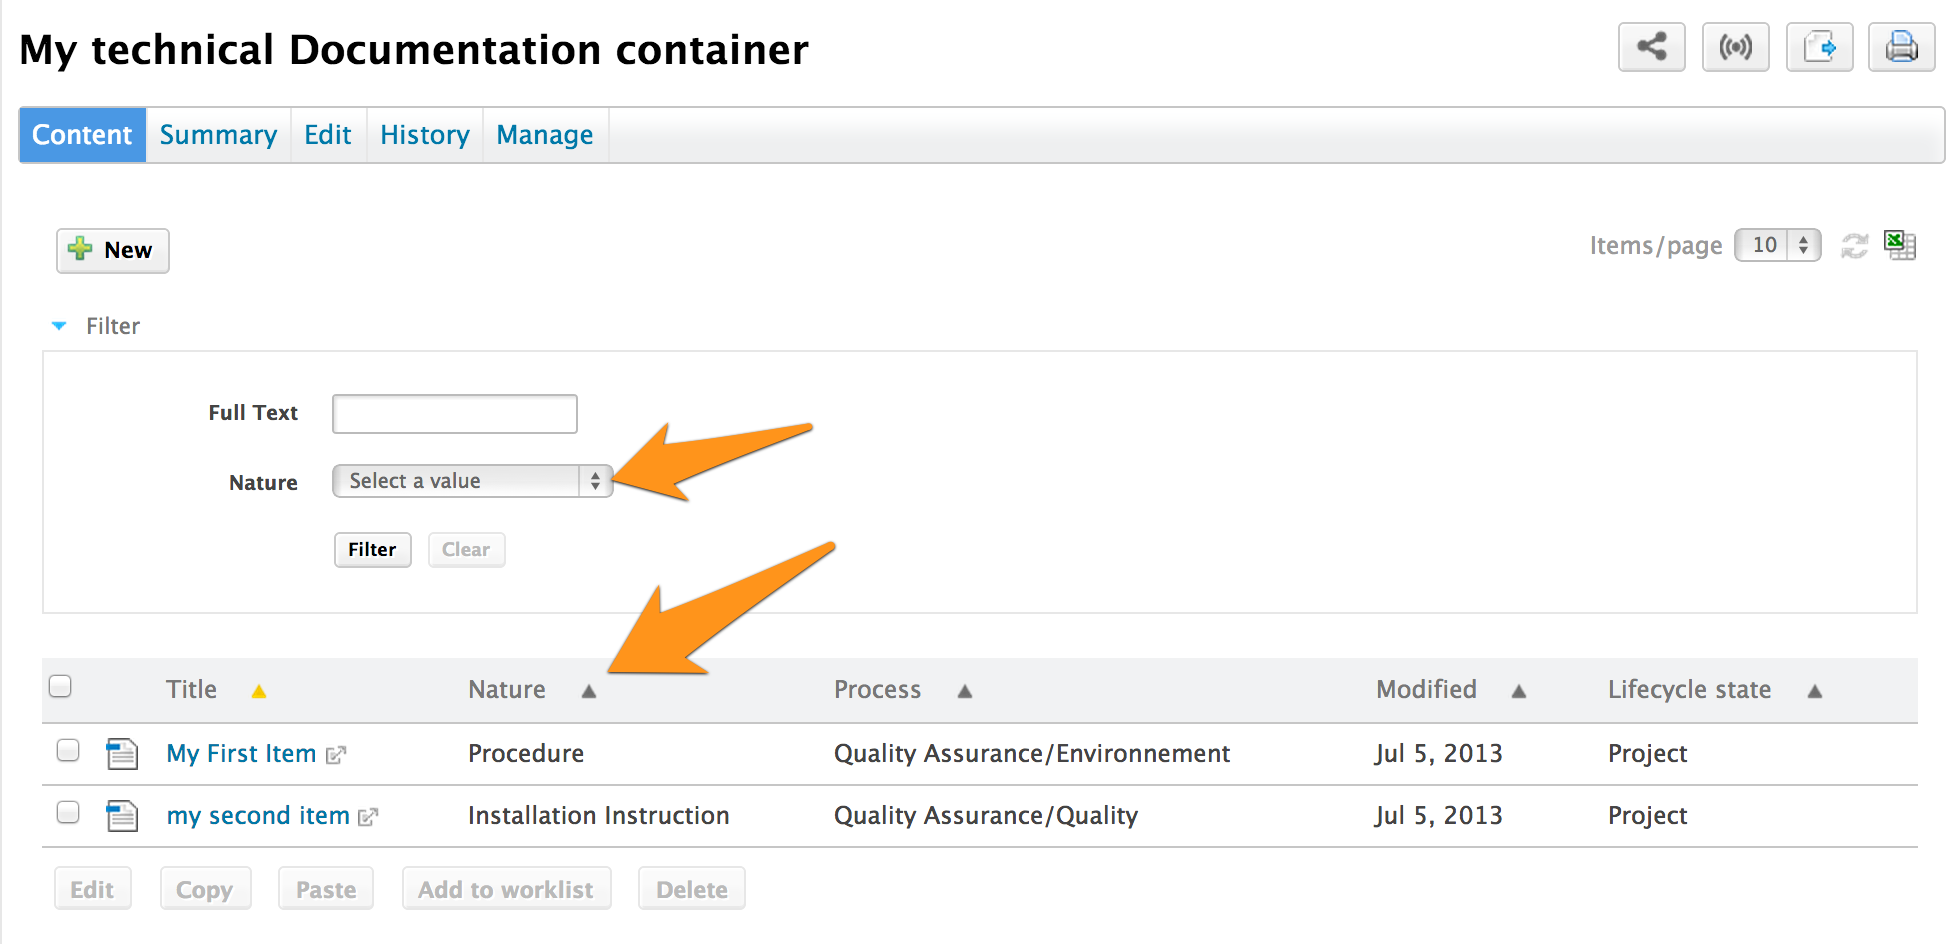

You now have a place to create documentation items. This new container leverages the specific metadata of documentation items.
To sum up what we saw:
- A container document type is a document type with the folderish facet.
- The Container Types and Accepted Children types define containment rules.
The listing of a folder is called a content view and is composed of three elements:
- a query that can hold dynamic parameters,
- a filter that can be used in the user interface,
- a result tab to display the returned documents.
It is now time to add custom behaviors, such as the locking policy we decided initially.
Read more: