The Digital Signature add-on introduces PDF signing capabilities to the Nuxeo Platform. This add-on also provides generation of user certificates, which are required for document signing.
The Nuxeo Platform Digital Signature add-on allows users to:
- download the PDF for previewing,
- download the root certificate to install inside your PDF viewer for verifying any future certificates,
- navigate to certificate generation,
- sign the PDF,
- view existing certificates without opening the signed PDF.
Concepts
Principles
- Documents are signed to protect them from modification, especially at critical stages in their lifecycle.
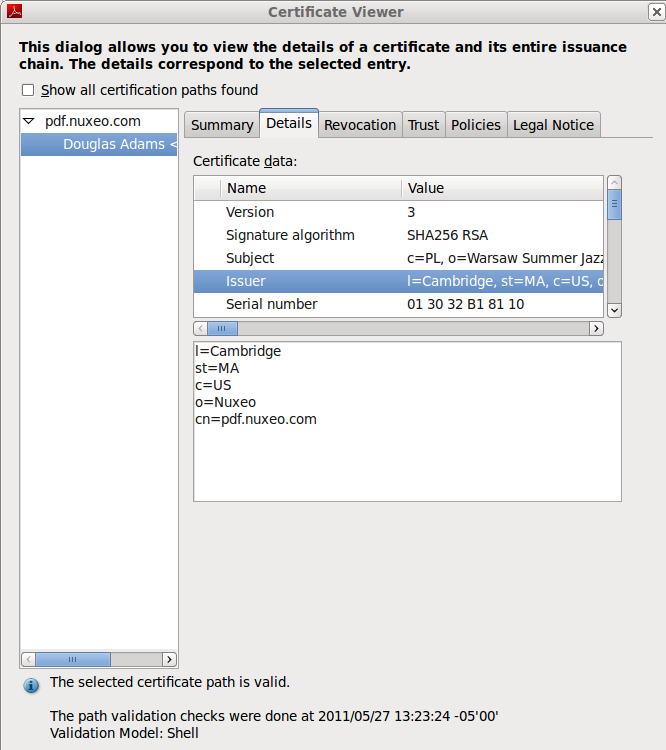
- Document- and user-certification in the Nuxeo Platform follow principles of asymmetric cryptography, PKI & the X.509 standards.
- To sign a document, a user needs a personal certificate.
- Each user can create her own certificate.
- Certificates are issued by Certificate Authorities (CAs).
What Is a Digital Signature?
... or why sign your documents digitally?
Digital signatures uniquely identify the document signer. They provide a similar functionality to handwritten signatures on paper, and are a convenient alternative to signing and scanning documents when a digital version of a document is required. Digital signatures are meant to assure authenticity and integrity of documents, that is to verify that the document originator - or signer - is who they claim to be, and to ascertain that a document has not been tampered with between the moment of signing and the subsequent viewing.
What Is a Digital Certificate?
Before you sign a document you need a digital certificate. Certificates are attached to documents to verify the identity of the signer, that is to check that the person signing the message is who they claim to be. Certificates are issued by Certificate Authorities (CA, also known as Issuer). To verify that a certificate has not been tampered with, it has to be validated against the CA's public key. If this verification is passed it means that the CA certifies the authenticity of the signer. Digital certificates are formatted using PKI standards, the most common of them is X.509, which is also used in this add-on.
Local and Root Certificate Authorities
Root Certificate Authority
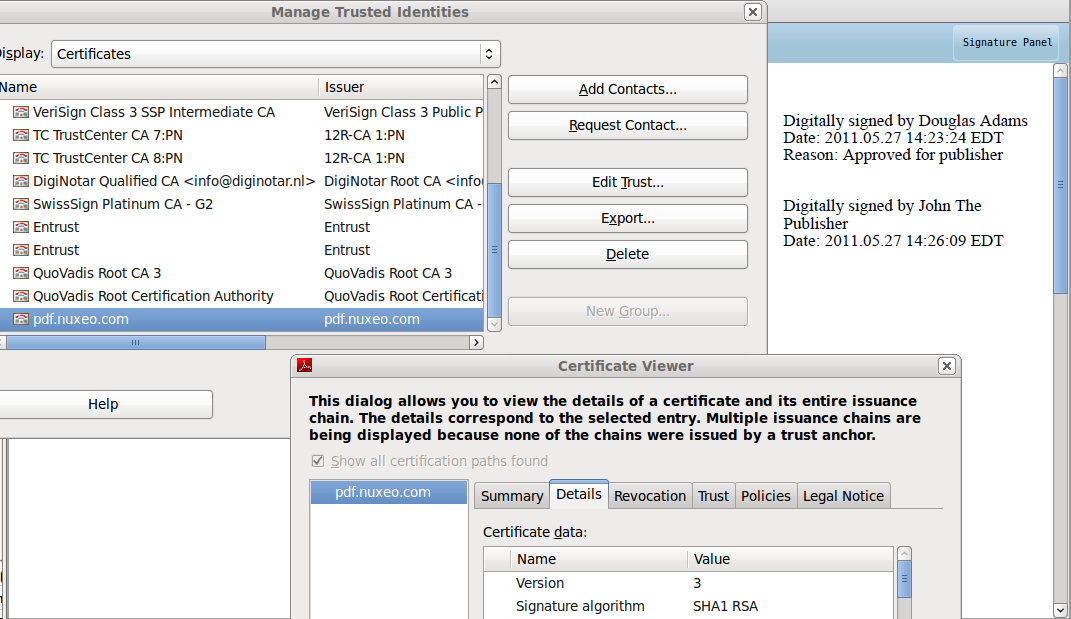
The highest level certificates are created by root Certificate Authorities (CA) which are supposed to be trusted publicly. No higher authority can certify the root certificates: those are the top-level certificates. You can see examples of those in your browser, under the certificate authorities / CA section.
Here are some of the more popular ones:
- Equifax Secure CA,
- VeriSign Class 3 Public Primary Certification Authority,
- Visa eCommerce Root,
- Deutsche Telekom Root CA 2.
Local Certificate Authority
Your Local Certificate Authority (CA) will be used to sign user certificates. The local CA certificate can either be signed by a higher-level certificate authority, or be self-signed. The local CA certificate will be created inside the system hosting your Nuxeo Platform instance.
The default Local CA that comes with our plugin is just an example certificate to be used for initial setup testing, and it should not be used for signing production documents.
Certification Chains
Now let's consider the following relationships:
- The document signature includes => the signer's certificate (user certificate).
- The user certificate was signed with => your local CA certificate.
- Your local CA certificate was signed by => a higher level CA certificate.
- The higher level CA certificate was signed by => a still higher CA certificate (… and so on… …and then, finally).
- A very high level CA certificate was signed by => the root CA certificate.
The root CA certificate closes the chain that leads down to the user's certificate.
Now, instead of verifying all the intermediary certificates, it is enough for your PDF viewer to have the root Certificate Authority verify it for you, via the sequence of intermediary CAs.
Root certificates are usually already present in popular PDF viewers and browsers, and if not, they can be updated automatically provided your software has been set up properly.
CA-Signing vs Self-Signing
… as applied to your local CA certificate.
If your local CA certificate was signed by a certificate authority, the users usually don't have to install your company's certificate in their browsers to verify the signed documents.
On the other hand, if your local CA was self-signed, the CA certificate has to be manually installed in the PDF viewer prior to verifying signatures. This has to be done only once per PDF viewing program and an example of certificate installation in a PDF viewer has been presented in our documentation.
Installation and Configuration
Installation
This addon requires no specific installation steps. It can be installed like any other package with nuxeoctl command line or from the Update Center.
After the package is installed, users get some new tabs:
- a Certificates tab in the Home
- a Signature tab on documents
Configuration
The Digital Signature package provides a sample root certificate populated with sample company's values. However you will need to configure the package so that documents are signed with your company's certificate and information instead of the sample one.
Setting up the Local Root Certificate
To disambiguate, the term "root certificate" in this section - and in the configuration of this plugin - relates to the Local Certificate Authority (CA) of your company which is the root of all user certificates. This is not to be confused with the global root Certificate Authority, that is one of the top-most entities of the global "chain of trust".
This plug-in root certificate helps establishing a simple method of user certificate verification, as it can be installed in a PDF reader. The best approach, however, is to have your local Certificate Authority's certificate signed by a higher level CA whose ancestor has been signed by one of the actual root Certificate Authorities. This incurs some setup overhead in the initial stages of the project. This method guarantees, though, a more secure approach to document verification, and frees the end users from having to install certificates in their PDF readers. PDF readers capable of handling security are updated automatically with the global root Certificate Authority information.
As the keystore configured in the installable package is a sample keystore containing a test configuration, it is required that it be replaced with the client keystore containing the keypair and the certificate to be used for signing user certificates. As of now the certificate+keypair need to be stored in a .jks formatted keystore and configured via the extension mechanism.
The user certificate generation step requires a Certificate Authority certificate (CA) to be set up inside the Nuxeo Platform system as all user certificates have to be signed by a CA with a recognizable identity — a company rather than a single user. The term local CA can be understood here as "company Certificate Authority" or "system-wide Certificate Authority". Note that there is only one CA certificate per system but each user can have his own certificate.
Setting up a CA certificate from a 3rd party authority
For this exercise you will need the following software:
keytool: the keytool comes with your JDK (Java Development Kit) installation.
openssl: Open SSL
Create a keypair (with alias
pdfcakeyin this example).keytool -genkey -keyalg RSA -alias pdfcakey -keypass password -validity 365 -keysize 1024 -dname "cn=PDF-CA, ou=Headquarters, o=Example Organization, c=US" -keystore pdfca-keystore.jksThis creates a keypair (private and public key), and self-signs it automatically.
If you don't wish to use a 3rd party Certificate Authority to sign your key, you can stop here.
Create a certificate signing request (CSR).
keytool -keystore pdfca-keystore.jks -storepass aaaaaa -alias alternatekey -keypass password -certreq -file pdfca.csrSubmit the CSR to a well-known 3rd party Certificate Authority of your choice to sign it.
When you receive the signed certificate pdfca.crt, import it into your keystore using a new new alias (
pdfcacertin this example).keytool -import -trustcacerts -alias pdfcacert -file pdfca.crt -keystore pdfca-keystore.jks
Setting up a local CA certificate
An alternative method would be to set up a local signing CA and use it for signing certificates.
Though it could work for small-scale deployments, this approach is not recommended for production purposes.
Step 1: Create a Certificate Authority (CA)
Create a CA key.
openssl genrsa -out ca.key 2048Create a self signed CA certificate.
openssl req -new -x509 -days 356 -key ca.key -out ca-self-signed.crt
Step 2: Create Subordinate Certificate Authority (SUBCA)
Create the key for the subordinate CA.
openssl genrsa -out subca.key 2048Create a certificate signing request (CSR) for the subordinate CA.
openssl req -new -key subca.key -out subca.csrSign the CSR of the subordinate CA.
openssl x509 -req -days 730 -in subca.csr -CA ca-self-signed.crt -CAkey ca.key -set_serial 01 -out subca.crtImport a certificate created from your CSR into a JKS keystore.
keytool -import -alias certalias -file subca.crt -keystore keystore.jksConvert the x509-certificate and the key to pkcs12 format to make it importable into the java keystore.
openssl pkcs12 -export -in subca.crt -inkey subca.key -name keyalias -CAfile ca.crt -caname root -out subca.p12(use "export" as password when prompted)
Convert the pkcs12 file to JKS format.
keytool -importkeystore -deststorepass storepass -destkeypass keypass -destkeystore keystore.jks -srckeystore subca.p12 -srcstoretype PKCS12 -srcstorepass export -alias keyaliasNow you will need to replace the sample certificate with your own that you just created. You can use the configuration information below which explains how to override the sample certificate with your company certificate.
Step 3: Replace the sample root certificate
Create a
***-config.xml(e.g.rootcert-digitalsignature-config.xml) file with the content below:<component name="my.signature.rootservice.config"> <require>org.nuxeo.signature.config.default</require> <extension target="org.nuxeo.ecm.platform.signature.api.pki.RootService" point="rootconfig"> <configuration> <rootKeystoreFilePath>test-config/keystore.jks</rootKeystoreFilePath> <rootKeystorePassword>abc</rootKeystorePassword> <rootCertificateAlias>pdfcacert</rootCertificateAlias> <rootKeyAlias>pdfcakey</rootKeyAlias> <rootKeyPassword>abc</rootKeyPassword> </configuration> </extension> </component>Put the extension in the
configdirectory of your server:$NUXEO/nxserver/configfor a Tomcat distribution,$NUXEO/server/default/deploy/nuxeo.ear/configfor a JBoss distribution.
Setting up the Company Information for New Certificates
Another extension provides general company information used in all certificates, like Country, Locale, Organization Name and Organizational Unit.
To add your company's information for users certificates:
Create another XML file called
***-config.xml(e.g.companyinfo-digitalsignature-config.xml) with the content below:<?xml version="1.0"?> <component name="my.signature.userservice.config"> <require>org.nuxeo.signature.config.default</require> <extension target="org.nuxeo.ecm.platform.signature.api.user.CUserService" point="cuserdescriptor"> <userDescriptor> <countryCode>MX</countryCode> <organization>Sigma Alimentos</organization> <organizationalUnit>Marketing</organizationalUnit> </userDescriptor> </extension> </component>Put the extension in the
configdirectory of your server:$NUXEO/nxserver/configfor a Tomcat distribution,$NUXEO/server/default/deploy/nuxeo.ear/configfor a JBoss distribution.
Use
When the Digital Signature add-on is installed on your Nuxeo Platform, you get some new tabs in your Nuxeo interface:
- Users have a new Certificates tab in their Home, from which they can generate their certificate to be able to sign documents.
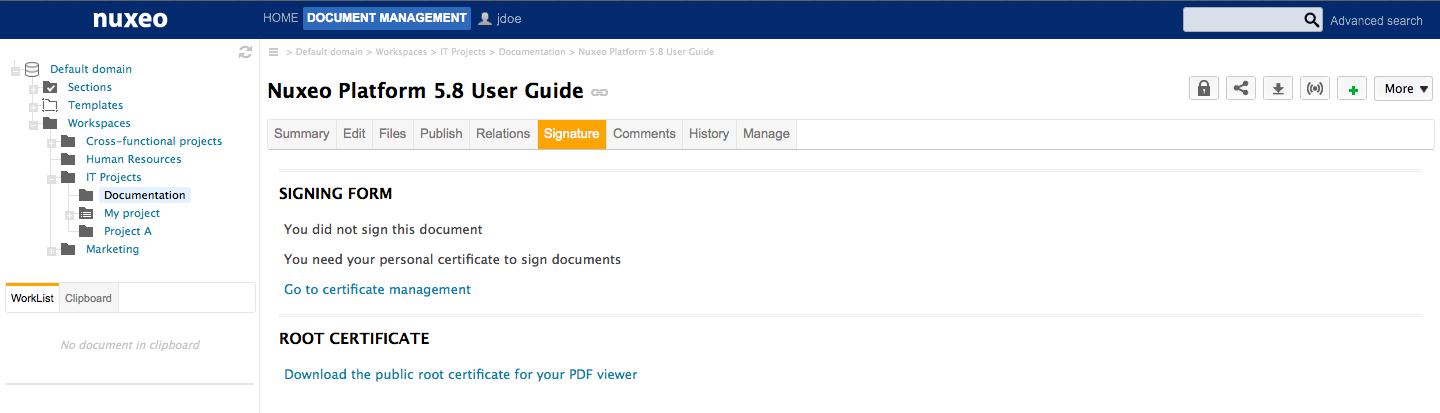
- Files documents have a new Signature tab, from which they can either see the signatures or sign the document if they have the right to.
Top-Level View
From a high-level functional point of view, here is what users need to be able to do using the digital signature add-on:
- User A creates a certificate.
- User A signs a document.
- User B installs the root certificate in a PDF viewer.
- User B opens a document, previews the document with a visible signature and can check its authenticity against the root certificate.
Generating a Certificate
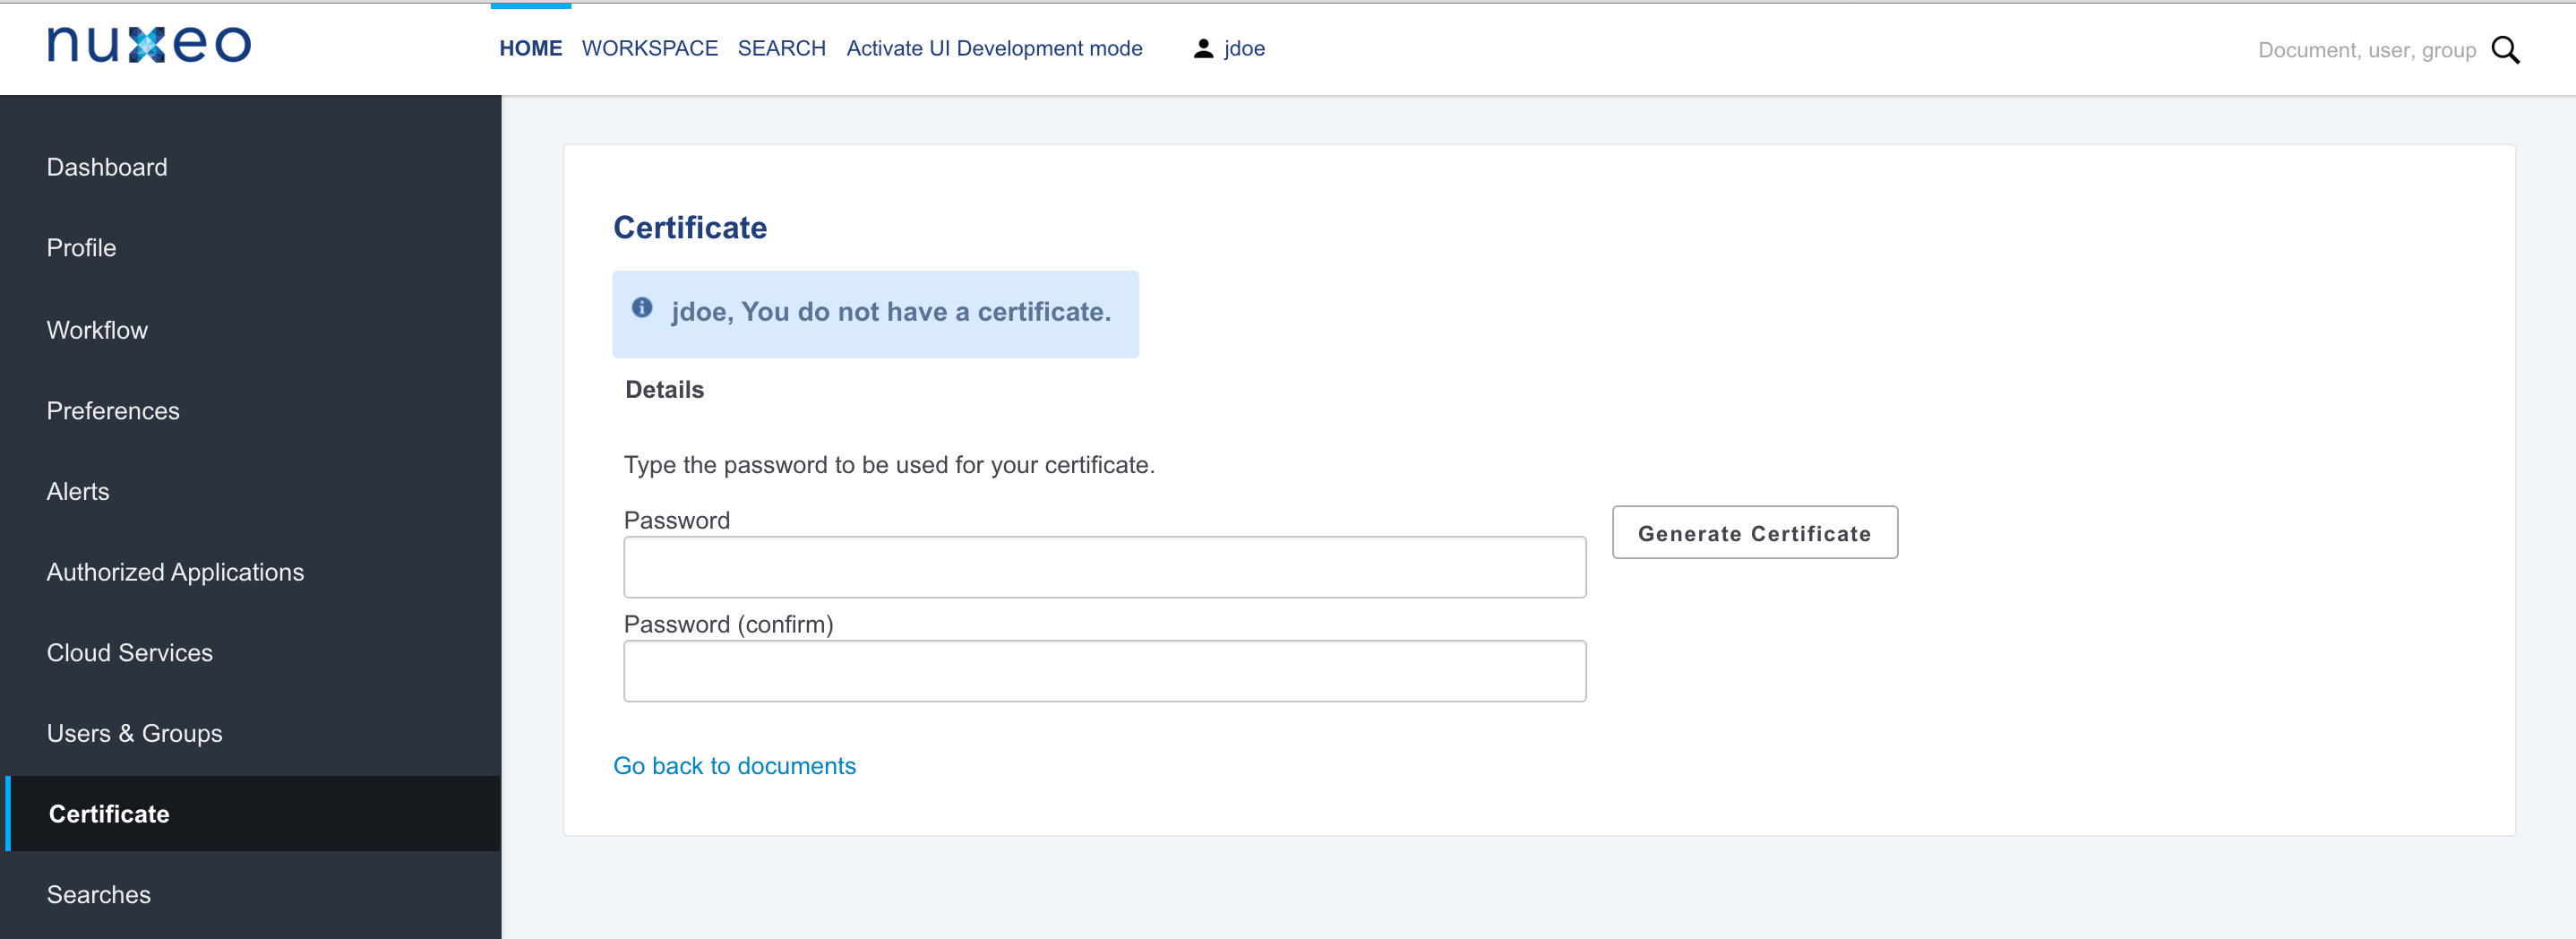
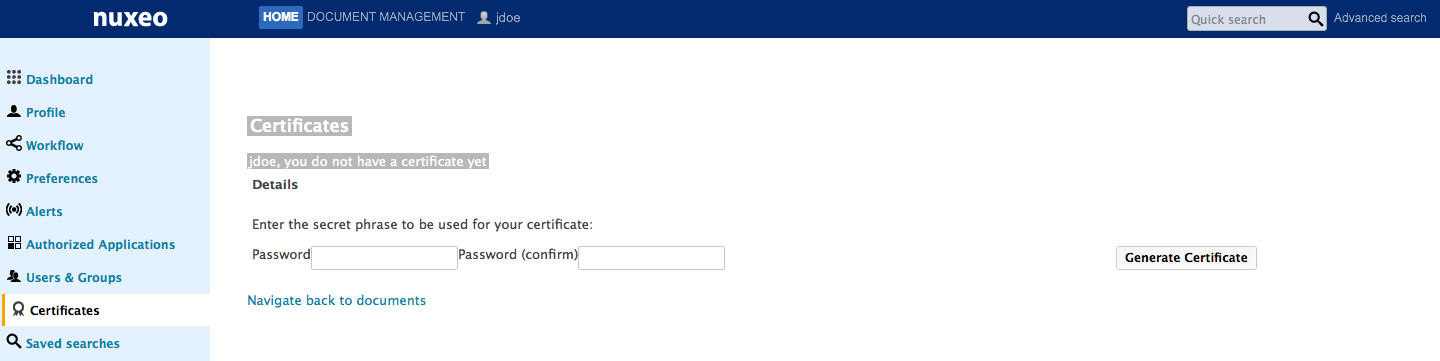
To be able to sign documents, users need to have a certificate. Every user of the application can have a certificate. However, this not automatic: users have to generate it. When users generate their certificate, they are asked to choose a password, that will be required to sign the document.
Make sure you remember your password (or store it secured) as there is currently no mechanism for resetting lost passwords.
The certificate generation relies on two sets of information:
- User's information: user's first name, last name and email address. The email address is used to check the user's unicity.
- Global company information entries configured by the system administrator.
To generate your certificate:
- Click on the Home main tab.
Click on the Certificates tab, where you can generate your certificate.
If you have no certificate yet, a link to the Certificates tab is displayed directly from the documents Signature tab.
A form to generate your certificate is displayed. If you already generated your certificate, it is displayed instead of the generation form.
Type and confirm the password that you will be asked when you sign documents.
- Click on the Generate Certificate button.
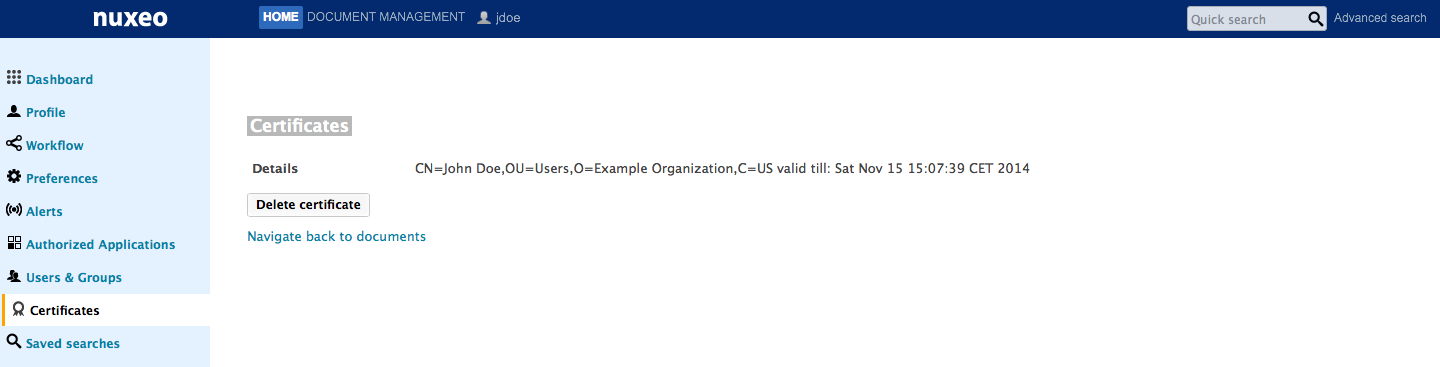
You certificate is generated and displayed.
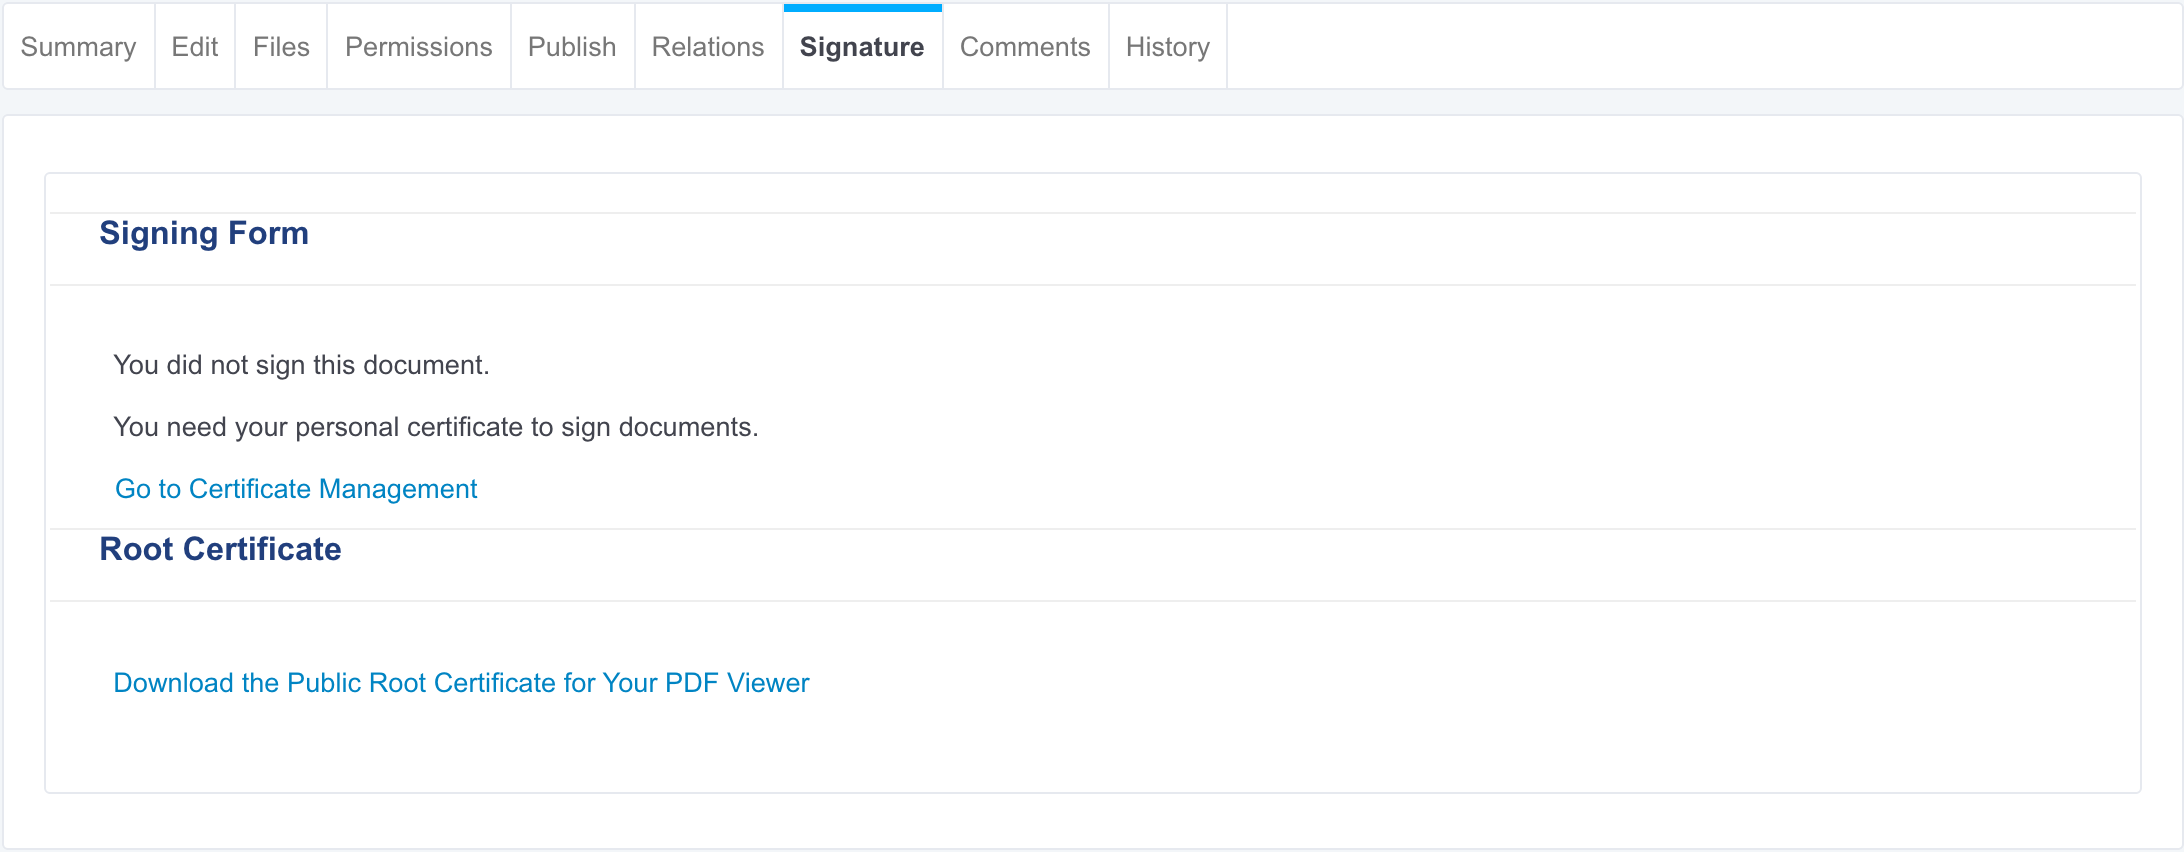
Signing a Document
Only users with "Edit" permission can sign documents.
To sign a document:
Click on the Signature tab of the document. The signing form is displayed.
If you haven't generated your certificate yet, you are displayed a link to the certificate management instead of the signing form.
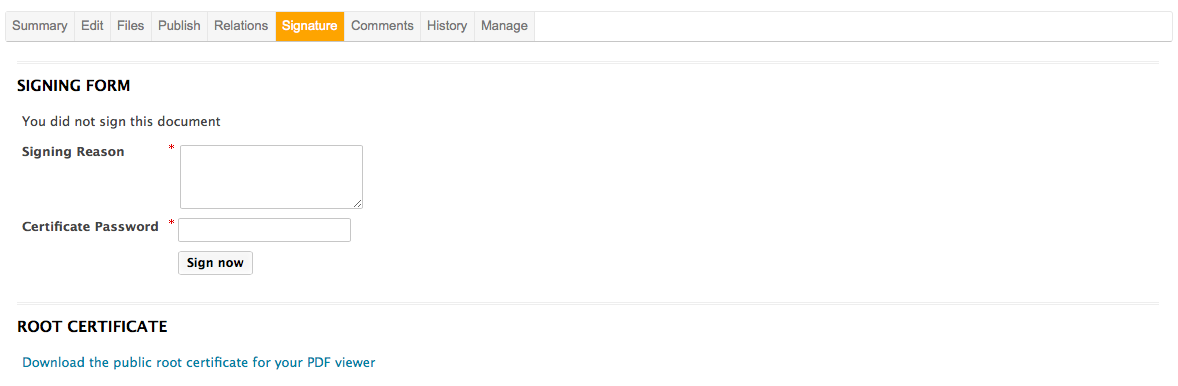
Type a comment in the "Signing Reason" text area.
- Type your password in the "Certificate Password" field.
- Click on the Sign now button.
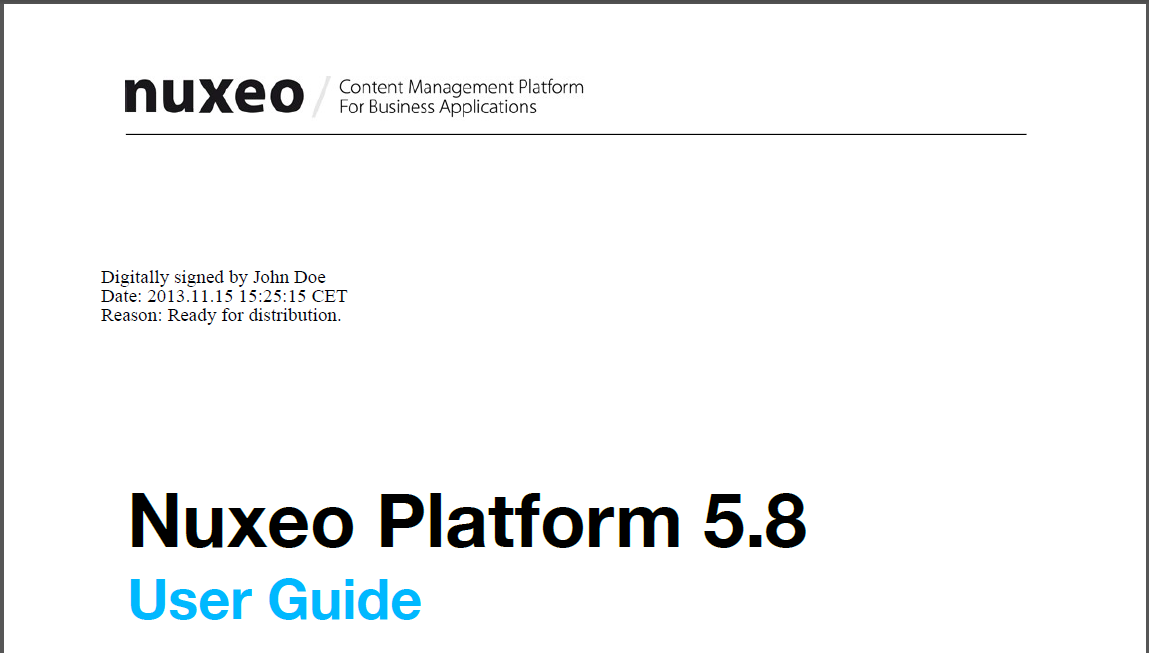
Your signature is displayed on the Signature tab instead of the signing form. It is composed of your certificate, your organization's certificate, and the expiration date of your certificate.
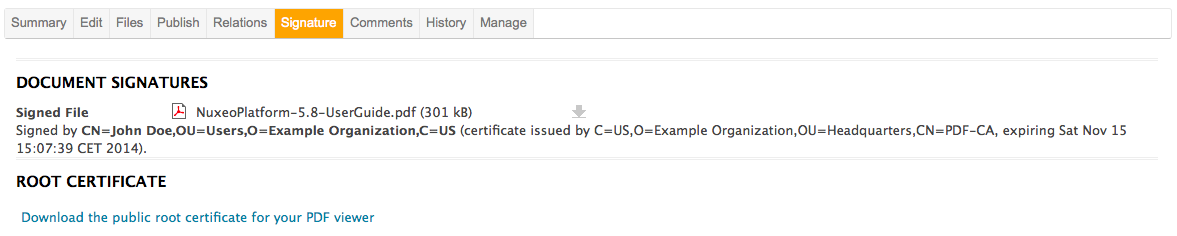 The signed PDF version of the document is attached to the document. It is displayed on the Signature tab, the Summary tab and the Files tab. The signing of the document is logged in the History tab.
Verifying the Signature of the PDF File
To verify the signature of the PDF, you need to:
- Install the public root certificate available from the Root Certificate section of the Signature tab:
- Click on the Download the public root certificate for your PDF viewer link to download the certificate.
- Follow your operating system's usual certificate installation steps.
- Download the signed PDF file by clicking on the file name from the Summary tab or the Signature tab, and open it.
Customization
The layout is defined by:
- Lines and Columns number,
- Starting point cell (Left to right - Top to bottom),
- Signature text size.
By default the configuration sets lines number to 5, columns number to 3, starting cell to 1 and text size to 10px.
<extension
          target="org.nuxeo.ecm.platform.signature.api.sign.SignatureService"
          point="signature">
    <configuration>
      <reason>This document signed as an example.
      </reason>
      <layout id="defaultConfig" lines="5" columns="3" startLine="1" startColumn="1" textSize="10"/>
    </configuration>
  </extension>
It means signatures display begins in the first cell, at the top left of the PDF document and so on, on 5 lines and 3 columns maximum.
Here is an example of how to override this default configuration:
<require>org.nuxeo.signature.config.default</require>
<extension
          target="org.nuxeo.ecm.platform.signature.api.sign.SignatureService"
          point="signature">
    <configuration>
      <reason>This document signed as an example.
      </reason>
      <layout id="customConfig" lines="5" columns="3" startLine="3" startColumn="3" textSize="10"/>
    </configuration>
  </extension>
Signatures display will begin in the third cell (top right) and so on, on 5 lines and 3 columns maximum.
If signatures number is higher than available cells number, the document will be signed digitally but extra signatures won't be displayed into it.