The Nuxeo Platform User Registration add-on enables users to invite external users to access a specific space of the Platform or a limited set of spaces. The invitations must be approved by an administrator of the Platform.
Installation
This addon requires no specific installation steps. It can be installed like any other package with nuxeoctl command line or from the Update Center.
When you have installed the package, as an admin, you have three new sub tabs under the Manage tab of any folderish document:
- User Invitation
- Bulk Invitation
- User Registration Requests
You also have a new User Registration tab in the Admin tab.
Configuration
Setting Up Email Sending
The Nuxeo Platform User Registration add-on sends email to the invited user with his credentials. So your Nuxeo server must be able to reach an e-mail server. This is the same configuration that the one required for the email alerts to work. See how to enable e-mail alerts.
Global Configuration
The administrators can set up some configuration directly from the Admin > User registration > Configuration tab.
Possible configuration options are:
| Field | Description |
|---|---|
| Allow New User Creation | Enables users to invite user that don't have an account on the Platform. A new user account is then created. The new user is not included in any group by default. |
| Force Rights Assignment | This option is useful when user is manually created at a later time or comes from a computed group. |
| Direct Validation If User Exists | If a user invites a user that has already been invited to another space and so who already has a account on the Platform, then the administrators don't have to approve the invitation again. It is directly approved by the system. |
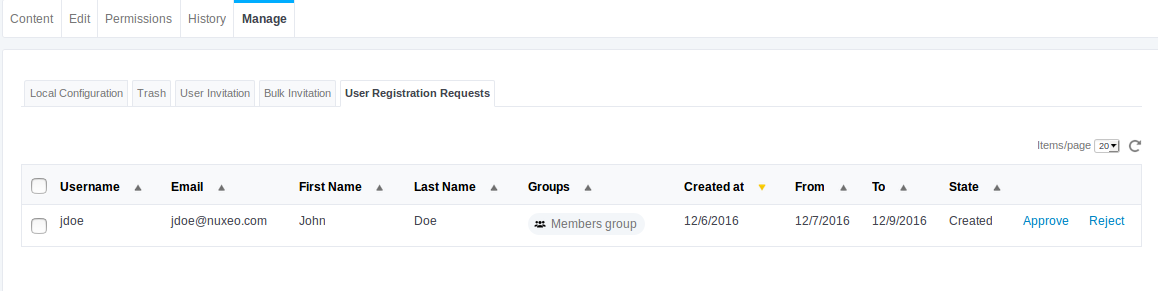
| Local Registration Tab | Displays a User registration requests subtab in the local Manage tab of a space, that displays the invitations that were done from the current space and their status. |
Functional Overview
The user registration process takes three steps:
- A user with Manage everything right invite one or several persons to access a workspace (or another type of space).
- The administrators of the application review this invitation and approve or reject it.
- If the invitation has been accepted by the administrators, an email is sent the invited user(s) so he validates his invitation. If the invitation has been rejected, it is canceled.
Inviting Users
Inviting a Single User to the Platform
Users with Manage rights on workspaces or section can invite users to the Platform.
To invite a user:
- Click on the User invitation sub tab.
- Fill in the form (see below for details).
- Click on the Invite user button. The administrators now have to approve the invitation so the invited user receives an invitation by email.
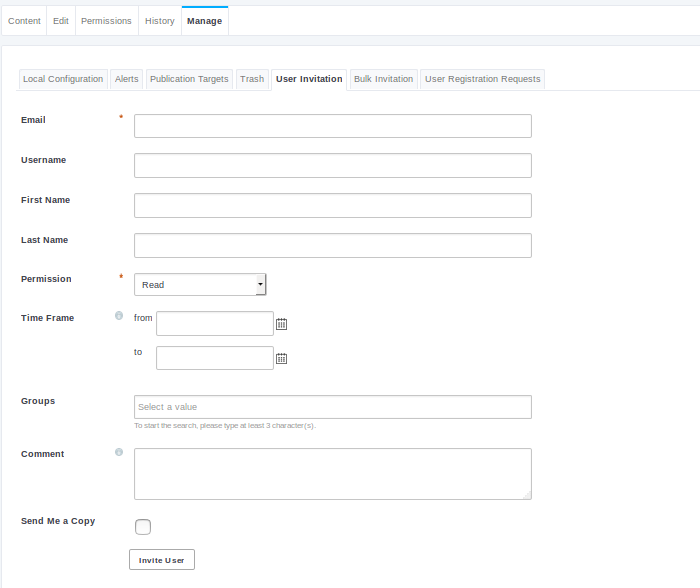
Invitation form details
| Field | Description |
|---|---|
| The email address to which the invitation will be sent. | |
| User name | The username the invited user will use to log in. |
| First name | The invited user's first name. |
| Last name | The invited user's last name. |
| Permission | The access right you want to give the invited user on the space. |
| Time Frame | Period during which the access right given to the user will be valid. |
| Groups | The group(s) in which the user will be a member. |
| Comment | A comment for the invited user to explain why he's invited, for instance. This comment will be in the invitation email. |
| Send me a copy | Your email address will be in the Cc recipients of the invitation email. |
Inviting Several Users
It is possible to invite several users at the same time. You just need to provide their email addresses and indicate what permission they will have on the space. After the administrator has approved the invitations, the invited users receive an email to validate their invitation.
To invite several users at the same time to a space:
- Click on the Bulk Invitation sub tab.
- Fill in the form (see below).
- Click on the Invite List button. The administrators now have to approve the invitations so the invited users receive an invitation by email.
Bulk Invitation Form Details
| Fields | Description |
|---|---|
| List of Recipients | The email addresses of the users you want to invite to the space. The email address will be their login. Use a comma (,) to separate the emails. |
| Permission | The access right you want to give the invited users on the space. |
| Comment | A comment for the invited user to explain why he's invited, for instance. This comment will be in the invitation emails. |
| Send me a copy | Your email address will be in the Cc recipients of the invitation emails. |
Managing Pending Invitations
When users invite external people to access the Platform, a new user account is created for this new external user. This is why the invitation must be accepted by an administrator before the invitation is actually sent.
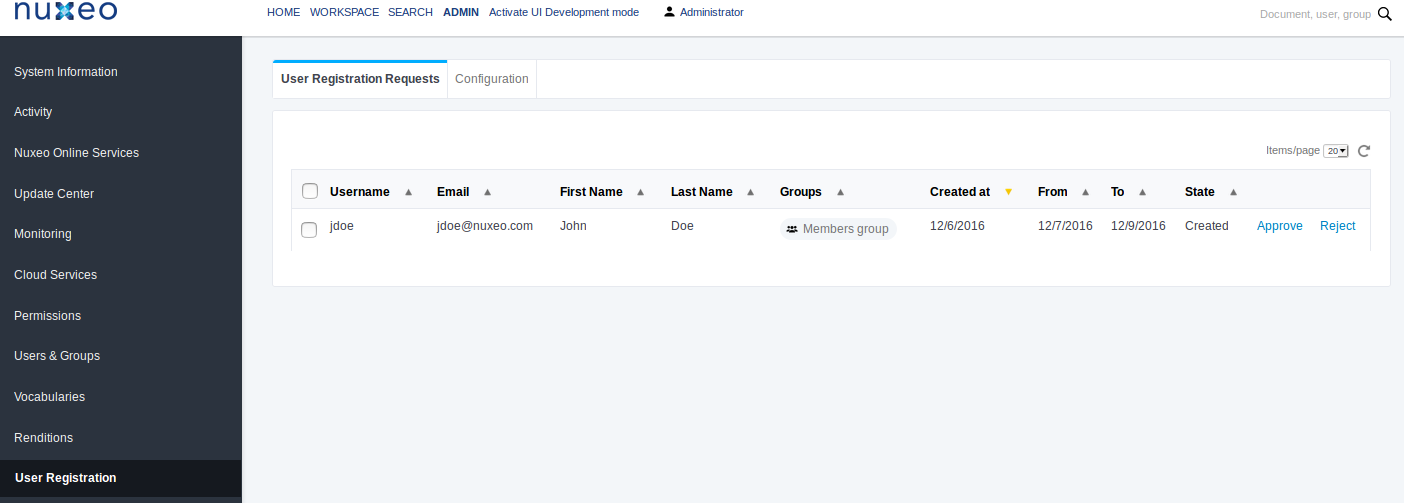
Invitations can have different statuses:
- Created: A local manager invited a user; administrator now have to approve or reject the invitation and the required user account creation.
- Approved: An administrator has approved the invitation; the needed user account is created and an invitation email is sent to the user.
- Rejected: An administrator has refused the invitation and the creation of the required new user account.
- Accepted: The invited user has confirmed he received the invitation by clicking on the validation link in the invitation email.
Accepting an Invitation
To accept an invitation:
- Click on the sub tab User Registration Requests of the space.
You can also see all invitation requests from the Admin > User Registration Requests tab.
Click on the Accept link of the invitation to validate. The invitation now has the state Accepted. Once the user has validated his invitation by clicking a link in the email, you can:
- Click on Revive. It will resend a new mail to the user to remember him he has been invited.
- Click on Delete. It will cancel the creation of the account if the user has not already enter his password.
- Click on Validate.
It will finalize the invitation process.

Rejecting an Invitation
To reject an invitation:
- Click on the sub tab User registration Requests of the space.
You can also see all invitation requests from the Admin > User Registration tab.
- Click on the Reject link of the invitation to validate. The invitation now has the state Rejected.
Validating Your Invitation
When you have been invited to a workspace, a folder or any type of space in the Nuxeo Platform, you get an email with a link to validate your invitation.
- Click on that link to validate your invitation.
- Create your password by typing it.

- Log in to the Nuxeo Platform.
Technical Configuration Overview
The user registration contributes to the nuxeo-invite and nuxeo-webengine-invite modules.
Default Configuration of the User Registration
<extension target="org.nuxeo.ecm.user.registration.UserRegistrationService"
             point="configuration">
    <configuration merge="true">
      <requestDocType>UserRegistration</requestDocType>
      <container>
        <docType>UserRegistrationContainer</docType>
        <parentPath>/management/</parentPath>
        <name>registrationRequests</name>
        <title>Registration Requests Container</title>
      </container>
        <userInfo>
          <schemaName>userinfo</schemaName>
          <usernameField>userinfo:login</usernameField>
          <passwordField>userinfo:password</passwordField>
          <emailField>userinfo:email</emailField>
          <firstnameField>userinfo:firstName</firstnameField>
          <lastnameField>userinfo:lastName</lastnameField>
          <groupsField>userinfo:groups</groupsField>
          <companyField>userinfo:company</companyField>
        </userInfo>
      <validationEmail>
        <title>You are invited to access Nuxeo</title>
        <template>skin/views/userRegistration/EmailInviteDocTemplate.ftl</template>
      </validationEmail>
      <reviveEmail>
        <title>You are invited to access Nuxeo</title>
        <template>skin/views/userRegistration/ReviveEmailInviteDocTemplate.ftl</template>
      </reviveEmail>
      <enterPasswordUrl>site/userRegistration/enterpassword/</enterPasswordUrl>
      <validationRelUrl>site/userRegistration/validate</validationRelUrl>
      <registrationUserFactory>org.nuxeo.ecm.user.registration.DefaultRegistrationUserFactory</registrationUserFactory>
    </configuration>
  </extension>
You can contribute to the default user registration configuration or add your new configuration by adding a specific name attribute in the configuration tag.
The invitation UI action uses the default_registration name to get the configuration of the user registration. If you contribute a new configuration name you will have also to contribute new actions that will use this configuration.
Each user invitation request is actually a document stored in a specific container. In the default configuration, requests are stored under /management .
- The container type is
UserRegistrationContainer. The folder is created if it does not exist. It has the facetRegistrationConfigurationto store the configuration name of the request object. - The user registration request documents have the type
UserRegistrationthat store all request metadata (username, email etc) thanks to theUserInvitationfacet.
How to Contribute a New "User Registration Request" Document Type
See the page How to Contribute a New "User Registration Request" Document Type.
- Authentication and User Management (developer documentation)
- How to Contribute a New "User Registration Request" Document Type
- Managing Users and Groups (user documentation)
- Setup Best Practices (admin documentation)