The Nuxeo Cloud Customer Console is the cloud interface from where the customers can access the development, preproduction, and production environments set up by Nuxeo. The development and preproduction environments in the console provide our customers with increased self service capabilities, such as building Dedicated Customer Images and deploy them to Customer Environments. Our long-term goal is to enable more self-service capabilities allowing customer increased visibility to hosted Nuxeo Cloud environments and related information.
Environments
By default, the following environments are available from the Nuxeo Cloud Customer Console.
- Development environment (DEV): Initial environment for implementing and developing changes.
- Pre-production environment: A replication of the production environment before creating the production environment. The pre-production environment can be scaled down to minimize cost.
- Production environment: The environment that is used to fulfill customer's business requirements.
Each environment uses the same architecture with scalable infrastructure.
Build and deploy your application
The Nuxeo Cloud Customer Console introduces the ability to build and deploy a dedicated Nuxeo Docker Image to your Pre-Production Cloud Environment. The same Docker image can then be promoted to production at your request by the Hyland Cloud team.
- Image Build Pipeline - The Image Build Pipeline is defined in a Project that is preconfigured by the Cloud Service Team. It uses a Nuxeo+HF Base Docker image and combines it with your application Marketplace package and dependent add-ons to produce your Dedicated Customer Docker Image. The Image is managed in a Project that you have access to. This Dedicated Docker Image artifact can then be deployed to your Pre-Production & Production environments.
- Image Deployment Pipeline - The Deployment pipeline is used to deploy the Dedicated Customer Docker Image to a Development Sandbox, Pre-Production, or Production environment. The same Image Build and Deployment pipelines are used by the Nuxeo Cloud team. At this time, only the Nuxeo Cloud Team can deploy the Dedicate Customer image to your Production environment. The Nuxeo Customer Docker Image is an artifact that has a unique build number. The Nuxeo Cloud Customer Console references the build number to select and deploy to the Environment.
Overview Page
After logging into the Cloud Console, the Overview page appears which displays the following information:
- Customer Contact Information
- Link to Nuxeo Cloud documentation
- List of Production, Pre-Production and Development Sandbox Environments
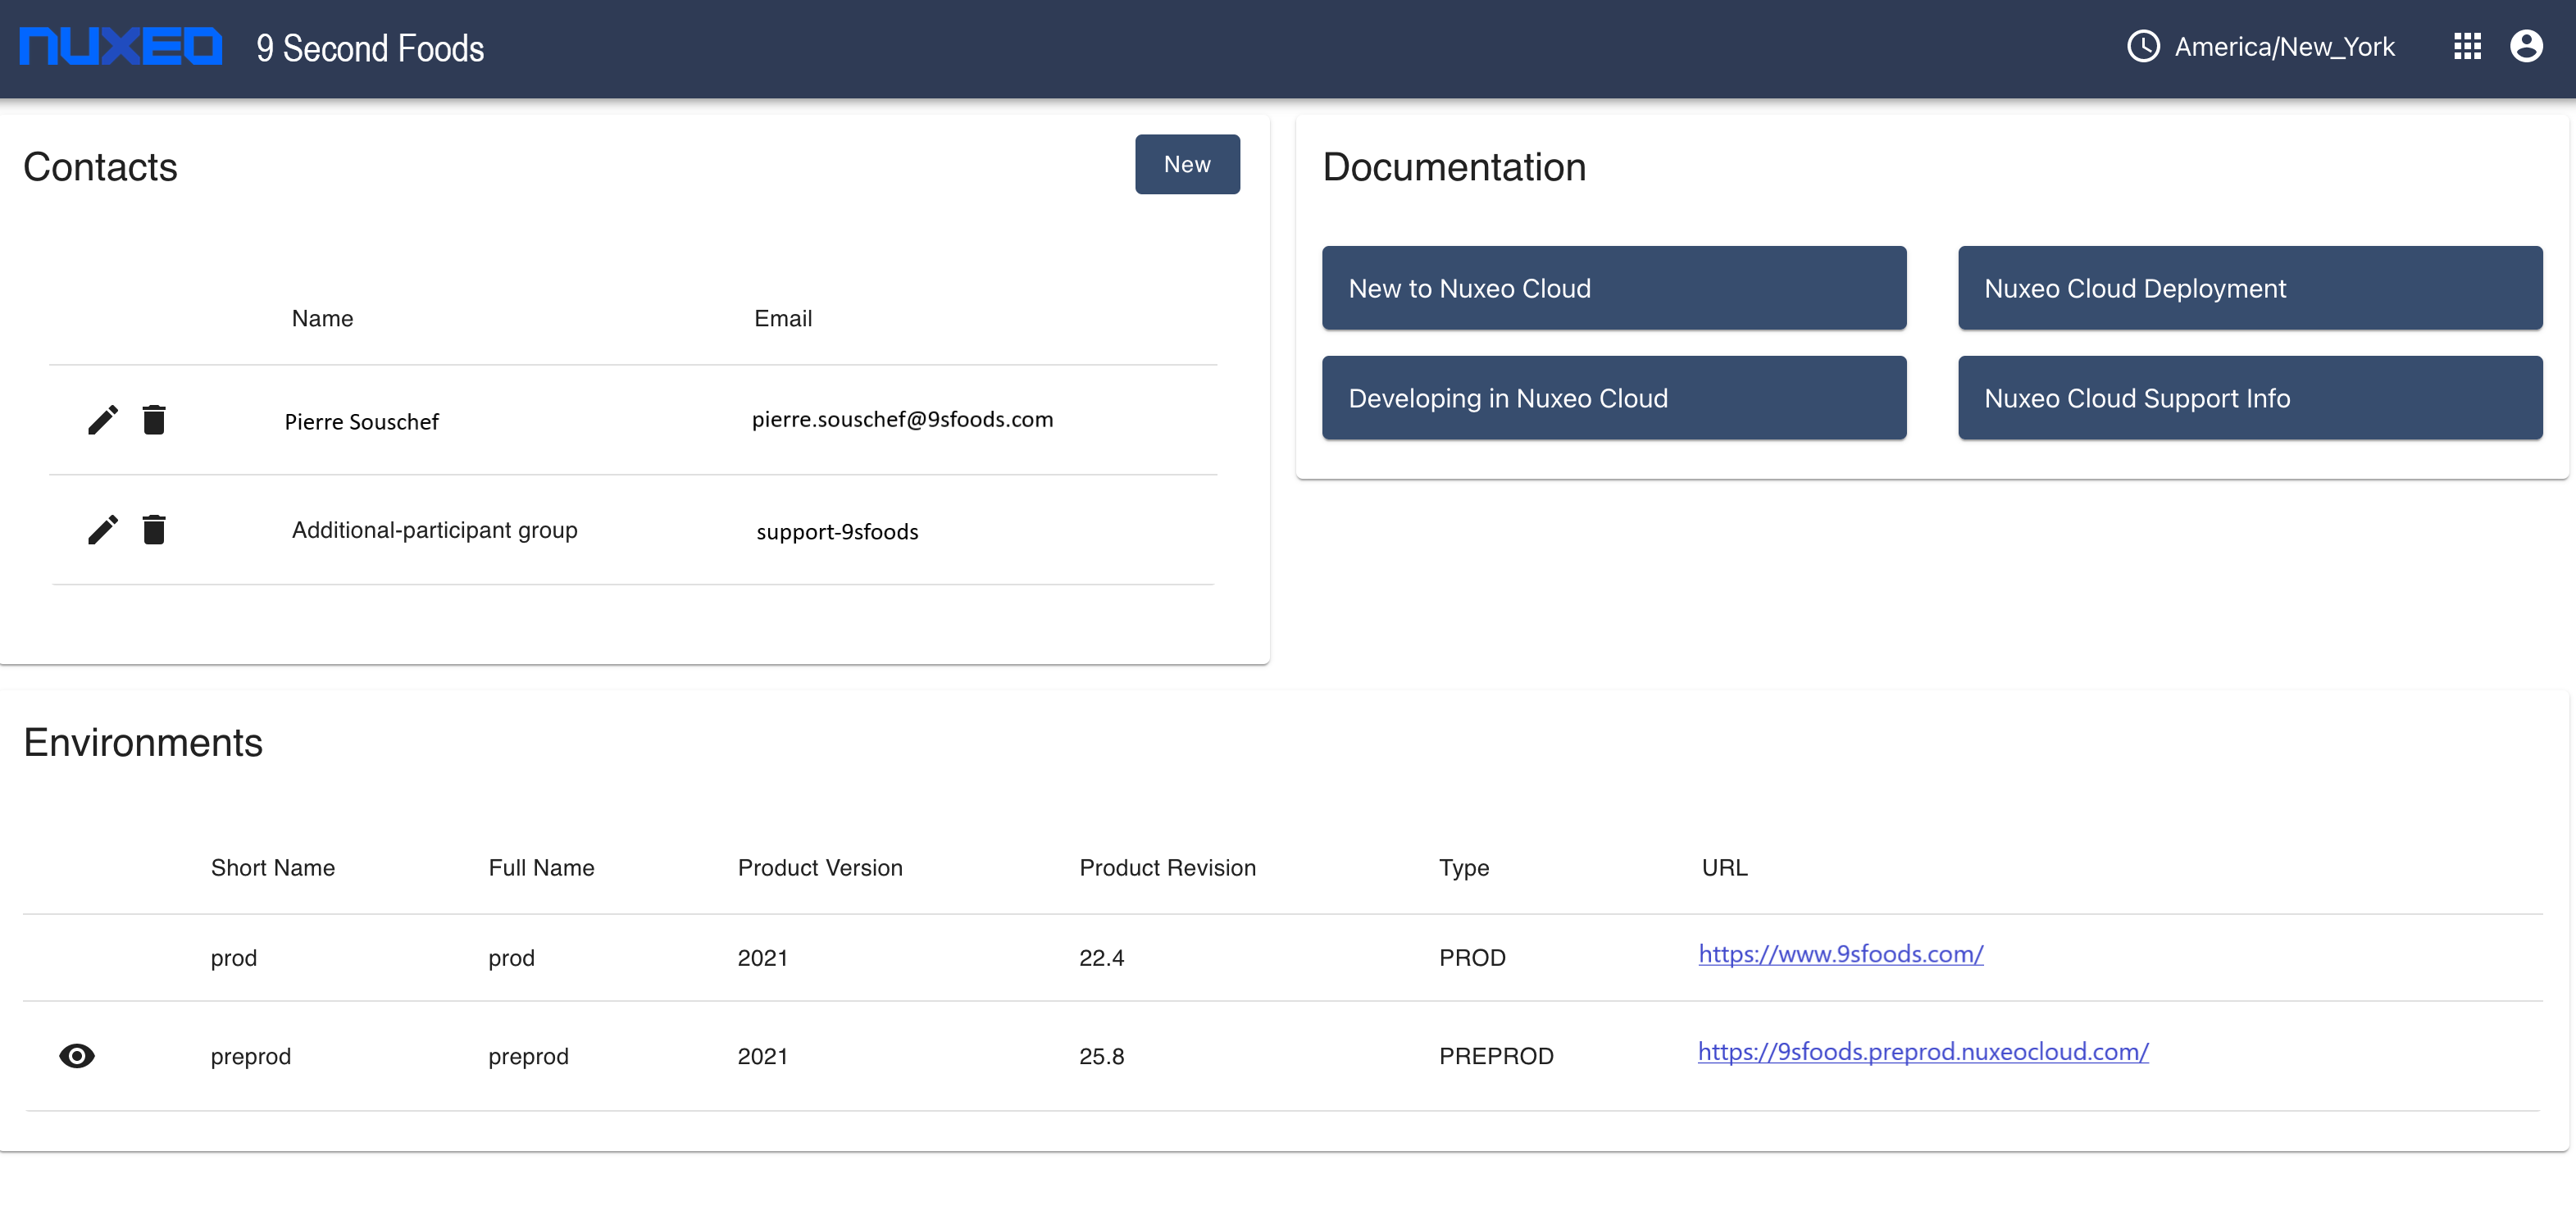
Contacts section
The Contacts section displays the contact information of the customers. Our support team refers to this information to communicate any updates or information regarding their environments. From this section, customers can add, remove, or edit their contact information.
Environments section
The Environments section lists development sandbox, pre-production, and production environments. Environment details can be accessed by clicking on the “eye” icon shown next to available environments listed on the Overview Page. At this time customers can only view and schedule deployments to Pre-Production and Development Sandbox environments within the Cloud Console. Production deployment requests must be made by submitting a Jira SUPNXP ticket.
Product Version and Product Revision
For each environment, we display the Product Version and the Nuxeo Product Revision. These provide information on the latest HotFix deployed to each environment. Please note that versions are dynamically retrieved from the login page.
Nuxeo HotFixes
Nuxeo Cloud applies Nuxeo LTS Hotfixes to all cloud environments the first and second week of each month during the maintenance window. Nuxeo Cloud customer contacts are notified via email at least 1 week prior to the Hotfix deployment.
Our standard deployment is:
- Pre-Prod: Available to users the first Friday of the Month
- Prod: Available to users the second Friday of the Month
Current LTS Hotfixes are displayed for each environment in the Nuxeo Customer Cloud Console. Pre-production environments can be placed “On Hold” for scheduled monthly Hotfix updates via the Customer Cloud Console.
- Log onto Nuxeo Cloud Console
- Select Pre-Production Environment by selecting the “eye” icon
Under “Config” dropdown in the top left corner of the page, select “Edit HotFix Hold”
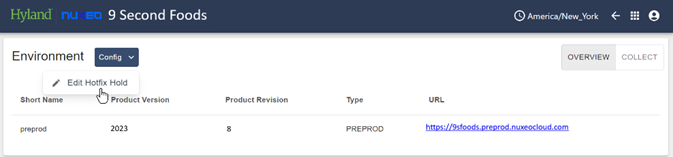
Select “Yes” to add or select “No” to remove a hold to the selected Pre-Production environment, and then select “Save”.
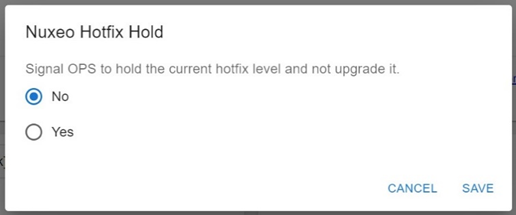
If a hold is removed, the environment will be included in the next HF deployment and be updated to the HF’s outlined in that release.
Customers may also request to update environments outside of the HotFix window via separate SUPNXP tickets without delaying or placing an environment “on hold”. These should be communicated to the Nuxeo Cloud team via SUPNXP Jira tickets.
Environment Details and Deployments
Environment details for the selected environment are shown on this page.
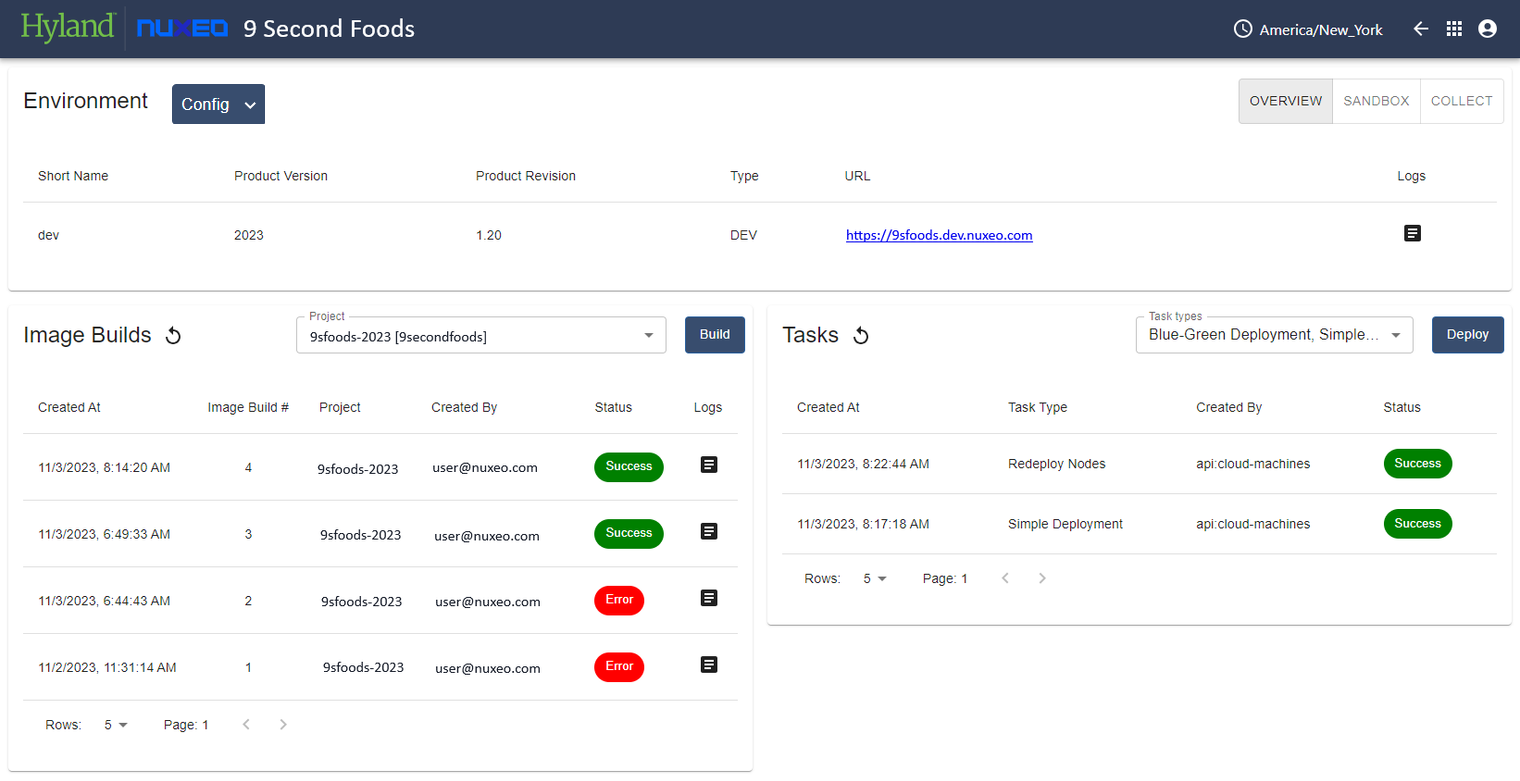
Development Sandbox
For development sandbox environments customers are able to view environment details, recent Image Builds and Logs and Tasks, as well as initiate new Image Builds or Deployments. There are also sub-pages for sandbox and collecting data on the development sandbox environment.
Prerequisites
To start working on your Development Sandbox, ensure that you have access to the following repositories.
- Git repository with adequate permissions to add an SSH deploy key
- Cloud Console
Pre-Production
For pre-production environments customers are able to view environment details, recent Image Builds and Logs, recent and scheduled Deploys, as well as initiate new Image Builds or Deploys. There is also a sub-page for collecting data on the pre-production environment.
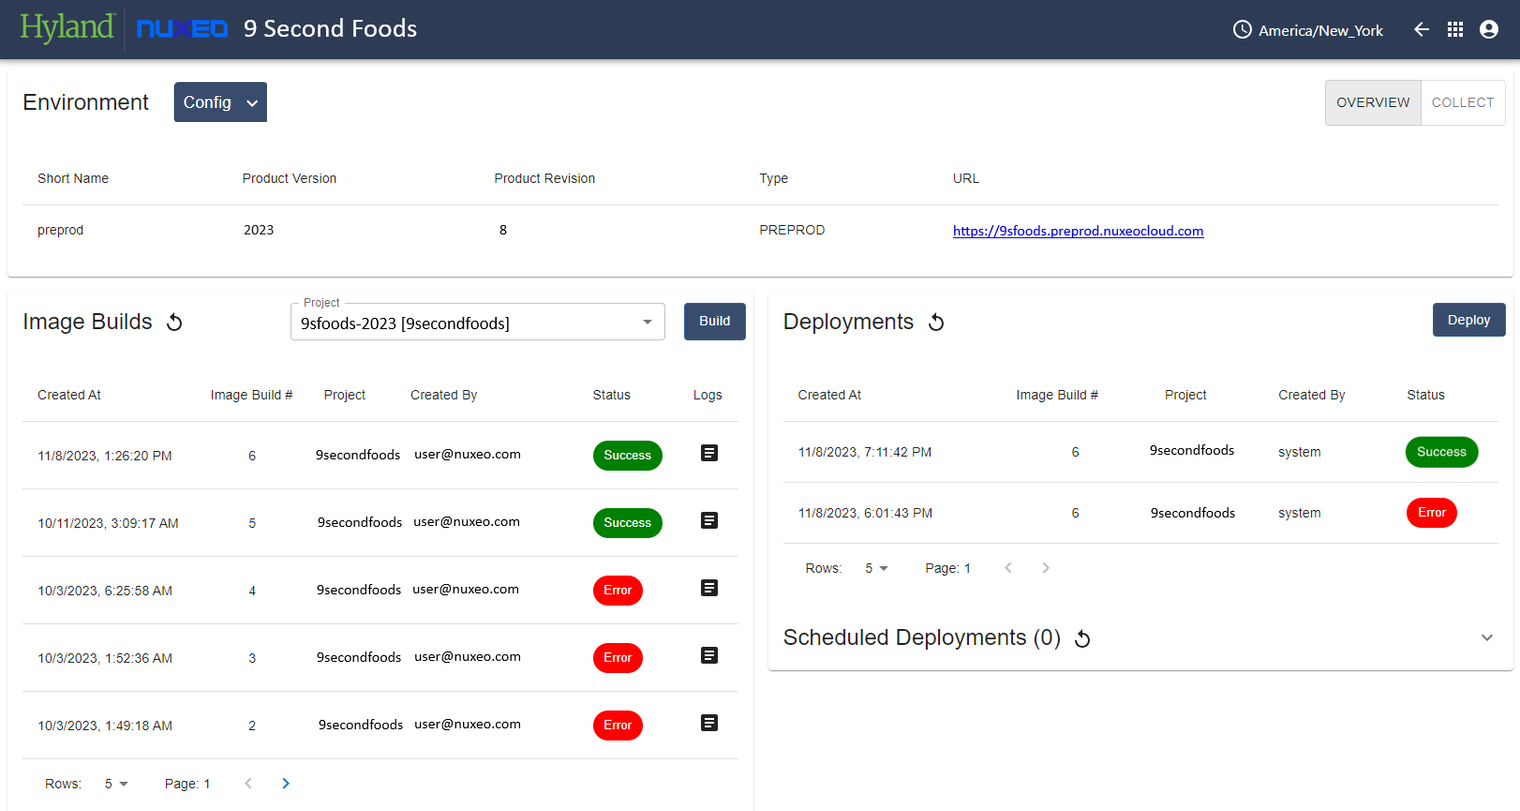
Image Builds
The Customer Cloud Console gives users the ability to create a new Docker Image Build that can be deployed to development sandbox or pre-production environments.
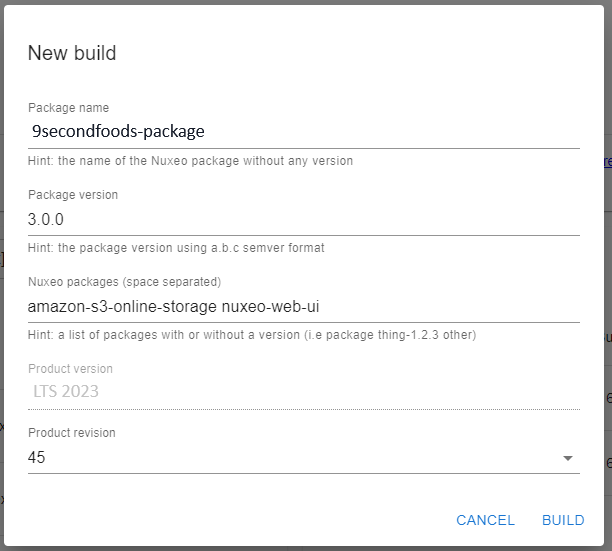
Image builds can also be filtered by Project in the dropdown at the top of the Image Builds table. This dropdown feature shows projects being run in pre-production or development sandbox environment.
When creating a new Image Build, customers are asked to provide the following:
- Package Name The name of the Nuxeo Marketplace Package to be used.
- Package Version The version of the Nuxeo Marketplace Package to be used. NO _SNAPSHOT build is permitted in the Preprod/Prod environments. You must create a fully versioned marketplace package.
- Nuxeo Packages There will be a list of packages/add-ons for the environment, which should not be altered. You can include additional add-ons that your application requires. You can also add dependent packages in your marketplace application to install as dependencies instead of listing them here. There are Cloud Based packages that you should not remove (amazon-s3-online-storage, nco-cloud). If you have questions, please ask our support team.
- Product Version This is the Nuxeo Version that will be predefined in the Project by the Cloud Team. If you need to create a new Docker Image for a specific Nuxeo version, please open a request and we will create a new Project for you.
- Product Revision The Nuxeo Hotfix version to be used.
Tasks
Located on the right side of the development sandbox overview page, there is a table for environment tasks. This table shows all recent pending, processing, and completed actions and deployments in the development sandbox environment.
Task Types
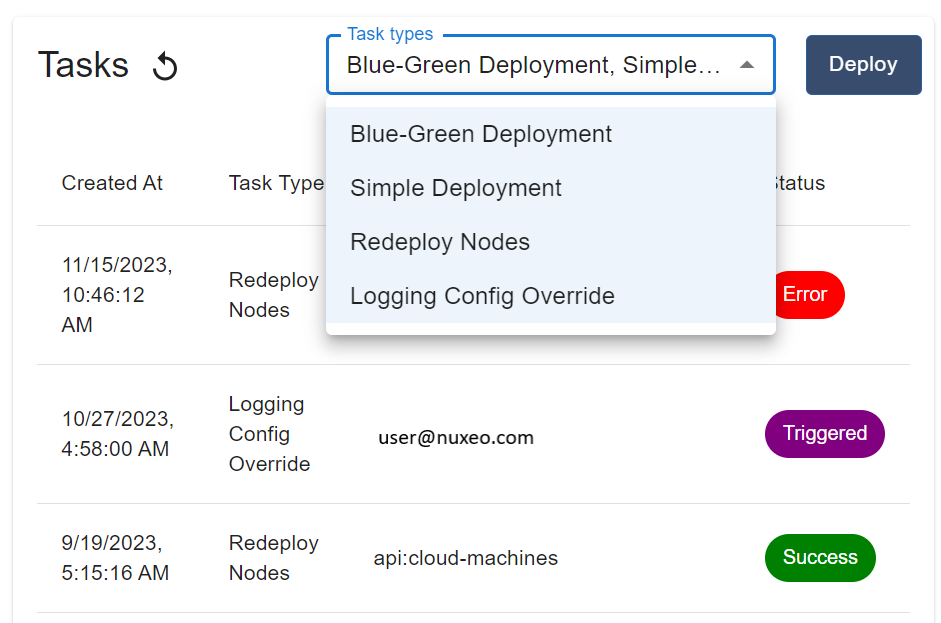
The task table can be filtered by the different task types that are listed there. By selecting this dropdown and selecting or deselecting the task type options, you can view the corresponding tasks.
Deployment
The Cloud Console provides customers with the ability to deploy an Image to development sandbox environments and pre-production.
Deployment Types
Blue-Green Deployment:
Available for pre-production and production environments. This deployment type brings up a new stack and brings it online when it is fully working. In case of failure, the new stack is destroyed and the previous remains online.
Simple Deployment:
During this deployment, the stack is updated, and the nodes are redeployed using the “Re-deploy Task”. This deployment type is used for development sandbox, test, and UAT environments and it is faster than a blue-green deployments.
Deployments by Environment
Development Sandbox Environments
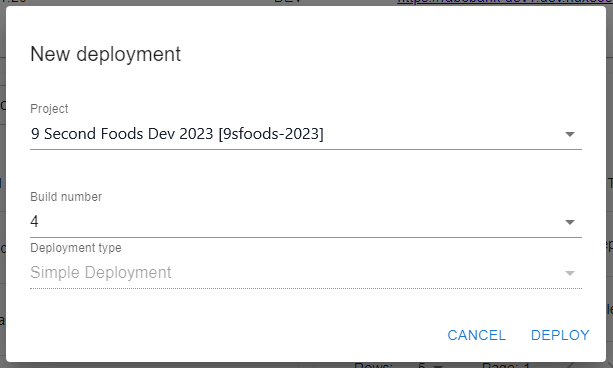
When creating a new development sandbox deployment, the customer is asked to identify the following:
- Project: Name of the project where the build is generated for deployment.
- Build number: The build number is created as a result of the image build process.
- Deployment Time: Simple Deployment is selected by default.
Pre-Production Environments
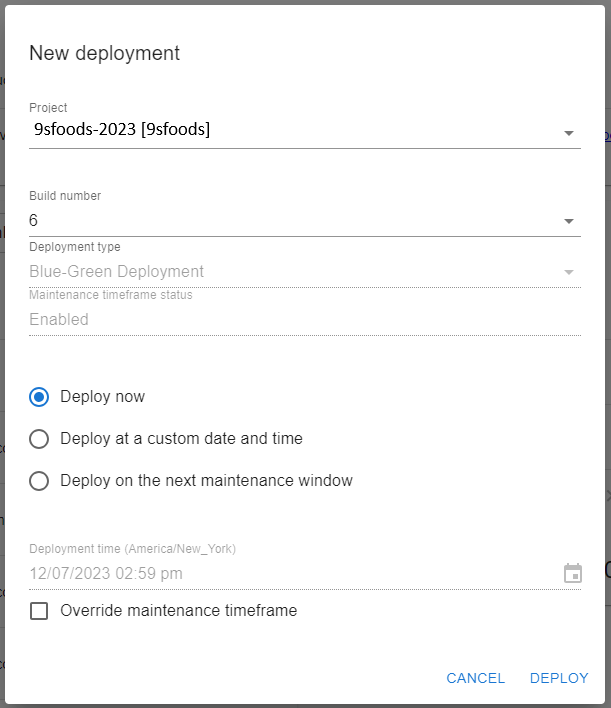
When creating a new pre-production deployment, the customer is asked to identify the following:
- Image Build: The image build number created as a result of the image build process.
- Deployment type: Simple Deployment is selected by default.
- Maintenance timeframe status: Displays whether maintenance timeframe is enabled or disabled for your environment.
- Deploy Now: Will start the deployment right after you press the deploy button.

- Deploy at a custom date and time: Allows you to schedule a time for deployment.
- Deploy on next maintenance window: This option will deploy during the next predefined Maintenance window. The Deployment Time will show as a read only and display the maintenance window start time.
- Override maintenance timeframe: Select this check box if you want to deploy outside the maintenance timeframe. If you attempt to deploy outside the maintenance timeframe without selecting the check box, an error is displayed.
Production Environment
Production deployments can be requested by following the Jira ticketing process which can be found here. Jira tickets should include the Project and the Build Number when requesting Production Deployments to ensure that the correct Build Image is deployed to Production.
Maintenance Windows
All Customers have a pre-defined Maintenance Window for performing deployments. Customers have the option to perform Pre-Production deployment during the next scheduled maintenance window by selecting the Deploy during next maintenance window checkbox.
The standard maintenance window for each region is as follows:
- US Customers - 12AM - 2AM ET Daily
- EU Customers - 12AM - 2AM CST Daily
- APAC Customers - 12AM - 2AM JST Daily
Maintenance Windows are defined in your Cloud Service Agreement. If you have questions, please contact your Customer Service representative.
Deployment Status and Details
Additional deployment information regarding the success or failure of the deployment can be found in the deployments table. More information will be provided on commonly found errors in the future. Deployment errors can be resolved by creating a Jira SUPNXP ticket to notify the Nuxeo Cloud team of the error.
Scheduled Deployments
When pre-production deployments are scheduled using a custom deploy time outside of their standard maintenance window, deployments will appear in the Scheduled Deployments table on their pre-production environment details page. Once scheduled deployments have been initiated, they will appear alongside previous deployments in the Deployments table. Scheduled deployments can also be deleted if the timeframe or other deployment details are no longer accurate.
Development Sandbox Features
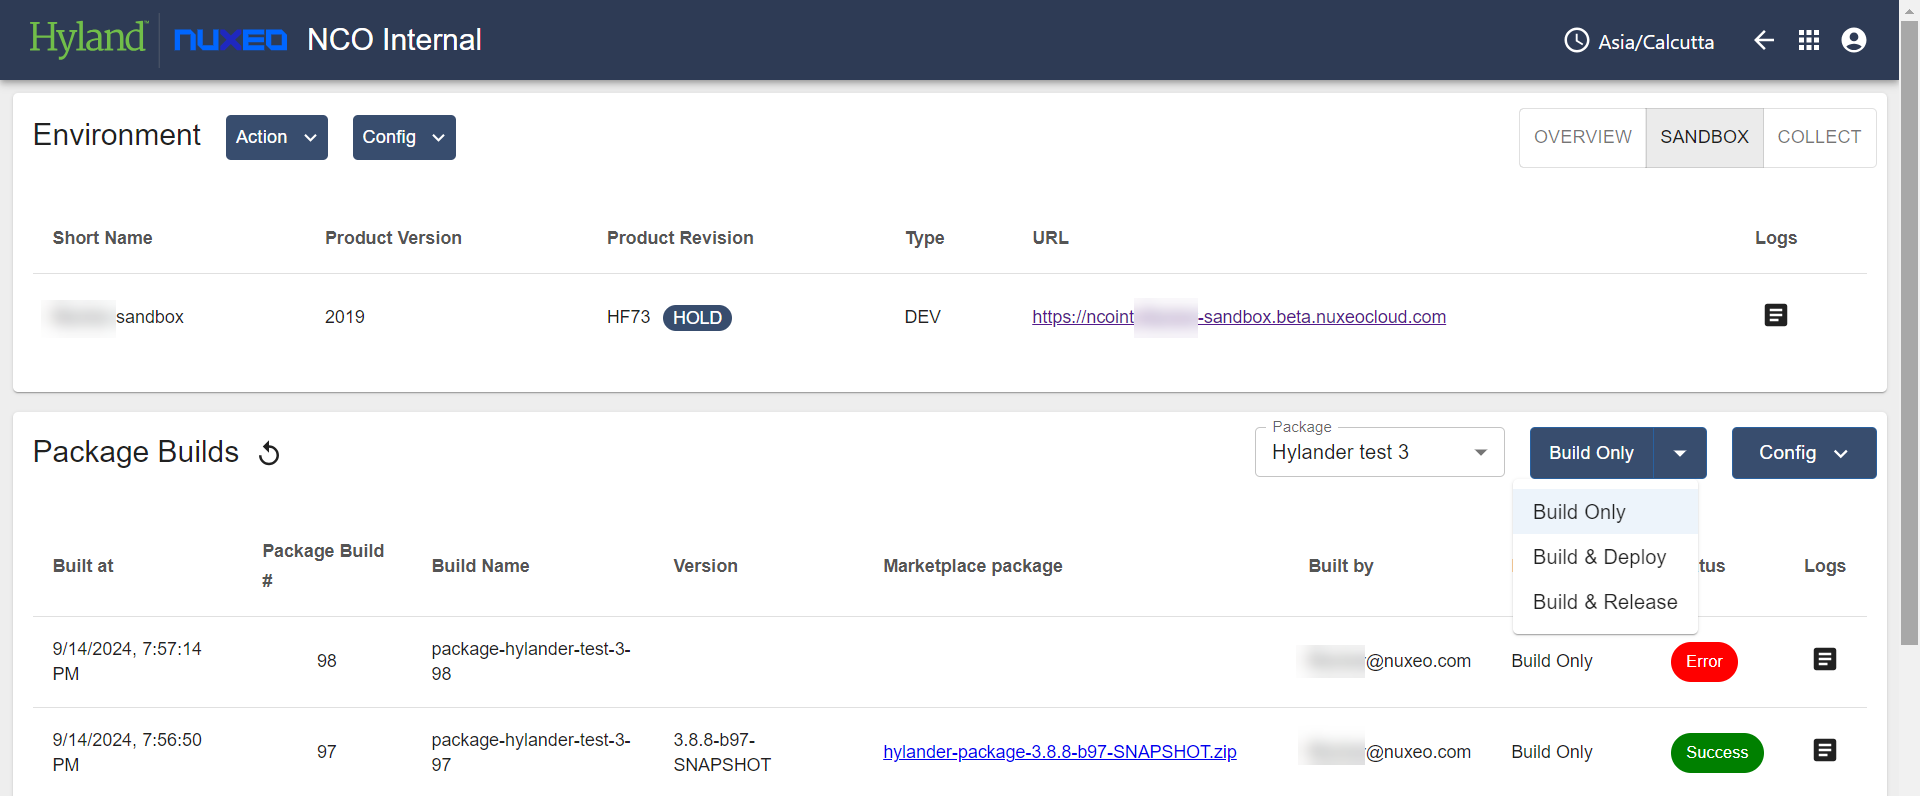
Package Builds
Packages can be initiated in the Sandbox sub-page by selecting either of the following options from the drop-down on the Package Builds section:
- “Build Only”
- “Build & Deploy”
- “Build & Release”
Package Configuration
You must configure your packages to start working on them. The following settings must be configured:
- Set up your repository
- Set the default Git branch
- Optional. For multiple projects, add the project folder
- Set up commit templates
- Set up tags templates
- Ensure that an SSH key is installed on your repository
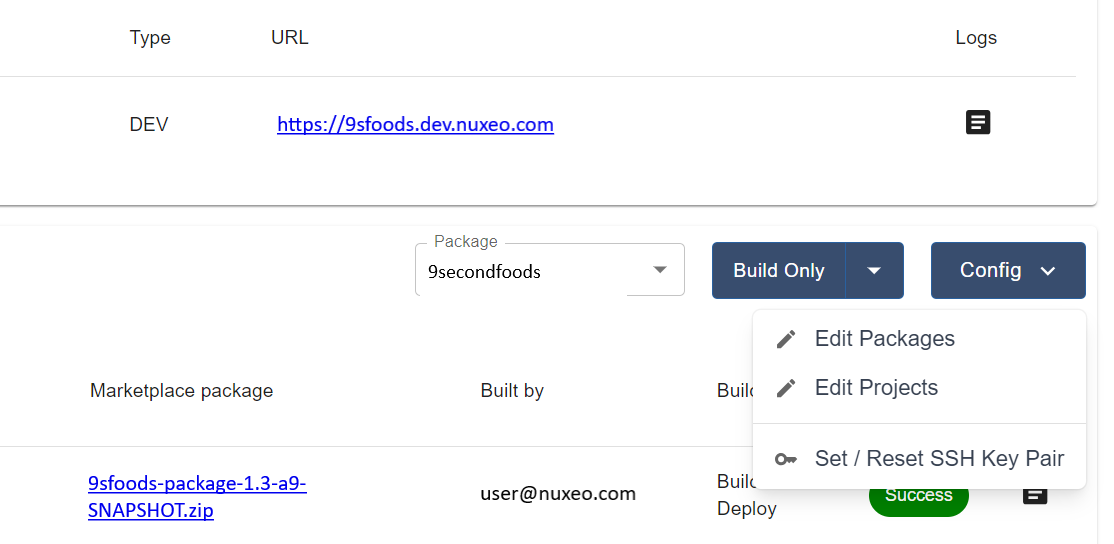
Note: After you select an environment in the Nuxeo Cloud Console, if you want to check whether an SSH key exists for a package, navigate to the SANDBOX tab, and in the Package Builds section, from the Config drop-down, click on either of the following options to check the SSH key pair status field:
- Edit Packages - When you click this option, the Edit packages dialog box opens, where you must select the REPOSITORY tab to view the SSH key pair status field. If a SSH key pair exists, the value is set to Available.
- Set/Reset SSH Key Pair - Clicking this option generates a SSH key pair if an SSH key pair is not available. If an SSH key pair exists, a popup message confirms that the key pair already exists.
Build and release your packages
After you build your packages from the development sandbox, you can release them to the marketplace. To build and release your package, complete the following steps.
- After logging in to Nuxeo Cloud Console, from the Environments section, click the view icon beside your environment.
- In the Environment page, select the Sandbox tab to navigate to the development sandbox environment.
- In the Package Builds section, from the Package drop-down select your package.
- From the Build actions drop-down, select Build and Release and click it.
- In the Build and release package dialog box, complete the following steps.
- Add the Git branch where you want to release the package.
- From the Release version bump options, select the version you want to release.
- From the Post-release version bump options, select the version on which the development would continue after the release.
- Click Build to initiate the build.
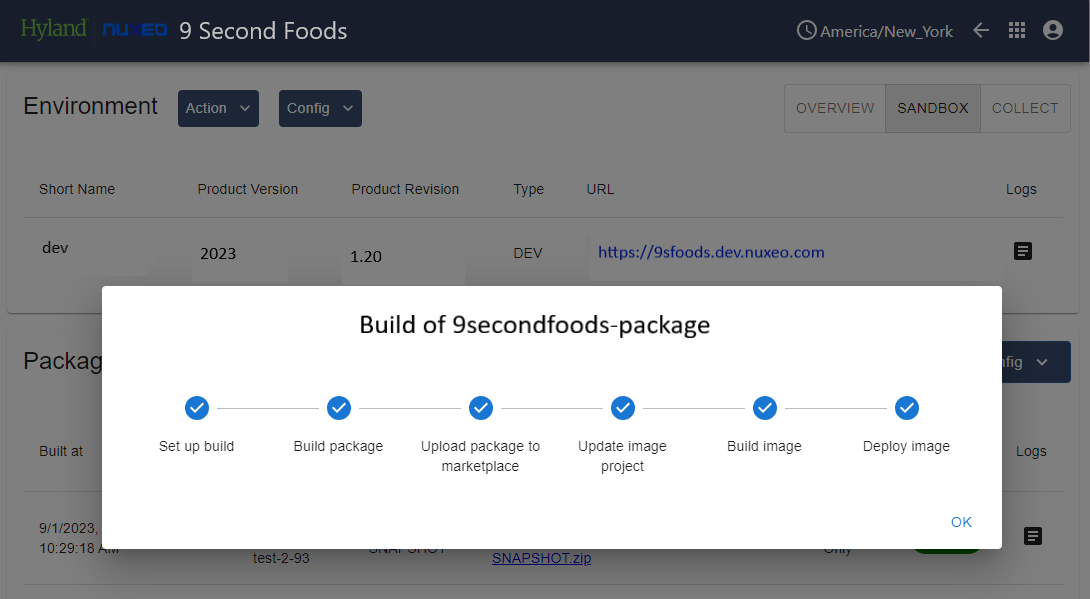
Tasks and Package Build/Deploy Pipeline Status
Additional details are provided for development sandbox tasks, package builds, and package deployments. The details of a task, package build, package deployment, and various other parameters can be viewed by selecting a row which denotes a package build. You can check the status of a package by selecting the status listed for the respective item.
Environment Configuration
Redeploy Nodes
Environment nodes can be re-deployed by selecting the “Action” dropdown and “Redeploy Nodes”.
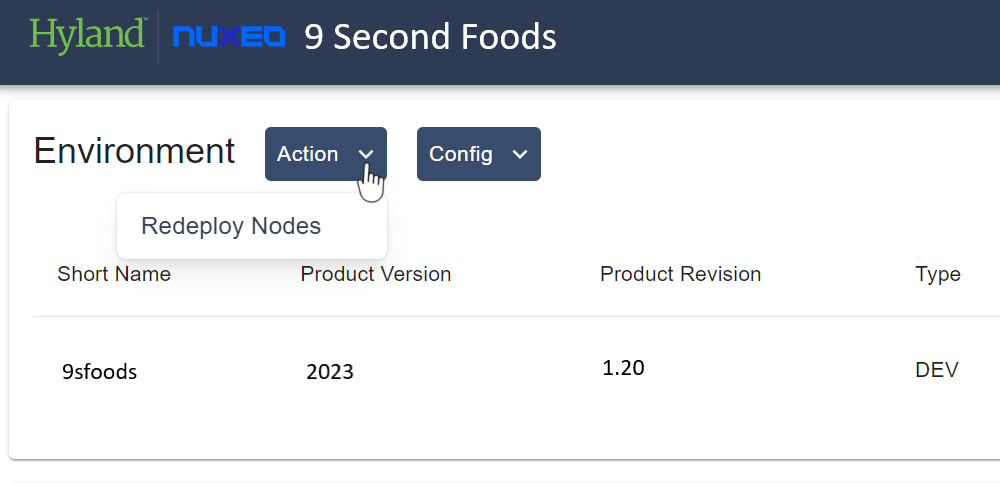
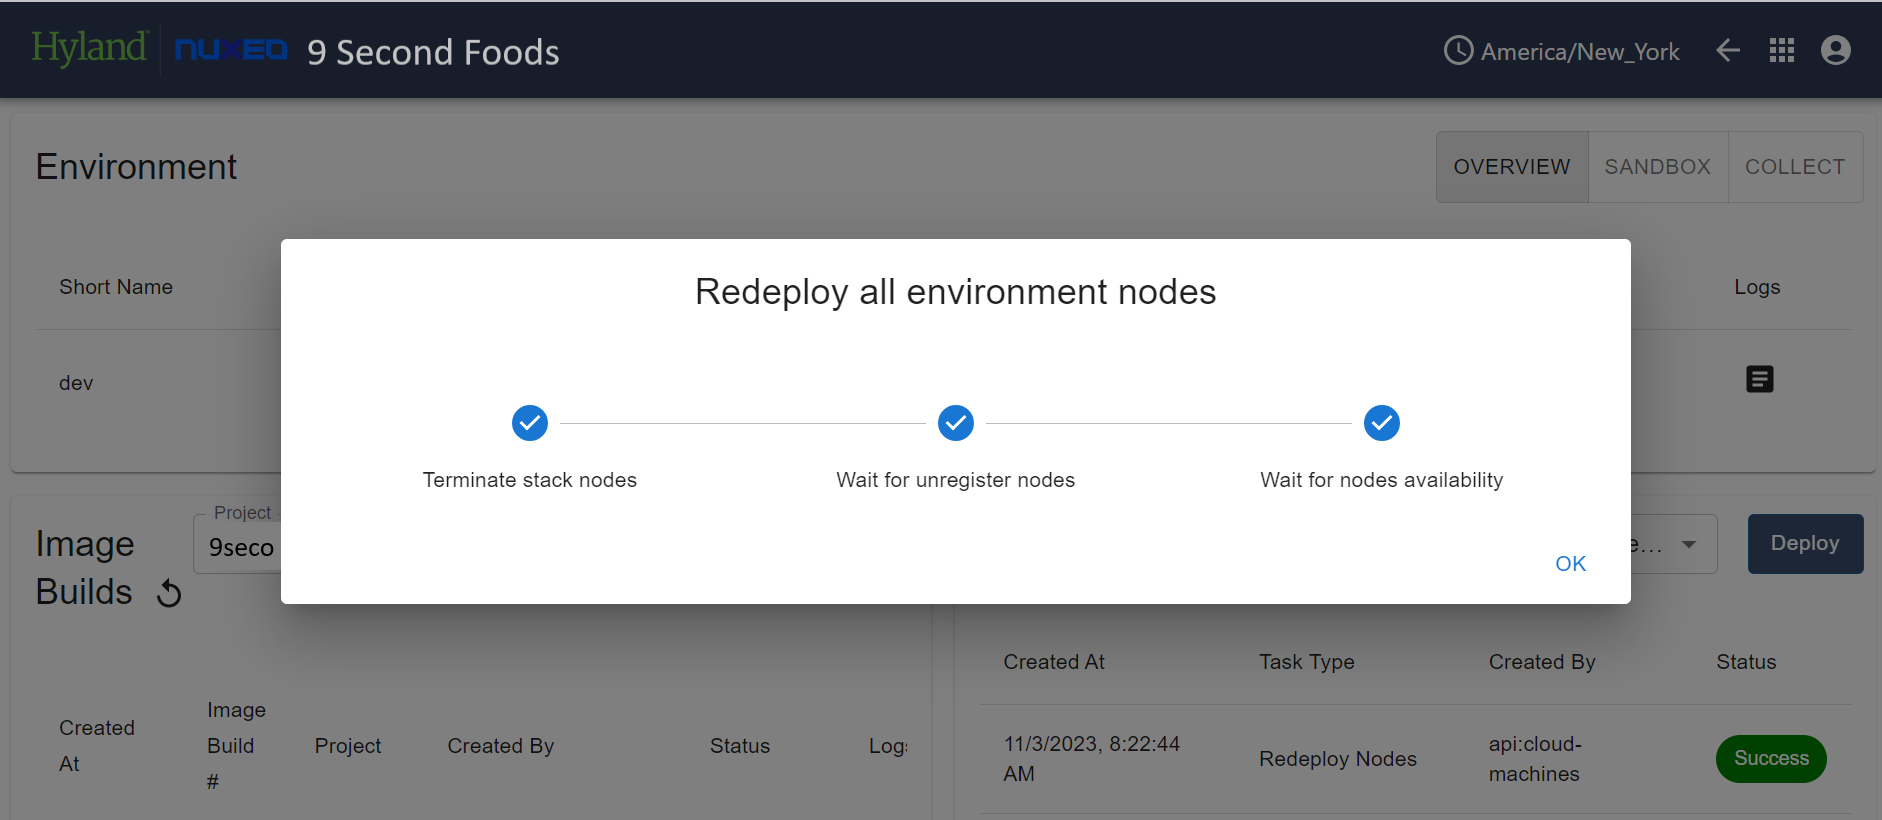
Once selected, a confirmation message will appear. After the user confirms and selects “Redeploy Nodes” on this message, the existing nodes are terminated, and new nodes are created.
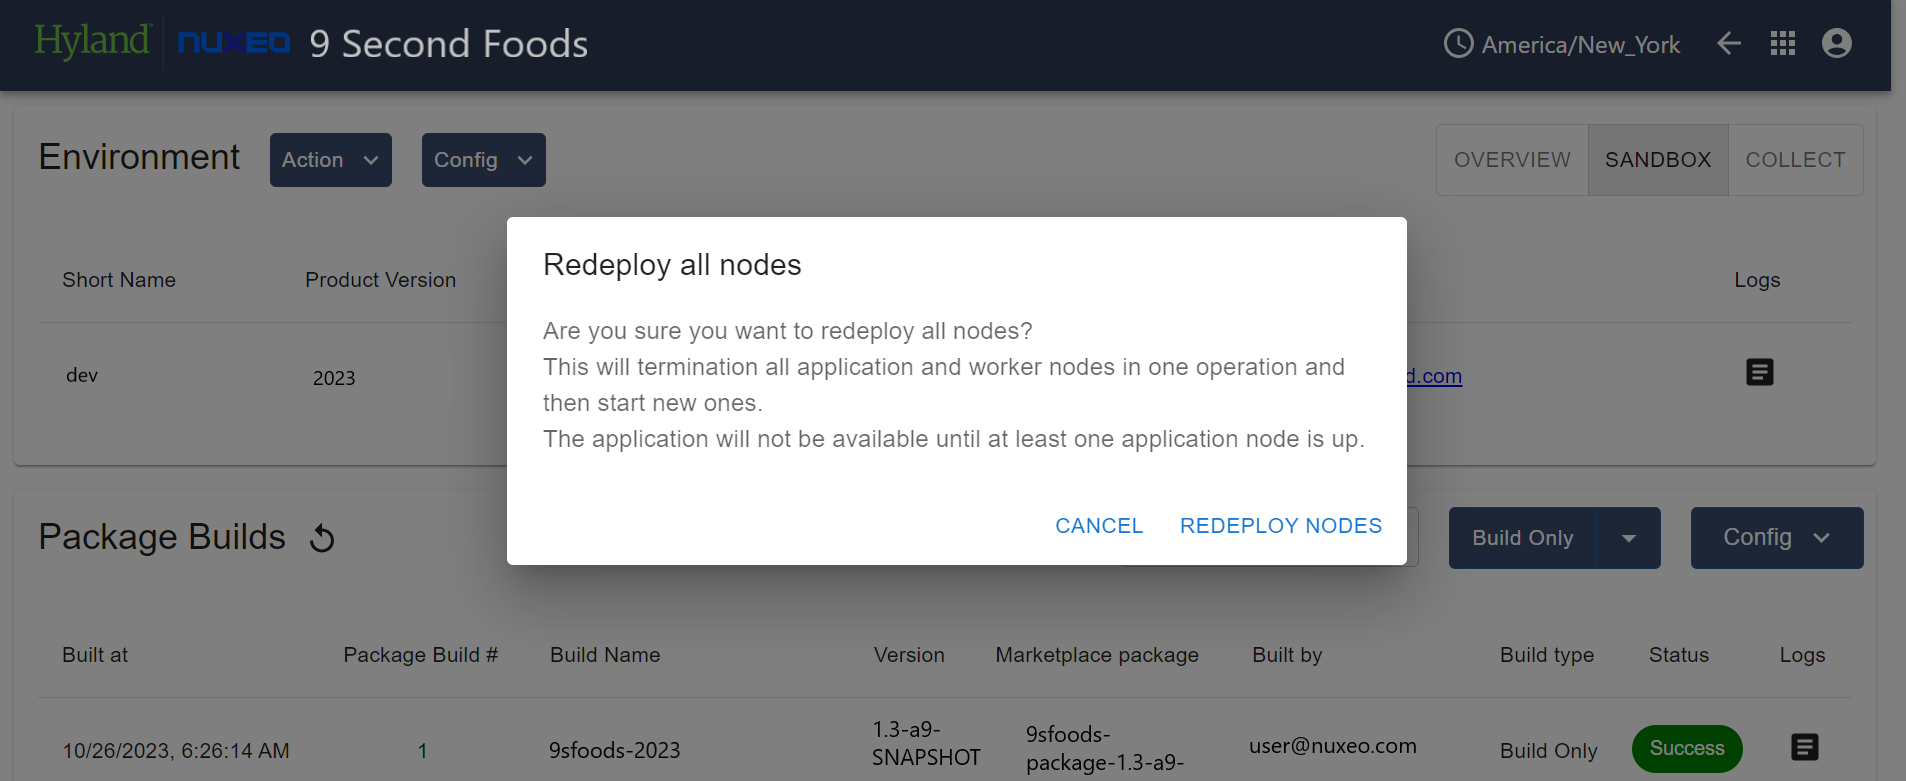
The status of the redeploy nodes action can be monitored on the Overview page in the Tasks table. Details can be viewed by selecting the current status shown next to the redeploy nodes task.
Log Override
Users can edit and update the development sandbox log configuration by completing the following steps:
- Navigate to the Sandbox environment.
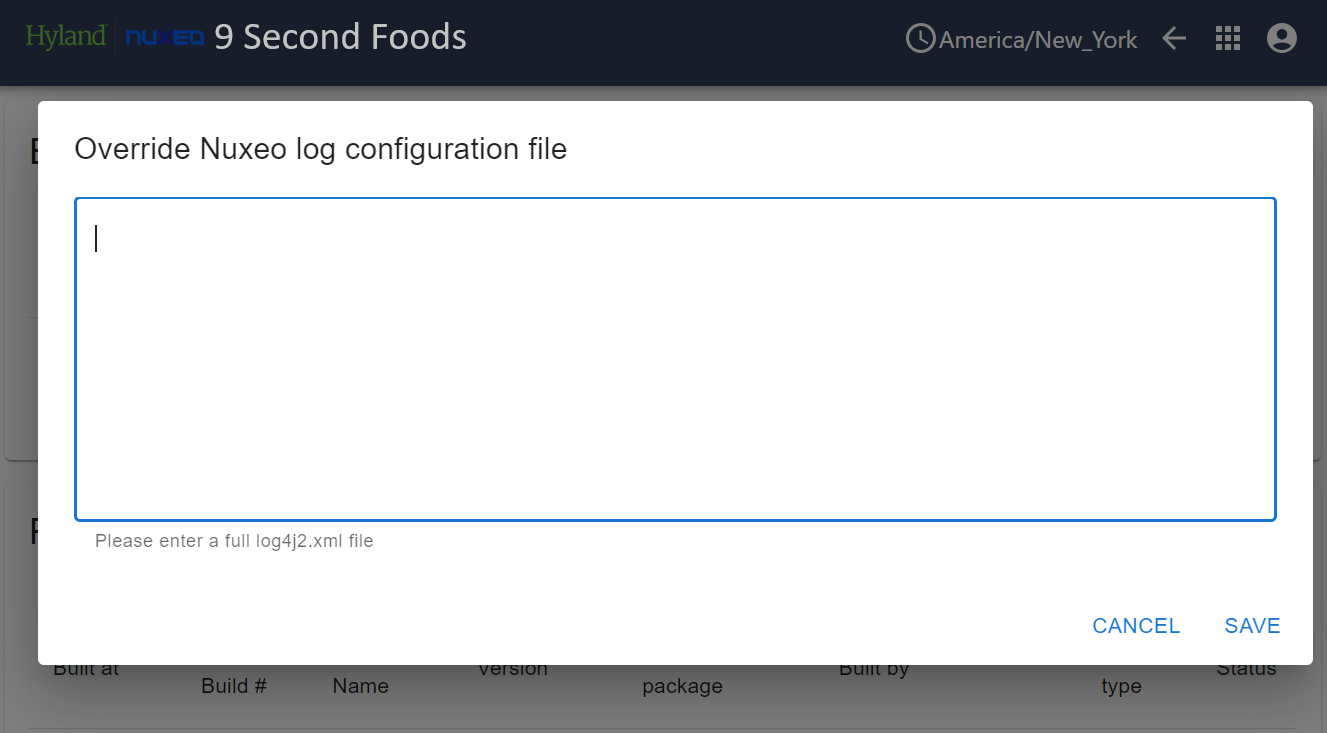
- From the Environments panel, click the Config drop-down and select Edit Log Override.
- In the Override Nuxeo log configuration dialog box, configure the log levels for the listed Class or package. To add a new class or package, complete the following steps.
- Click ADD. A new row appears.
- Add the class or package in the new row and select the appropriate log level. By default, INFO is selected in the log level.
Once the changes have been entered into the text field and the “Save” button has been selected, there is an automatic trigger to create a log override task and re-deploy the environment nodes.
Customers can monitor the log override status in the tasks table as it’s running, and when the new configuration is available it will show in the task table as “Success”.
Secrets
If you have secrets, you can enter those in this window. Then if customers would like to have the secrets added to the “Cloud Stack Secrets Manager”, you can communicate that to the Nuxeo Cloud Operations team to update this for you.
Configuration Override
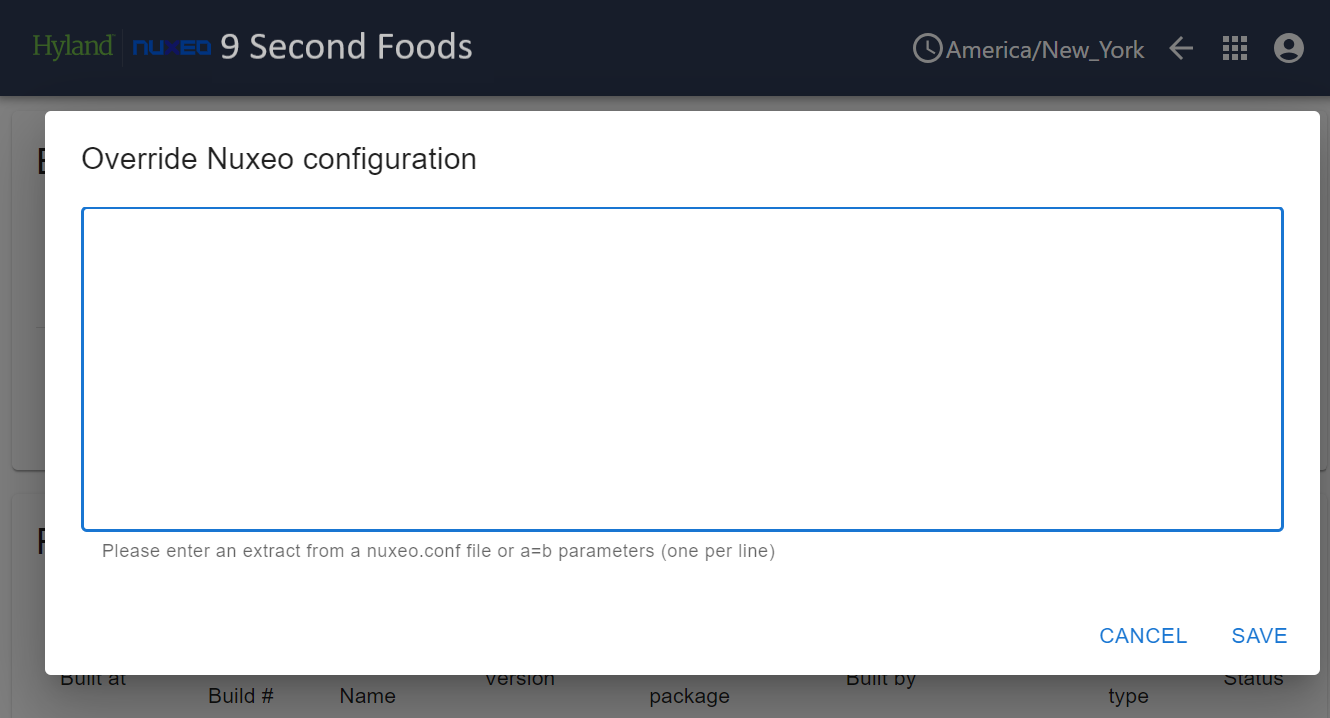
Users can edit and update the development sandbox override configuration by entering an extract from a nuxeo.conf file or a=b parameters (one per line) into the populated window below. This window can be accessed by selecting the “Config” dropdown and “Edit Log Override”. The configuration file can be edited or updated at any time.
Please wait for any running Deploy or Log Override to complete to save any Configuration Override changes to ensure all changes are consistent. If a Configuration Override is saved while another task is processing, redeploying nodes once all tasks are complete will resolve any inconsistencies.
Once the changes have been entered into the text field and the “Save” button has been selected, the changes won’t be applied until the nodes have been re-deployed.
Additional details and examples of nuxeo.conf files that can be used for this feature can be found on the related documentation page.
Package Configurations
Edit Packages, Edit Projects, and Set/Reset SSH Key Pair can be accessed from the dropdown button located in the upper right-hand corner of the Package Build table on the sandbox page.
Edit Packages
Once a package has been created by the NCO team, a package can be edited by selecting “Edit Packages” from the Config dropdown. In the Edit packages popup, you can edit the Package project, the repository, and the release settings.
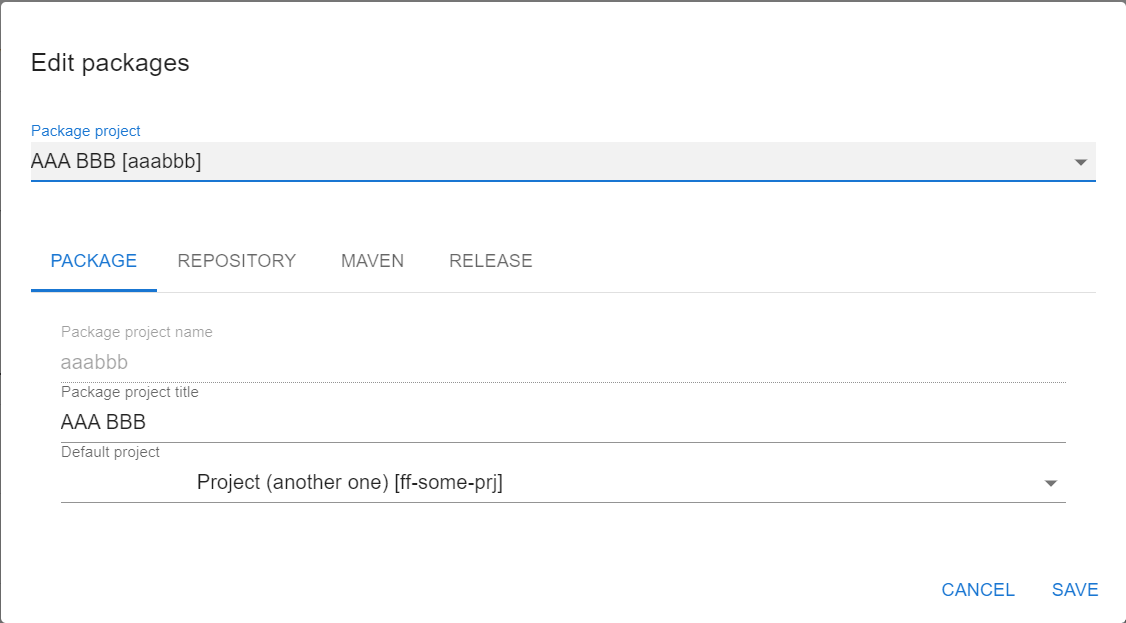
- Package Project: Displays the package project to be edited.
Information related to the package project is organized under four tabs, which are explained below:
- PACKAGE
- REPOSITORY
- MAVEN
- RELEASE
Information that can be edited under each of these tabs is explained below:
PACKAGE
- Package project title: The package project title can be edited to any customizable name.
- Default project: The project to be selected from available development projects.
REPOSITORY
- Git repository URL: SSH related Git URL (Example: [email protected]:myorg/myrepo.git)
This URL is not limited to GitHub. The console is compatible with other code repositories like BitBucket, as long they support SSH keys. - Git default branch name: The default branch name in Git.
- Git project folder: Specify the project folder for the package if multiple projects are hosted in the repository.
MAVEN
- Build Maven phase: Select the appropriate Maven Build lifecycle phase.
- Release Maven phase: Select the appropriate Maven Build lifecycle phase.
RELEASE
- Studio package version property: Specify the property that generates the Nuxeo Studio package version.
- Release commit message: Defines the format in which the commit message is populated.
- Post-release commit message: Defines the format in which the post-release commit message is populated.
Edit Projects

- Project: Project to be edited.
- Project title: The package project title can be edited to any customizable name.
- Nuxeo Packages (space separated): There will be a list of packages/add-ons for the environment and should not be altered. You can include additional add-ons which your application requires. You can also add dependent packages in you MP application to install as dependencies instead of listing them here. There are Cloud Based packages that you should not remove (amazon-s3-online-storage, nco-cloud). If you have questions, please ask our support team.
Set / Reset SSH Key Pair
By selecting Set / Reset SSH Key Pair from the dropdown, the user can generate a local public SSH key. A confirmation window will appear when the Set / Reset SSH Key Pair, and by selecting Yes a new SSH key pair will be generated. Once generated, the new SSH Key Pair will be displayed only once, and the key must be updated in their GitHub repository deploy keys section manually. If a SSH key is lost, you must generate a new SSH key pair.