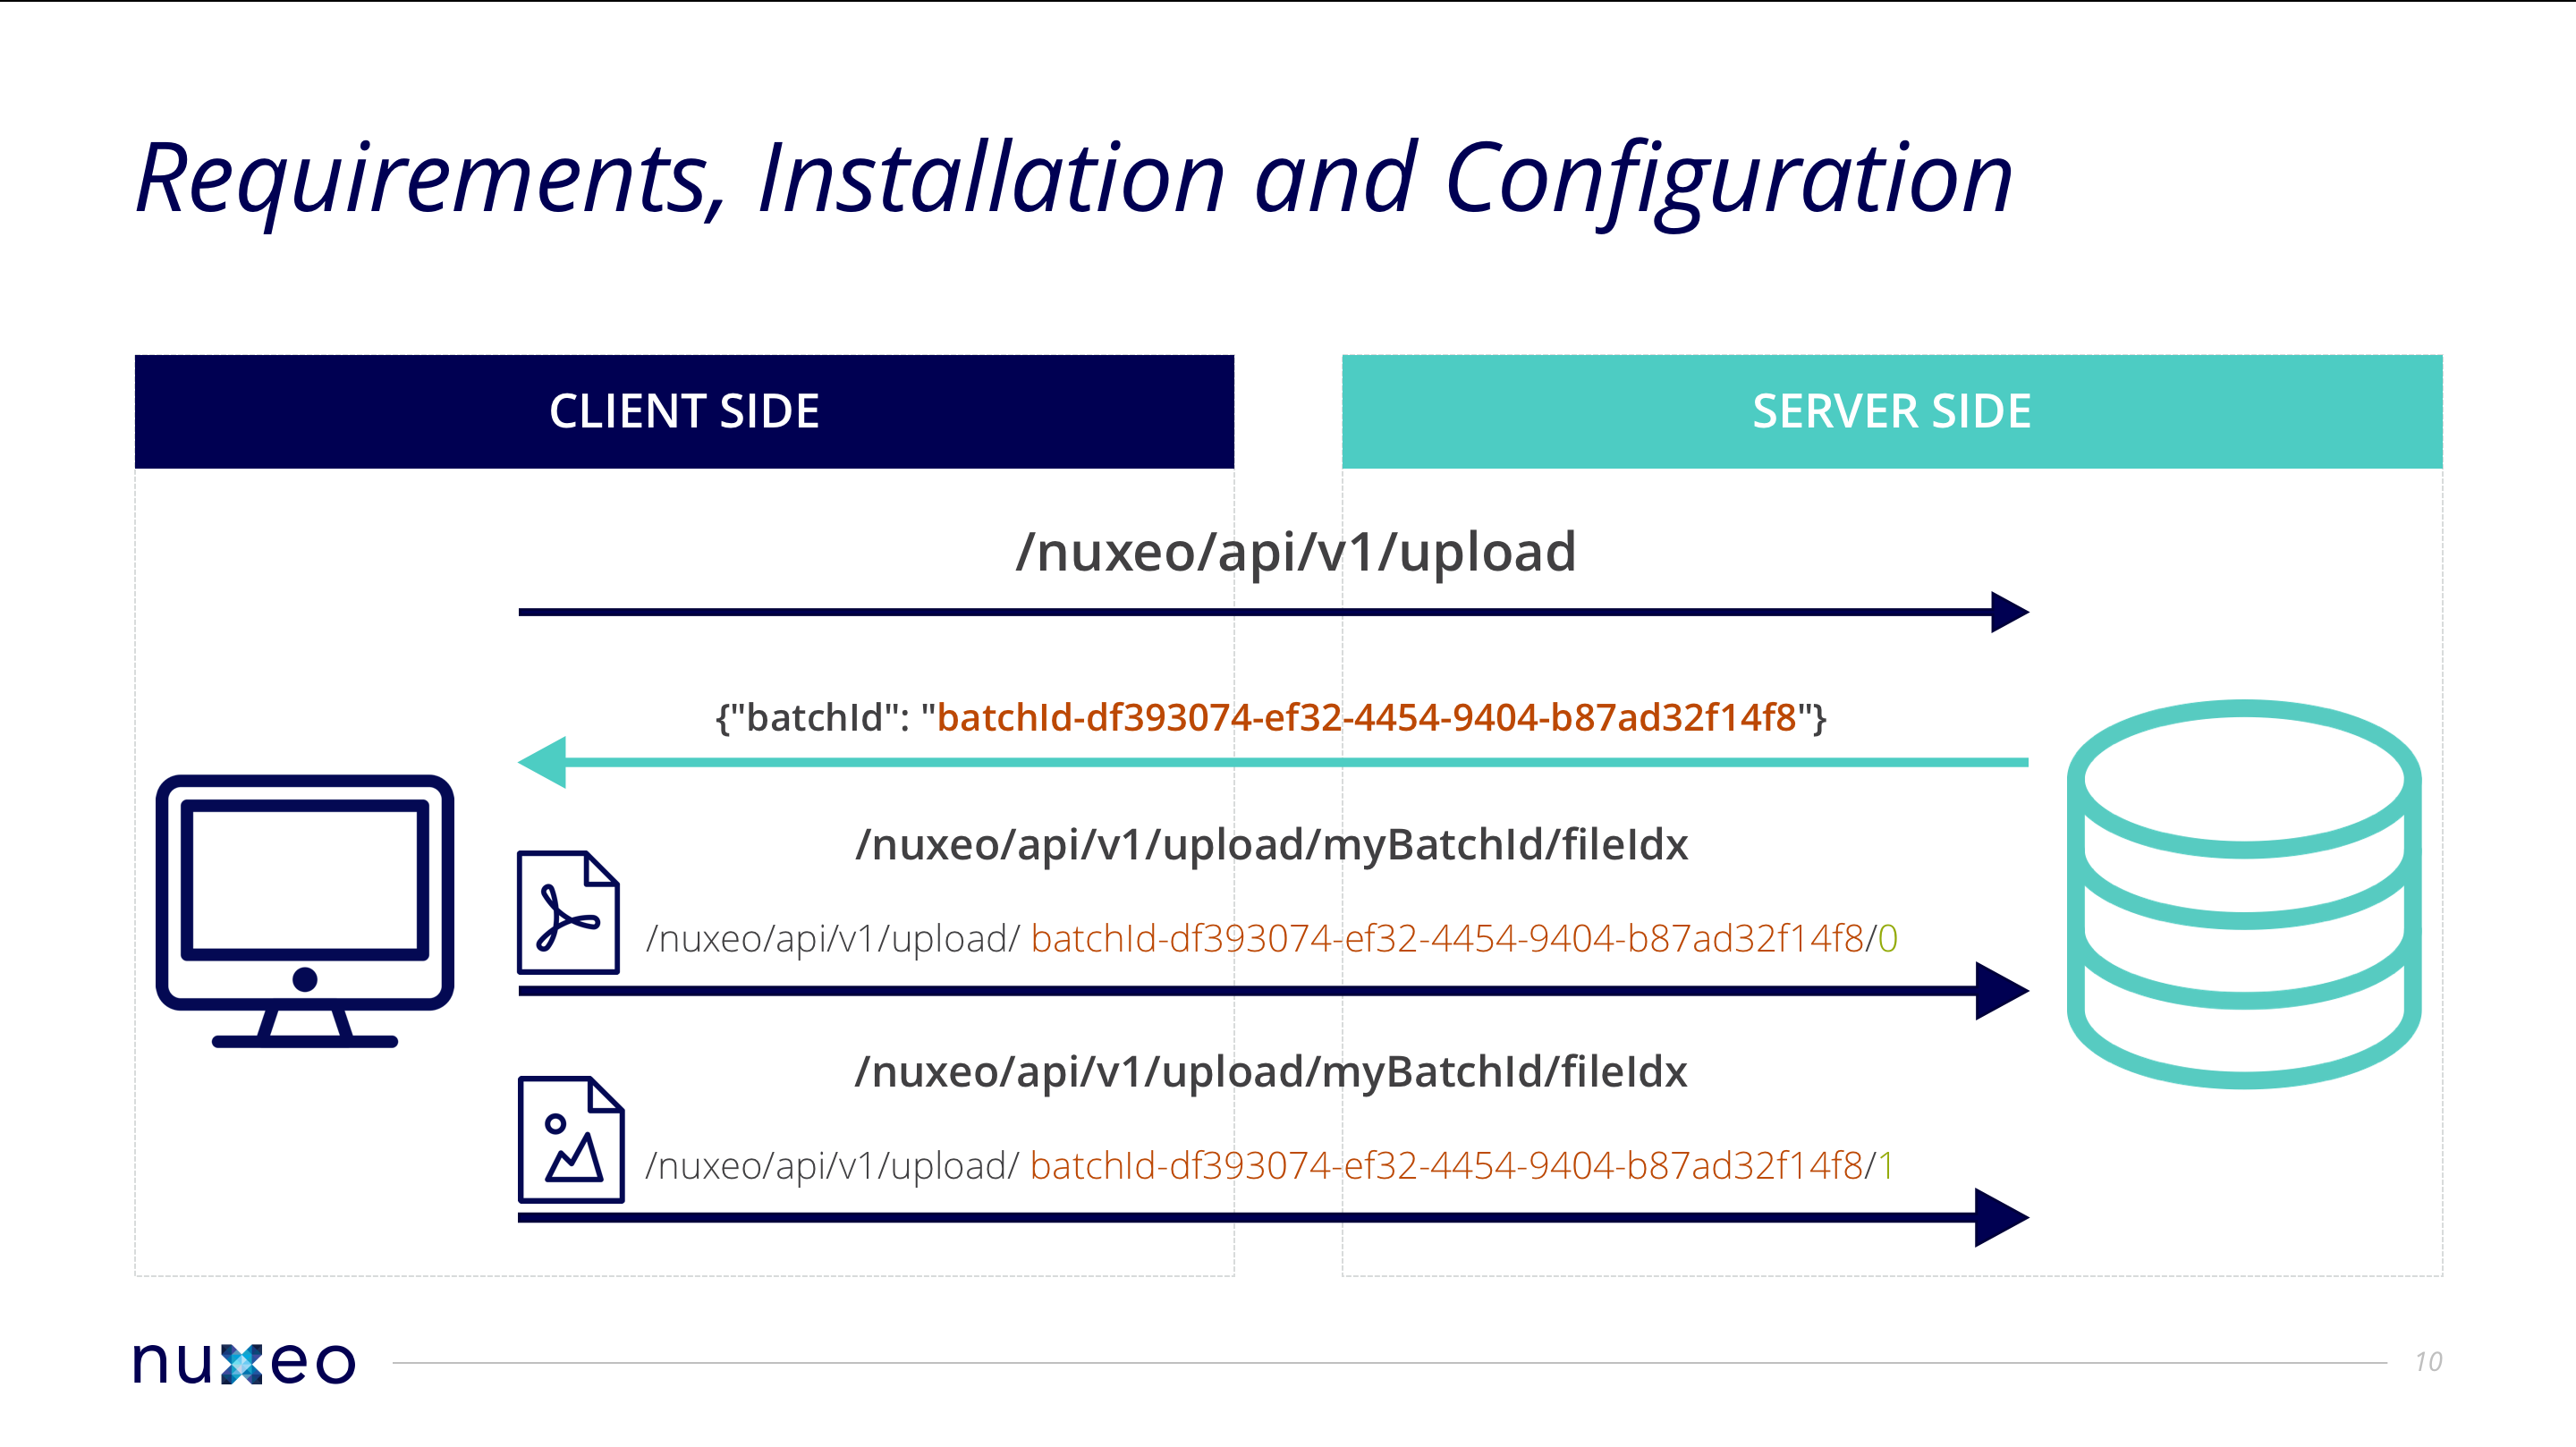
This endpoint allows to upload a batch of files to a Nuxeo server. The uploaded files can then be used as the input of an Automation operation or a property of a document through the REST API.
Batch Upload Endpoint
| Path | Description |
|---|---|
| Uploading a File | |
GET /api/v1/upload/handlers |
Lists all registered batch upload handlers |
POST /api/v1/upload/new/{handler} |
Initializes a new batch associated with the specified handler |
POST /api/v1/upload/{batchId}/{fileIdx} |
Uploads a file (see below for details on the necessary headers) |
POST /api/v1/upload/{batchId}/{fileIdx}/complete |
Notifies Batch Upload Handler that a file has been uploaded, JSON structure down below |
GET /api/v1/upload/{batchId} |
Gets information about a batch file |
GET /api/v1/upload/{batchId}/info |
Gets JSON structured information about a batch file |
GET /api/v1/upload/{batchId}/complete |
Notifies the Upload Handler that an upload was complete (not used in default handler) |
GET /api/v1/upload/{batchId}/{fileIdx} |
Gets information about a specific batch file |
DELETE /api/v1/upload/{batchId} |
Drops a batch |
DELETE /api/v1/upload/{batchId}/{fileId} |
Deletes a file from a batch |
| Uploading a File in Chunks | |
POST /api/v1/upload/{batchId}/{fileIdx} |
Uploads a chunk (see below for details on the necessary headers) |
GET /api/v1/upload/{batchId}/{fileIdx} |
Gets information about a chunked file |
| Using File from a Batch | |
POST /api/v1/upload/{batchId}/execute/{operationId} |
Executes an Automation chain or operation using the blobs associated to a batch as input |
POST /api/v1/upload/{batchId}/{fileIdx}/execute/{operationId} |
Executes an Automation chain or operation using a specific file inside the batch as input |
| Deprecated Endpoints (Maintained for Historical reasons) | |
POST /api/v1/upload/ |
Initializes a batch with the default handler |
Uploading Files
Batch Initialization
Before uploading any file, you need to initialize a batch, even if there is only one file to upload.
This handshake phase is mandatory to acquire a server-side generated batch ID to be used in subsequent requests as part of the REST resource path.
POST http://NUXEO_SERVER/nuxeo/api/v1/upload/new/default
This request initializes a new batch associated with the default handler and returns a 200 OK status code with the following JSON data:
{"provider": "default", "fileEntries": [], "batchId": batchId}
The batch id can be seen as an upload session id, especially for a resumable upload.
Batch Upload Handler Architecture
Example for Amazon Web Services S3
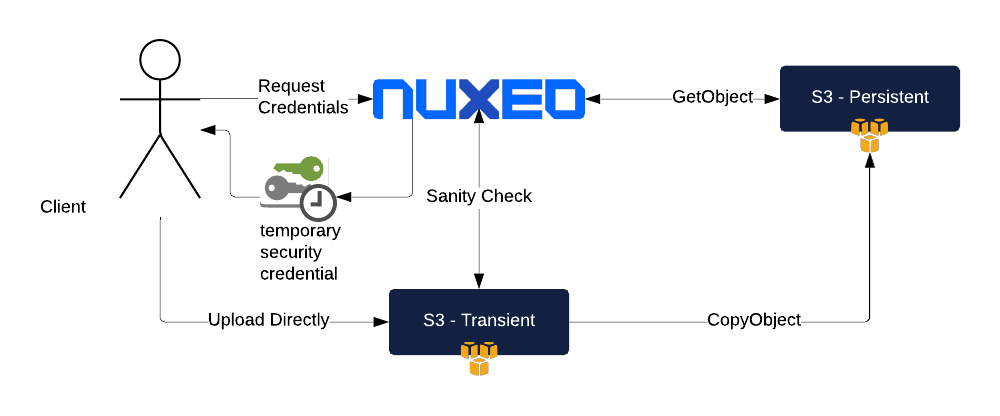
- Client initiates batch
- Request Temporary Credentials and S3 Data
- Upload file to S3 Bucket
- POST file information to Nuxeo
- Attach to Document
Using a Different Upload Handler
On batch initialization you call:
POST http://NUXEO_SERVER/nuxeo/api/v1/upload/new/<provider>
This will associate all the upload mechanism to this specific provider. We recommend reading documentation regarding the specified provider. To upload several files using different providers, you need to use different batches with different providers.
Uploading a File
You can do a simple POST with the payload containing your file, but a multipart encoded upload is also supported.
POST http://NUXEO_SERVER/nuxeo/api/v1/upload/{batchId}/{fileIdx}
The batchId is the batch identifier. You need to use the one returned by the batch initialization request, otherwise you will get a 404 Not Found status code.
The fileIdx is the index of the file inside the batch. The file can be referenced later with this index and it keeps track of the client-side ordering, since the order in which the server receives the files may not be the same.
The batch identifier should be common to all the files you want to upload and attach to the same batch.
You also need to set some custom HTTP headers:
| Header name | Description |
|---|---|
X-File-Name |
The name of the file |
X-File-Type |
The mime type of the file |
Content-Type |
Should be set to application/octet-stream |
Content-Length |
The size of the file in bytes, required if your HTTP client doesn't add this header, typically the Nuxeo JavaScript Client |
Returns a 201 CREATED status code with the following JSON data:
{"batchId": batchId, "fileIdx": fileIdx, "uploadType": "normal", "uploadedSize": xxx}
The value of the uploadType field is normal by default, it can be chunked if the file was uploaded in chunks.
Getting Information about the Batch Files
Two options are available:
GET http://NUXEO_SERVER/nuxeo/api/v1/upload/{batchId}
Returns a 200 OK status code if the batch contains at least one file and a 204 No Content status code if the batch doesn't contain any file.
JSON response data:
[{"name": file1, "size": yyy, "uploadType": "normal"}, {"name": file2, "size": zzz, "uploadType": "normal"}]
Or
GET http://NUXEO_SERVER/nuxeo/api/v1/upload/{batchId}/info
Returns a 200 OK status code everytime and contains a structured JSON Object with batch information.
JSON response data:
{ "batchId": "<batchId>", "provider": "default", "fileEntries": [{"name": file1, "size": yyy, "uploadType": "normal"}, {"name": file2, "size": zzz, "uploadType": "normal"}] }
Getting Information about a Specific Batch File
GET http://NUXEO_SERVER/nuxeo/api/v1/upload/{batchId}/{fileIdx}
Returns a 200 OK status code if the batch contains a file with the given index and a 404 Not Found status code otherwise.
JSON response data:
{"name": xxx, "size": yyy, "uploadType": "normal"}
Dropping a Batch
DELETE http://NUXEO_SERVER/nuxeo/api/v1/upload/{batchId}
Returns a 204 No Content status code and drops (deletes) the batch.
By default, executing a batch will automatically remove it. You can prevent this behavior by executing it with the header X-Batch-No-Drop set to true. In such a case, you have to take care of dropping the batch manually after you're done with it.
Deleting a File from a Batch
DELETE http://NUXEO_SERVER/nuxeo/api/v1/upload/{batchId}/{fileId}
Returns a 204 No Content status code and removes the file from the batch.
Uploading a File in Chunks
Using a resumable upload is useful otherwise uploading large files over a broken connection could take days.
Chunking is a good idea because:
- It allows you to manage upload resumption with enough granularity (restart with chunk x).
- It allows multiplexing (upload on multiple TCP streams)
- It allows you to overcome the limitations of some reverse proxies (limits the risk of having a POST considered as too big).
Sequence Diagrams
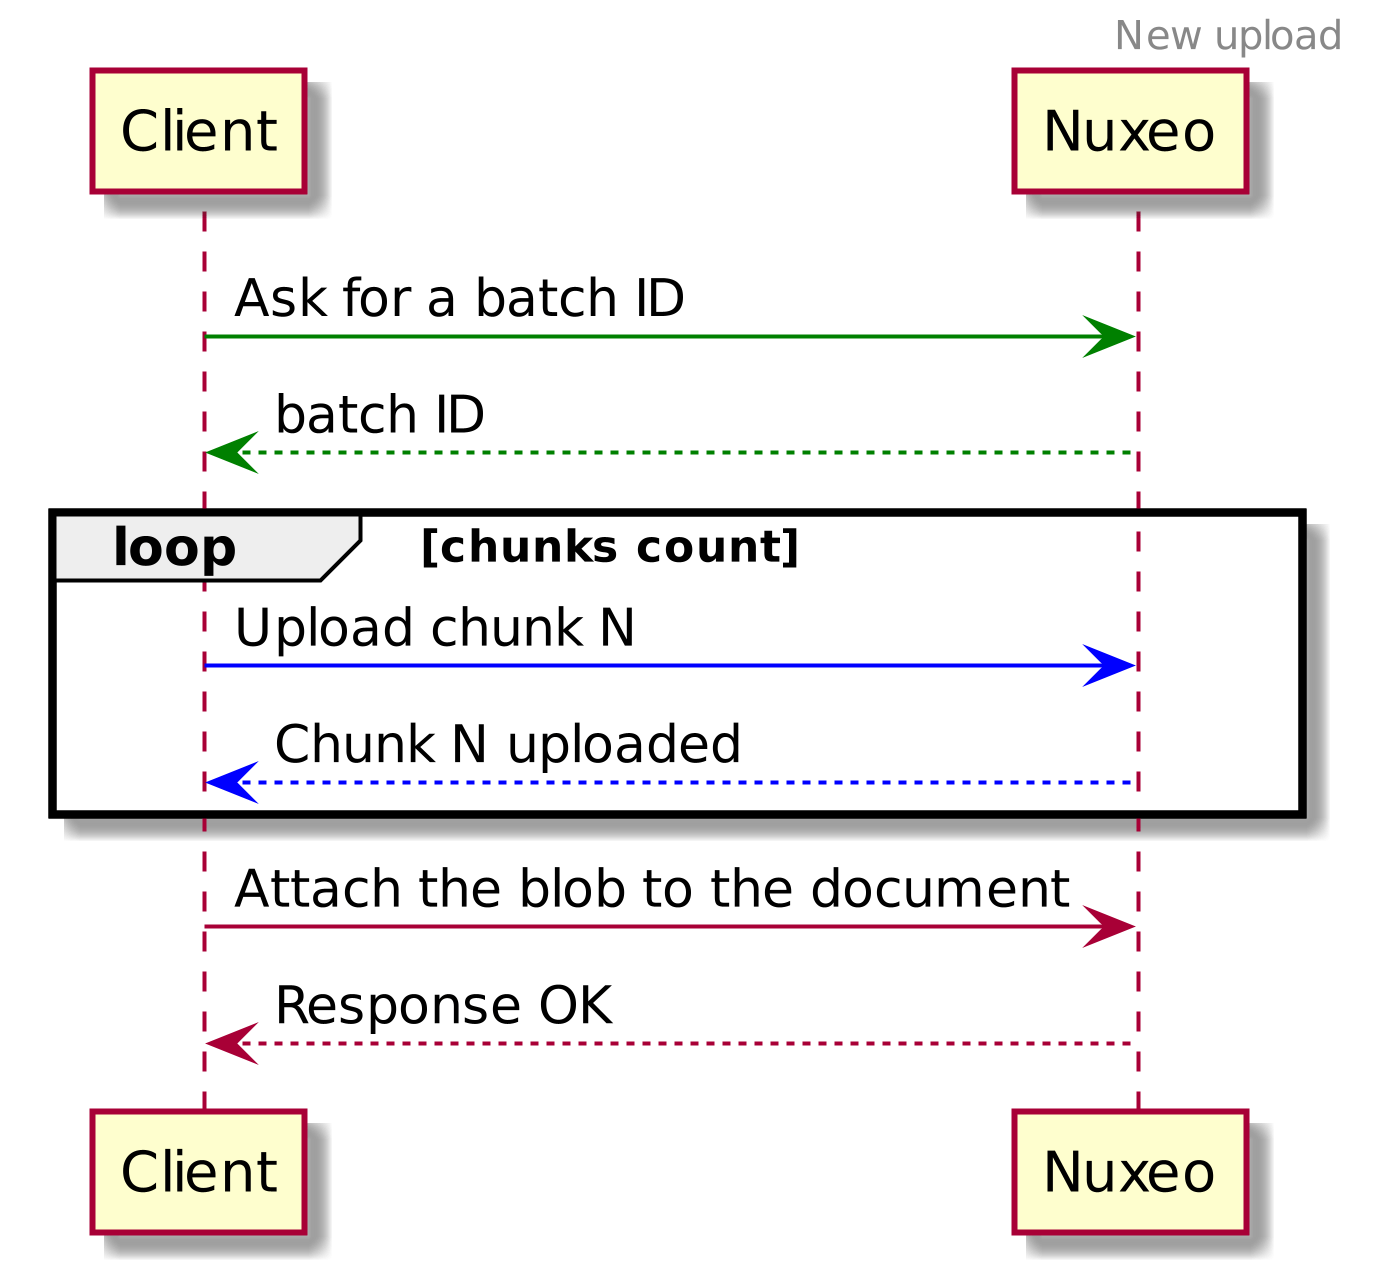
New Upload
This is the sequence diagram of the complete process of uploading a file in chunks:

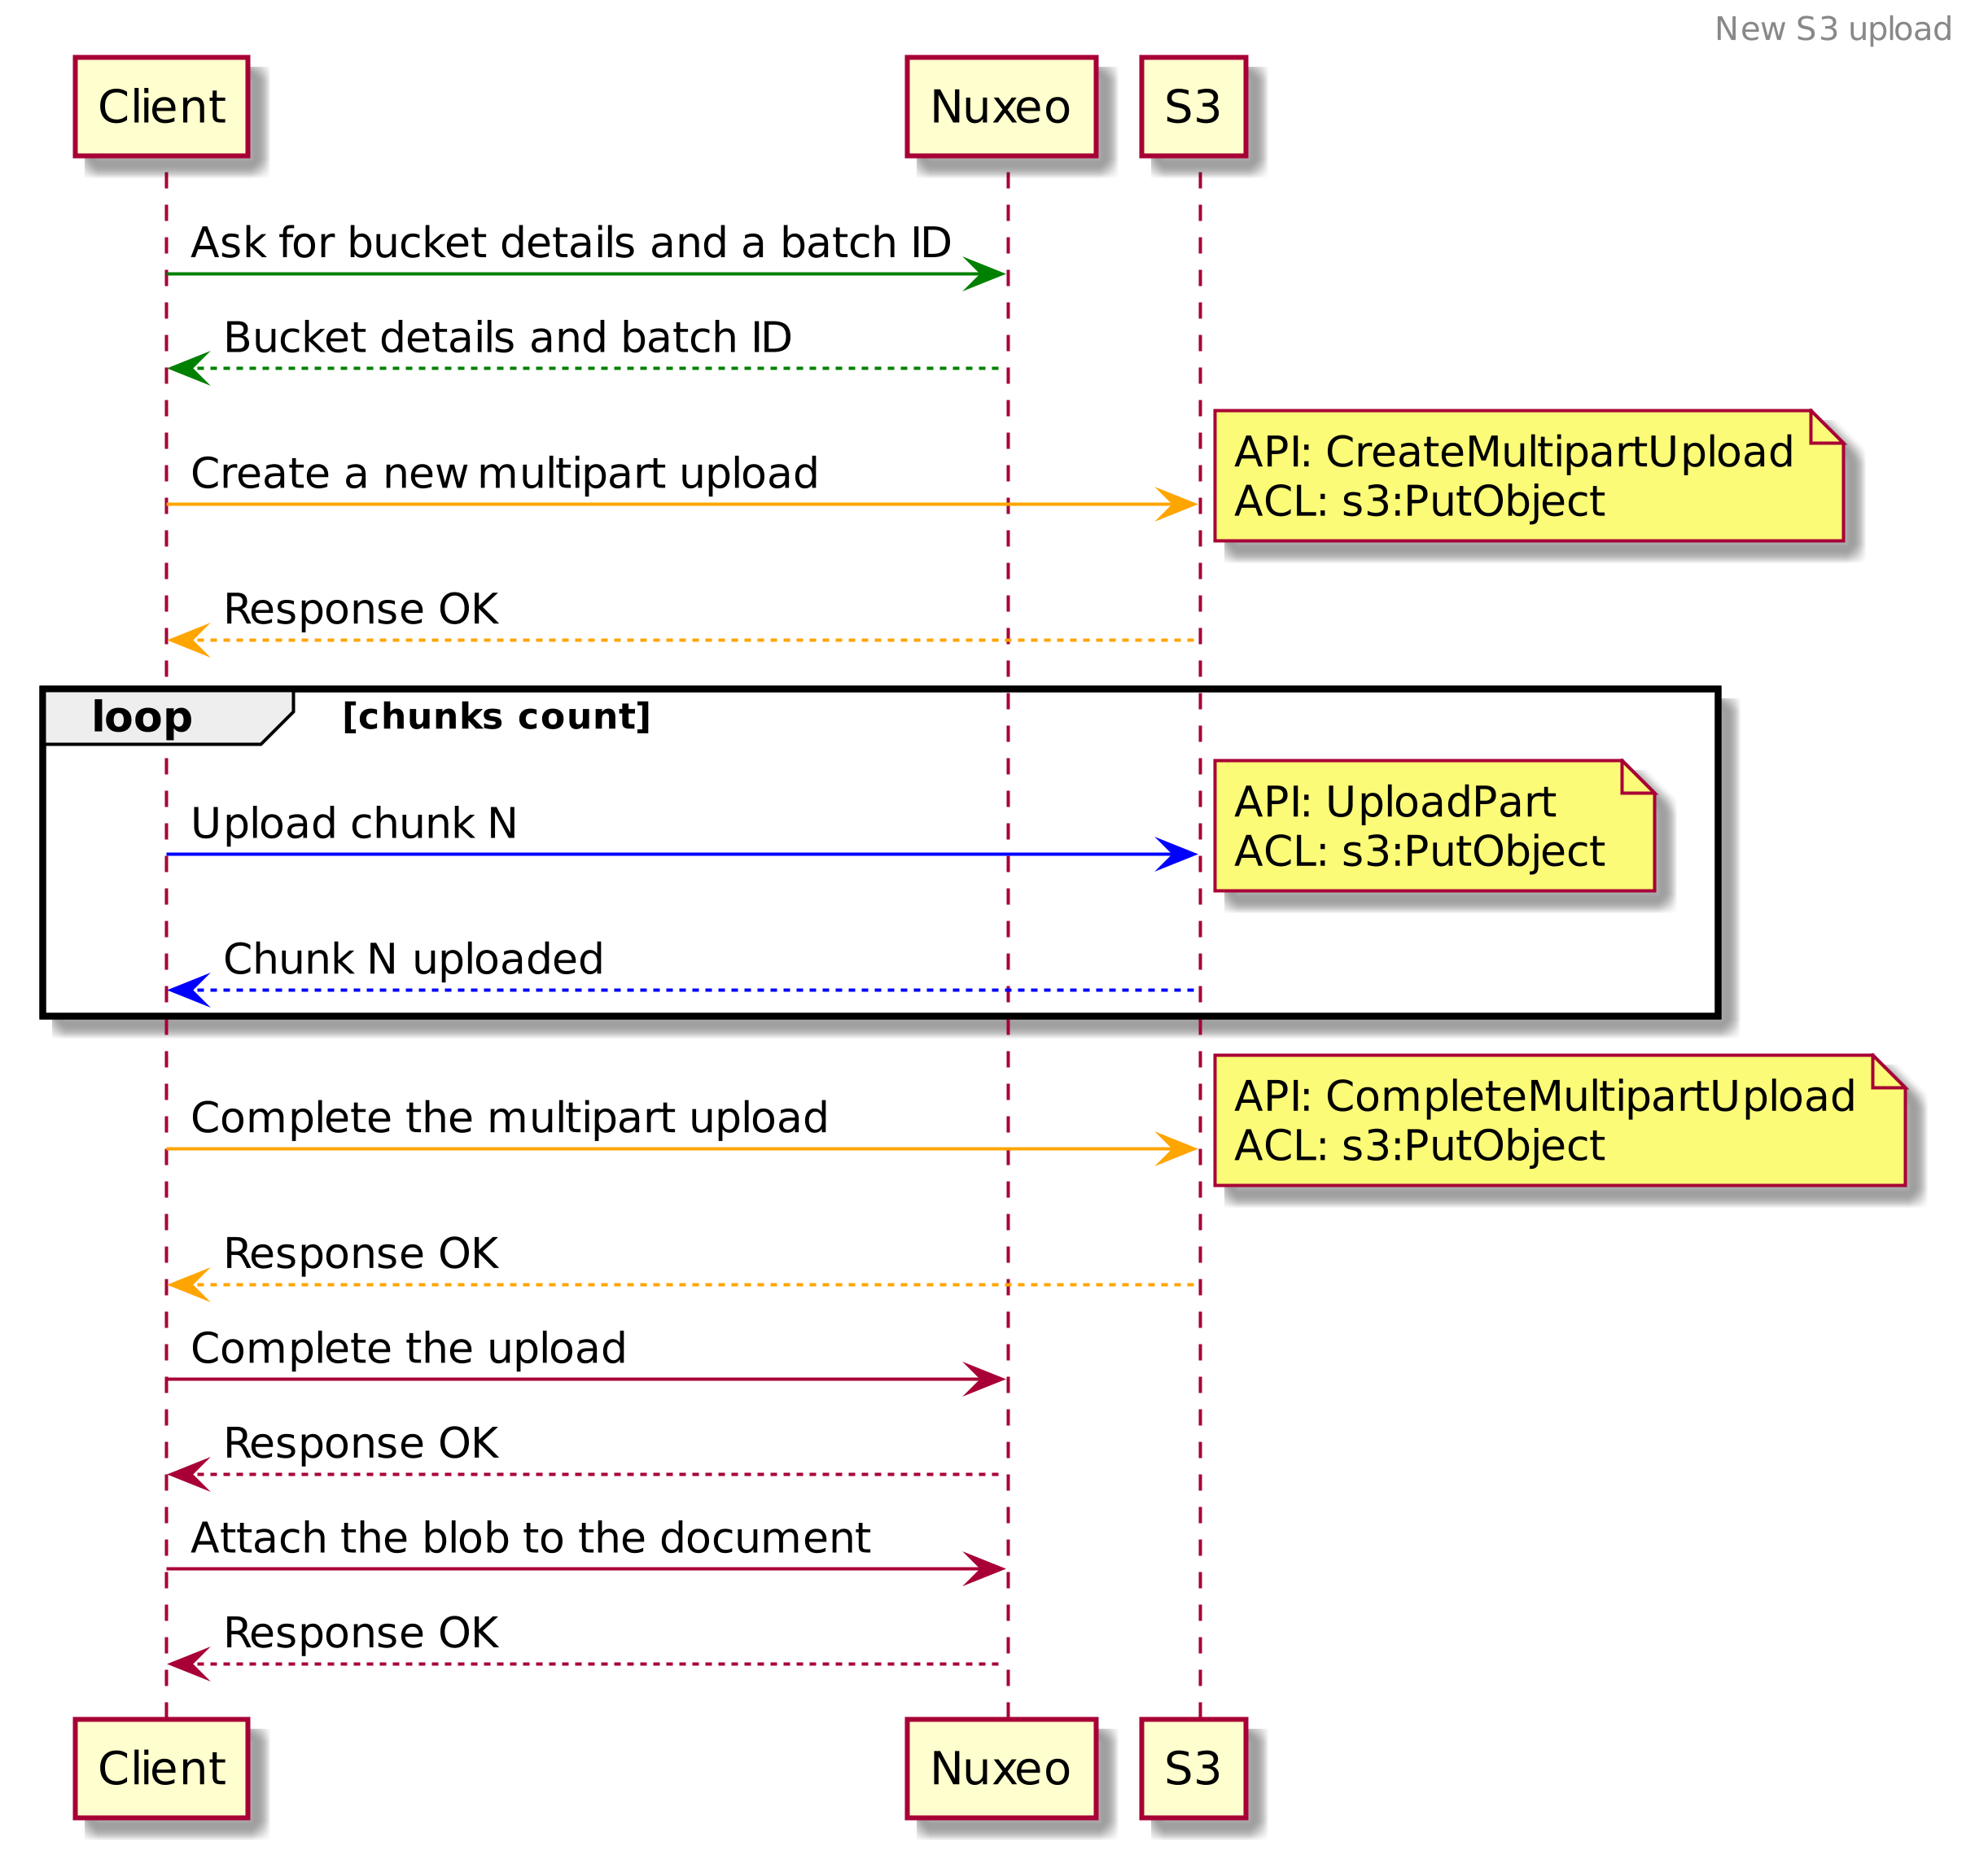
And this is the sequence diagram of the complete process of uploading a file in chunks using a different upload provider (here Amazon S3):

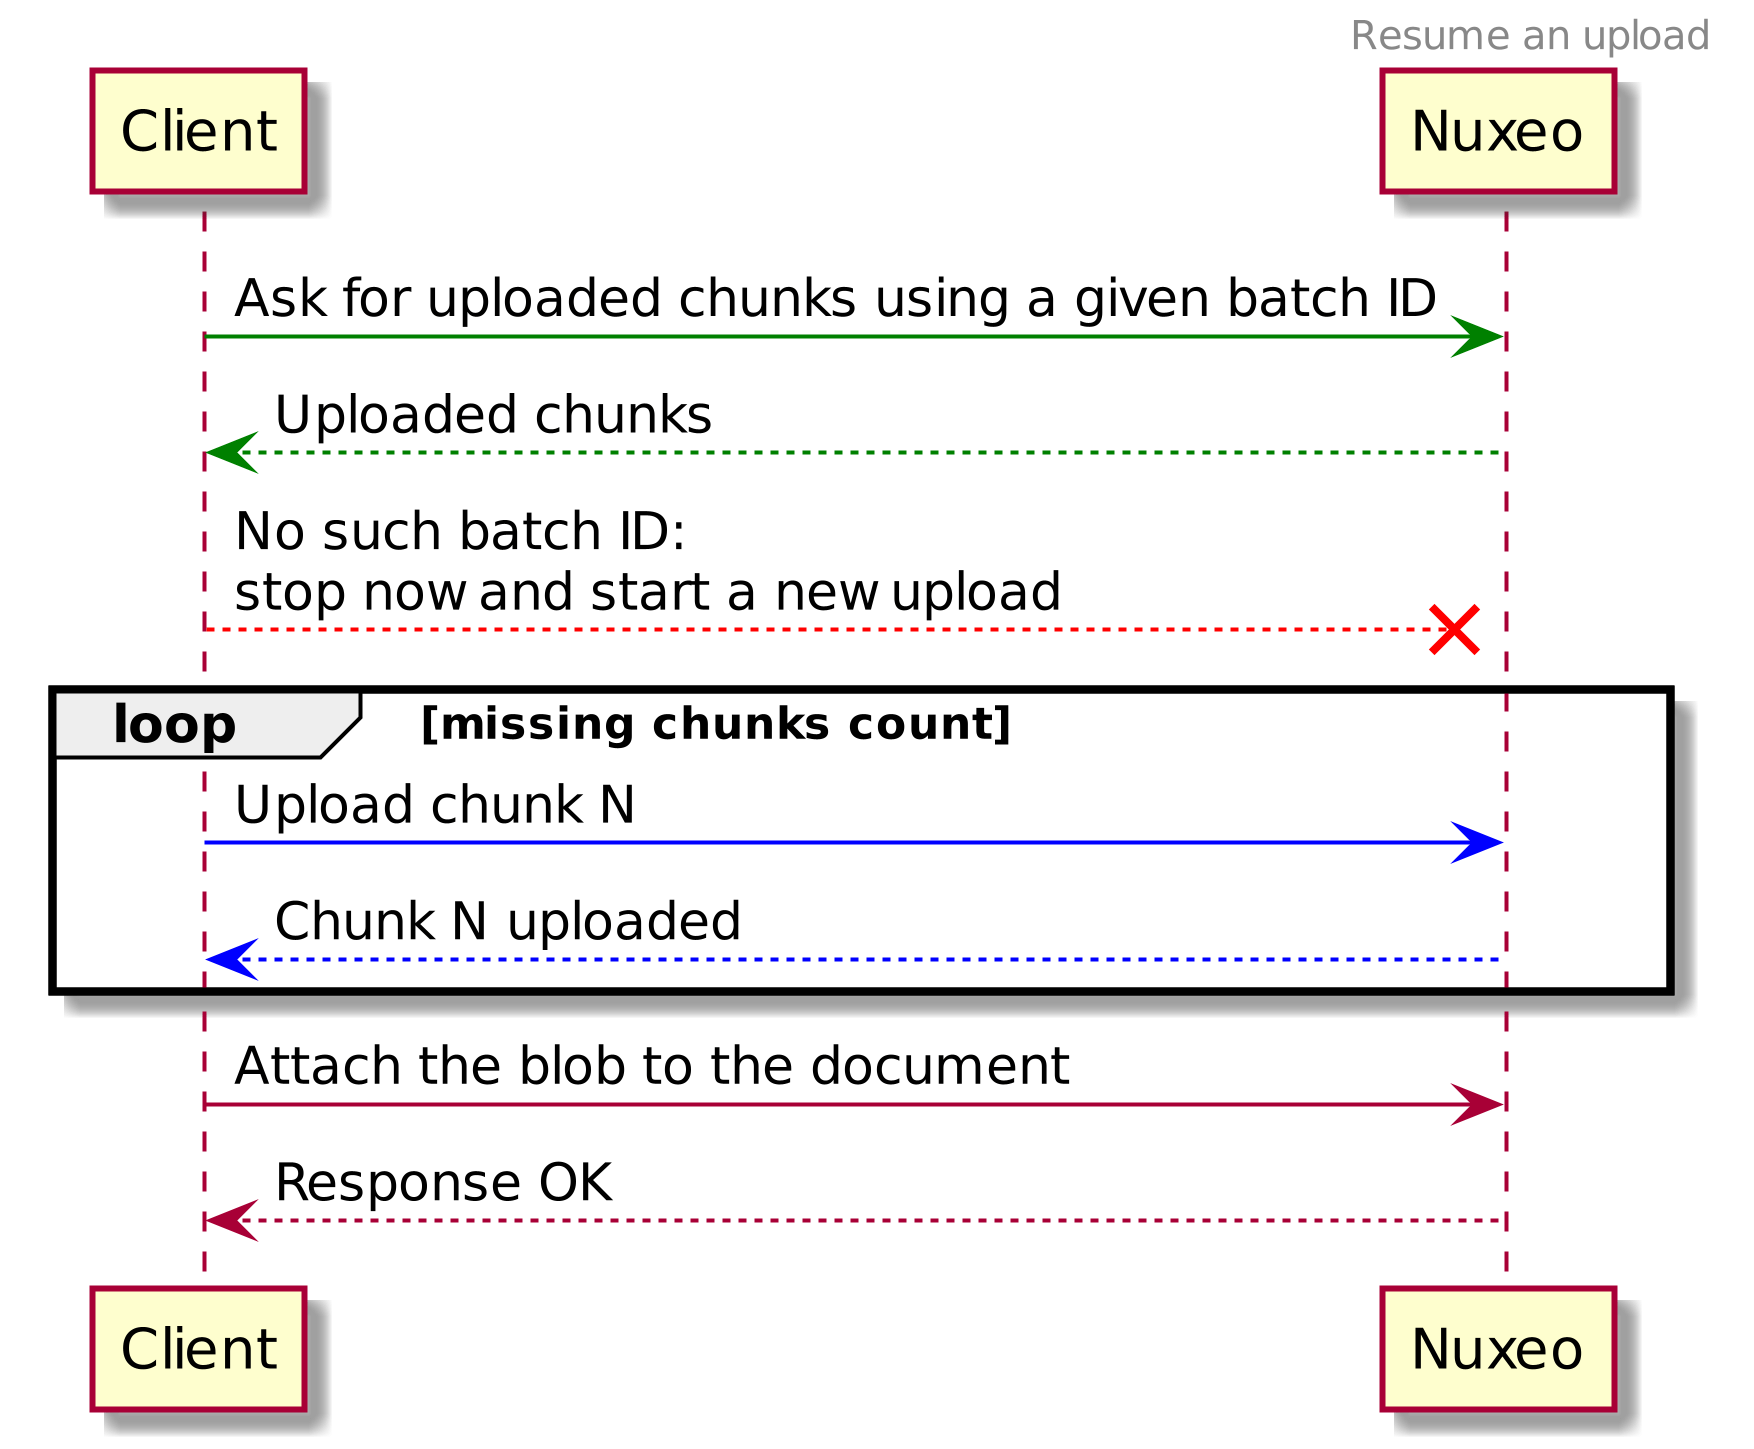
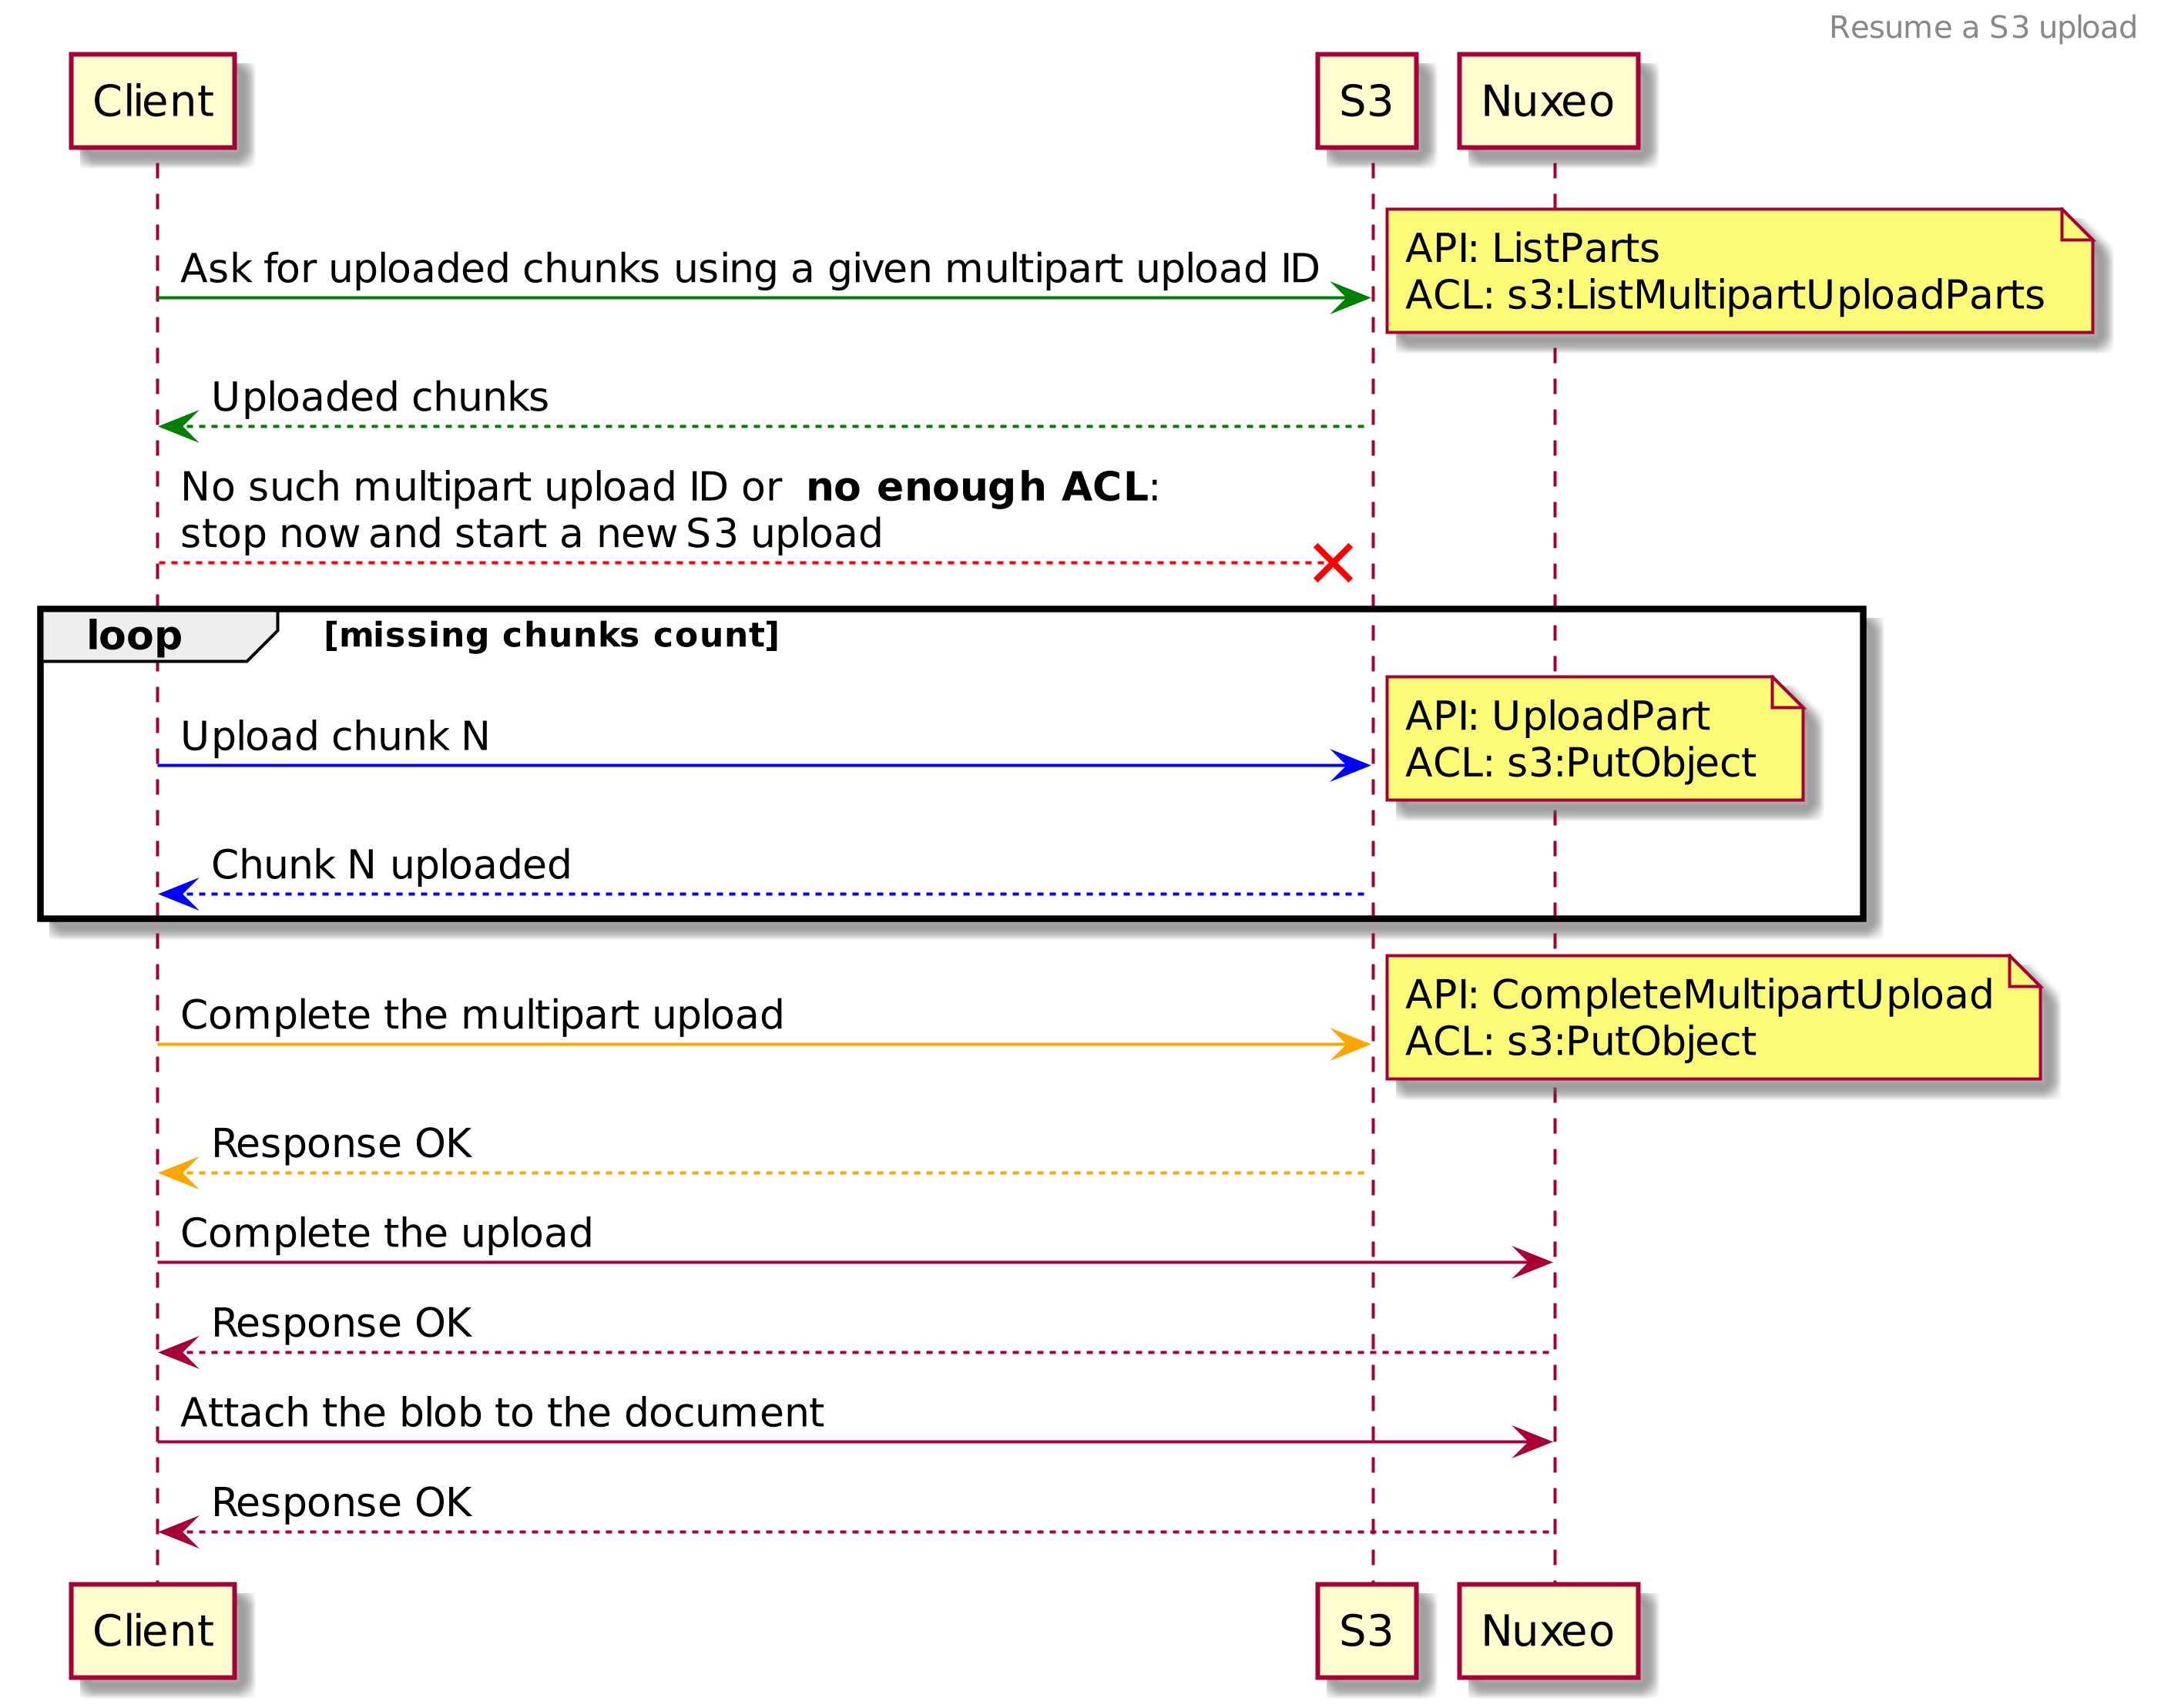
Resume Upload
This is the sequence diagram of the complete process when resuming a chunked upload:

And this is the sequence diagram of the complete process when resuming a chunked upload using a different upload provider (here Amazon S3):

Uploading a Chunk
As for uploading a whole file, you can do a simple POST with the payload containing your chunk.
POST http://NUXEO_SERVER/nuxeo/api/v1/upload/{batchId}/{fileIdx}
The batchId and fileIdx serve the same purpose as for uploading a whole file. They should be common to all the chunks you want to upload for a given file in the batch.
You need to set the same HTTP headers as for a whole file, adding some extra ones:
| Header name | Description |
|---|---|
X-Upload-Type |
chunked |
X-Upload-Chunk-Index |
Index of the chunk |
X-Upload-Chunk-Count |
Total chunk count |
X-File-Name |
Name of the file |
X-File-Size |
Size of the file in bytes |
X-File-Type |
Mime type of the file |
Content-Type |
Should be set to application/octet-stream |
Content-Length |
Size of the chunk in bytes, required if your HTTP client doesn't add this header, typically the Nuxeo JavaScript Client |
X-Upload-Chunk-Index must be the number of the chunk in the ordered list of chunks, starting from 0.
For instance if the file is made of 5 chunks you will send 5 requests with the following headers and i between 0 and 4:
X-Upload-Chunk-Index: iX-Upload-Chunk-Count: 5
Optionally depending on the HTTP client you are using you might need to add the Content-Length header to specify the size of the chunk in bytes.
For a file uploaded in one go, the chunks attached to the batch are stored on temporary disk storage until the batch is executed or dropped.
Returns a 201 CREATED status code for a complete chunked file and a 202 Accepted status code for an incomplete chunked file.
JSON response data:
{"batchId": batchId, "fileIdx": fileIdx, "uploadType": "chunked", "uploadedSize": xxx, "uploadedChunkIds": [0, 1, 2], "chunkCount": 5}
Getting Information about a Chunked File
GET http://NUXEO_SERVER/nuxeo/api/v1/upload/{batchId}/{fileIdx}
Returns a 200 OK status code for a complete chunked file and a 202 Accepted status code for an incomplete chunked file. It is this specific 202 Accepted status code that lets you know that you either need to upload the missing chunks or to resume an interrupted file upload.
If the batch doesn't contain any file with the given index, returns a 404 Not Found status code.
JSON response data:
{"name": xxx, "size": yyy, "uploadType": "chunked", "uploadedChunkIds": [0, 1, 2, 4], "chunkCount": 5}
Using Files From a Batch
Batch Execute
You can execute an Automation chain or an Automation operation using the blobs associated to a batch as input.
To place the blobs as input, call a specific batch operation by passing the operationId and batchId path parameters:
POST http://NUXEO_SERVER/nuxeo/api/v1/upload/{batchId}/execute/{operationId}
Accept: application/json, */*
Content-Type: application/json; charset=UTF-8
{"params": {"operationParam": "value", ...}, "context": {...}}
Optionally you can use the fileIdx path parameter to specify the index of the file inside the batch that you want to use as input of the chain or operation to execute.
POST http://NUXEO_SERVER/nuxeo/api/v1/upload/{batchId}/{fileIdx}/execute/{operationId}
This way of calling an Automation operation is actually used in the default UI to manage drag and drop:
Files are progressively uploaded to the server:
- You can drop several sets of files,
- There is a maximum number of concurrent uploads.
When upload is finished you can select the operation or chain to execute.
More info about Drag and Drop configuration.
Sample code using the Java client:
// Get a Nuxeo client
NuxeoClient nuxeoClient = new NuxeoClient.Builder().url("http://NUXEO_SERVER/nuxeo")
                                                   .authentication("Administrator", "Administrator")
                                                   .connect();

// Upload a file
BatchUploadManager batchUploadManager = nuxeoClient.batchUploadManager();
BatchUpload batchUpload = batchUploadManager.createBatch();
File file = new File("/file/to/upload.txt");
batchUpload = batchUpload.upload("0", file, file.getName(), "text/plain", file.length());

// Execute an Automation operation with the uploaded file as input
Document doc = new Document("file", "File");
doc.set("dc:title", "new title");
doc = nuxeoClient.repository().createDocumentByPath("/folder_1", doc);
Blob blob = batchUpload.operation("Blob.AttachOnDocument").param("document", doc).execute();
Referencing a Blob from a JSON Document Resource
You can reference a Blob by its batch id and file index in the JSON document you're sending to the REST API.
{
  "entity-type": "document",
  "properties": {
    "file:content": {
      "upload-batch":"batchId-50b2ccb2-ce69-4fdc-b24e-b4ea8c155a05",
      "upload-fileId":"0" // referencing the first file of the batch
    }
  }
}
Sample code using the Java client:
Document doc = nuxeoClient.repository().fetchDocumentByPath("/my/document/path");
doc.setPropertyValue("file:content", batchUpload.getBatchBlob());
doc = doc.updateDocument();
Learn More
- Follow the course Importing Documents / REST API Import at Hyland University.
- Test these endpoints on your local instance with Nuxeo API Playground (see documentation to configure your local instance).
