The quickest way to start building a dashboard is to use the Polymer CLI to scaffold our custom elements.
Generate a
nuxeo-sample-dashboarddashboard element:mkdir -p nuxeo-sample-dashboard && cd $_ polymer initNote: Polymer CLI will ask for a couple of values in order to scaffold the project according to your needs. It is a good practice to build dashboards as custom elements since you can then use them anywhere you want. For this reason we would suggest you to use the template
polymer-2-element - A simple Polymer 2.0 element template. Further details can be found Create an element project with the Polymer CLI.But you can also build dashboards as full applications in which case the template
polymer-2-application - A simple Polymer 2.0 applicationshould be used instead. For more details please visit Create an application project with the Polymer CLIOnce the
nuxeo-sample-dashboardelement is generated you can install further client side dependencies. In this case you need the Nuxeo Data Visualization Elements and a charting library to produce charts for your dashboard:bower install --save nuxeo/nuxeo-dataviz-elements bower install --save GoogleWebComponents/google-chartPolymer CLI scaffolded a sample custom element so you now need to replace this sample content with your own. In this example build a simple chart with the total number of Serial Review workflows started by each user:
nuxeo-dataviz-sample.html<link rel="import" href="../polymer/polymer-element.html"> <link rel="import" href="../nuxeo-dataviz-elements/nuxeo-workflow-data.html"> <link rel="import" href="../google-chart/google-chart.html"> <dom-module id="nuxeo-sample-dashboard"> <template> <style> :host { display: block; } </style> <!-- Retrieve our data and store it in 'initiators' --> <nuxeo-workflow-data workflow="SerialDocumentReview" event="afterWorkflowStarted" grouped-by="workflowInitiator" start-date="[[startDate]]" end-date="[[endDate]]" data="{{initiators}}"> </nuxeo-workflow-data> <!-- Display a Pie Chart with out data --> <google-chart type="pie" cols='[{"label": "User", "type": "string"},{"label": "Value", "type": "number"}]' rows="[[_rows(initiators)]]"> </google-chart> </template> <script> /** * `nuxeo-sample-dashboard` * Custom Dashboard * * @customElement * @polymer * @demo demo/index.html */ class NuxeoSampleDashboard extends Polymer.Element { static get is() { return 'nuxeo-sample-dashboard'; } static get properties() { return { startDate: String, endDate: String }; } // Transform our data for usage with Google Charts _rows(data) { return data.map(function(e) { return [e.key, e.value]; }); } } window.customElements.define(NuxeoSampleDashboard.is, NuxeoSampleDashboard); </script> </dom-module>Each Polymer element usually includes a usage demo which you can edit to see and showcase your custom element in action:
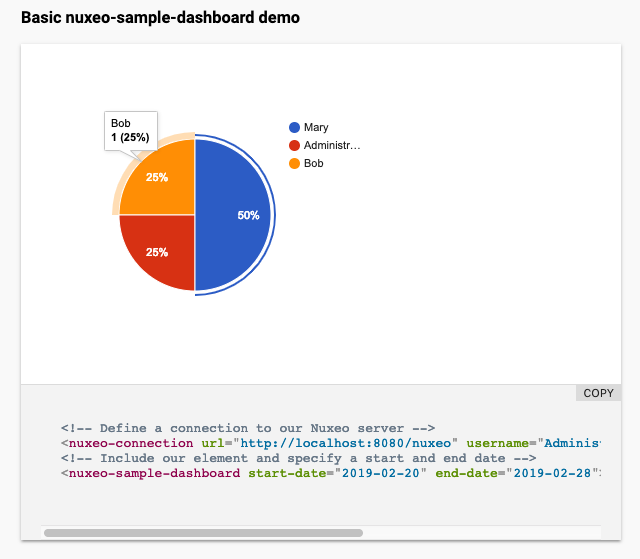
demo/index.html<!doctype html> <html lang="en"> <head> <meta charset="utf-8"> <meta name="viewport" content="width=device-width, minimum-scale=1, initial-scale=1, user-scalable=yes"> <title>nuxeo-sample-dashboard demo</title> <script src="../../webcomponentsjs/webcomponents-loader.js"></script> <link rel="import" href="../../iron-demo-helpers/demo-pages-shared-styles.html"> <link rel="import" href="../../iron-demo-helpers/demo-snippet.html"> <link rel="import" href="../nuxeo-sample-dashboard.html"> <link rel="import" href="../../nuxeo-dataviz-elements/nuxeo-workflow-data.html"> <link rel="import" href="../../nuxeo-elements/nuxeo-connection.html"> <link rel="import" href="../../google-chart/google-chart.html"> <custom-style> <style is="custom-style" include="demo-pages-shared-styles"> </style> </custom-style> </head> <body> <div class="vertical-section-container centered"> <h3>Basic nuxeo-sample-dashboard demo</h3> <demo-snippet> <template> <!-- Define a connection to our Nuxeo server --> <nuxeo-connection url="http://localhost:8080/nuxeo" username="Administrator" password="Administrator"></nuxeo-connection> <!-- Include our element and specify a start and end date --> <nuxeo-sample-dashboard start-date="2019-02-20" end-date="2019-02-28"></nuxeo-sample-dashboard> </template> </demo-snippet> </div> </body> </html>To checkout your element you can use Polyserve, a simple web server to use bower components locally that you can install with:
npm install -g polyserve
polyserve -p 3000
Once Polyserve is up and running we can finally see our custom element's demo at: http://localhost:3000/components/nuxeo-sample-dashboard/demo/
Using the Polymer CLI is also possible to checkout your element by running the following command:
polymer serveIt will point to the local web server URL that, by default, should be something like: http://127.0.0.1:8081/components/nuxeo-sample-dashboard/
Both are simple ways to launch a server and see your demo up and running.
Polymer CLI also generated a folder
testthat contains a couple of tests for the scaffoldednuxeo-sample-dashboardelement. Those tests can be run by using the following command:polymer testAfter our customizations the scaffolded tests won't make sense anymore and we would need to code specific tests for our customized element and its logics. Further information about this topic can be found on our Quality Assurance page.