In this tutorial, you will learn how to execute UI functions after business logic execution. For example, when you create a custom button which triggers an automation chain, it is helpful to add a notification displayed upon the successful (or unsuccessful) call of the operation.
Let's say we want to copy a document to another folder and to navigate to this new document, integrating notifications automatically.
Prerequisites
- Create two Workspaces in your Nuxeo platform, under Domain > Workspaces called:
source_folder: where we create the original documenttarget_folder: where the copy is created
- Generate the metadata layout of the File document type in Nuxeo Studio Designer: UI > Built-in Document Types > File > metadata > Configure
Create Your Operation
Add the nuxeo-operation element in the File metadata layout to execute the Document.Copy operation (Documentation available on Nuxeo Explorer).
<nuxeo-operation  id="copyOp"
                  op="Document.Copy"
                  input="[[document]]"
                  params='{"target": "/default-domain/workspaces/target_folder","name":"target-document"}'>
</nuxeo-operation>
Add Your Notification Element
The Polymer paper-toast element offers an easy way to display user notifications. This element needs a specific id, for instance, let's call it copyToast.
- Using JavaScript, you can modify the text to display, using :
this.$.copyToast.text = 'Document copied';. - When you need your toast to be displayed, just call the
open()method on it:this.$.copyToast.open(); - No need to "close" the toast, it will be automatically done for you (you can set
durationto0, a negative number orInfinityto persist the toast on screen).
Add the paper-toast element on the metadata file:
<paper-toast id="toast"></paper-toast>
Add a Button
Create a button to execute the _copy function.
Copy this document: <paper-icon-button  id="btn"
                                        icon="icons:content-copy"
                                        on-tap="_copy">
</paper-icon-button>
This function calls our operation. We also add a paper-tooltip element to display a helper message while hovering the icon button.
<paper-tooltip for="btn">Execute copy</paper-tooltip>
Define the Copy Function
In the Polymer section, add the function that will execute the operation:
Polymer({
    is: 'nuxeo-file-metadata-layout',
    behaviors: [Nuxeo.LayoutBehavior],
    properties: {
      /**
         * @doctype File
         */
      document: Object
    },
    _copy: function() {

      this.$.copyOp.execute().then(function(result) {
      this._toast("Document copied!");

      }.bind(this))
        .catch(function(error) {
        alert("Error when creating the copy:\n" + error);
      }.bind(this))},


    _toast: function(text) {
      this.$.toast.hide();
      this.$.toast.text = text;
      this.$.toast.open();
    },

    doChange: function () {
      this.destination = this.document.parentRef;
      this.$.copyOp.execute().then(function(result) {
        this._toast("Document copied!");
        window.location.href = this.urlFor('browse', result.path);

      }.bind(this))
        .catch(function(error) {
        alert("Error when creating the copy:\n" + error);
      }.bind(this))}
  });
In this case, we're using a function to raise a notification so that we don't have to create multiple paper-toast element for each message:
_toast: function(text) {
        this.$.toast.hide();
        this.$.toast.text = text;
        this.$.toast.open();
      },
Deploy Your Project
Save your changes and hot reload your project.

Going Further
Navigating to the New Document
If we need to navigate to the new copy, then we need to add a window.location.href = this.urlFor('browse', result.path); line. However, it implies that the notification message won't be seen as it will appear between the moment when the user clicks and when the new document will be opened. That's why using nuxeo-dialog element would provide a better user experience in this case.
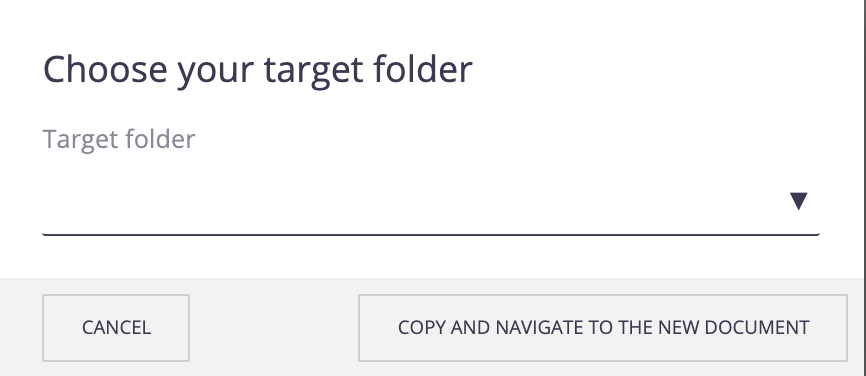
Opening a Dialog
nuxeo-dialog element is used to display a new window to the user, asking for a confirmation, or a choice.
We want the user to:
- Click on the copy button.
- Select the destination folder where the document should be copied. This way, the destination path won't be static.
- Click on the confirmation button to execute the copy and navigate to it. In case of error, it will raise the problem in the
paper-toastelement.
We then need to adapt our layout:
- Create the
nuxeo-dialog:<nuxeo-dialog reparent id="popupRight" modal no-auto-focus> <h2>Choose your target folder</h2> <div> <nuxeo-document-suggestion label="Target folder" value="{{destination}}" page-provider="folderish-suggestions" min-chars="0" class="input"></nuxeo-document-suggestion> </div> <div class="buttons"> <paper-button dialog-dismiss>Cancel</paper-button> <paper-button dialog-confirm class="primary" on-tap="doChange">Copy and Navigate to the new document</paper-button> </div> </nuxeo-dialog> - In Nuxeo Studio Modeler, create a page provider called
folderish-suggestionsto list the element where the source document can be copied:ecm:primaryType IN ('Folder','Workspace') AND ecm:isTrashed = 0 AND ecm:isProxy = 0 AND ecm:isCheckedInVersion = 0 AND ecm:fulltext = '?*' - In the Advanced Configuration section of the page provider, uncheck the
Quote parametersoption. Create the
doChangefunction:doChange: function () { this.destination = this.document.parentRef; this.$.copyOp.execute().then(function(result) { this._toast("Document copied!"); window.location.href = this.urlFor('browse', result.path); }.bind(this)) .catch(function(error) { alert("Error when creating the copy:\n" + error); }.bind(this))}The file should look like this in the end.
- Save your changes and hot reload your project.