Creating a Document
You can create a document using the JS client create method.
nuxeo.repository().create({parentRef}, {document})...
The parentRef is the ID or path under which your document should be created.
A Document cannot be instantiated directly, so you need to create the object manually. Refer to the REST API Entity Types documentation to see what you need to send.
When doing a POST request to create a document, you only need to specify a few elements : entity-type, document type and name. The properties object can be used to send more metadata. Here is a sample below:
{
  "entity-type": "document",
  "type": "File",
  "name": "myDocumentName",
  "properties": {
    "dc:title": "My Document Title",
    /* Timezone is not needed for dates, but you can add it if you want to */
    "myschemaprefix:aDateProperty": "2050-12-25",
    /* Multivalued properties have to be sent as javascript arrays... */
    "myschemaprefix:aStringMultivaluedProperty": ["some", "text", "here"],
    /* Complex properties have to be sent as javascript objects... */
    "myschemaprefix:aComplexProperty": {"firstName": "Chuck", "lastName": "Norris", "birthDate": "1968-12-25"}
    /* ...So complex multivalued properties are sent as? Object arrays of course! */
    "myschemaprefix:aMultivaluedComplexProperty": [
      {"firstName": "Chuck", "lastName": "Norris", "birthDate": "1968-12-25"},
      {"firstName": "Bruce", "lastName": "Lee", "birthDate": "1965-10-21"}
    ]
 }
}
Practice - Document Creation
- Download createDocuments.js or open in another tab to copy and paste.
- Store your Nuxeo Server URL in the
baseURLvariable. - Define the properties for the Workspace, Folder and Document you will create. (See REST API Entity Types for more information)
- Using the
nuxeo.repository().create({parentRef}, {document})...method, create the My Workspace in "Workspaces". - Create a Folder in My Workspace.
- Create a Document (File, Note, etc.) in the Folder.
- When your code is ready, run it with the following command:
$ node createDocuments.js
-
Create Documents - Solution
            const Nuxeo = require('nuxeo');

            const nuxeo = new Nuxeo({
              baseURL: 'http://NUXEO_SERVER/nuxeo',
              auth: {
                method: 'basic',
                username: 'Administrator',
                password: 'Administrator'
              }
            });

            nuxeo.schemas("*");

            // Define Workspace properties
            const workspaceToCreate = {
              'entity-type': 'document',
              'type': 'Workspace',
              'name': 'myWorkspace',
              'properties': {
                'dc:title': 'My Workspace'
             }
            };

            // Define Folder properties
            const folderToCreate = {
            'entity-type': 'document',
            'type': 'Folder',
            'name': 'myFolder',
            'properties': {
              'dc:title': 'My Folder'
            }
            };

            // Define Document properties
            const documentToCreate = {
              'entity-type': 'document',
              'type': 'File',
              'name': 'myFile',
              'properties': {
                'dc:title': 'My File'
             }
            }

            const whereToCreateWorkspace = '/default-domain/workspaces/';

            const repository = nuxeo.repository();

            // Create the Workspace, Folder and then Document
            repository
              .create(whereToCreateWorkspace, workspaceToCreate)
              .then(workspace => {
                console.log('Workspace has been created:');
                console.log(workspace);
                console.log('\n');
                return repository.create(workspace.path, folderToCreate);
              })
              .then(folder => {
                console.log('Folder has been created:');
                console.log(folder);
                console.log('\n');
                return repository.create(folder.path, documentToCreate);
              })
              .then(file => {
                console.log('File has been created:');
                console.log(file);
                asserResult(file);
              })
              .catch(error => {
                console.log('Apologies, an error occurred.');
                console.log(error);
              });
Updating a Document
Updating a document is done using the JS client nuxeo.repository().update(document)... method.
The document parameter is a document object containing:
- the entity-type
- the document ID (in a
uidfield) - the properties to update (in a
propertiesobject)
// Sample document object for an update call
var documentToUpdate = {
  'entity-type': 'document',
  'uid': 'document-to-update-id',
  'properties': {
    // Only send the properties that need to be updated
    'dc:title': 'My Updated Title'
  }
};
Creating a Version
The X-Versioning-Option header can be used when you need to increment the minor or major version of the document. It returns the versioned document. Creating a version also means that you will be able to revert to that version later if needed. By default, no version is created when updating a document and the 'live' (snapshot) document is returned.
Accepted values for the header are MAJOR (creates a version and increments the major version number), MINOR (creates a version and increments the minor version number) or NONE (no version is created, if another update is performed later you won't be able to revert the document to the specific state you left it in during the first update). There is no functional difference between a minor and major version.
Practice - Document Update
- Download updateVersionDocument.js or open in another tab to copy and paste.
- Store your Nuxeo Server URL in the
baseURLvariable. - Update the Document you created in the previous exercise (with a new title, for example)
- Increment the Major version during the update.
- Uncomment the
assertResult(document)method to test your results. - When your code is ready, run it with the following command:
$ node updateVersionDocument.js
-
Update and Version Documents - Solution
            const Nuxeo = require('nuxeo');

            var nuxeo = new Nuxeo({
              baseURL: 'http://NUXEO_SERVER/nuxeo',
              auth: {
                method: 'basic',
                username: 'Administrator',
                password: 'Administrator'
              }
            });

            nuxeo.schemas("*");

            var documentToUpdate = {
              "entity-type": "document",
              // Use the UID of the document you created in the previous exercise
              "uid": "8a1b5856-630b-486c-89a8-fd82d1fbce9e",
              "properties": {
                "dc:title": "Updated File"
              }
            };

            nuxeo.repository()
                .header("X-Versioning-Option", "MAJOR")
              .update(documentToUpdate)
              .then(function(document) {
                console.log("Document has been updated:");
                console.log(document);
                // Check your result
                assertResult(document);
              })
              .catch(function(error) {
                throw error;
              });

            /************
            DO NOT EDIT BELOW THIS LINE
            ************/

            function assertResult(document) {
              if (document.isCheckedOut === true) {
                console.log("You didn't create a version while updating your document. Check the headers you are sending.");
                return false;
              }

              console.log("Congratulations, you have successfully completed this exercise");
            }
A version is only created when there are actual modifications sent because it checks to see if the properties have changed.
If you launch the same call in the solution twice in a row, the first call will create a version, the second won't.
Uploading a File
You can upload files with REST API outside the context of a transaction through the batch upload endpoint. This means that you can upload files as big as you want without risking a timeout.
Uploading a File with the JS client:
- Creates a
Nuxeo.Blobobject containing the file. - Instantiates a batch.
- Uploads the file.
Note: The file can be attached to the document either during document creation, or by updating it.
// Access the local file
const filePath = '/local/path/to/myFile';

fs.stat(filePath, (err, stats) => {

  // Create a blob from the filePath passed as variable
  const blob = new Nuxeo.Blob({
    'content': fs.createReadStream(filePath),
    'name': path.basename(filePath),
    'size': stats.size
  });
  const fileName = path.basename(filePath);

  // Start a new batch and upload
  var batch = nuxeo.batchUpload()
    .upload(blob)
    .then(function(res) {
      // Can attach files to Document here...
    })
    .catch(function(error) {
      throw error;
    });
});
Check out the Importing Files with the REST API video at Hyland University for more information.
Practice - File Upload
- Download uploadFile.js or open in another tab to copy and paste.
- Store your Nuxeo Server URL in the
baseURLvariable and modify thefilePathandwhereToCreatevariables. - Access the local file.
- Create a blob from the
filePathpassed as variable. - Upload the file, create a Document and attach the file to it.
- When your code is ready, run it with the following command:
$ node uploadFile.js
-
Upload a File - Solution
            const Nuxeo = require('nuxeo');

            // We require 'path' and 'fs' to access the local file system
            const path = require('path');
            const fs = require('fs');

            const nuxeo = new Nuxeo({
              baseURL: 'http://NUXEO_SERVER/nuxeo',
              auth: {
                method: 'basic',
                username: 'Administrator',
                password: 'Administrator'
              }
            });

            const filePath = '/local/path/to/myFile';

            const whereToCreate = '/path/to/myFolder';

            nuxeo.schemas("*");

            // Access the local file
            fs.stat(filePath, (err, stats) => {
              if (err) {
                console.log(`File not found. Please check the filePath variable (currently set to ${filePath}).`);
                return;
              }
              if (!stats.isFile()) {
                console.log(`${filePath} is not a file. Please check the filePath variable.`);
                return;
              }
              // Create a blob from the filePath passed as variable
              const blob = new Nuxeo.Blob({
                'content': fs.createReadStream(filePath),
                'name': path.basename(filePath),
                'size': stats.size
              });
              const fileName = path.basename(filePath);

              // Upload the file, create a Document and attach the file to it
              nuxeo.batchUpload()
                .upload(blob)
                .then(uploadedFile => {
                  console.log('File is uploaded, we will now attach it to a document.');
                  const documentToCreate = {
                    'entity-type': 'document',
                    'type': 'File',
                    'name': 'MyFile',
                    'properties': {
                      'dc:title': fileName,
                      'file:content': uploadedFile.blob
                    }
                  };

                  return nuxeo.repository().create(whereToCreate, documentToCreate, { schemas: ['*'] });
                })
                .then(document => {
                  console.log('File has been created:');
                  console.log(document);
                })
                .catch(error => {
                   console.log(error);
                });
            });
Fetching Documents
You can fetch documents with Nuxeo JS Client using the Repository class and the document path or ID.
nuxeo.repository().fetch(docId)
nuxeo.repository().fetch(docPath)
Headers
Special HTTP Headers can be set to fine-tune your request. Here are a couple of examples for fetching a document:
properties:schema1, schema2: Retrieves only specific schemasproperties:*: Retrieves all schemas
With JS client, you can set headers in the Nuxeo instance to ensure they are sent with each call, or in one specific request:
nuxeo.header(someHeader, someValue);
var callOptions = {
  'headers': { headerName: headerValue, ... }     // overrides all headers set for this call only
  'schemas': ['dublincore', 'common', ...]             // overrides the schemas set in the Nuxeo object for this call only
};
nuxeo.class().method(..., callOptions)
Practice - Using Headers
- Download headers.js or open in another tab to copy and paste.
- Referring to the Nuxeo JS client documentation, modify the code to:
- Ensure that further calls return all schemas in the response.
- Retrieve a document you previously created, using its path or ID.
- When your code is ready, run it with the following command:
$ node headers.js
-
Using Headers - Solution
            const Nuxeo = require('nuxeo');

            var nuxeo = new Nuxeo({
              baseURL: 'http://NUXEO_SERVER/nuxeo',
              auth: {
                method: 'basic',
                username: 'Administrator',
                password: 'Administrator'
              },
            });

            checkCredentials();

            nuxeo.header("properties","*");

            nuxeo.repository('default')
              // Use the UID of the document you created in the previous exercise
              .fetch('8a1b5856-630b-486c-89a8-fd82d1fbce9e') // you can also use the docPath here
              .then(function(document) {
                console.log(document);
              })
              .catch(function(error) {
                throw error;
              });
Resolvers
Resolvers allow you to retrieve the object associated with the ID stored in a property, all within the same call. It can be used with:
- Documents
- Users
- Vocabulary entries
Assuming that we have:
- A
Contractdocument referencing aCompanydocument ID - A
Companydocument referencing acountryvocabulary ID - A
countryvocabulary
...the depth header allows you to control the aggregation depth:
depth:rootRetrieves objects attached to the current object (default) |
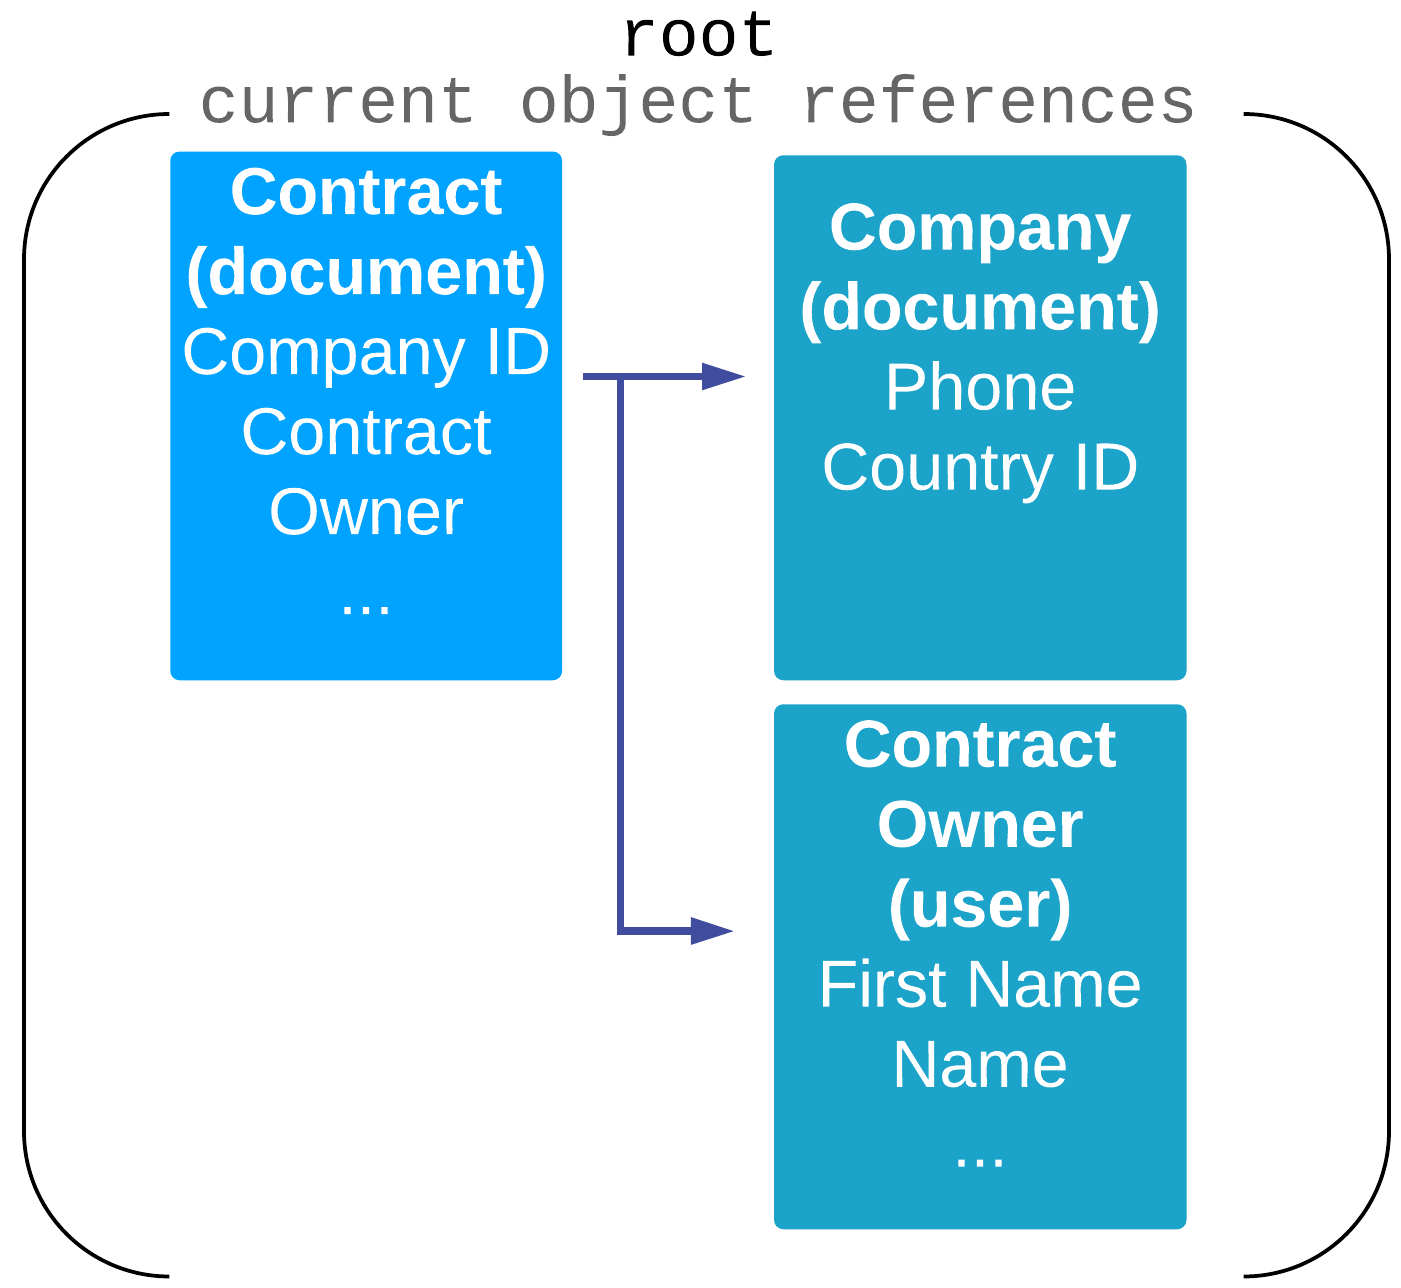
|
depth:childrenRetrieves the objects referenced by the current object and one level deeper |
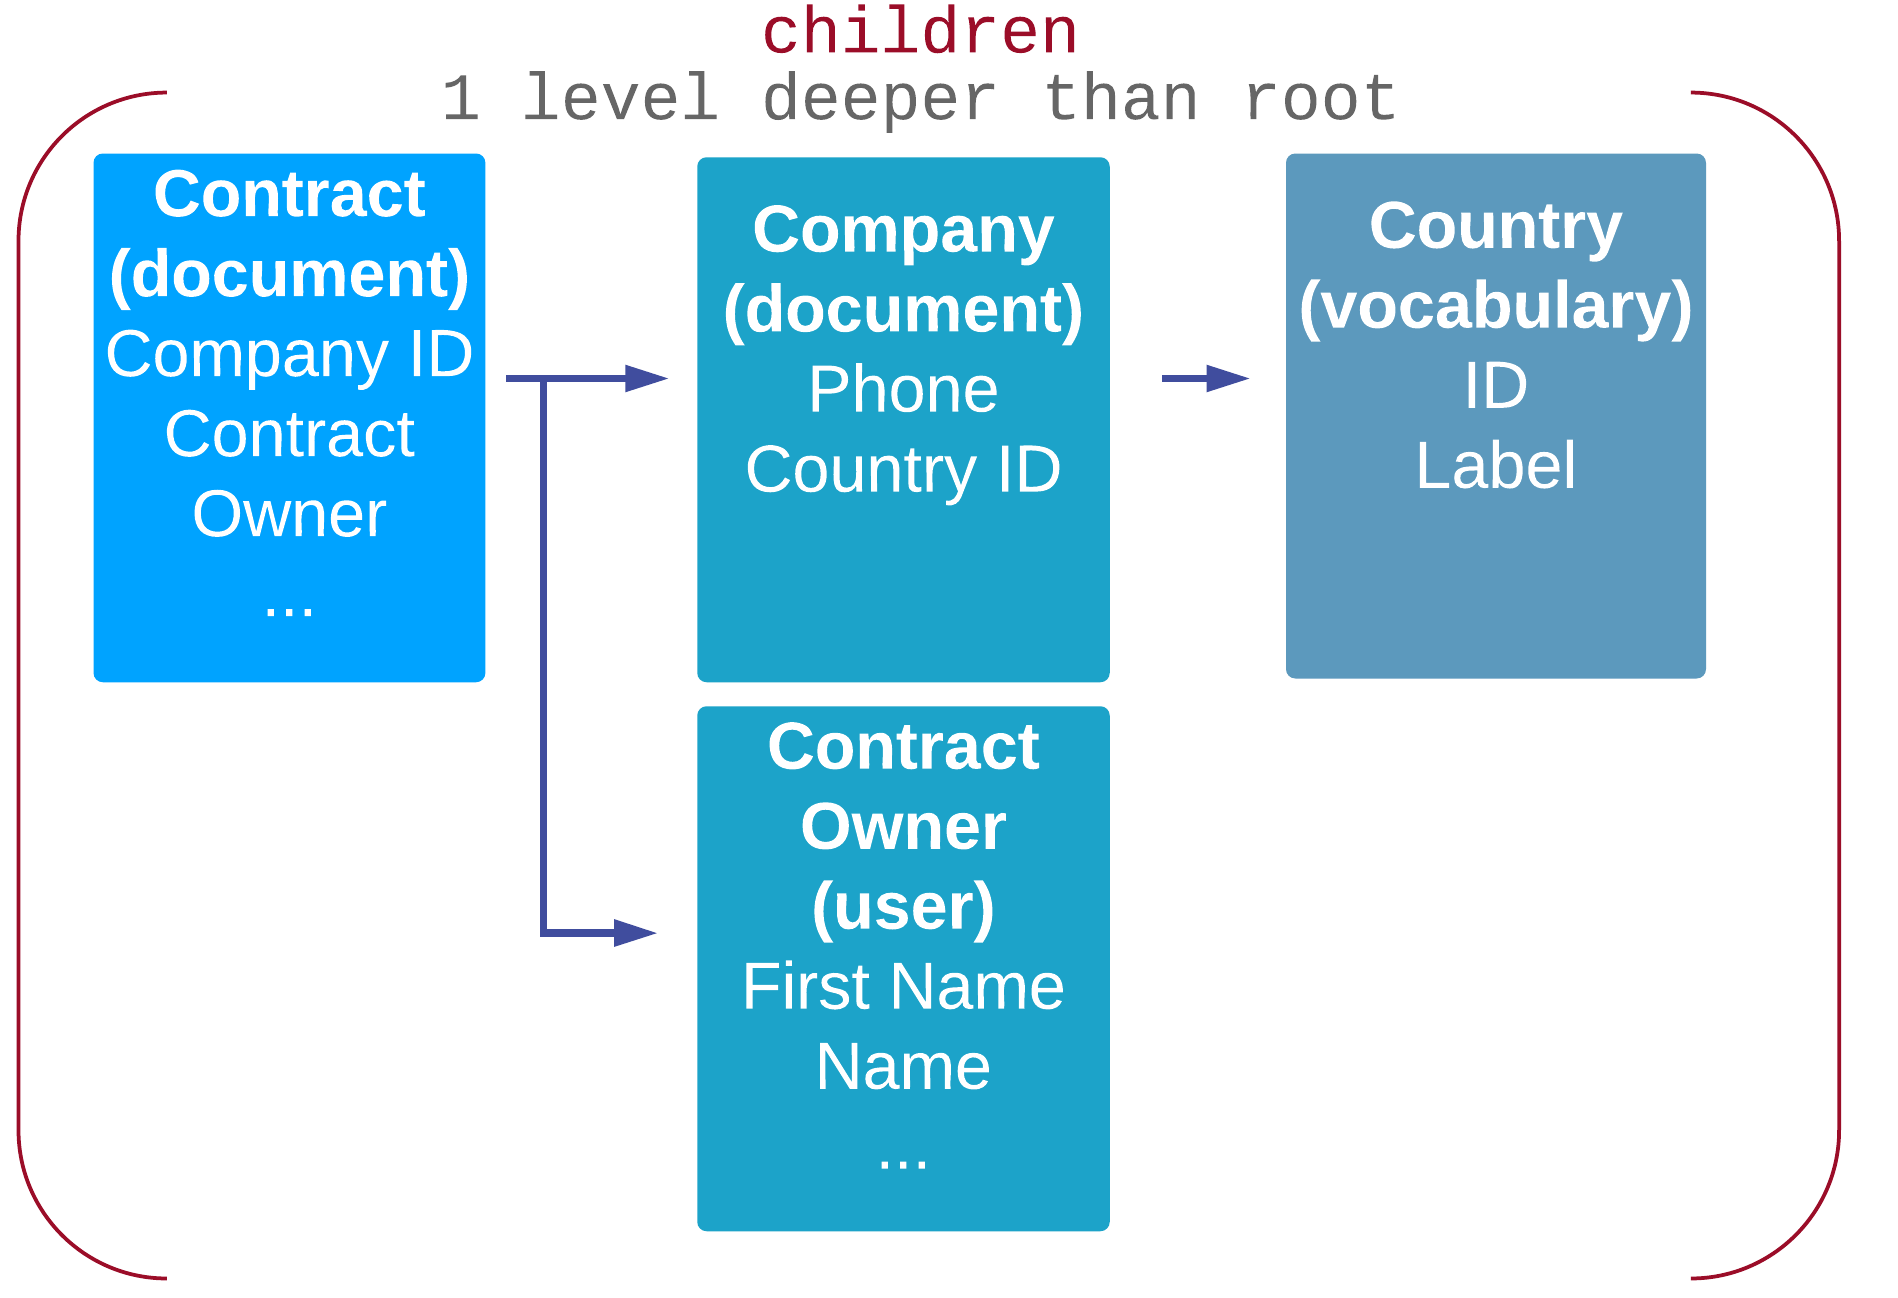
|
depth:maxRetrieves objects referenced by the current object, and objects referenced up to two levels deeper |
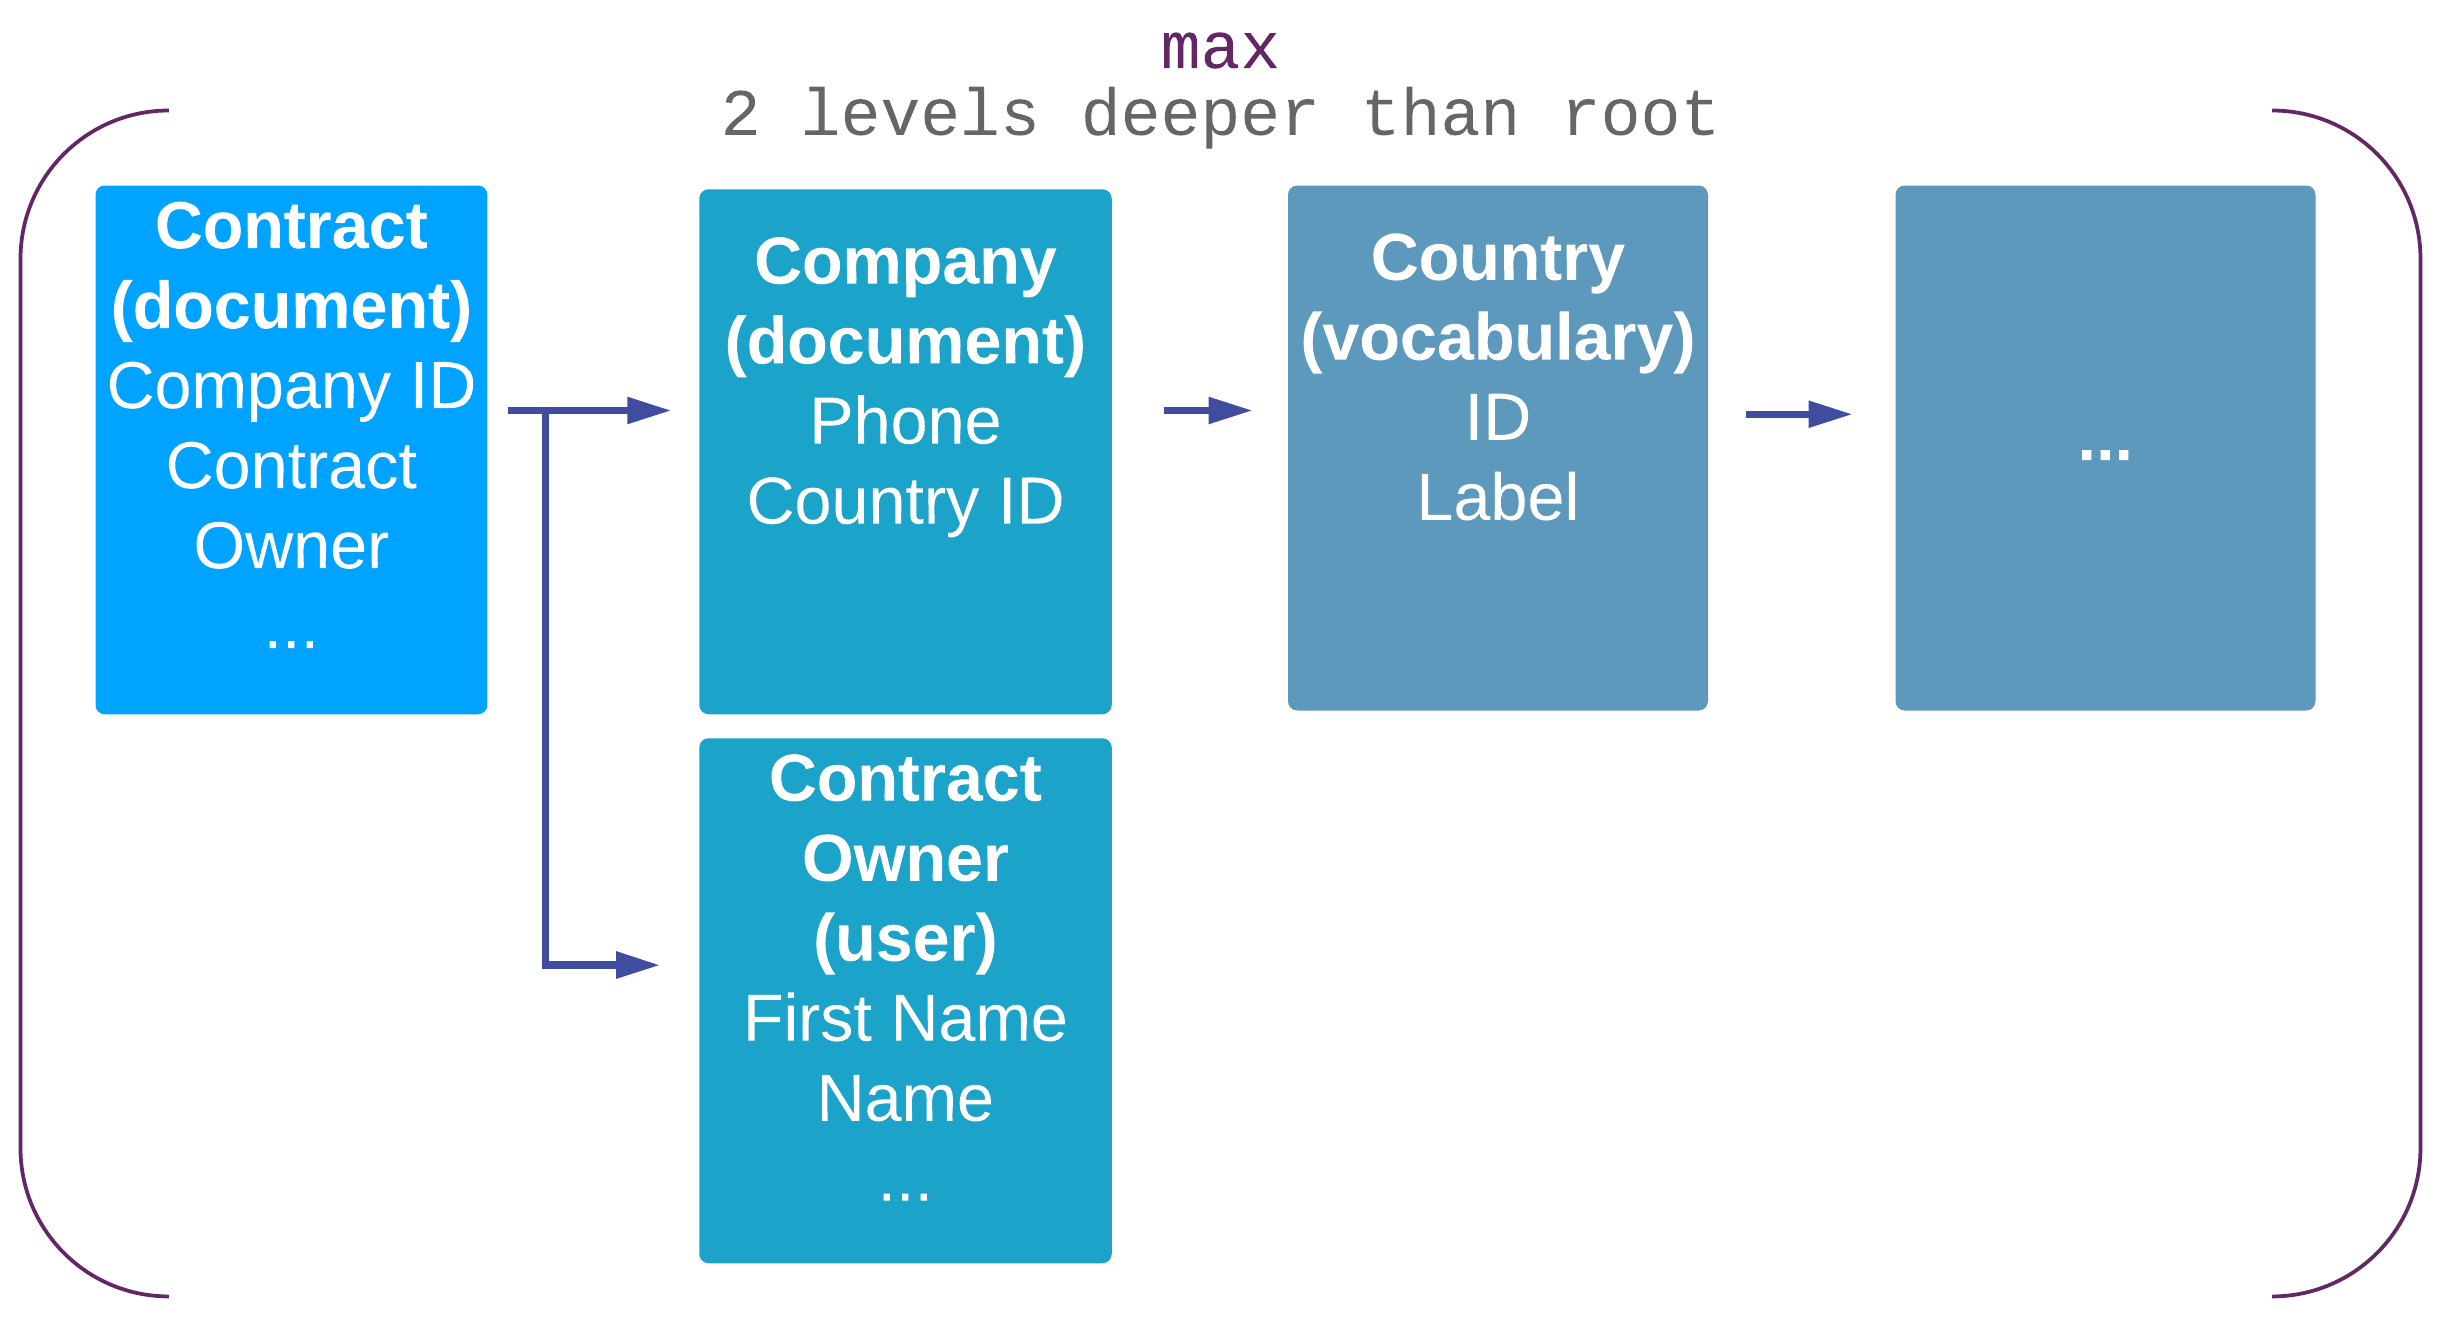
|
In addition to the depth header, you can use:
fetch.documentwith the property IDs storing the references, for each additional object to retrieve:"fetch.document":"{schema}:{property}, {schema}:{property}"fetch.document:properties, to retrieve all objects at the same time.The corresponding JS client methods:
nuxeo.repository().fetchProperty('entity-type', '{schema}:{property}')...

nuxeo.repository().fetchProperties(
  // Declare all properties to fetch at once, overrides the previous definition
  { 'entity-type', ['{schema}:{property}', '{schema}:{property}'] }
)...
Notes about the JS client methods:
- More information about the entity types can be found in the REST API Entity Types documentation page.
- The entity type you fill in is that of the first object you are retrieving.
- When calling a document, use the
documententity in thefetchPropertymethod, no matter what kind of entity types further referenced objects may have. - When calling a user, use the
userentity in thefetchPropertymethod, no matter what kind of entity types further referenced objects may have.
Practice - Resolvers
Create custom document types
- Create two different document types that each extend the File document type:
CompanyandContract. - Under the Schema tab in the
Contractdocument type, add a custom schema that includes the fieldcompanyIdof typeDocument. - Under the Creation Layout tab in the
Contractdocument type, addcompanyIdto the form. - Deploy your Studio project on your Nuxeo Platform instance or perform a Hot Reload from the Dev Tool extension.
Create some documents in your Nuxeo Platform instance
- In Nuxeo Platform, create a company, My Company.
- Create a contract, My Contract, attributing it to My Company during creation.
Fetch the documents
- Download usingResolvers.js or open in another tab to copy and paste.
- Replace
NUXEO_SERVERwith your Nuxeo Server URL and thedocIdwith that of the contract you created. - Add the appropriate resolvers to return the
Companyobject andContractobject in the same call. - When your code is ready, run it with the following command:
$ node usingResolvers.js
-
Using Resolvers - Solution
const Nuxeo = require('nuxeo');

            var nuxeo = new Nuxeo({
              baseURL: 'http://NUXEO_SERVER/nuxeo',
              auth: {
                method: 'basic',
                username: 'Administrator',
                password: 'Administrator'
              },
            });

            nuxeo.schemas("*");

            nuxeo.repository()
            // Retrieve the contract document and the company document in the same call
                .header("depth", "children")
              .header("fetch.document", "properties")
            // Replace with the contract document ID or path
              .fetch('4b33906d-5753-44c7-a83b-bec35581cc9b')
              .then(function(document) {
                console.log("Document has been retrieved:");
                console.log(document);
            // Call the following method to check your result
                assertResult(document);
              })
              .catch(function(error) {
                throw error;
              });


            /************
            DO NOT EDIT BELOW THIS LINE
            ************/

            function assertResult(document) {
              if (document.type !== 'Contract') {
                console.log("Retrieved document is not a 'Contract'.");
                return false;
              }

              if (!document.get('contract:companyId').properties) {
                console.log("Document not associated with a company.");
                return false;
              }

              console.log('Congratulations, you\'ve successfully completed this exercise.');
            }
Learn More
JSON Marshalling documentation
Enrichers
Adding enrichers when fetching a document is done by setting the enrichers.document header, document being the entity type that will be enriched. If you were calling a user, you would use the enrichers.user header instead, and so on. As for resolvers, what matters here is the entity type of the first object you have been calling. Entity types are listed in the REST API Entity Types documentation.
Enrichers are provided in the response of the contextParameters object.
The corresponding JS client methods:
nuxeo.repository().enricher('entity-type', 'enricher')...

nuxeo.repository().enrichers(
  { 'entity-type', ['enricher1', 'enricher2'] }
)...
Practice - Enrichers
- Download usingEnrichers.js or open in another tab to copy and paste.
- Replace
NUXEO_SERVERand the document UID. - Use content enrichers to retrieve the document's ACLs and preview URL.
- When your code is ready, run it with the following command:
$ node usingEnrichers.js
-
Using Resolvers - Solution
            const Nuxeo = require('nuxeo');

            var nuxeo = new Nuxeo({
              // Replace with your Nuxeo Server URL
              baseURL: 'http://NUXEO_SERVER/nuxeo',
              auth: {
                method: 'basic',
                username: 'Administrator',
                password: 'Administrator'
              },
            });

            nuxeo.repository()
              .enricher("document", "acls")
              .enricher("document", "preview")
              // Replace with UID or path of existing document
              .fetch('8fa1ed7a-22f4-49cb-b185-58dd9d2beb4f')
              .then(function(document) {
                console.log("Document has been retrieved:");
                console.log(document);
                assertResult(document);
              })
              .catch(function(error) {
                throw error;
              });


            /************
            DO NOT EDIT BELOW THIS LINE
            ************/

            function assertResult(document) {
              if (!document.contextParameters.acls) {
                console.log("You didn't obtain the document's acls.");
                return false;
              }

              if (!document.contextParameters.preview) {
                console.log("You didn't obtain the document's preview.");
                return false;
              }

              console.log('Congratulations, you have successfully completed this exercise.');
            }
Adapters
Adapters allow you to modify the response before retrieving it. They were created before enrichers, and now you can use enrichers instead of most adapters.
Calling an adapter is done by using an @{adaptername} in your call URL.
There are some use cases where adapters come in handy:
- Retrieving a folderish document's children instead of the document itself
Example
GET http://NUXEO_SERVER/nuxeo/site/api/v1/path/{pathOfTheDoc}/@children?currentPageIndex=0&pagesize=20&maxResults=100
- Executing business logic and retrieve its output instead
POST http://NUXEO_SERVER/nuxeo/site/api/v1/path/{pathOfTheDoc}/@op/{myOperation}
{
  "params": {
    "opParam": "value"
  }
}
Piping
Several adapters can be chained; in this case the result of the first adapter will become the input for the second, and so on.
POST http://NUXEO_SERVER/nuxeo/site/api/v1/path/{pathOfTheFolder}/@children/@op/Chain.myChain
{
  "params": {
    "chainParam": "value"
  }
}
Pay attention to the fact that document list adapters are paged. That means that the chain will run on all documents of the current page.
Using Adapters with the JS Client
As adapters can provide virtually anything in the response, there is no specific class that can be used to call adapters in the JS client. Instead, you need to use the Request class to launch a call, passing the URL and the call method:
// Sample to retrieve the ACLs of the default domain
nuxeo.request('/path/default-domain/@acl')
  .get()
  .then(function(result){
    // Code to do something with the result here
  })
  .catch(function(error){
    // Code to handle error thrown here
  });
Practice - Adapters
- Download usingAdapters.js or open in another tab to copy and paste.
- Replace
NUXEO_SERVERwith your Nuxeo Server URL. - Use an adapter to obtain the audit log of an existing document.
- Pass the result to the
assertResultmethod to check your work. - When your code is ready, run it with the following command:
$ node usingAdapters.js
-
Using Adapters - Solution
            const Nuxeo = require('nuxeo');

            var nuxeo = new Nuxeo({
              baseURL: 'http://NUXEO_SERVER/nuxeo',
              auth: {
                method: 'basic',
                username: 'Administrator',
                password: 'Administrator'
              },
            });


            // Use adapters to obtain your contract's audit log (history)
            nuxeo
            // Replace with the contract document ID or use the path endpoint and document ID
              .request('id/4b33906d-5753-44c7-a83b-bec35581cc9b/@audit')
              .get()
              .then(function(result) {
                console.log("Result has been retrieved:");
                console.log(result);
            // Call the following method to check your result
                assertResult(result);
              })
              .catch(function(error) {
                throw error;
              });


            /************
            DO NOT EDIT BELOW THIS LINE
            ************/

            function assertResult(result) {
                if(!result['entity-type'] == "logEntries") {
                console.log("Document audit log not found. Check the adapter in your request.");
              }

              console.log('Congratulations, you have successfully completed this exercise.');
            }
Learn More
Web Adapters for the REST API documentation.
Deleting and Trash Management
You can permanently delete a document with a simple DELETE call.
In the JS client, you can use the delete method contained in the Repository object:
nuxeo.repository().delete(documentRef)...
where documentRef is either a document ID or a document path.
If you want to handle a trash mechanism, you should change the document state:
document.followTransition(transitionName)...
where document is a Document object and transitionName the name of the transition to follow.
Using the default document lifecycle:
- Follow the
deletetransition to put a document in thedeletedstate. - Follow the
undeletetransition to restore a document to theprojectstate.
Then it is up to you to make sure your queries will not retrieve documents in the deleted state.
Practice - Document Deletion
Trash Management
- Download trashManagement.js or open in another tab to copy and paste.
- Replace
NUXEO_SERVERwith your Nuxeo Server URL. - Retrieve a document using its ID or path.
- Put the document in the "deleted" state.
- Pass the trashed document to the
assertResultmethod. - When your code is ready, run it with the following command:
$ node trashManagement.js
-
Trash Management - Solution
            const Nuxeo = require('nuxeo');

            var nuxeo = new Nuxeo({
              baseURL: 'http://NUXEO_SERVER/nuxeo',
              auth: {
                method: 'basic',
                username: 'Administrator',
                password: 'Administrator'
              },
            });

            nuxeo.schemas("*");

            nuxeo.repository()
            // Retrieve a document using its ID or path
            // (Replace with existing document UID or path)
              .fetch('dde30fe7-1dec-47d2-8ee7-01faba5120ac')
              .then(function(document) {
                console.log("RETRIEVED DOCUMENT:");
                console.log(document);
            // Put the document in the "deleted" state
                document.followTransition('delete')
                .then(function(trashedDocument) {
                  console.log("DOCUMENT TRASHED:");
                  console.log(trashedDocument);
            // Pass the trashed document to the assertResult method
                  assertResult(trashedDocument);
                })
                .catch(function(error) {
                  throw error;
                });
              });


            /************
            DO NOT EDIT BELOW THIS LINE
            ************/

            function assertResult(document) {
              if (document.state !== 'deleted') {
                console.log("The document is not in the deleted state.");
                return false;
              }

              console.log('Congratulations, you have successfully completed this exercise.');
            }
Document Deletion
- Download documentDeletion.js or open in another tab to copy and paste.
- Replace
NUXEO_SERVERand the document UID. - Delete the document using its ID or path.
- Pass the result to the
assertResultmethod. - When your code is ready, run it with the following command:
$ node documentDeletion.js
-
Document Deletion - Solution
            const Nuxeo = require('nuxeo');

            var nuxeo = new Nuxeo({
              baseURL: 'http://NUXEO_SERVER/nuxeo',
              auth: {
                method: 'basic',
                username: 'Administrator',
                password: 'Administrator'
              },
            });

            nuxeo.schemas("*");

            nuxeo.repository()
            // Replace with UID or path of existing document
              .delete('66cb53a4-3515-4751-8f5b-960f39ceb7dd')
              .then(function(result) {
                assertResult(result);
              })
              .catch(function(error) {
                throw error;
              });


            /************
            DO NOT EDIT BELOW THIS LINE
            ************/

            function assertResult(result) {
              if (!result.status || result.status !== 204) {
                console.log("The document still exists. Permanently delete the document to complete this exercise.");
                return false;
              }
              console.log('Document deleted.');
              console.log('Congratulations, you have successfully completed this exercise.');
            }