This tutorial is one of the steps of a complete project tutorial on technical documentation management. Although recommended, the reading of the previous steps is not mandatory and you should be able to adapt easily the logic to your own document types.
In this tutorial we will create a one step workflow that will be assigned to a user depending on the Nature metadata of the document. Basically there will be one responsible per possible nature of the document. This workflow will set the document to approve.
All the concepts used in this tutorial will be explained. However, for more information about workflows in Studio, you can browse to the page Workflow.
Creating the Workflow
To create a new workflow, simply go to the workflow section of Studio, click New and choose a name.
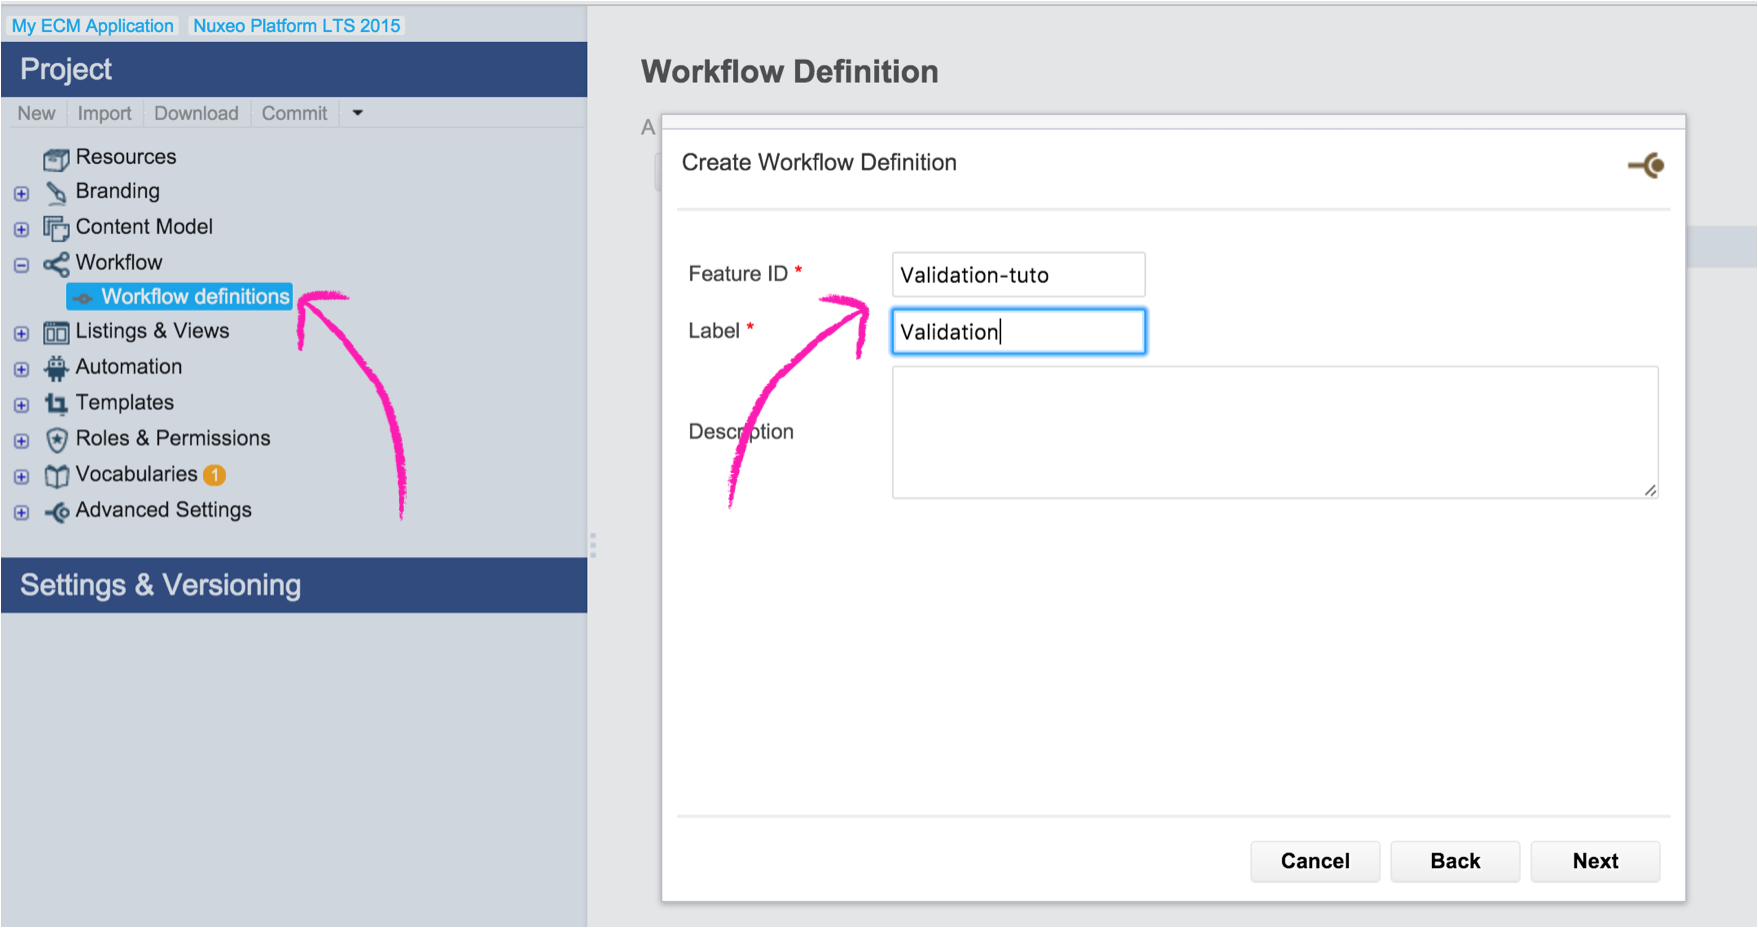
A workflow can be configured through four tabs:
- Definition: Where you select the name and label of the workflow.
- Variables: Where you can manage the Workflow variables that will be used through-out the different steps of the workflow, like comments, user inputs...
- Activation: Where you define the filter to enable or not the workflow.
- Graph: Where you define all the workflow steps and their transitions. This is the most important tab. After you create your workflow, it's normal you get validation error, pending the creation of the graph.
You will find more information about Studio Workflow screens at the page Workflow screens.
Activation Tab
First let's define when the workflow should be available.
- Go to the Activation tab.
- Select our previously created custom type
DocumentationItemin Current document has one of the types. This makes sure the workflow can not be started on other document types.
Graph Tab
The next step is to design the graph of the workflow. So you can go to the Graph tab.
When a workflow is triggered, the Nuxeo Workflow Engine will look for the Start node. From here, it will check if any of the transitions going out of the node is true and follow it (them if several). By default a Start node has a one transition for which the condition is always true so it is an automatic transition. It will work the same way for the next node. Once in the node, the Workflow Engine will wait for a condition to be true to get out of the task and go to the next one. Most of the time the condition is that a button has been clicked on. Much more technical information is available at the page Runtime Instantiation & Execution Logic.
For a start, we decided that our workflow should be as simple as possible so will just use an Approve task, which a simple task with one button and one transition. We will add more buttons and transitions later on if needed.
- On the Graph tab, drag and drop an Approve task from the left (Start and Stop nodes are already there).
- Link them by drag and dropping with your mouse the symbol of the output transition from a node to the next one as shown in the screen shot here under.
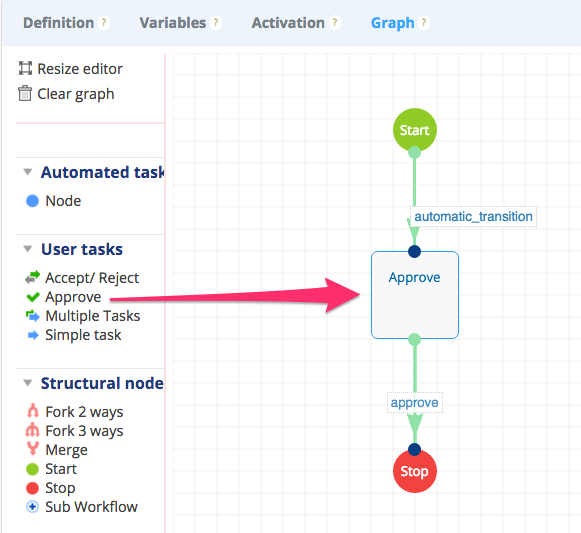 Our workflow graph is now set up. The Start and Stop nodes are very simple so we do not need to do anything about them for now, but the Approve task should be configured.
- To configure the Approve task, go over the task and click on the icon
 .
A Node properties window pops up and is divided into five tabs:
.
A Node properties window pops up and is divided into five tabs:
- General: Main properties of the task like assignees, title, directive...
- Variables: Local variables for this node.
- Form: Will be displayed to the user and enables interaction with her/him.
- Resolution Actions: To configure buttons on the task for the users.
- Transitions: To define all the possible ways to go out of the node and the conditions to follow one transition or another.
- Escalation Rules: To set up rules to be triggered if your task sleeps for too long for instance.
You will find more information about Studio Node property screens at the page Node popup.
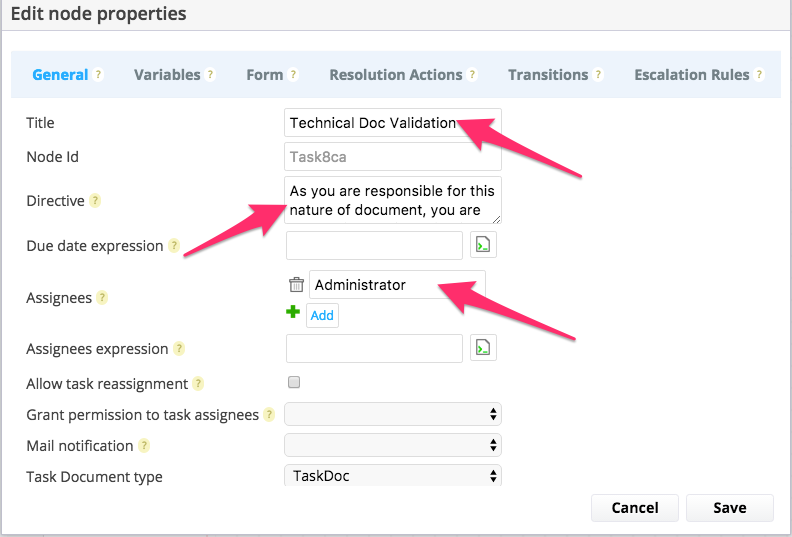
Approve Task General Tab
- Go to the General tab.
- Choose a title for the task: "Technical Doc Validation".
- Choose a directive that will be displayed in the workflow dashboard: "As you are responsible for this nature of document, you are responsible for the document validation."
- Remove the Due date expression as we will not use it. But that would be very useful to define an escalation rule for instance.
- In Assignees, you can define static assignees (users or groups) for the task; click on Add and type
Administrator. - In Assignees expression, you can make some computations to automatically designate the assignees. That will be useful later, but for now, empty the field.
- You have access to others options (like Mail Notification, Allow task reassignment) but we'll leave them empty for now.
Approve Task Variables Tab
In the Variables tab, you can remove Assignees as we do not need it. We may need to add some other variables at some point, but we do not need it for now.
Approve Task Form Tab
The Form tab enables to choose how to interact with the user. You can drag and drop fields here if variables are defined for the workflow or node.
You cannot access properties of the documents attached to the workflow directly from here
We just want the user to approve the task for now so nothing is required in the form.
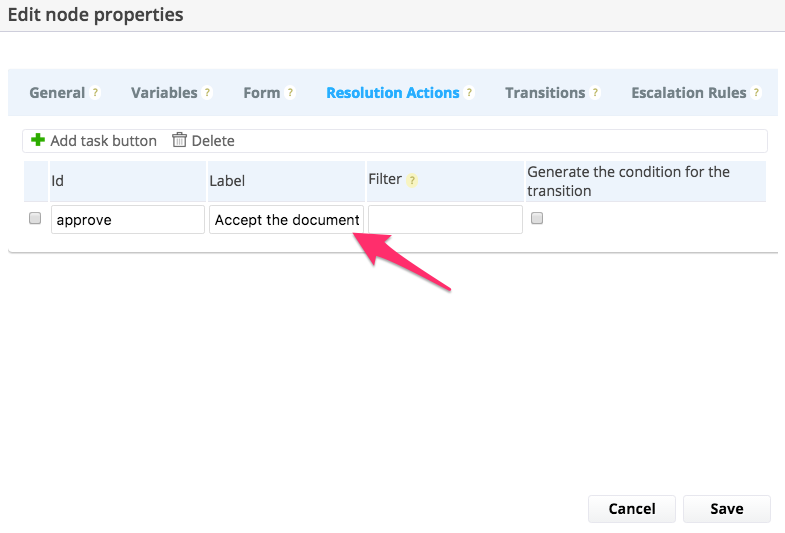
Approve Task Resolution Actions Tab
Just one Approve button is enough for now but we can change the label of the button and type "Accept the document".
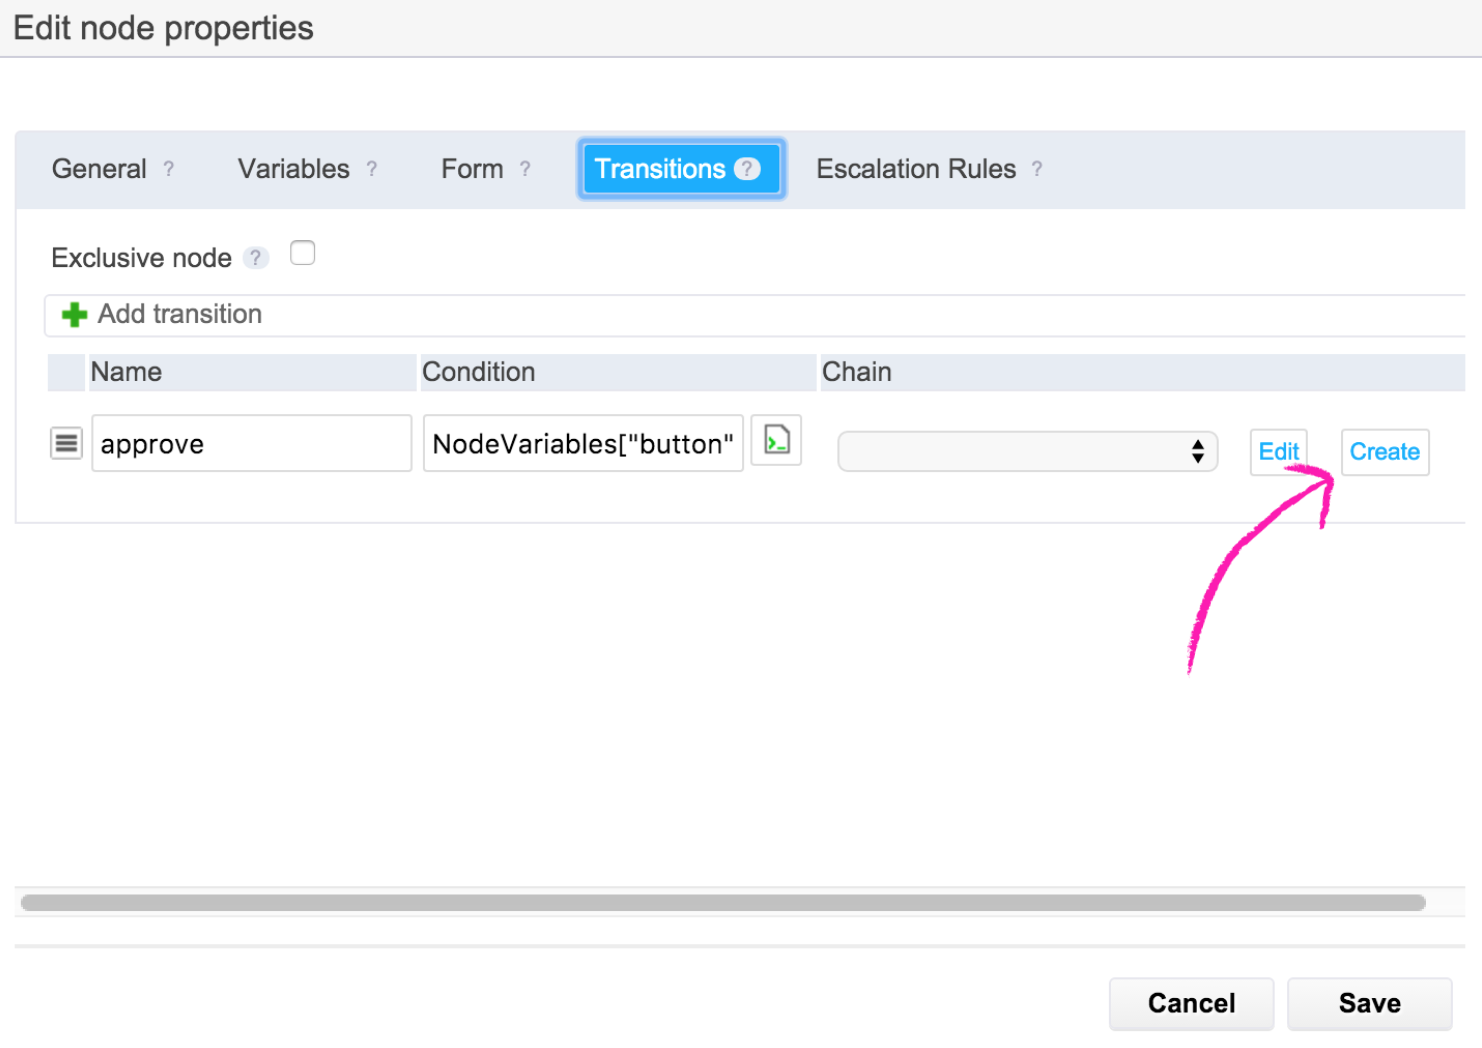
Approve Task Transitions Tab
In the Transitions tab you will see that there is already the transition we need, so do not change anything. You can notice that the condition for the Approve condition is
NodeVariables["button"] =="approve".This is because when a user clicks on a button, it puts the name of the button in a node variable called Button, so by using its value, the workflow engine can know what button was clicked on and compute what transition to follow. You can set more complex condition based transitions on other workflow variables for instance.
- We do not want escalation rules for now, so you can leave the corresponding tab for now.
- Click on the Save button of the Node properties popup, and click on the Save button of the workflow.
You now have a very simple workflow enabled on DocumentationItems that follows a simple path. You can deploy your Studio on your server and test you workflow. It should create a task for Administrator and do nothing after validating the task.
Computing Assignees Dynamically
If you followed the first part of the tutorial (Implementing Documentation Items), you have a DocumentationItem that can have three possible natures. We want to have a different user responsible for each possible nature:
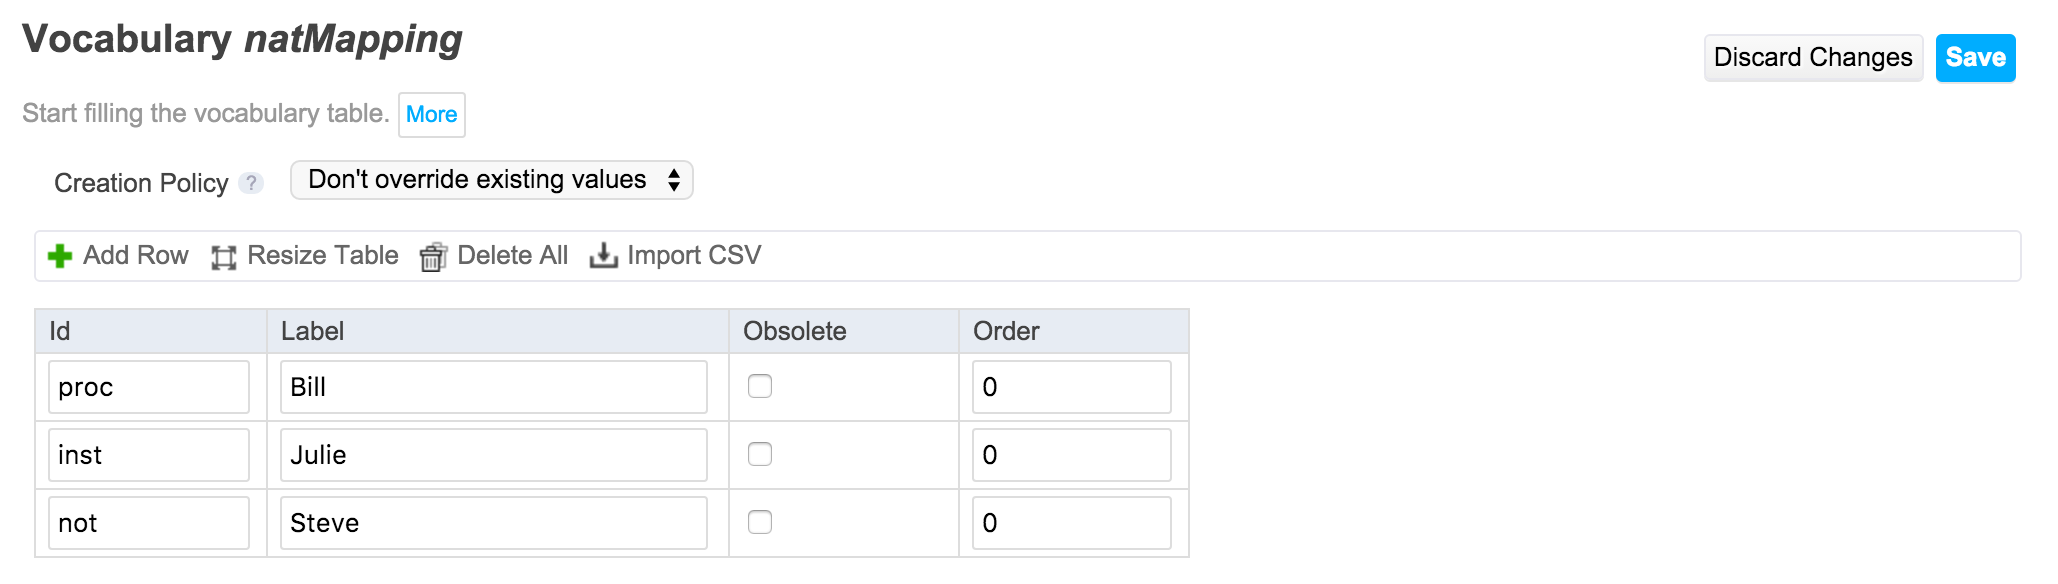
- Procedure (proc) -> Bill
- Notice (not) -> Julie
- Installation Instruction (inst) -> Steve
Of course, the responsible can change over time so you do not want to hardcode the value in the workflow but make it possible for an administrator to change the mapping without restarting the system just for that. The use of a vocabulary to store both the nature key and its mapped responsible seems like a good solution. We will compute the Assignee of the task from this vocabulary and the value of the Nature stored on the DocumentationItem.
First create a Vocabulary called
natMappingand populate it with the values explained above: a nature (the key not the label) and a user name (we will create them later).You should get a vocabulary like this.
 How to create a Vocabulary
We already created a Vocabulary in a previous tutorial of this series. If you do not remember or did not follow the tutorial, you will find the information at the end of the page Implementing Documentation Items. For each key of the natQual vocabulary, you should have the same key in natMapping with the corresponding responsible user name as a label.
You can also refer to the page How to Add a New Vocabulary.
- Go back to the workflow graph, on the Approve task of the workflow and edit it.
- In the Assignees field, remove the
Administratorby clicking on the icon .
. Edit the field Compute additional assignees by clicking on the icon
 on the right.
 A window pops up in which you see a drop down list called Browse Context, in this list you have access to many variables you can use to compute information.
In the Browse context drop drown list, select Fn and then getVocabularyLabel("voc","key") and click on Insert.
- Replace
"voc"by your vocabulary name:"natMapping"(you should keep the quotes as it is a String that is expected). Remove
"key"and leave the cursor here.In Browse Context, select
Documentand then["xpath"]and click Insert.This the way to access a document property.
You should replace
"xpath"by your actual metadata which is"qa:nature".Your final expression should be:
@{Fn.getVocabularyLabel("natMapping", Document["qa:nature"])}.xpathIn many places in the Nuxeo Platform, you will be asked for a XPath which is a way to reference a metadata. A metadata in the Nuxeo Platform is always part of a schema, so to identify a metadata you only need the prefix of the schema (
dcas dublincore for instance) and the name of the metadata, separated by a colon. Hence, the XPath for the nature of the document which is held by the schema Dublin Core isqa:nature.XPath are also used NXQL (Nuxeo query language). You will find other examples of XPath in the NXQL page.
- Click on OK, save the node properties, save the workflow and redeploy your Studio project to your server.
- On your server, as an Administrator, go to the Admin Center > Users and Groups, and create the three following users: Steve, Julie and Bill. Make sure you spell them exactly like you did in natMapping vocabulary.
- Go to a DocumentationItem that has a nature and launch the workflow, it should be automatically assigned to the correct user.
We now have a workflow that self assigns to the right user but it still does nothing in the end: our document is still not validated. This is the next step.
Triggering Validation Logic with the Workflow
We have seen in Document Locking Right after Its Creation that business logic in the Nuxeo Platform is created with Automation Chains that are then triggered through different means (event handlers, user actions, APIs...). The exact same logic applies to workflows. Automation Chains can be triggered at different moment of the workflow :
- When entering a node,
- When exiting a node,
- On a specific transition.
So the general logic is so define when the chain should be triggered and then create the corresponding Automation chain.
As our workflow is very simple (only one button), we can put the validation logic almost anywhere: as an output of the validation task, as an input of Stop node or on the outgoing transition of the validation task. However, if we try to see a little bit further, we can probably choose wisely.
- We will probably add a Reject button to the task, so we do not want to launch the validation chain whenever exiting the validation task.
- The Stop node may be shared with other tasks in the future, so probably not a good choice neither.
- What we want is that the validation logic is triggered when the user clicks on a button Accept the document which will trigger the transition approve.
So in the end, let's bind our validation logic to the approve transition.
- In Studio, edit the Approve task and go to the Transitions tab.
- In the transition list, you will see on the left that you can either select an existing chain, or create a new one. Click on Create.
- Choose a name so that will know this is the validation chain of the validation workflow, something like
ValWf_ValidateDoc. You are redirected to the Automation Chain Screen where you can select the operation you need. In our case, we would like the document to be in a valid state. We have an operation that is called "Document > Follow Transition" that enables to change the state of the document depending of its lifecycle. However, we did not set a specific lifecycle for our document yet. So we should start with that. - Save your empty chain.
Setting the Lifecycle
In the Nuxeo Platform, all document types have a lifecycle that enables to describe the state of the document. This not linked directly to the workflow. You can have workflows that does not change the state of the document, or you can also change the state of a document outside of a workflow. You change the state of the document by using the Automation operation called FollowLifeCycleTransition in the Document category.
More information on lifecycles in Studio at the page Life cycle.
- Go to Document Model > Life Cycles.
- Create a new one called
technicalDocLifeCycle.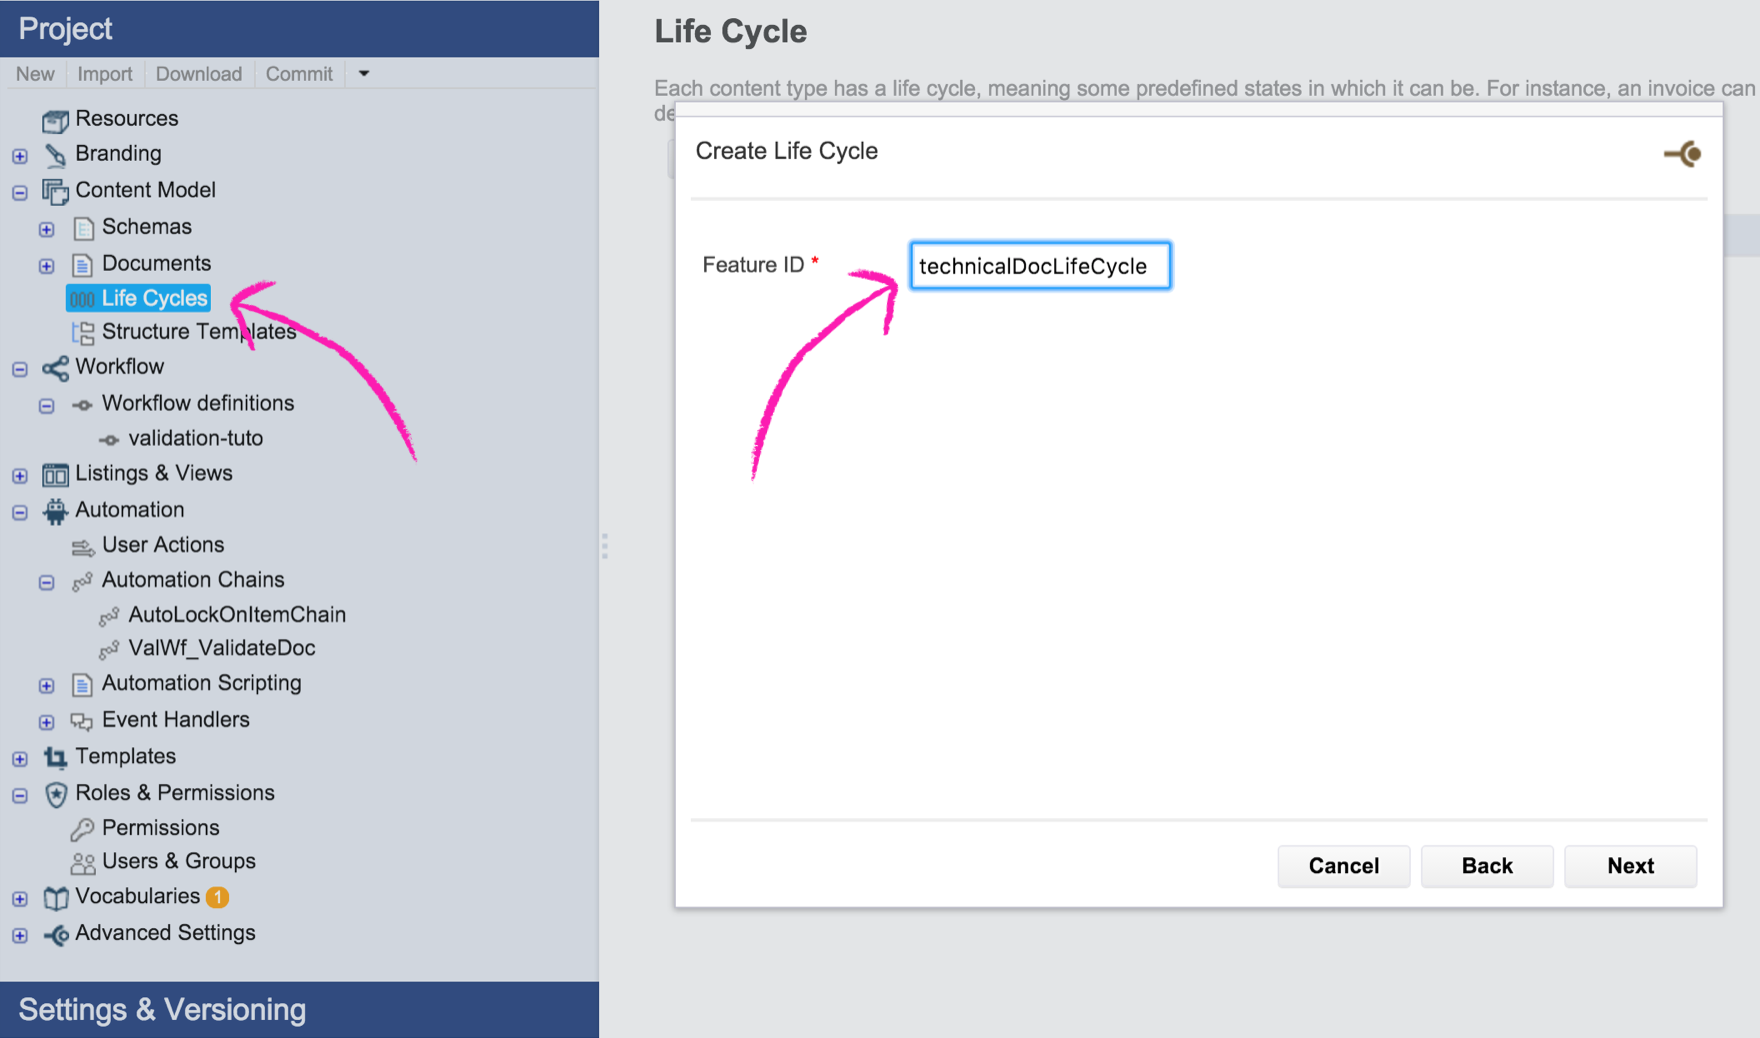
A lifecycle needs an Initial State. Create one by clicking on Initial State and then clicking somewhere in the graph.
Go over the state and edit the state to name it
draft.- Create two other normal states and call them
validandobsolete(we may not need this one for now). - Go over each state and link them to the others as shown on the following screen shot (you can move transitions by clicking on the dot on the middle).
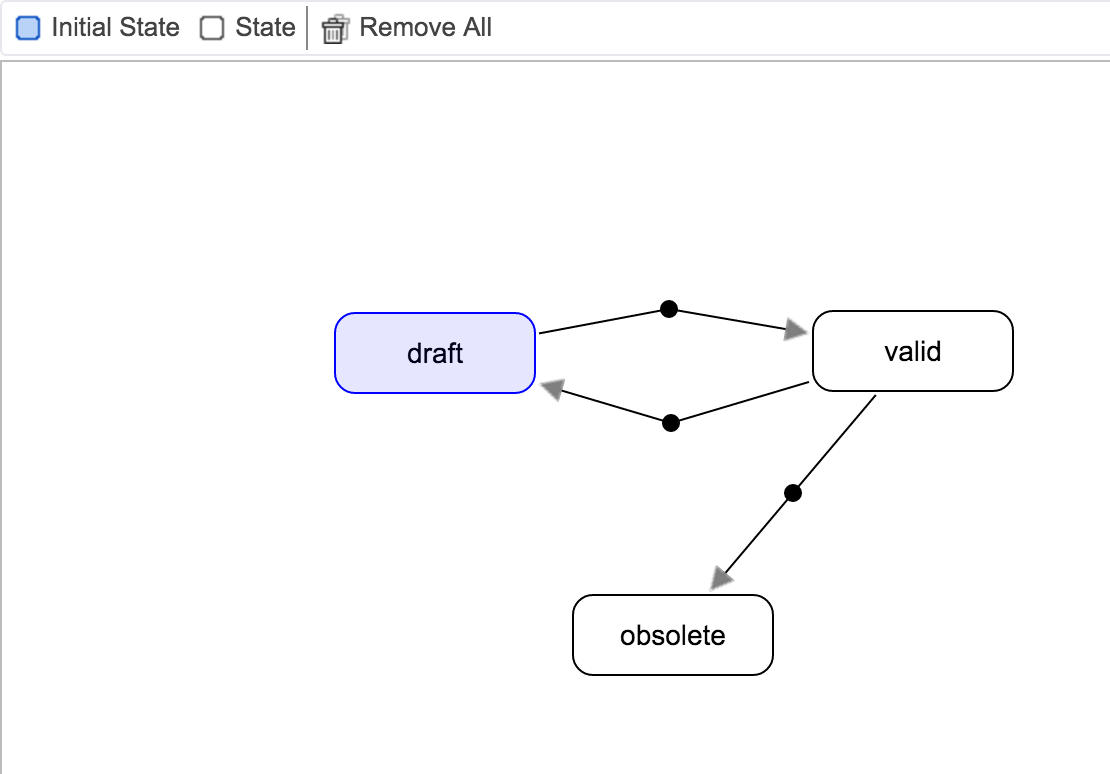 The transition are named automatically by Studio using the following pattern: to_state.
- Save the lifecycle.
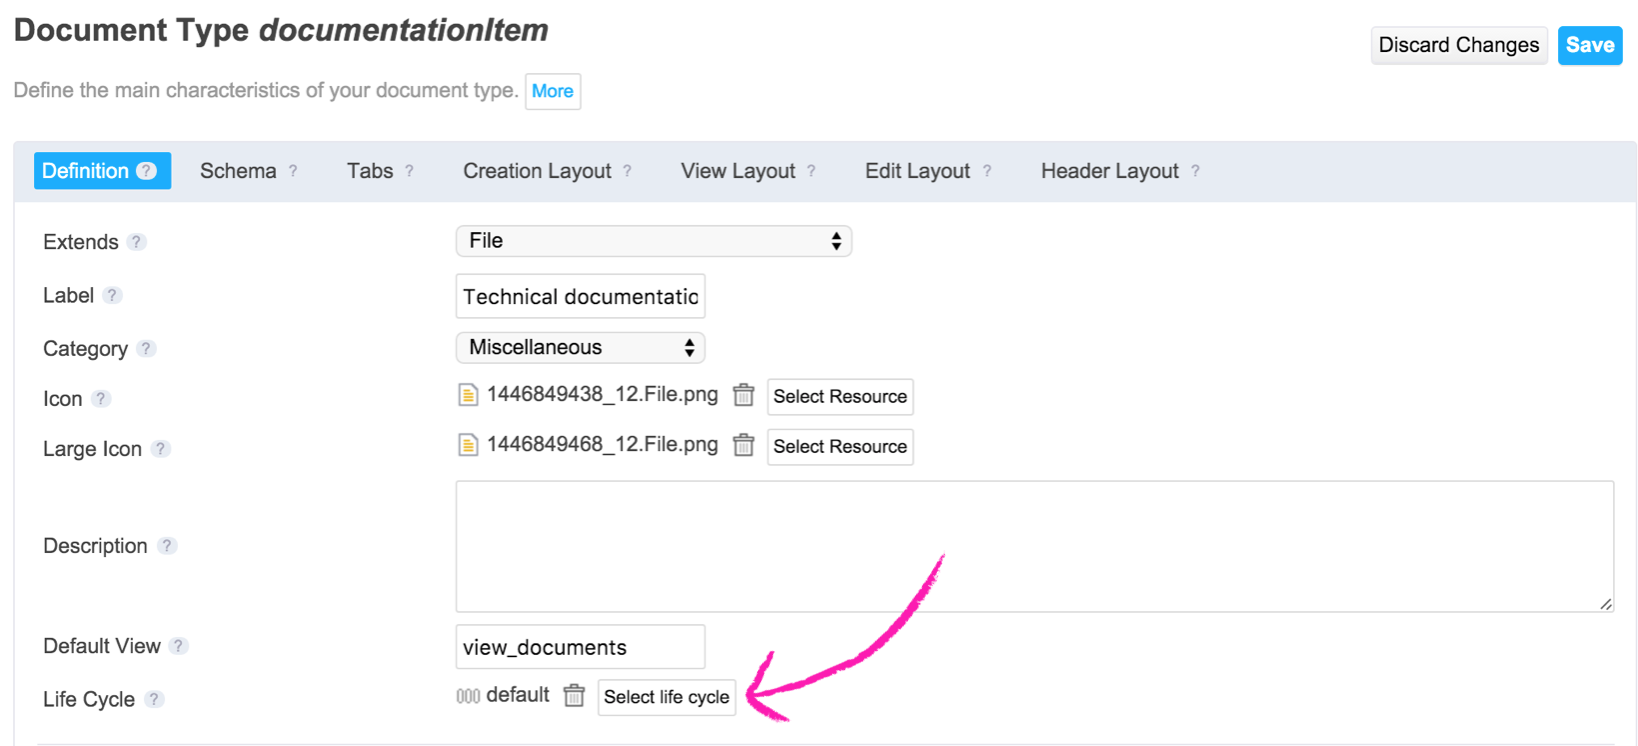
- Go to the DocumentationItem document type, and select the newly created lifecycle.
Defining the Automation Chain
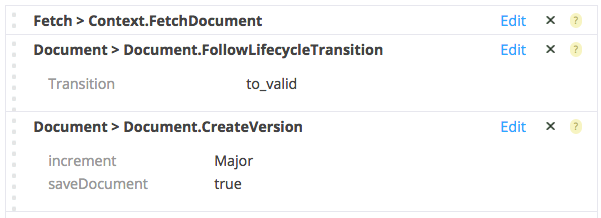
- Now that the lifecycle is defined, go back to the Automation chain ValWf_ValidateDoc.
- Add the operation Documents > Document.FollowLifeCycleTransition.
The expected parameter is the name of the lifecycle transition you want the document to follow:
to_validin our case. - Add the operation Document > Document.CreateVersion with the parameters:
- Increment: Major
- saveDocument: checked. It will create a new version of the document each time it is validated.In the end you should have:
- Save the chain, deploy your project, create a new DocumentationItem with a nature metadata and enjoy your workflow.
If you followed the previous tutorial (Document Locking Right after Its Creation), your document is locked after is creation. The assigned user of the workflow can validate the document but cannot modify it. You should probably create an automation chain that uses the operation Document > Document.Unlock and trigger it at the beginning of the workflow, for instance as the input chain of the validation task.
You now have documents that can be validated by different users depending on their nature.
To sum up what we saw:
- A workflow is a list of tasks linked by transitions.
- Each task can have static or dynamic assignees and a form to interact with them.
- A workflow can trigger Automation Chains at any moment to add business logic to it.
The next step is to add some steps to the workflow so that the validator can ask for more information.