Use Case
Company C has decided to be more rigorous on proposals sent by the sales team. A workflow has to be set up so that each proposal is reviewed by the head of operations, this one being able to decide of an additional juridical control.
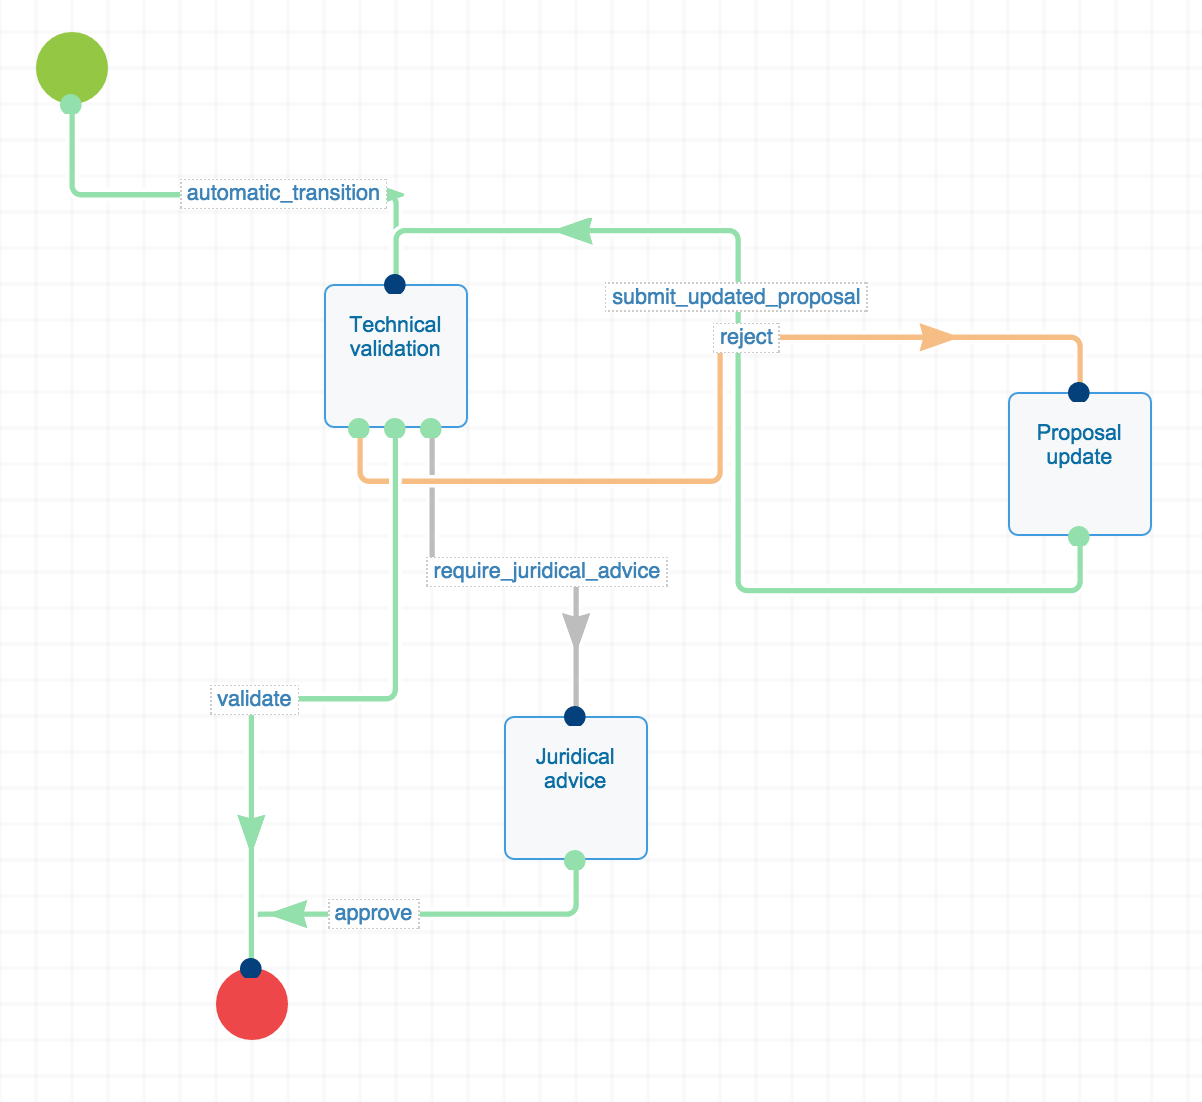
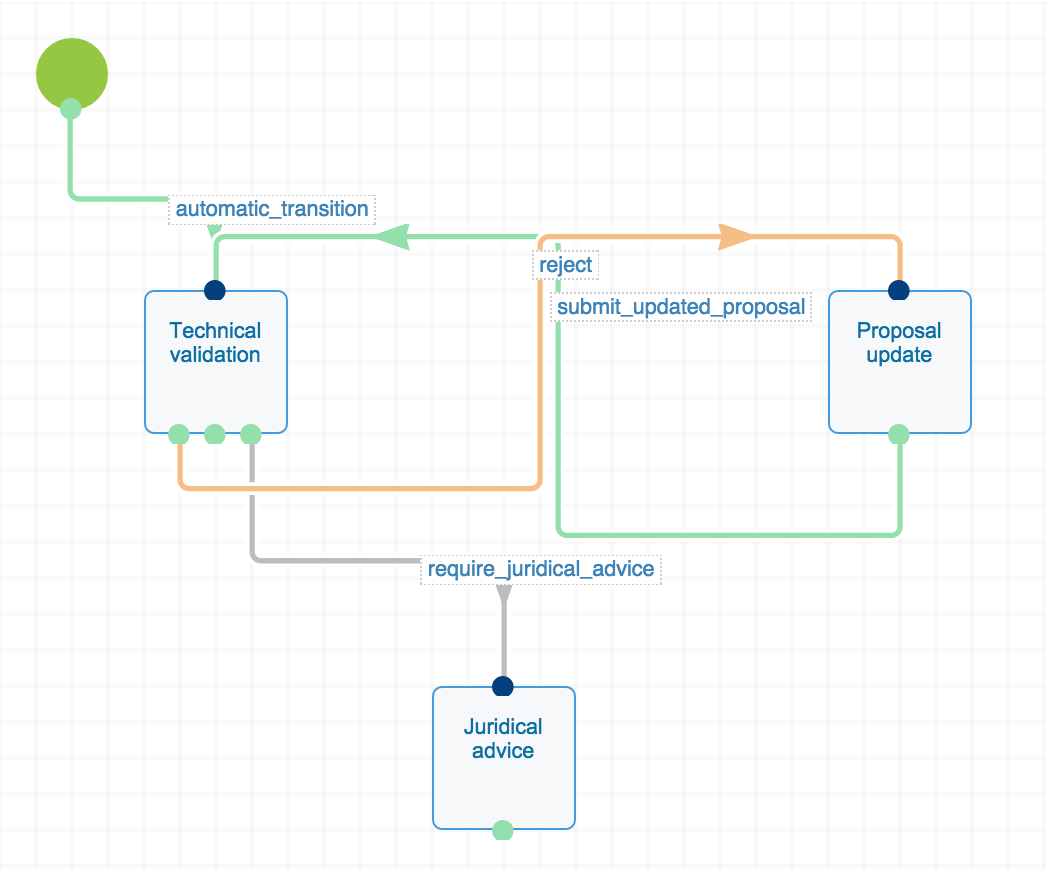
The graph we want is like this:

Prerequisites
The following operations have to be done in your Nuxeo Platform before following this tutorial:
- Create a user having for id "Jack".
- Give Jack read and edit access on the domain.
- Create a user group having for id "Internal_Lawyers".
- Populate the "Internal_Lawyers" group with at least one user.
- Create the user that will launch the workflow.
Implementation Steps
Creating the Workflow
- In the Workflow category, click on Process definitions.
- Click on the New button.
- Give the workflow an id ("
SalesProposalWorkflow"), a label and a description.
- Click on the Ok button.
Defining the Workflow's Availability
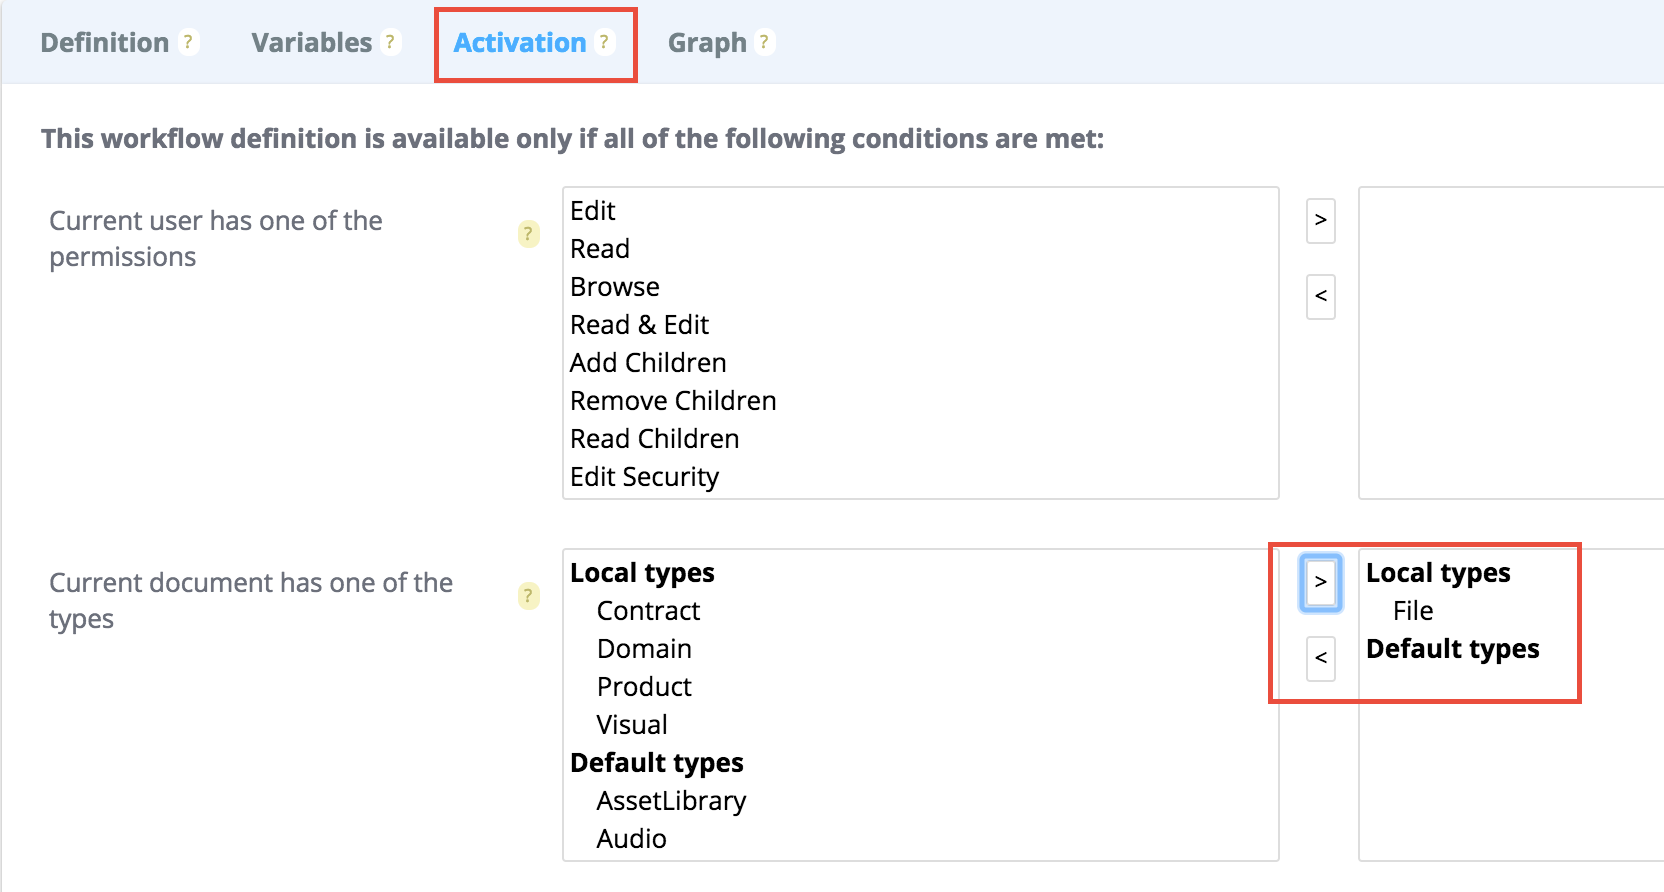
Workflows can be launched through a drop down list on the summary screen of every document. Into the “Activation” tab, you can decide for which type of document the workflow you do will be usable, for which group of users, etc.
- From the workflow, click on the Activation tab.
- In the "Current document has one of the types", select File.
Starting the Graph
A workflow must start with a node for which the "start node" property is checked and have at least one end node with the "end node" property checked. To make it simpler, Studio provides a node template library (on the left), from which a Start node and an Stop node are available.
To start the workflow graph:
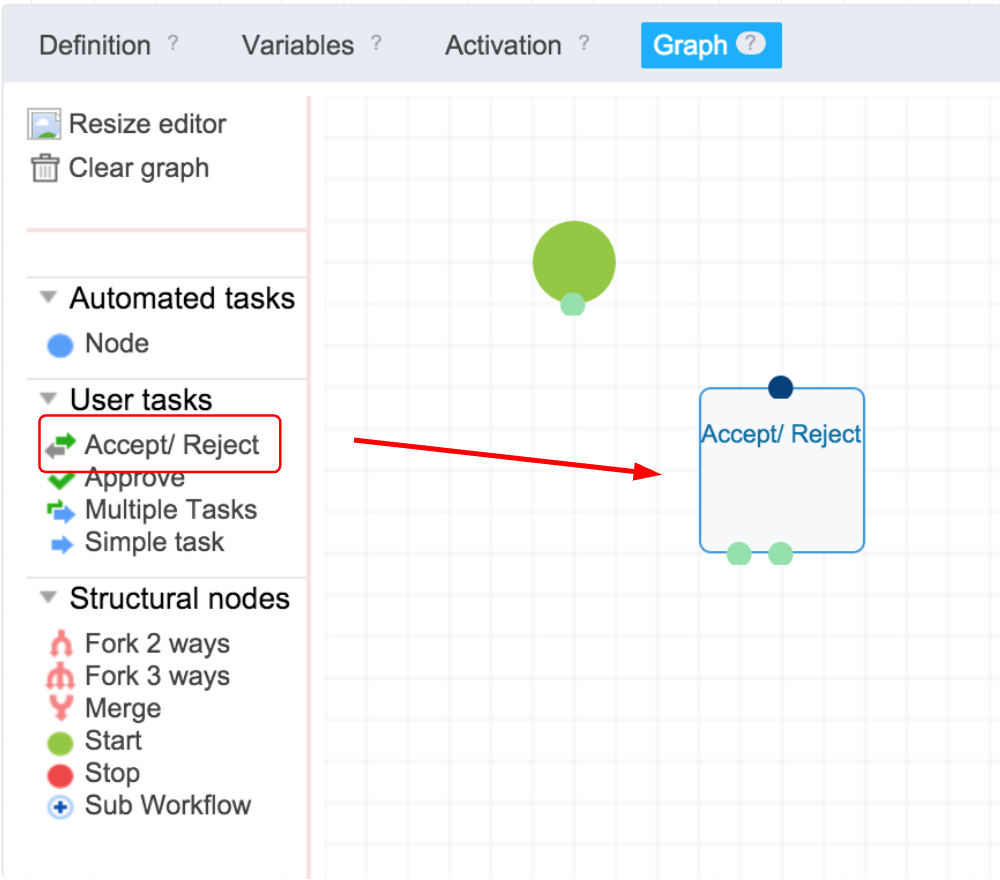
- Click on the Graph tab.
- By default, Studio adds the Start and Stop nodes automatically. If not, drag and drop the Start node on the graph.

Defining the Technical Validation Step
Let's create and configure the technical validation step.
Adding the Technical Validation Node
This node will create a task for the head of operations, named "Jack". Jack will have to accept or reject the proposal submitted by the salesman, or decide that it requires a juridical advice.
Drag the Accept/Reject node template from the node template library and drop it on the graph. It will already have some of the needed transitions and buttons pre-configured: “Validate” and “Reject”. You actually need another transition (“Need juridical advice”), which you will add manually in a future step.
Configuring the Technical Validation Node
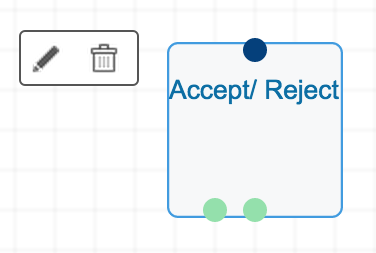
- Hover on the Accept/Reject node you just dropped and click on the Edit icon
 that appears to open the node properties.
- In the General tab, rename the title “Accept/Reject” by "Technical validation" and add
CurrentDate.days(5)in front of the Due date expression.
- Add a statical assignee ("Jack"): Click on the "Add" link in front of the "Assignees" field. Add the "Assignees expression"
NodeVariables["assignees"]. We will leave aside the “Grant permission to task assignees” field blank.
- Click on the Save button of the popup.
- Click on the Save button of the workflow feature on the bottom left corner.
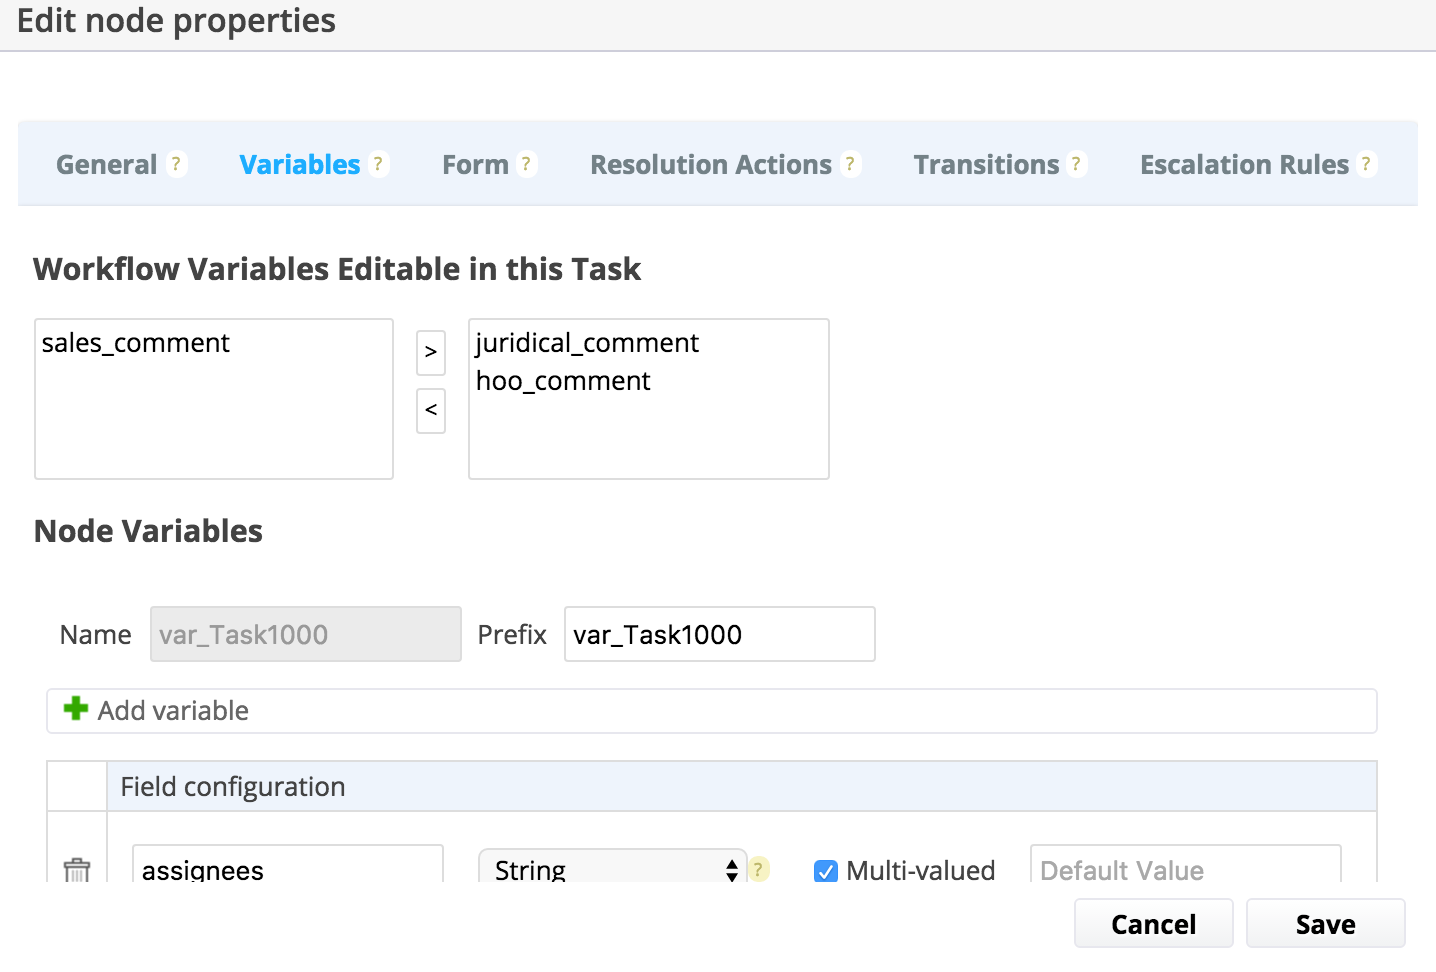
Configuring the Workflow Variables
During this task, we want to capture the head of operations' comment. We could use a node variable, but using a workflow variable is more appropriate as it will let us leverage the head of operations' comment value in the other nodes. For example, to display it to the other users in their own task validation form, so as to know what was the option of the head of operations when taking the decision. Getting the juridical advisor and salesman's comment will be needed at a later stage, so we will add workflow variables for their comments as well.
This variable will be named “hoo_comment”.
To add the workflow variables:
- Click on the Variables tab of the workflow.
- Add the head of operation's comment variable and name it
hoo_comment. It is like editing a schema. - Add the juridical advisor's comment variable:
juridical_comment. - Add the salesman's comment variable:
sales_comment.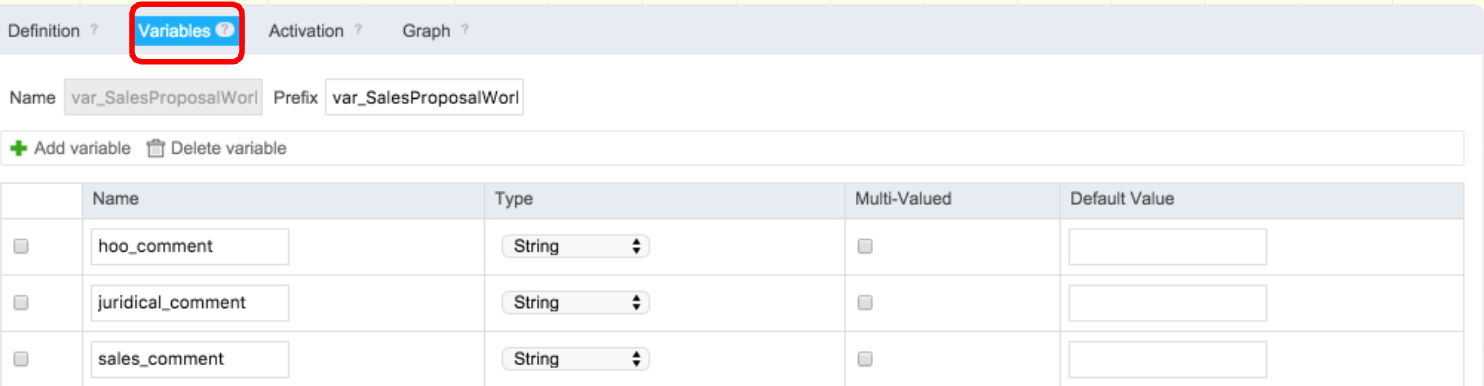
- Click on Save.
Configuring the Technical Validation step forms and actions
The form lets the user edit some of the workflow's variables (either at workflow level or node level), and the buttons help the engine to know which transition to play after the node, depending on what the user clicked on.
Configuring the Form
- Go back to the “Technical validation” node.
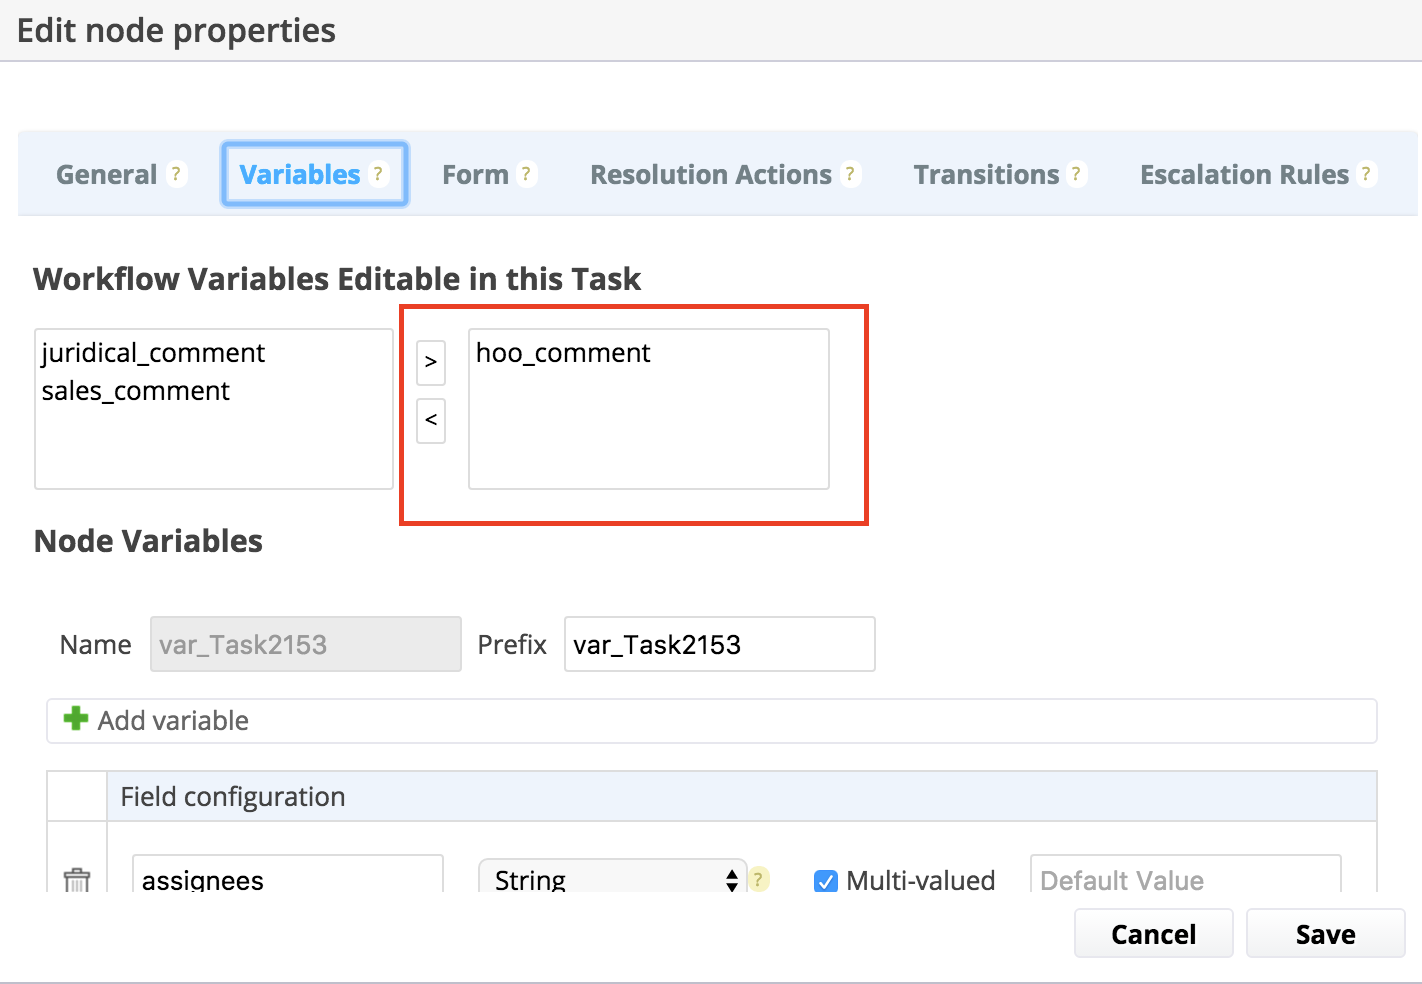
- Click on the Variables tab.
Add the hoo_comment to the right collumn.
- Click on the Form tab. A form like the one to edit a document's layout is displayed.
- Add a field for the comment of the user who validates: Drag the “hoo_comment” field from the workflow variables schema and drop it on the layout.
- Edit the widget, the same way you edit the form of a document:
- Change its title for "Head of operations comment".
- Select the widget type "Textarea".

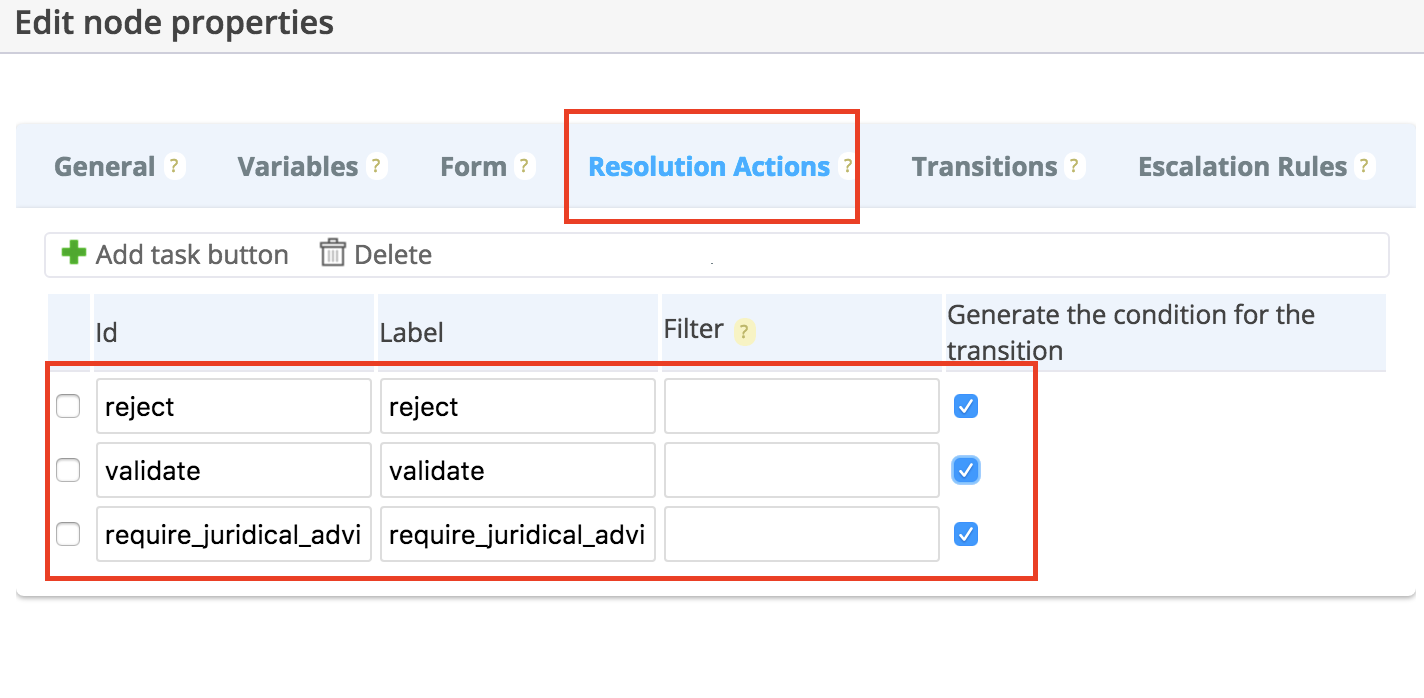
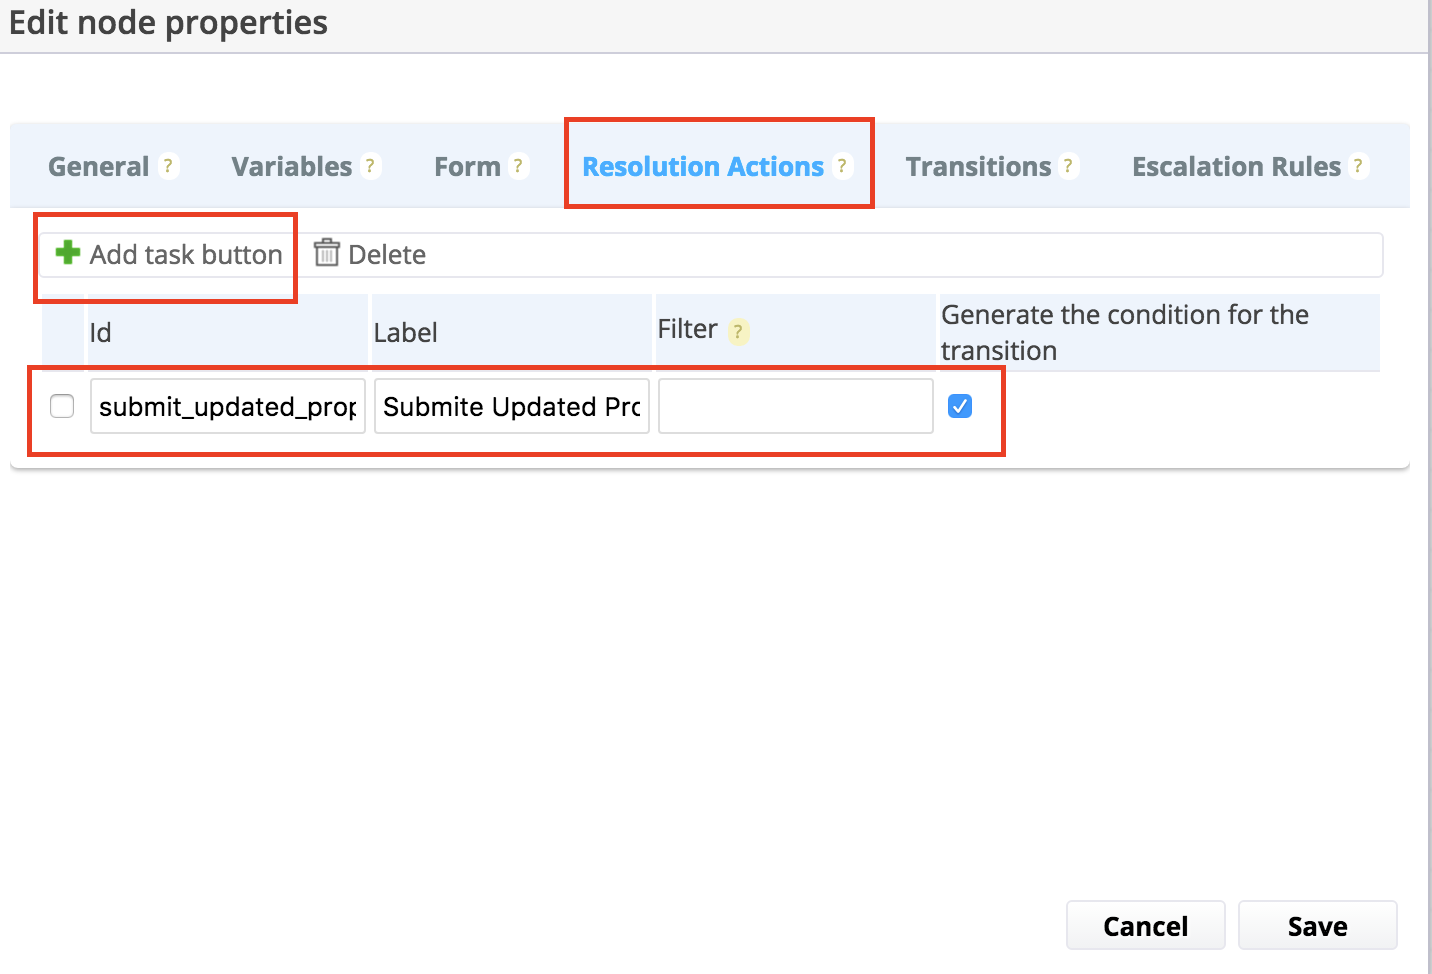
Setting up the Tasks Buttons
The buttons that are shown on the form are configured on the Resolution Actions tab. Two are already available because of the template node you chose. You need to add a third one when the document requires juridical expertise.
- Click on Add task button.
- Fill in the button id and label.
- Let the box "Generate the condition for the transition" checked.
Check the Transitions
Each button is automatically associated to a transition to define what should be done when the user clicks on the button. Transitions automatically get a condition, which is a system node variable called “button”. This variable is systematically updated with the id of the button used to process the task. It is useful to configure the behavior of the transitions.
- Finally, click on the Transition tab.
Note that you could add more terms in the condition if necessary.

- Click on Save.
Connecting the Nodes
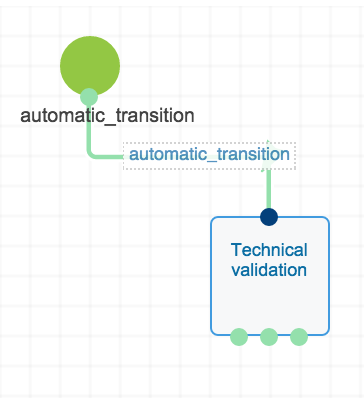
- Go back to the graph.
- Link the Start node to the Technical validation node, by pulling an arrow between the unique transition point of the Start node to the input point of the Technical validation node.
Note that you have three transition points on the technical validation node, ready to be pulled to the next nodes.
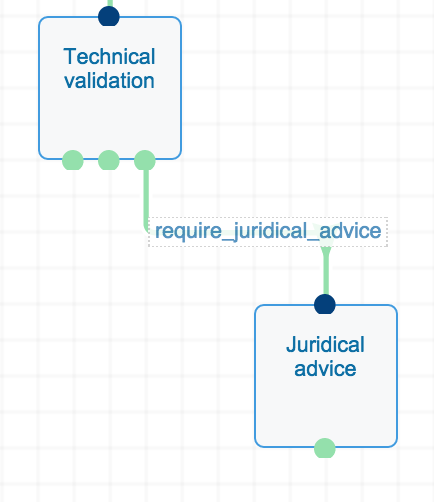
Defining the "Juridical Advice" Node
Now that we have our “Technical validation” node set up, we need to create the nodes used for its possible transitions. First comes the “Juridical advice” node. As most operations have been described before, we will only comment this node’s specificities.
Adding the Node
Drag the “Approve” node from the node template library and drop it on the graph.

Configuring the "Juridical Advice" Node
- Open the node properties.
- Rename the node to “Juridical advice”.
- Define the assignees.
This time we would like to ask a member of the “Internal_ Lawyers” user group to comment instead of a specific person. Therefore, instead of adding a specific username, you may simply add an assignee and use the prefix “group:” to specify a user group. In this case, we will set the value to “
group:Internal_Lawyers” and add the "Assignees expression" “NodeVariables["assignees"]”. Grant the appropriate rights. The internal lawyers may not have the necessary rights to read and/or edit a sales proposal document. To avoid an exception to be thrown because of this, you need to grant them the appropriate rights on the document that needs juridical advice temporarily. This is what the “Grant permission to task assignees” field is used for. In this case, choose the “Read & Edit” permission to let them modify the document. Keep in mind that these rights will only be granted during the operations made on this node, and reverted to their previous state when following a transition to another node.

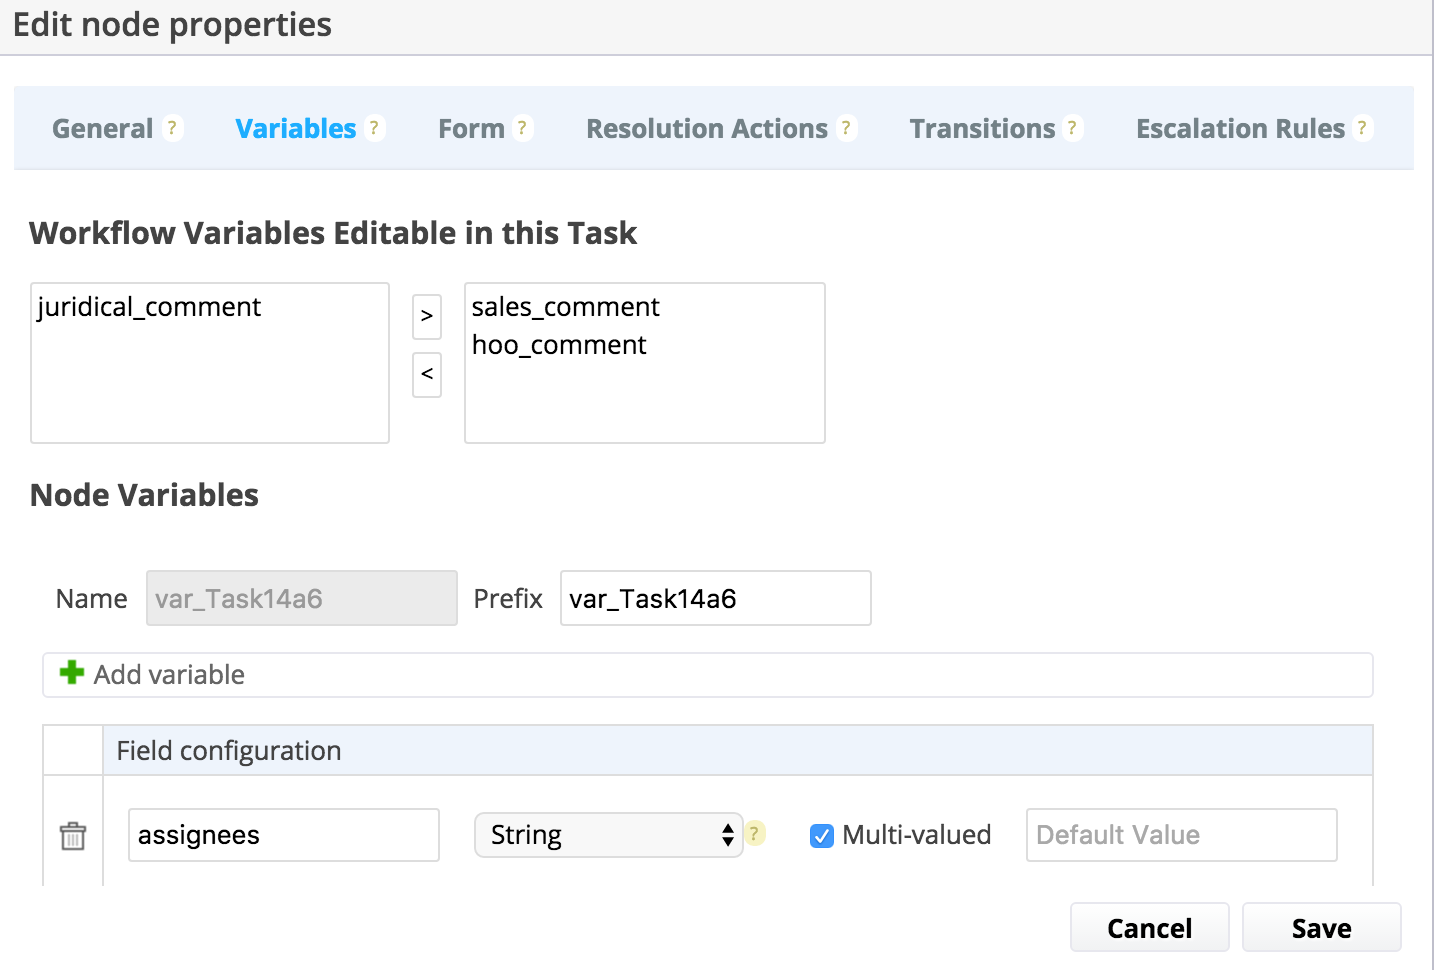
Configuring the Form
- Click on the Variables tab and add the "juridical_comment" and "hoo_comment" variables to the right column.
- Click on the Form tab.
- Add the “juridical_comment” field the same way you did with the “Technical validation” node.

- Add the “hoo_comment” as well, but make sure to set it as read only.

- Click on Save.

Connecting the Nodes
- Go back on the graph.
- Search for the technical validation node’s juridical advice requirement output point.
- Pull an arrow from there to the juridical advice node’s input point.
Defining the "Proposal Update" Node
You will now take care of the “Proposal update” node, which will be used in case Jack refuses the proposal.
Adding the Node
The “Approve” node will once again be the most appropriate. Pick it up and drop it on the graph.
Configuring the "Proposal Update" Node
- Open the node properties.
- Rename the node to “Proposal update”.
- Rename the directive: In the “Directive” field, replace “Acknowledgement” by “Proposal update”.
- Define the Due date expression:
CurrentDate.days(5) - Define the assignees.
Here comes another interesting situation: this task may not be assigned to a particular person, neither may it be assigned to a group. It needs to be assigned to the document's creator. To do so, a variable needs to be used instead of a hard coded value. The "Assignees" field may only receive usernames or groups, not variables.
We will rather use the “Assignees expression” field and set this variable as value: “
@{Document["dc:creator"]}”. This will return the document creator's username. Note that there are no specific rights to grant there as in this situation the document will be heading back to its creator.
Configuring the Form
- Click on the Variables tab and add the "sales_comment" and "hoo_comment" variables to the right column.
- Click on the Form tab.
- Add the “sales_comment” field as well as the “hoo_comment” field, the latter still in read only mode.

- Rename the task.
Calling the task an approval task could lead to confusion for the salesman that wants to submit an updated proposal. Thus, we will rename it.
- Click on the Resolution Actions tab.
- Click on the Add task button link.
- We will use “submit_updated_proposal” as the task button's id and “Submit updated proposal” as label.
Removing the "Approve" Transition
- Click on the Transitions tab. As you may see, deleting the task button in the previous step does not automatically remove the transition as well. We will do it manually then.
- Click on the icon
 next to the "approve" transition and click on Remove in the contextual menu.

- Confirm row deletion on the popup window.
- Click on Save.
Connecting the Nodes
- Go back to the graph.
- Search for the technical validation node’s reject output point.
- Pull an arrow from there to the proposal update node’s input point.
- Make sure you connect the proposal update node’s output point back to the technical validation node’s input point too.
Adding the End Node
This is almost finished. The last node needed is the end node. This node sets a possible ending to the workflow. In this situation only one end node will be used, but remember that you may use several end nodes if needed.
Pickup the “Stop” node from the node template library and drop it on the graph.
Automating Document's Metadata Update
A document being accepted by the head of operations or the juridical services has to see its metadata updated. This is something we can achieve through an automation chain. Let's see how we will manage this situation.
- Open the end node properties.
- Check the existing chains / Launch a new chain creation.
In the General tab, the "Automation chains" section lets you make use of an existing automation chain, that you may even edit by using the corresponding link. Automation chains can be launched at different moments, fdepending of your needs. The input operation chain will be played when entering the node, the output chain when the node is being left. In this situation the chain needs to be played from the start, but is not existing yet though.
- Click on the Create link of the "Input operation chain".

- Give an id to your chain : "
SetAsApproved".
In the editor, add the "Document > Follow Life Cycle Transition" operation using drag and drop.

Open it and set its value to "approve".
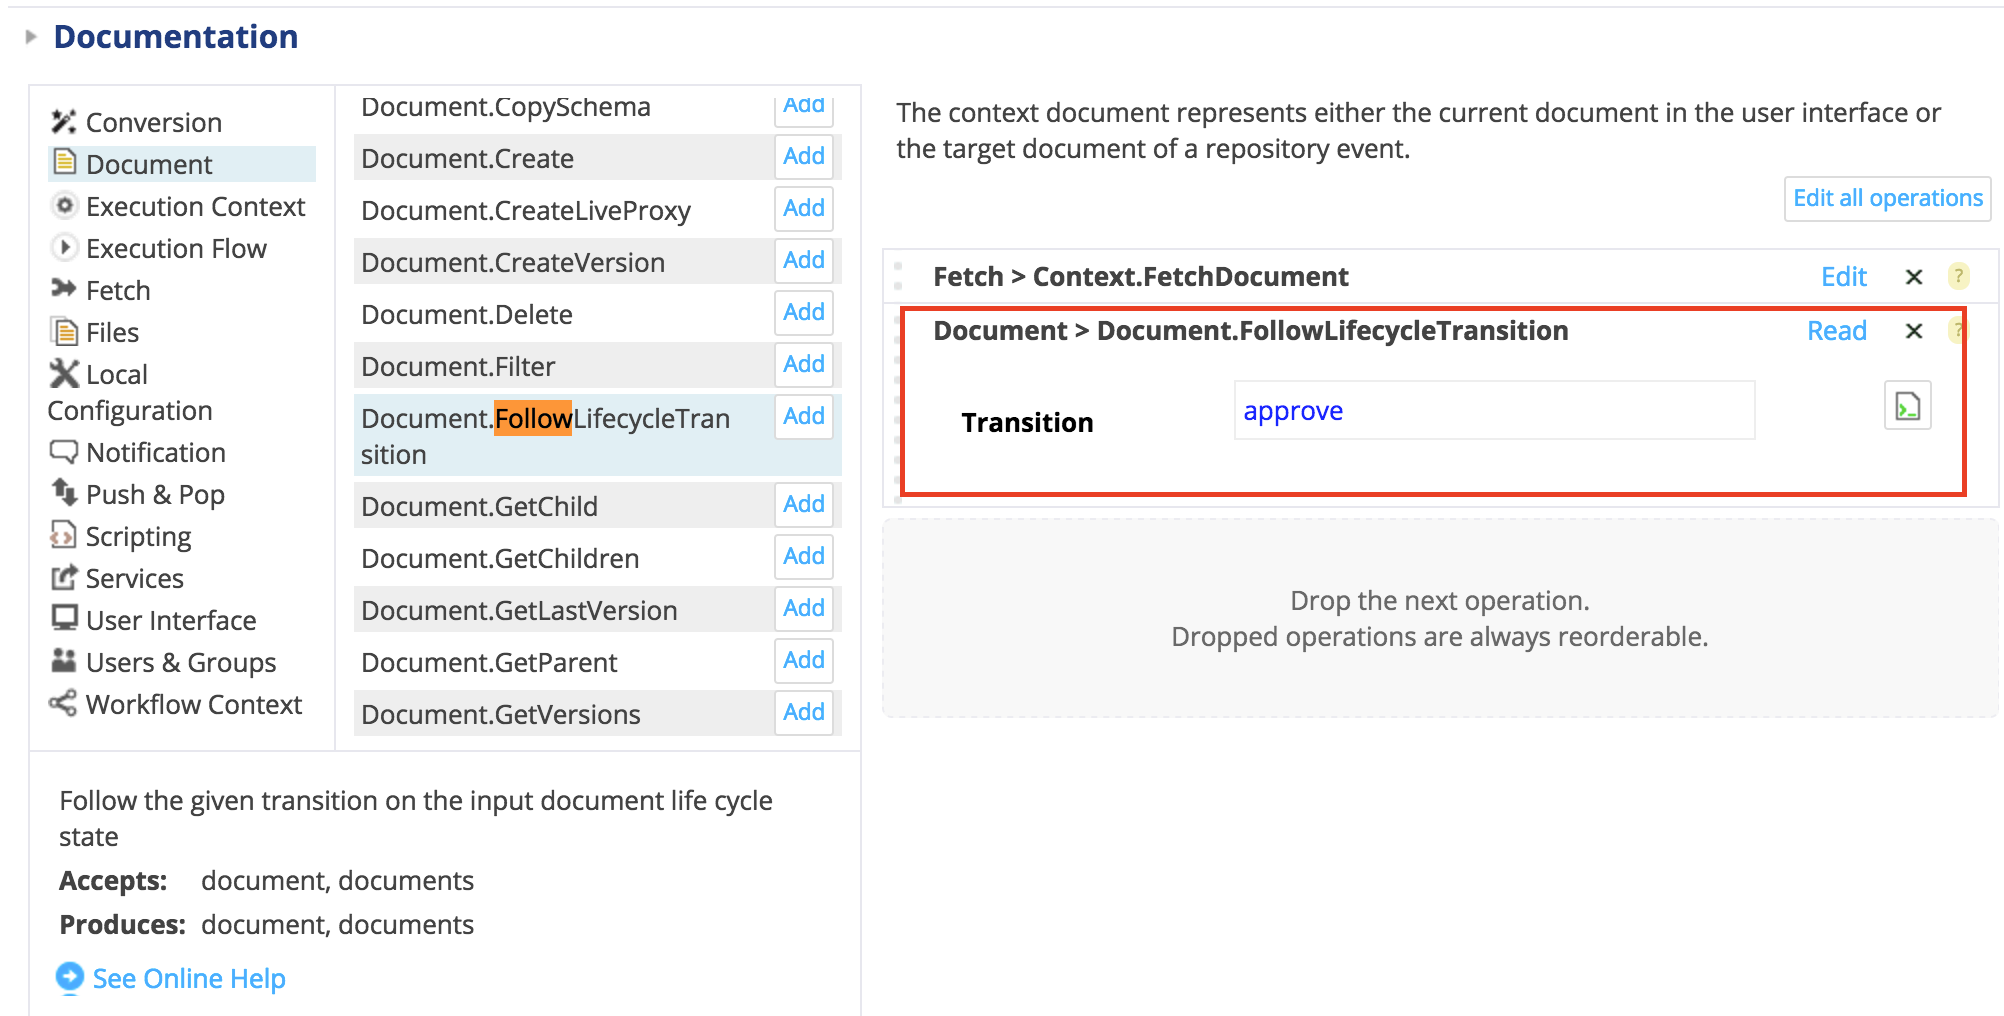
Save the chain and go back to your workflow graph.
Now that the chain is created, you may have a look at your end node properties.
You will see that the input operation chain has been automatically filled in thanks to our previous operation.

- Click on the Create link of the "Input operation chain".
Connecting the Nodes
- Link both the technical validation node’s accept output point and the juridical advice’s outpoint to the end node.
Save your work. Your workflow is now complete. Enjoy it! Below is a screenshot of what it may look like once finished.