Integrating the Nuxeo Platform with a SAML 2.0 IdP
The Nuxeo SAML 2.0 addon allows setting up Nuxeo as a Service Provider and supports WebSSO thus relying on an external SAML Identity Provider (IdP) for authentication. It has been successfully tested so far with Okta, OneLogin, Ping One, SSOCircle, Google, OIF and ADFS. If you are not familiar with SAML you can read our Background on SAML 2.0 section below.
- Install the SAML2.0 Authentication addon available from the Nuxeo Marketplace.
- Retrieve your IdP SAML metadata configuration file. This file stores SAML configuration like supported bindings, endpoints, certificates, etc., that are used by our SAML plugin to configure your IdP. Some IdP make this metadata available in a URL which you can also reference directly in the next step.
Contribute (in a Studio project, or in the
nxserver/configfolder) a new authentication plugin that makes use of theorg.nuxeo.ecm.platform.auth.saml.SAMLAuthenticationProvider, with a reference to the XML Metadata for IdP specific configuration. Ex:<component name="org.nuxeo.ecm.platform.login.saml.auth"> <require>org.nuxeo.ecm.platform.ui.web.auth.WebEngineConfig</require> <require>org.nuxeo.ecm.platform.ui.web.auth.defaultConfig</require> <extension target="org.nuxeo.ecm.platform.ui.web.auth.service.PluggableAuthenticationService" point="authenticators"> <authenticationPlugin name="SAML_AUTH" enabled="true" class="org.nuxeo.ecm.platform.auth.saml.SAMLAuthenticationProvider"> <loginModulePlugin>Trusting_LM</loginModulePlugin> <!-- Setting needStartingURLSaving - to true: user will be redirected to the URL initially asked for after authentication. - to false: user will always be redirected to the home page after authentication. --> <needStartingURLSaving>true</needStartingURLSaving> <parameters> <!-- Make sure to use a unique name, especially if you have several identity providers --> <parameter name="name">MyIdP</parameter> <!-- The IdP's icon will only be shown if SAML auth is displayed as an alternative login option in the login form. --> <!-- <parameter name="icon">/img/idpIcon.png</parameter> --> <!-- The metadata parameter can either be a URL or a path to a static file --> <parameter name="metadata">nxserver/config/metadata-idp.xml</parameter> </parameters> </authenticationPlugin> </extension> </component>You can find more examples here.
Read-only repositories (for instance LDAP) requireuserResolverCreateIfNeededanduserResolverUpdateto be set to false:<component name="org.nuxeo.ecm.platform.login.saml.auth"> <require>org.nuxeo.ecm.platform.ui.web.auth.WebEngineConfig</require> <require>org.nuxeo.ecm.platform.ui.web.auth.defaultConfig</require> <extension target="org.nuxeo.ecm.platform.ui.web.auth.service.PluggableAuthenticationService" point="authenticators"> <authenticationPlugin name="SAML_AUTH" enabled="true" class="org.nuxeo.ecm.platform.auth.saml.SAMLAuthenticationProvider"> <loginModulePlugin>Trusting_LM</loginModulePlugin> <needStartingURLSaving>true</needStartingURLSaving> <parameters> <parameter name="name">MyIdP</parameter> <parameter name="metadata">nxserver/config/metadata-idp.xml</parameter> <parameter name="userResolverCreateIfNeeded">false</parameter> <parameter name="userResolverUpdate">false</parameter> </parameters> </authenticationPlugin> </extension> </component>Configure the user attributes mapping for your identity provider's response. Either add a XML contribution into your Studio project or in the previous XML component. This mapping configuration can be achieved by providing a JavaScript or Groovy script. A sample is provided below using JavaScript code.
<extension
  target="org.nuxeo.usermapper.service.UserMapperComponent"
  point="mapper">
  <mapper name="saml" type="js">
    <mapperScript>
      searchAttributes.put("username", userObject.getNameID().getValue());
      userAttributes.put("email", userObject.getNameID().getValue());
      userAttributes.put("firstName", userObject.getAttributeByName("firstName").getAttributeValues().get(0).value);
      userAttributes.put("lastName", userObject.getAttributeByName("lastName").getAttributeValues().get(0).value);
    </mapperScript>
  </mapper>
</extension>
SAML User MappingEnsure thegetAttributeByNamevalues are correct before deploying your configuration. To do so, we recommend you to install any browser extensions which allows you to read the SAML response and identify those values (like SAML Chrome Panel on Google Chrome). A good practice is also to write inside the<mapperScript>tagConsole.log(userObject.getAttributes().get(0).getName())and increment the value from
0progressively to see in yourserver.logthe expected values of thegetAttributeByName. Finally, check the user mapping information are properly configured on your SAML provider.Use this new authentication plugin in the authentication chain, by contributing its definition from your Studio project (or in the previous XML component).
<extension
  target="org.nuxeo.ecm.platform.ui.web.auth.service.PluggableAuthenticationService"
  point="chain">
  <authenticationChain>
    <plugins>
      <plugin>BASIC_AUTH</plugin>
        <!-- Optionally, add the FORM_AUTH
        if you want to see the SAML authentication appear
        as an alternative option on the login form.
        In this case, make sure to fill in the icon's path
        in the authentication plugin parameters.
        -->
        <!-- <plugin>FORM_AUTH</plugin> -->
      <plugin>SAML_AUTH</plugin>
    </plugins>
  </authenticationChain>
</extension>
Configure your Identity Provider:
- Map user email to NameID metadata (check documentation of your IdP for doing so).
- Declare your Nuxeo Platform server as a Service Provider:
- Either by uploading the generated XML metadata file available at
http://NUXEO_SERVER/nuxeo/saml/metadata. - Or by configuring it manually on the IdP. In that case, you should use as the SAML consumer endpoints:
http://<nuxeo_url>/nuxeo/nxstartup.facesif you have the JSF UI (or both UIs)http://<nuxeo_url>/nuxeo/uiif you are using the web UI alone
- Either by uploading the generated XML metadata file available at
Configure the following CORS filter to allow the IDP redirect
<extension target="org.nuxeo.ecm.platform.web.common.requestcontroller.service.RequestControllerService" point="corsConfig">
  <corsConfig name="idp" supportedMethods="POST" allowOrigin="https://myIdpDomain">
   <pattern>/.*</pattern>
  </corsConfig>
</extension>
Optionally generate a keystore for enabling encryption. If you want to enable signing and/or encryption (not mandatory with some IdP) you have to generate a keystore and add the proper configuration to
nxserver/config(ex:saml-keystore-config.xml):<component name="org.nuxeo.ecm.platform.auth.saml.key.contrib"> <extension target="org.nuxeo.ecm.platform.auth.saml.key.KeyManager" point="configuration"> <configuration> <keystoreFilePath>nxserver/data/samlKeystore.jks</keystoreFilePath> <keystorePassword>password</keystorePassword> <passwords> <password key="saml">changeit</password> </passwords> <signingKey>saml</signingKey> <encryptionKey>saml</encryptionKey> </configuration> </extension> </component>To generate the keystore you can use keytool:
keytool -genkeypair -keystore samlKeystore.jks -alias saml -keypass changeit -dname 'CN=Nuxeo O=Nuxeo' -storepass passwordIf you have an existing certificate that you wish to use you should be able to import it using the keytool as well:
keytool -import -alias foo -file certfile.cer -keystore publicKey.storeYou can find other use cases and more extensive documentation about keytool here.
After having set up the Java KeyStore and updating the SAML keystore configuration with the proper aliases(key) and passwords the metadata generated at
http://NUXEO_SERVER/nuxeo/saml/metadatashould include the correct X509 certificate data.
Sources
Sources of the addon can can be found here.
You need to build the JAR and follow the sample here.
Background on SAML 2.0
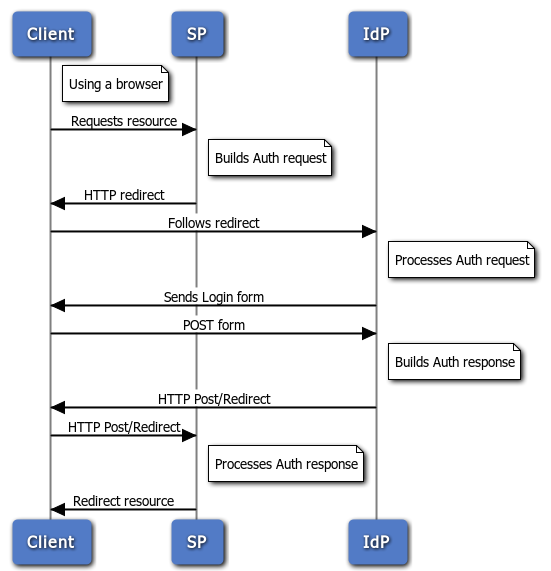
Security Assertion Markup Language (SAML) 2.0 is an XML-based protocol that uses security tokens containing assertions to pass information about a user between a SAML authority, known as the identity provider (IdP), and a SAML consumer, the service provider (SP).
SAML 2.0 has a very broad scope with a large number of supported profiles but its primary use case is single sign-on which is specified in the Web Browser SSO Profile.
When a web user tries to access a resource at a service provider they are redirected for authentication with the identity provider. This identity provider produces an authentication assertion, and the service provider consumes the assertion to establish a security context for the web user.
The specification of these assertions and of the request-response protocol messages themselves is independent of the underlying communications and messaging protocols. The mapping between these two is known in SAML as a 'binding'.
SAML 2.0 has defined several binding options: HTTP redirect, HTTP POST, HTTP artifact, and SOAP. For Web Browser SSO, the HTTP Redirect Binding and the HTTP POST Binding are commonly used.

For a detailed presentation of SAML V2.0, you should read the SAML V2.0 Specification.