In this how-to, we consider you already developed with Nuxeo Platform with the necessary commands in the deployment-fragment.xml to copy the web resources to $NUXEO/nxserver/nuxeo.war. As an example, we will explain how to install the textcolor plug-in.
Adding the TinyMCE textcolor Plug-In
The general procedure to make a new plug-in available is to apply the initialization code, provided in the plug-in documentation, to the tinyMCE#init method in tinymce_init.js.
Go to the textcolor page, that provides the initialization code.
tinymce.init({
    plugins: "textcolor",
    toolbar: "forecolor backcolor"
});
Copy the pristine version of tinymce_init.js under your project's
src/main/resources/web/nuxeo.war/tinymce.In the sources of the
nuxeo-platform-ui-webplug-in, TinyMCE files are undersrc/main/resourcesbut it requires an extra command in thedeployment-fragment.xml:<copy from= "nxwebplatform.tmp/tinymce/" to= "nuxeo.war/tinymce/" />Also, ensure you are requiring
<require>org.nuxeo.ecm.platform.ui</require>to override the default file.Open your
tinymce_init.jsfile.Copy the
pluginsargument of the textcolor definition and insert it in thepluginsargument of your file.plugins : ["textcolor link image code searchreplace paste visualchars charmap table fullscreen preview nuxeoimageupload nuxeolink"],Copy the
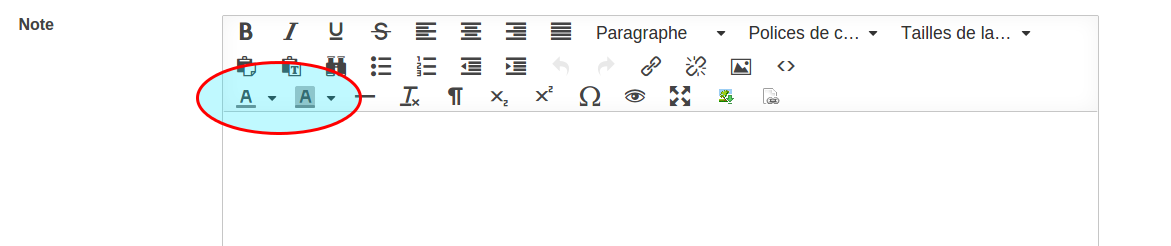
toolbarargument of the textcolor definition and insert it in thetoolbar3argument of your file. This will add the buttons on the third line of the TinyMCE toolbar.toolbar3 : "forecolor backcolor | table | hr removeformat visualchars | subscript superscript | charmap preview | fullscreen nuxeoimageupload nuxeolink",The resulting code is:
  tinyMCE
      .init({
        width : width,
        height : height,
        mode : "exact",
        theme : "modern",
        elements : eltId,
        plugins : ["textcolor link image code searchreplace paste visualchars charmap table fullscreen preview nuxeoimageupload nuxeolink"],
        language : lang,
        // Img insertion fixes
        relative_urls : false,
        remove_script_host : false,
        toolbar1 : "bold italic underline strikethrough | alignleft aligncenter alignright alignjustify | formatselect fontselect fontsizeselect",
        toolbar2 : "paste pastetext searchreplace | bullist numlist | outdent indent | undo redo | link unlink anchor image code",
        toolbar3 : "forecolor backcolor | table | hr removeformat visualchars | subscript superscript | charmap preview | fullscreen nuxeoimageupload nuxeolink",
        menubar: false,

        // TODO : upgrade the skin "o2k7" with the new version
        /*skin : "o2k7",
        skin_variant : "silver",
        theme_advanced_disable : "styleselect",
        theme_advanced_buttons3 : "hr,removeformat,visualaid,|,sub,sup,|,charmap,|",
        theme_advanced_buttons3_add : toolbar, */

        setup : function(ed) {
          ed.on('init', function(ed) {
            loaded = true;
          });
        }
      });
}
And that's how the new icons will be displayed:
Using Hot-Reload
While the development mode is activated, you can use the hot-reload of the files located in $NUXEO/nxserver/nuxeo.war to test the customization of TinyMCE in live, without spending time in server restarts.
- In
nuxeo.conf, set the propertyorg.nuxeo.devtotrue. - Start the Nuxeo Platform and in a browser, go to the creation form of a Note document.
- Open the file
$NUXEO/nxserver/nuxeo.war/tinymce/tinymce_init.jsin your favorite JavaScript editor. - Apply the needed modifications and save the file.
- In your browser, reload (F5) the page and observe the changes in the rich text editor.
Useful Links