The Nuxeo Aspera connector enables users to upload/download binaries with the Aspera Connect client. It is designed to be used with Aspera On Cloud instances, however, if you use a self-hosted Aspera instance, you will still be able to use the Nuxeo Aspera Connector. Contact your IBM Aspera team for more information and assistance.
Version 3.0.0
Requirements
- Aspera Desktop Client - you will be prompted to install the necessary version when using the Connector.
- Nuxeo Server LTS 2019 (10.10, HF 31, at least) with access to AWS S3 Storage along with the Amazon S3 Online Storage plugin
- IBM Aspera on Cloud Subscription (see the note above about Aspera self-hosted)
Version 3.0.0 of the Nuxeo Aspera Connector is aligned with IBM Aspera Connect 3.9.9 SDK and, by default, points to the IBM Aspera Connect SDK 3.9.9 CDN URL. If you would like to host the SDK on your own servers or point to another version, please see our entry on configuring the SDK url. If you are using a version newer than this, functionality might be affected.
Installation
Installation is comprised of two steps:
- Install the Nuxeo Package available from the marketplace.
- Install the Aspera Connect desktop client (you will be prompted to install the necessary Aspera software when you try to use the Connector, if you do not already have it).
Configuration
Aspera Configuration
We need to configure 2 Aspera nodes; one for upload and one for download.
Each node will be attached to one S3 bucket in Nuxeo:
- The main Nuxeo S3 bucket in Nuxeo for download purpose
- The S3 transient store bucket for upload purpose
Follow this Aspera documentation to attach S3 buckets to Aspera.
Please note that, in the documentation above, for Download the IAM role used by Aspera only needs READ permissions on the bucket.
The policy attached to this role can be added as shown in this sample:
{
  "Version": "2012-10-17",
  "Statement": [
    {
      "Sid": "VisualEditor0",
      "Effect": "Allow",
      "Action": [
        "s3:ListBucket",
        "s3:GetObject",
        "s3:GetBucketLocation"
      ],
      "Resource": [
        "arn:aws:s3:::bucket-name",
        "arn:aws:s3:::bucket-name/\*"
      ]
    }
  ]
}
The policy for Upload must be able to put and get objects from the S3 bucket, for example:
{
  "Version": "2012-10-17",
  "Statement": [
  {
    "Sid": "VisualEditor0",
    "Effect": "Allow",
    "Action": [
    "s3:PutObject",
    "s3:GetObject",
        "s3:AbortMultipartUpload",
        "s3:DeleteObject",
        "s3:ListMultipartUploadParts"
      ],
      "Resource": "arn:aws:s3:::bucket-name/*"
    },
    {
      "Sid": "VisualEditor1",
      "Effect": "Allow",
      "Action": [
        "s3:ListBucketMultipartUploads",
        "s3:ListBucket",
        "s3:GetBucketLocation"
      ],
      "Resource": "arn:aws:s3:::bucket-name"
    }
  ]
}
Nuxeo Configuration
Transient Store on AWS
To use S3 direct upload with Nuxeo, you will need to add another policy to a new role for example:
{
    "Version": "2012-10-17",
    "Statement": [
        {
            "Effect": "Allow",
            "Action": [
                "s3:ListAllMyBuckets"
            ],
            "Resource": "arn:aws:s3:::*"
        },
        {
            "Effect": "Allow",
            "Action": [
                "s3:ListBucket",
                "s3:GetBucketLocation",
                "s3:AbortMultipartUpload",
                "s3:ListMultipartUploadParts",
                "s3:ListBucketMultipartUploads"
            ],
            "Resource": "arn:aws:s3:::yourbucketname"
        },
        {
            "Effect": "Allow",
            "Action": [
                "s3:PutObject",
                "s3:GetObject",
                "s3:DeleteObject",
                "s3:AbortMultipartUpload",
                "s3:ListMultipartUploadParts",
                "s3:ListBucketMultipartUploads"
            ],
            "Resource": "arn:aws:s3:::yourbucketname/*"
        }
    ]
}
Make sure that all configuration values are set in the nuxeo.conf:
nuxeo.s3storage.transient.bucket=
nuxeo.aws.accessKeyId=
nuxeo.aws.secretKey=
nuxeo.aws.region=
nuxeo.s3storage.bucket=
nuxeo.s3storage.useDirectUpload=true and nuxeo.s3storage.transient.roleArn= (documented as part of the previous version configuration) are no longer necessary for the Nuxeo Aspera Connector and can be removed, if you only use these values for the Nuxeo Aspera Connector, and not for any other reason. See upgrade notes.
Aspera Nuxeo Configuration
Add the Aspera access keys in nuxeo.conf:
Example:
## is the same for the 2 nodes
aspera.node.url=
aspera.node.port=

### ACCESS KEY ON UPLOAD NODE LINKED TO TS S3 BUCKET
aspera.access.key.id=
### SECRET KEY ON UPLOAD NODE LINKED TO TS S3 BUCKET
aspera.access.key.secret=

### ACCESS KEY ON DOWNLOAD NODE LINKED TO MAIN S3 BUCKET
aspera.download.access.key.id=
### SECRET KEY ON DOWNLOAD NODE LINKED TO MAIN S3 BUCKET
aspera.download.access.key.secret=
SDK URL
The Aspera Connect SDK version used with this version of the Nuxeo Aspera Connector defaults to Aspera Connect SDK 3.9.9. If you would like to use a different SDK, you can modify this in one of two ways:
- In the
nuxeo.conffile - As a contribution
Functional Overview
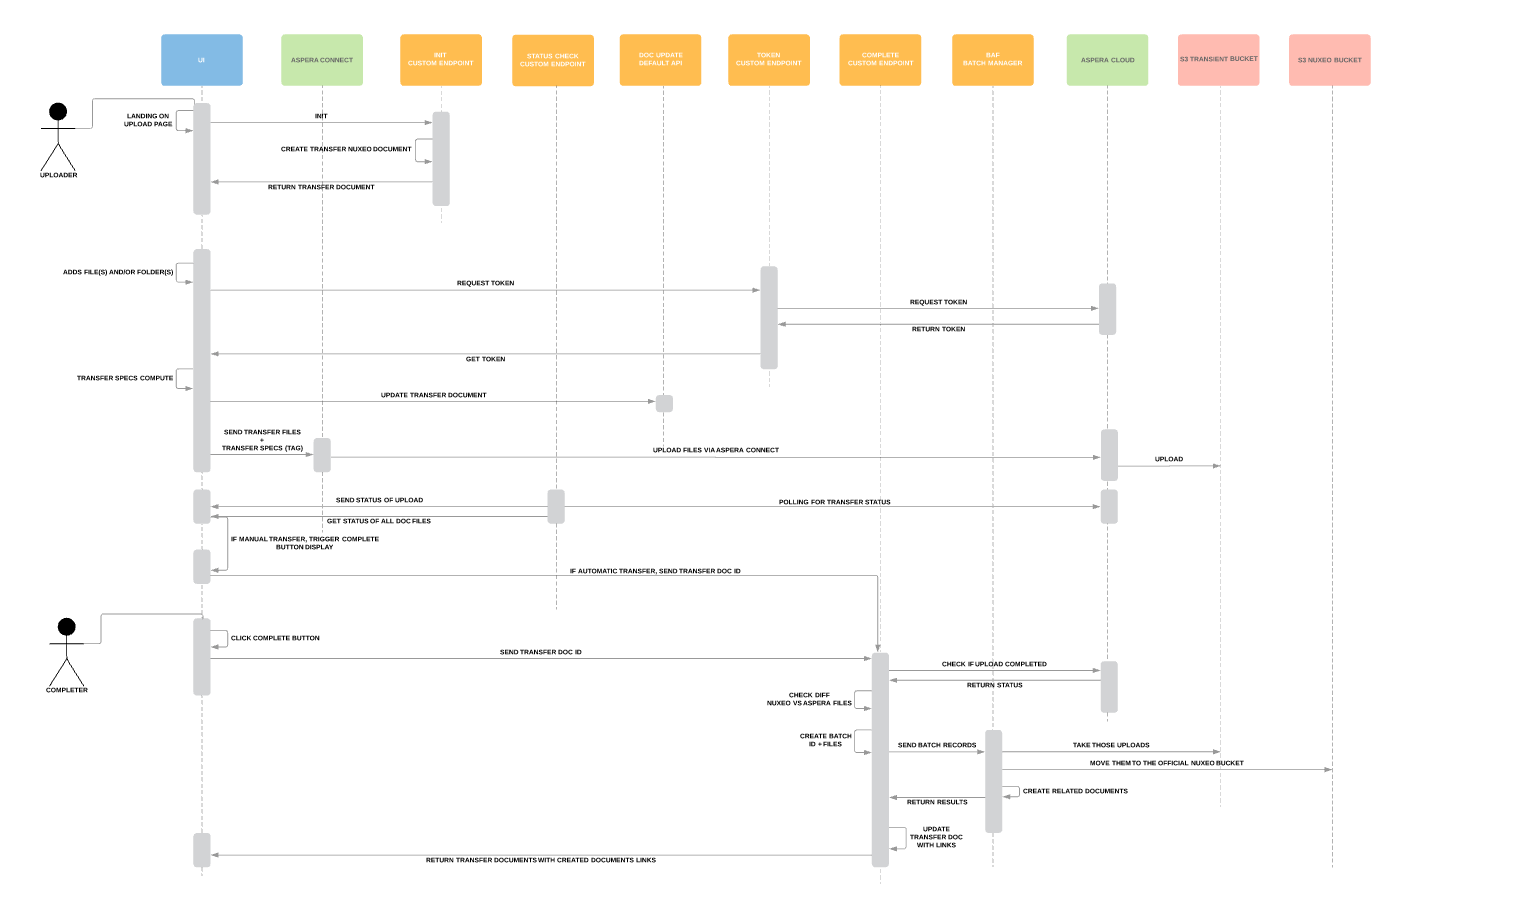
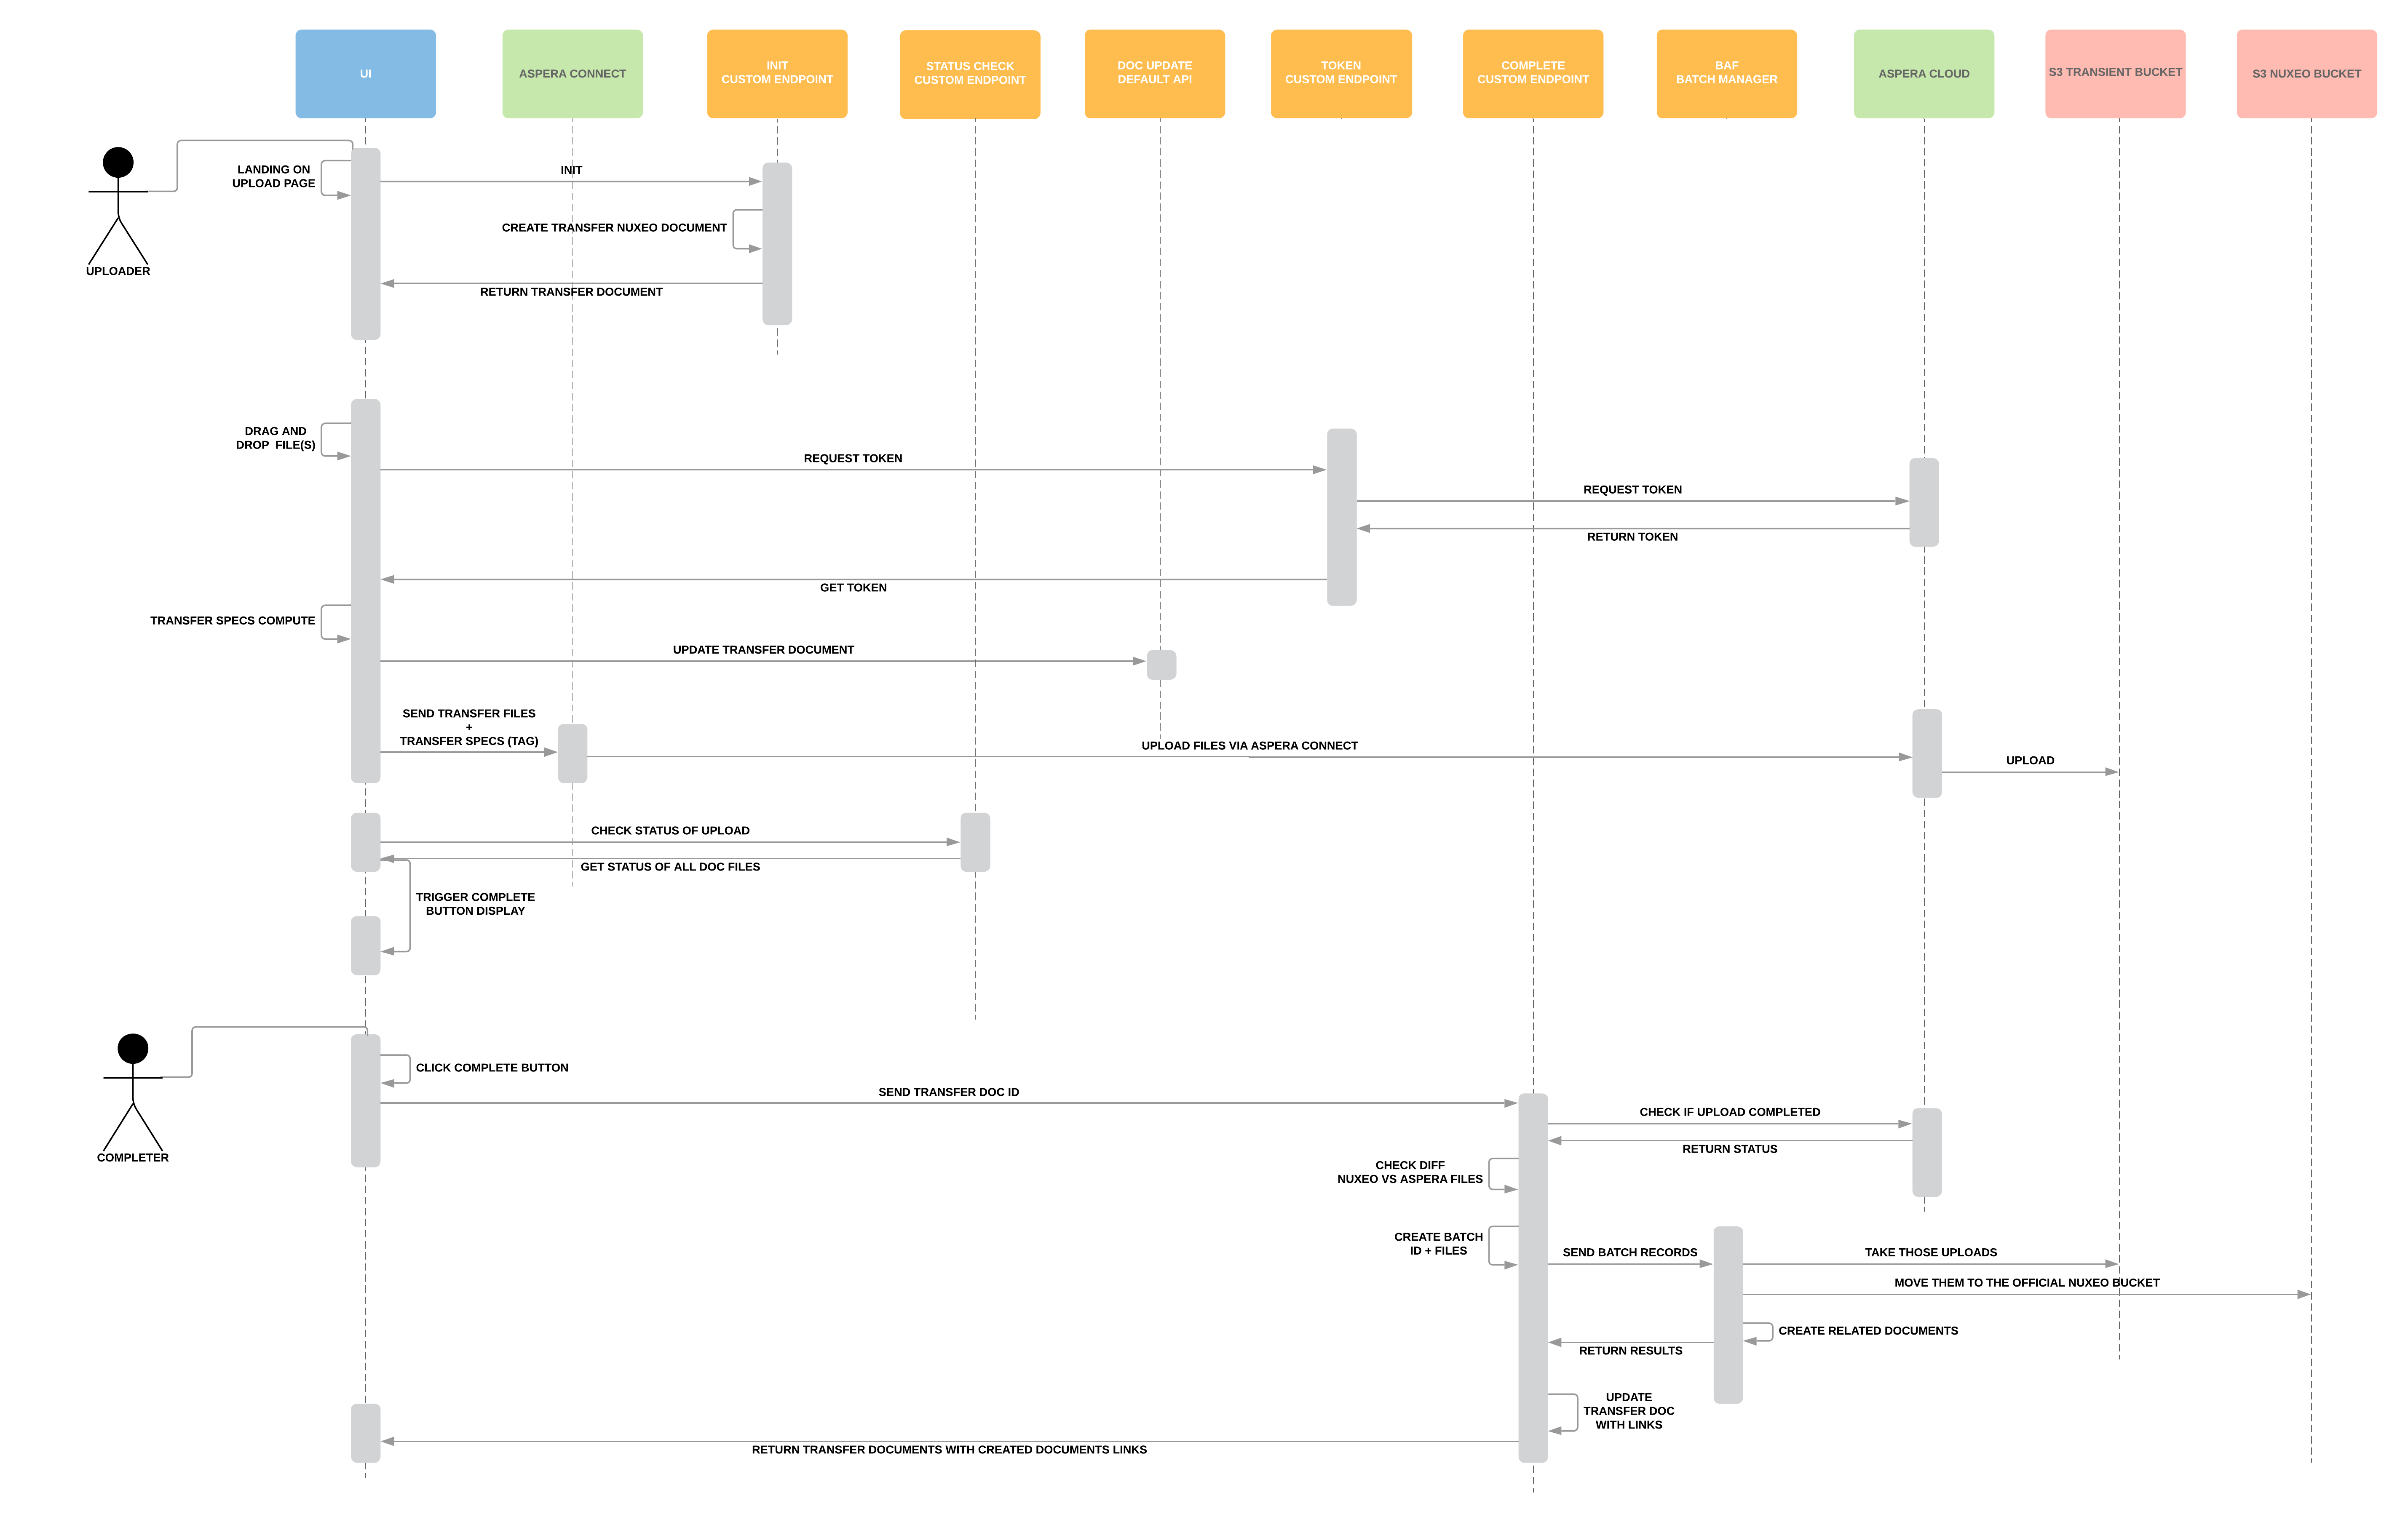
The Nuxeo Aspera Connector uses Transfers to add content to the Nuxeo system. Transfers are “wrappers” or “buckets” for the files/folders you add to the Nuxeo system.
Transfer Steps
The process of adding files and folders using the Nuxeo Aspera Connector is divided into 2 steps: Upload and Create.
In the first step, the user uploads files and folders to the transfer bucket. While in this step, it may be possible, depending on the chosen “transition type”, for a user to add items to the bucket and add properties that will apply (as needed/desired).
Once content and any metadata have been added, the transfer can be completed and the content is then created in the system.
Transfer Transition Types
Transitioning between the “upload” and “create” steps can be achieved in 2 ways: automatically (auto-create) or manually.
Users can choose which option to use when creating the transfer from the transfer dashboard/transfer view. When creating a transfer from a "folderish" document in the browsing tree, the transition type defaults to manual. You can toggle it to auto-create before adding content. It is not possible to change from manual to auto-create (or vice versa) after you start adding content to the transfer. Once you set the auto-create, some limitations around modifying the transfer will apply. As long as the transfer is empty, you can change the transition type, but once you start adding content, the transition type is "locked".
When auto-create is toggled/selected to be “on”, the user needs only to start the upload of the content to the transfer. Once the upload is completed, the system will automatically start the process to create the content in the system; no need to wait around simply to push a button.
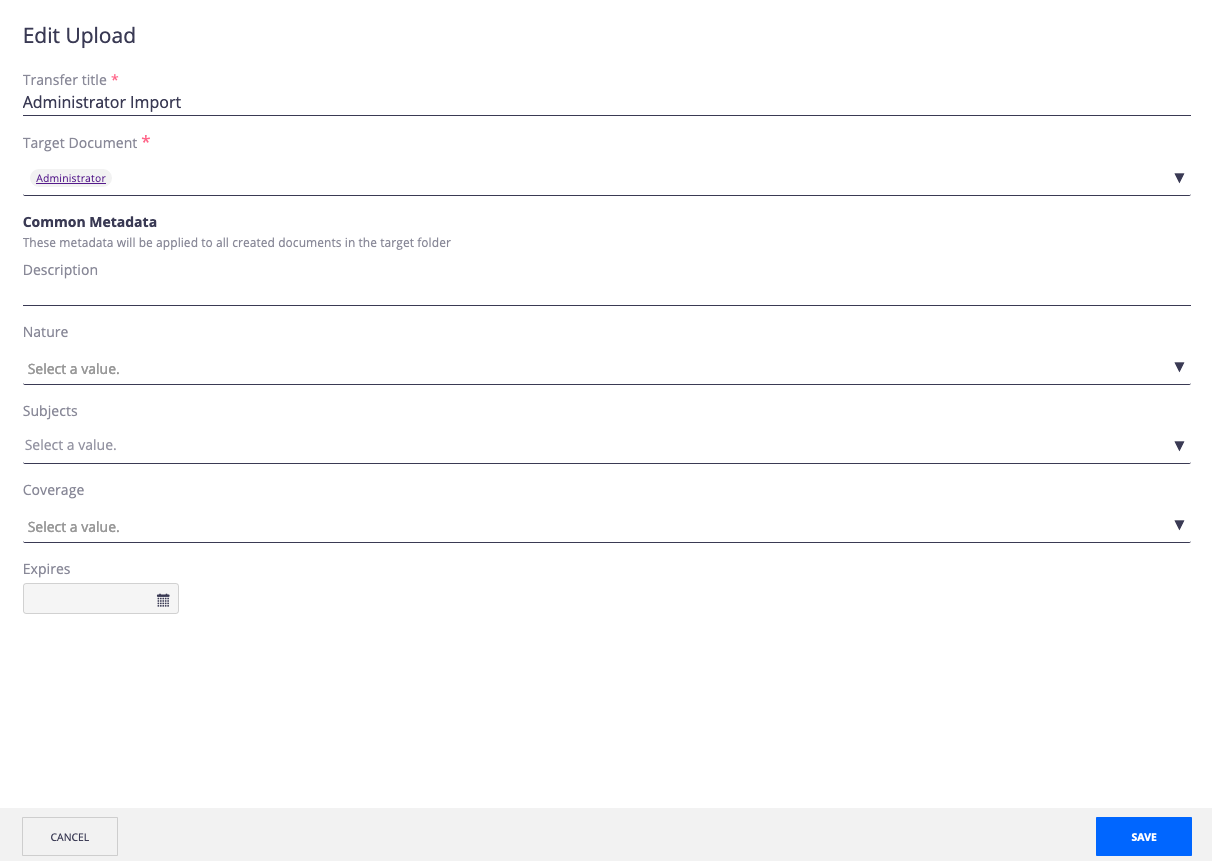
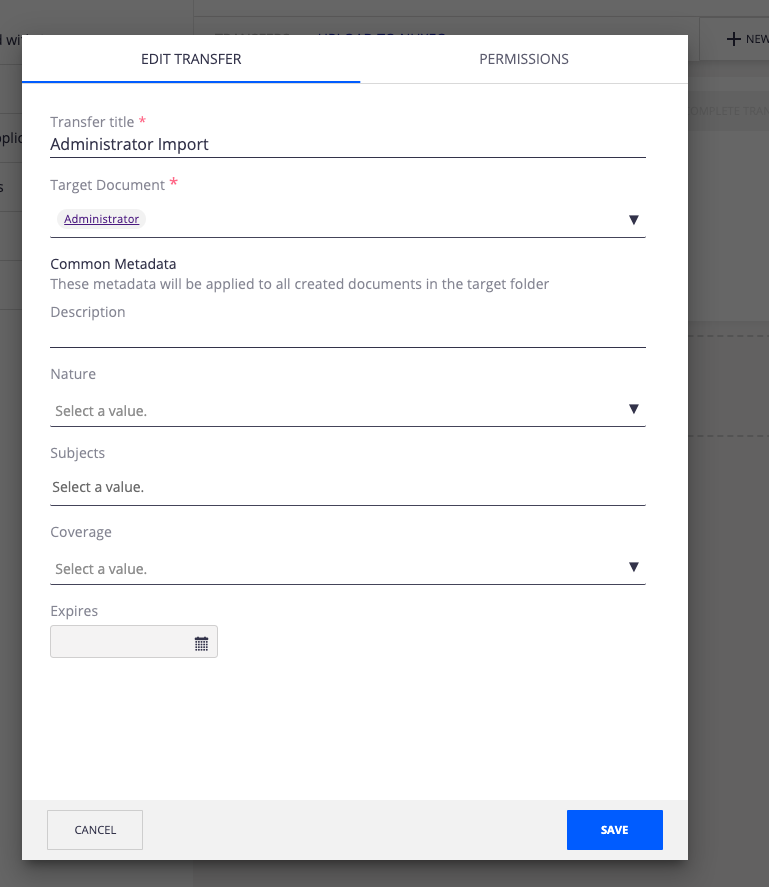
Before adding content to the transfer, you can edit the “common metadata” which would apply to all items in the transfer. Users can, of course, decide not to include any metadata at all, and simply add content, too.
If a user has content that needs to be “tagged” or “catalogued” with metadata before creation in the system, the “manual” transition option might be a better choice.
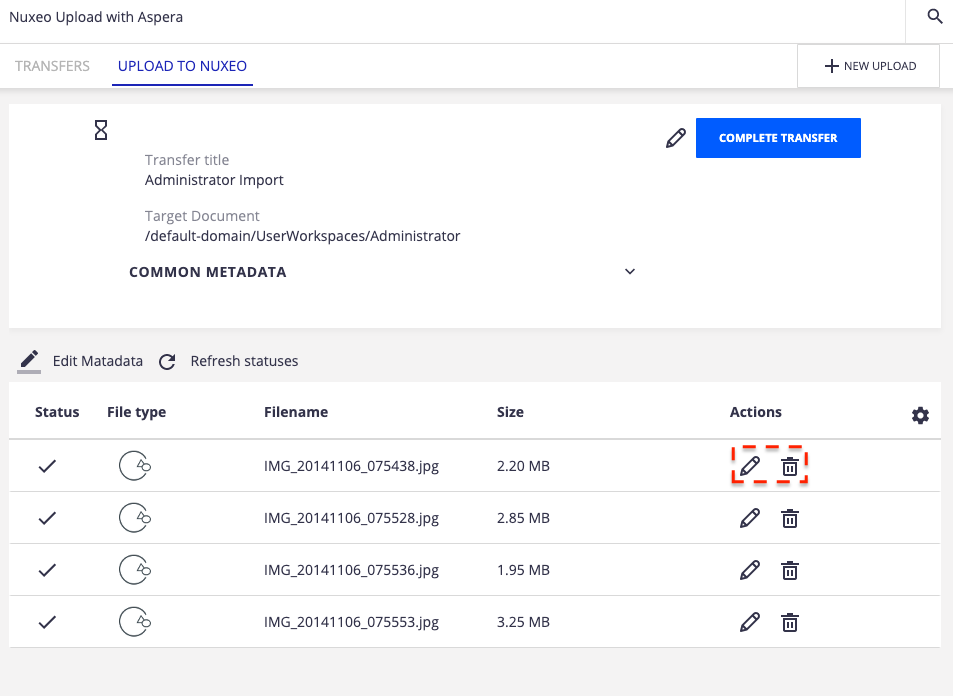
To use the manual option, choose “no” for auto-create or toggle the auto-create to “off” when creating a new transfer (you can only turn off auto-create if there is no content in the transfer). This will require someone manually start the creation process by clicking the Complete transfer button once the upload is finished (the button is only visible once there is no longer an upload in progress).
When using the manual transition, the user uploads content to the transfer bucket. While in this step, a user can add content to the transfer and add properties that apply to the items. Properties can be added that "apply to all" using the “common metadata” panel; more file-specific properties can be added either to multiple files at once (bulk edit of metadata) and/or individually, using a single-file action.
Once the metadata has been edited to fit the user's needs, the transfer can be completed and the content is then created in the system.
Transfers have 3 functional states:
Started: content is being "uploaded"Pending: content is being "created"Completed: transfer has been completed and the content has been created in the system
Using Aspera with Nuxeo
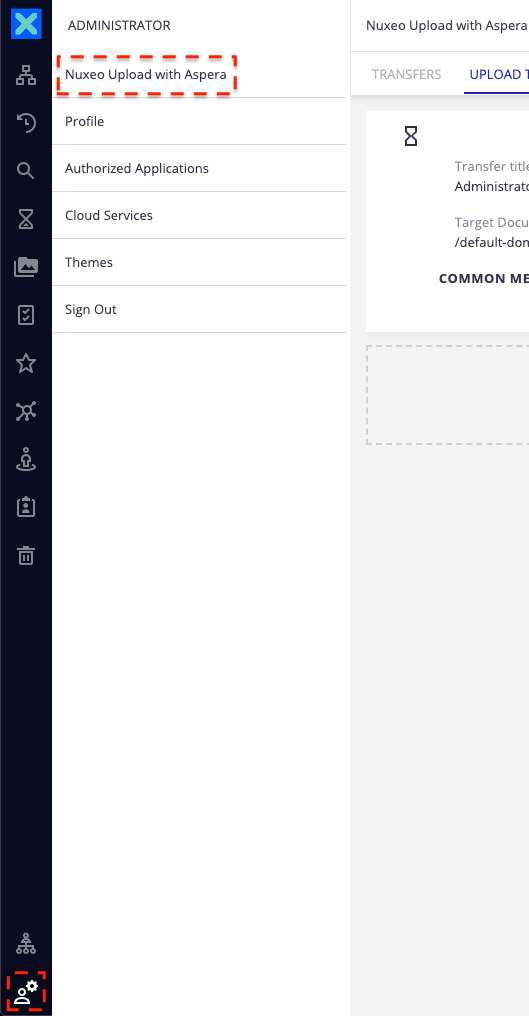
Once in your instance, Nuxeo Aspera Upload can be accessed two different ways:
- From the User Settings menu located on the left side:
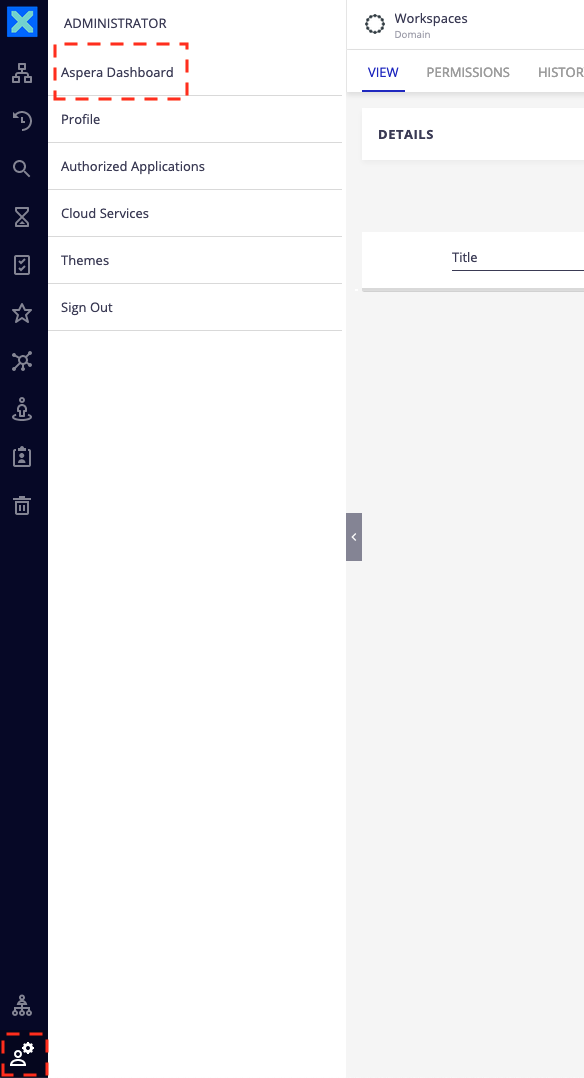
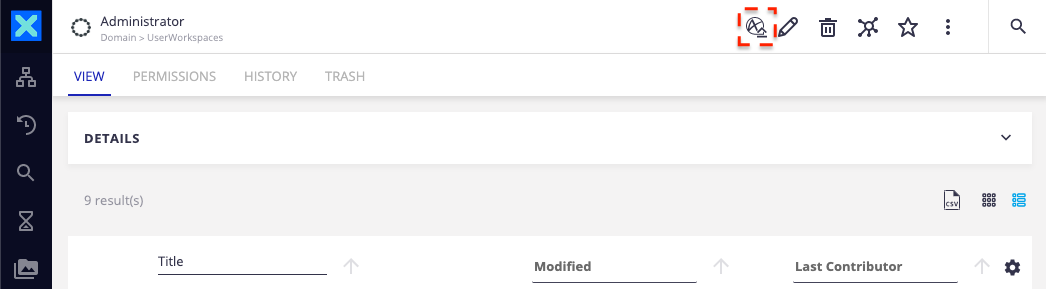
- By clicking on the Aspera upload button displayed on every folderish document (workspace, folder, etc.)
The content uploaded by Aspera will be accessible in this folderish document. If the transfer is "started" from the Aspera Dashboard or from the Transfer View using the "+ New Upload" button, the target location is the user's personal workspace.
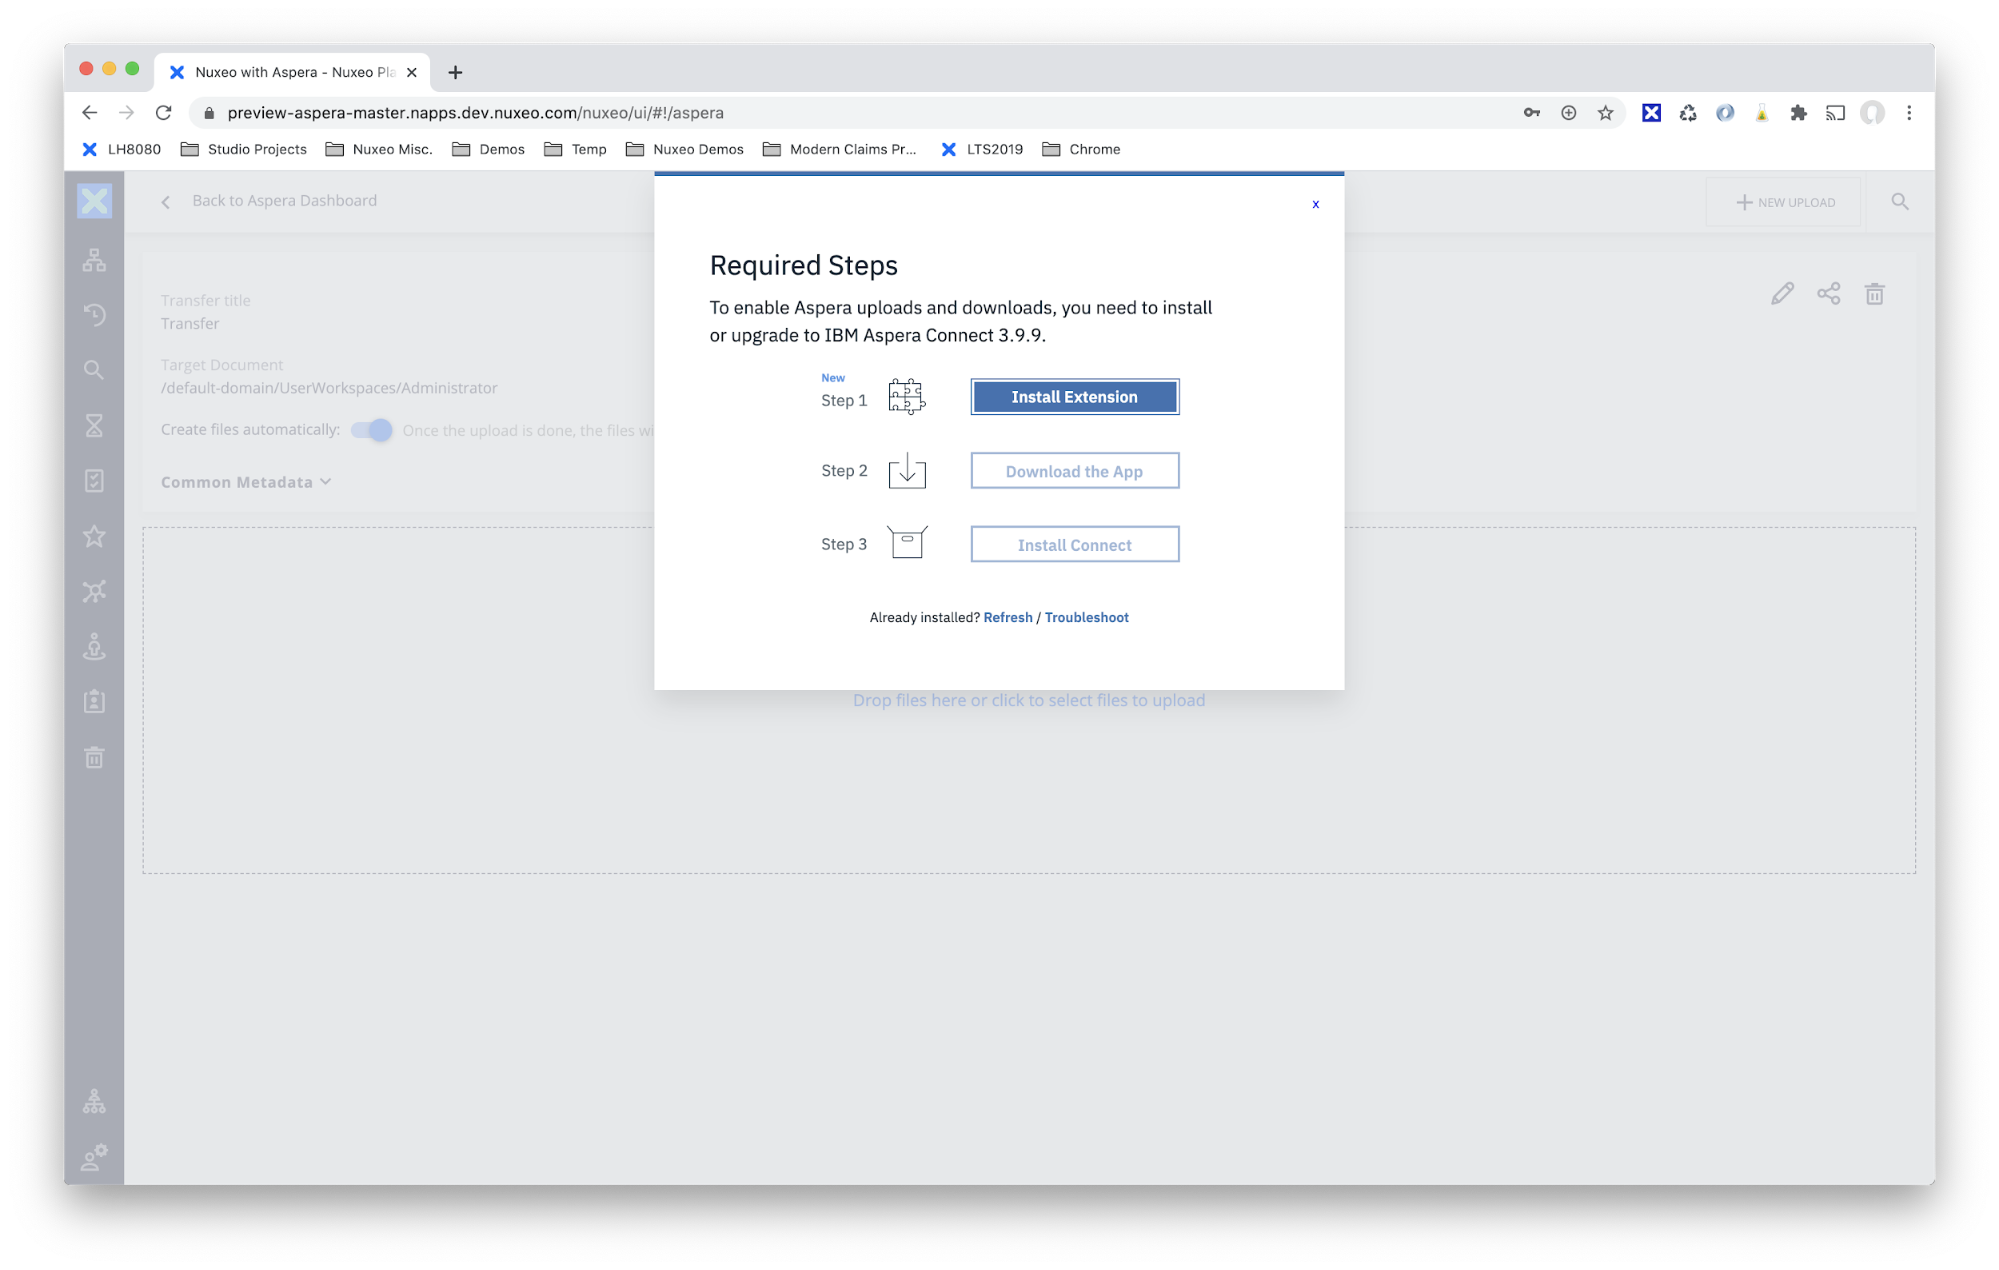
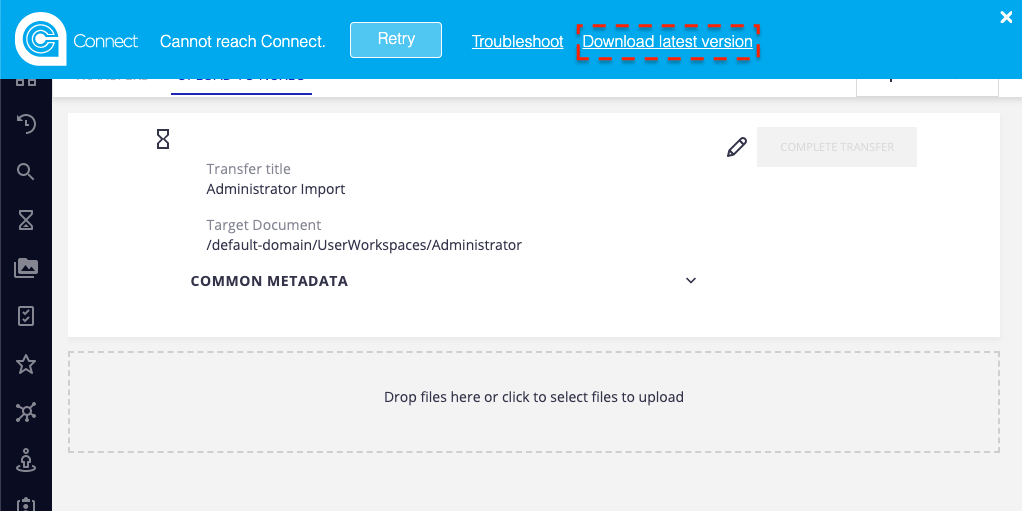
Once on the Transfer View (as you begin to add content), you will be able to download the Aspera Desktop client via the following banner at the top (if not already installed or if a new version is needed):
Once on the Aspera menu, there are 2 main views available:
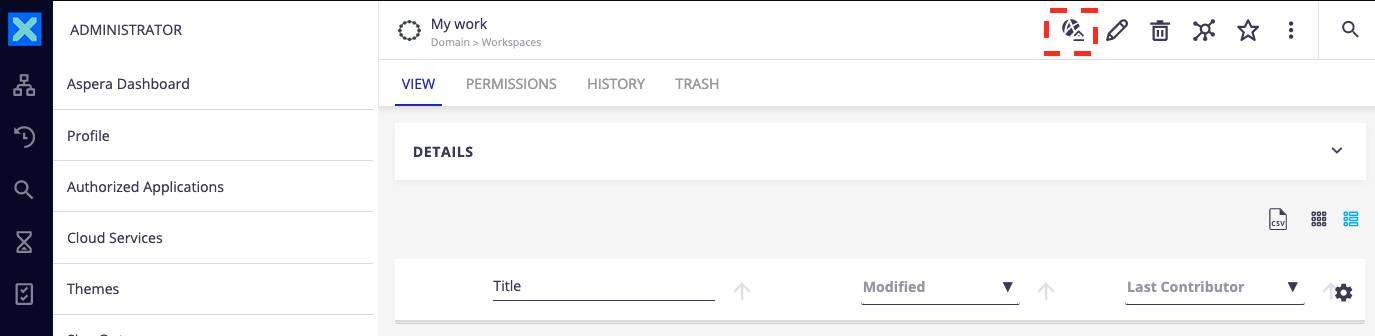
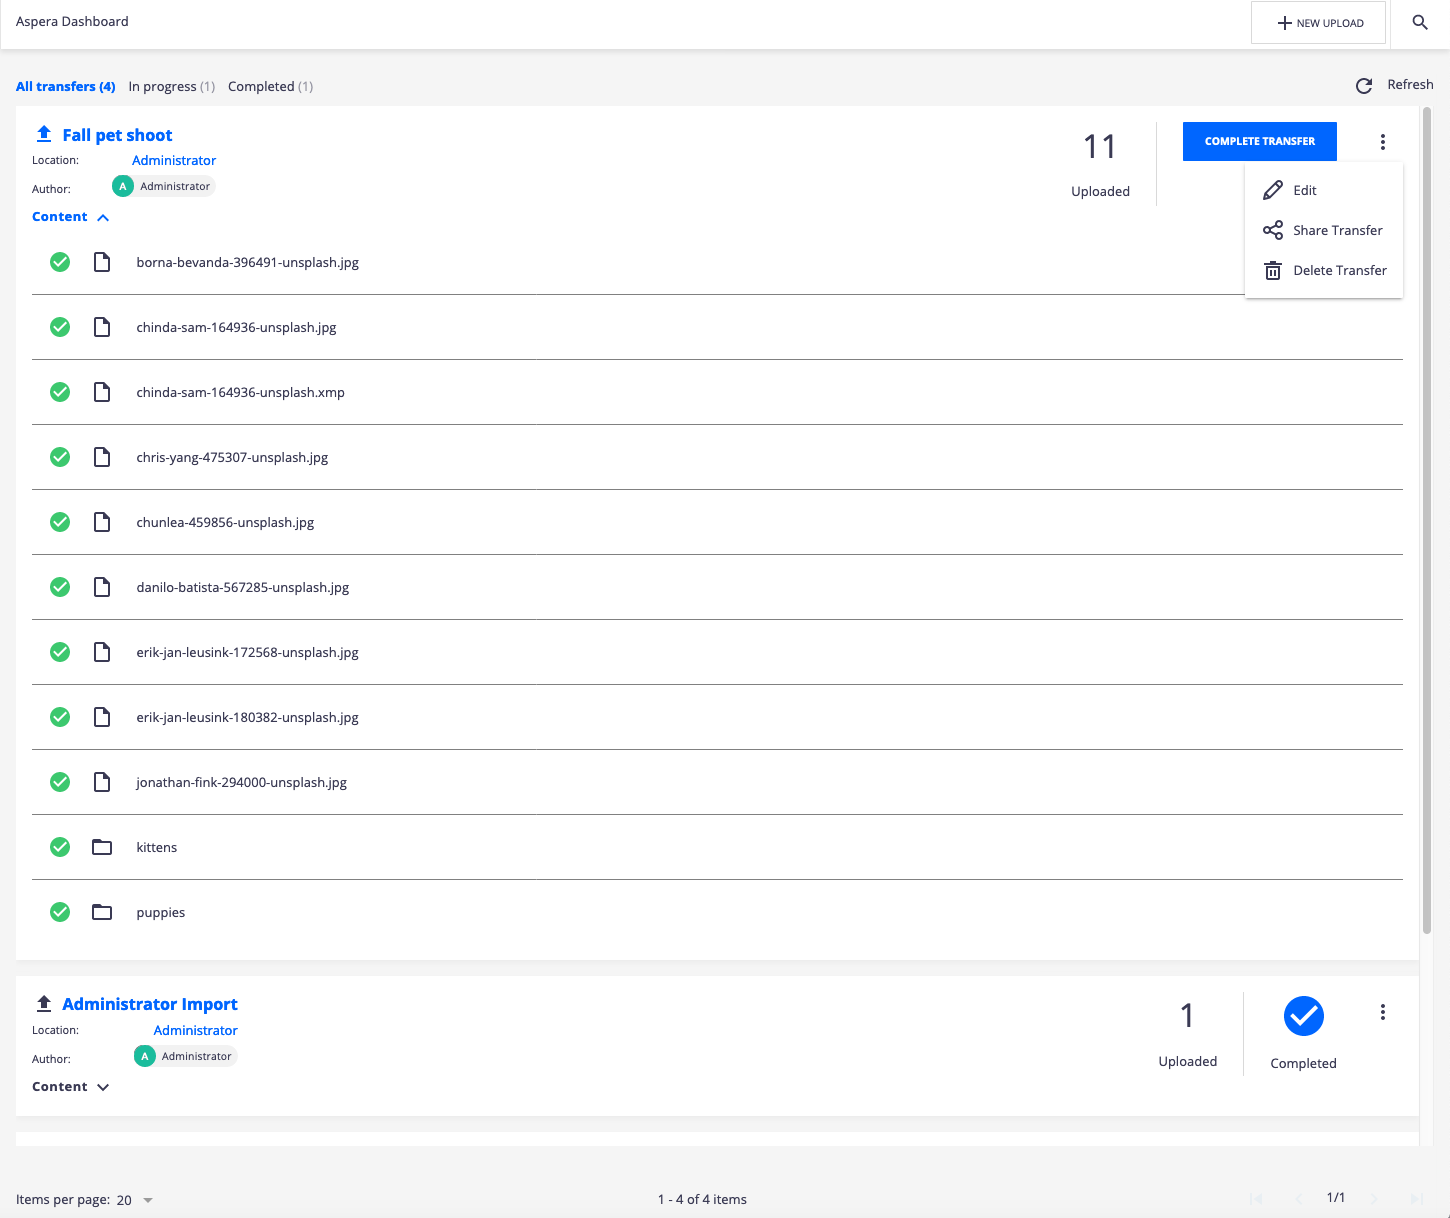
Aspera Dashboard
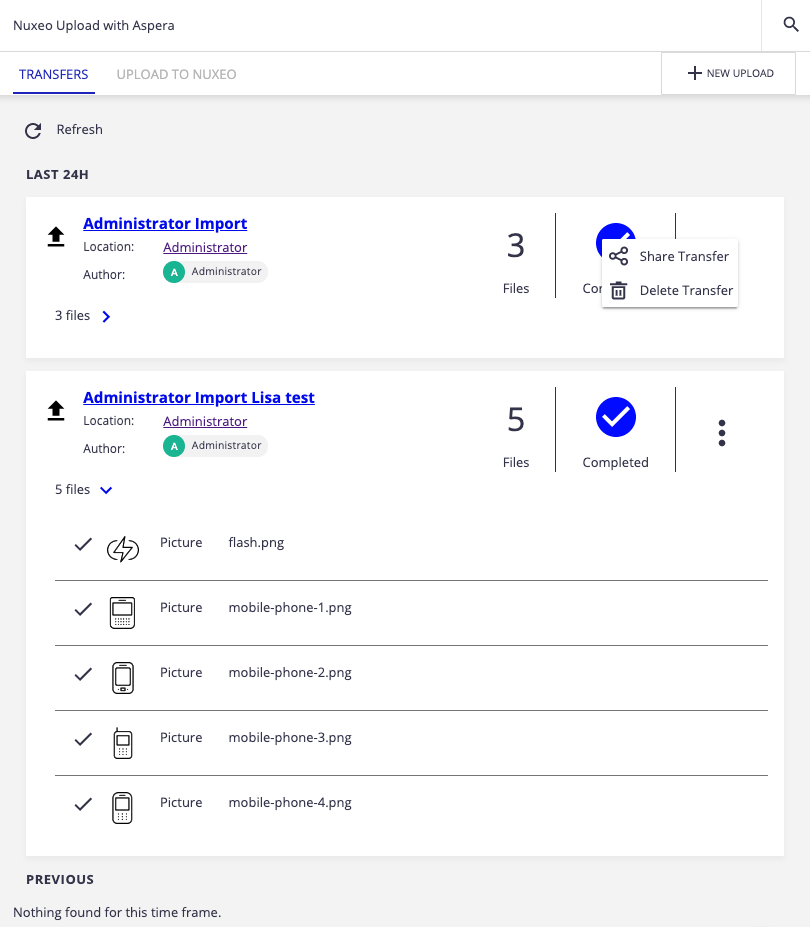
This screen shows the status of all current transfers in your Nuxeo application.
You can:
- Create new uploads/transfers
- Access the transfers’ metadata and content properties
- Complete transfers
- Share transfers
- Delete transfers
All of these actions are available via the “transfer” view, as well. You can find information on the actions in the “transfer view” section below.
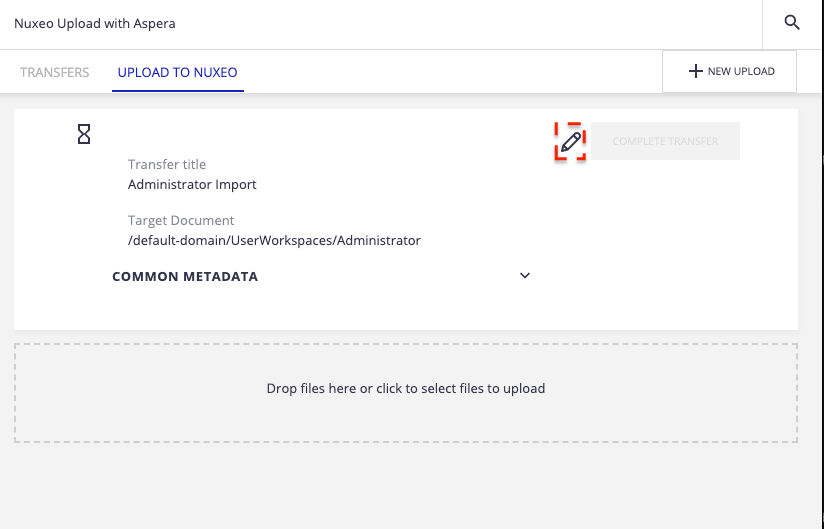
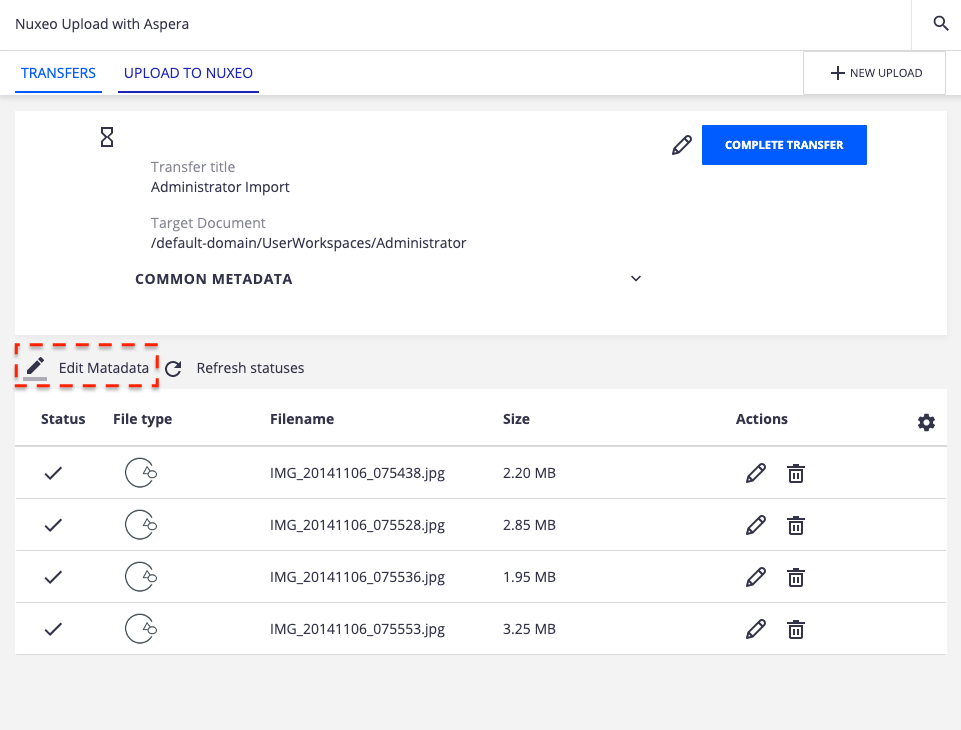
Transfer View
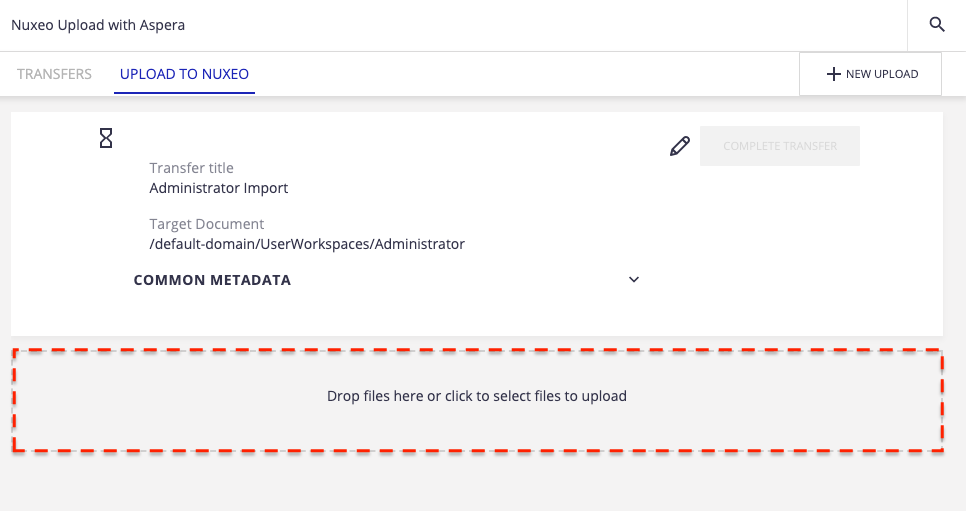
To create a transfer from the dashboard, simply click + New Upload in the upper right-hand corner. By default, this will set the “target document” (or destination) as the user’s personal workspace. This can be edited using the “common metadata” edit; "target location" value.
On this screen, different actions are available:
- Drag and drop (or click to select) file(s) or folder(s) to upload with Aspera and follow the status of the uploads (you can follow the status whether you have the Aspera desktop client or not).
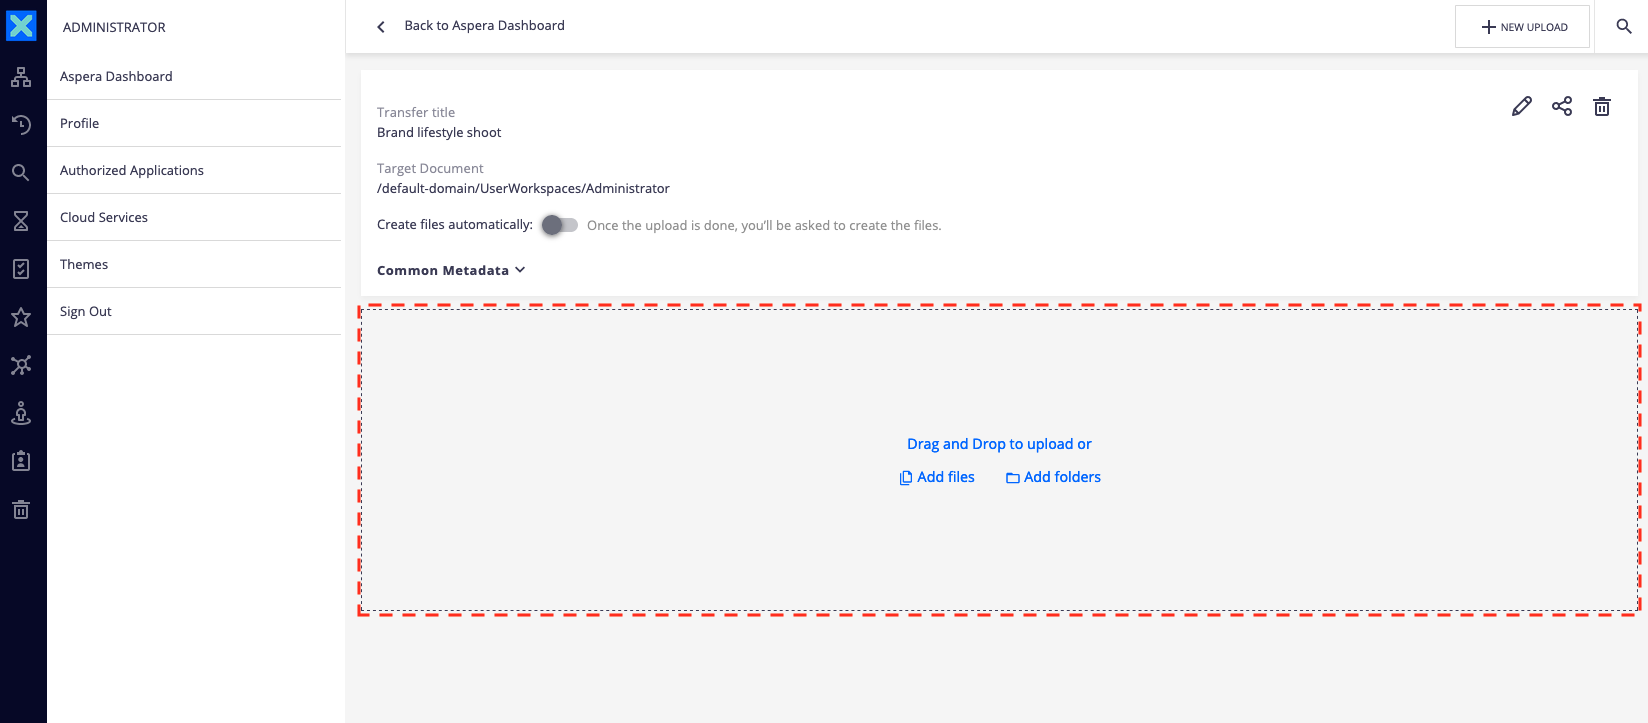
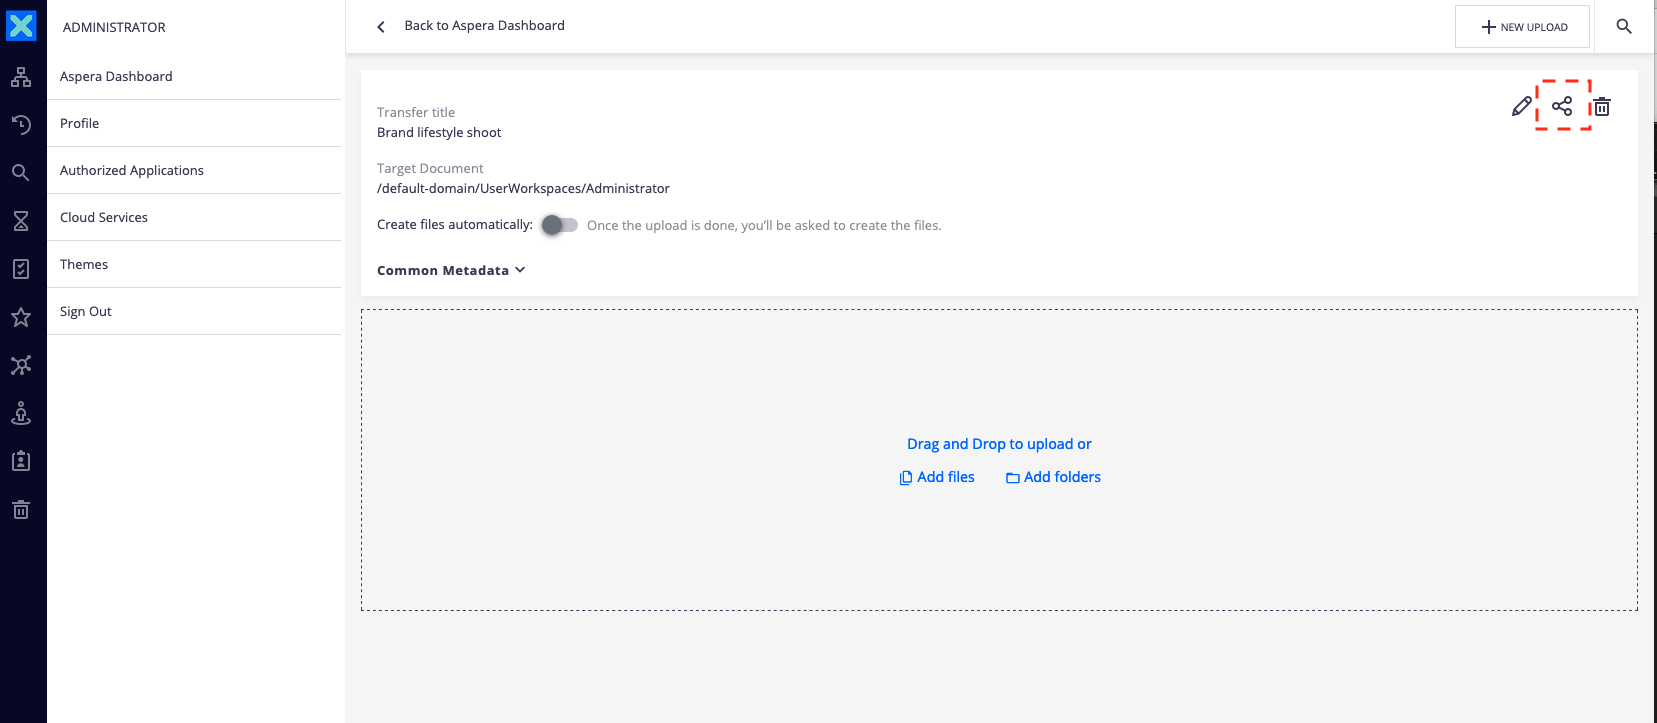
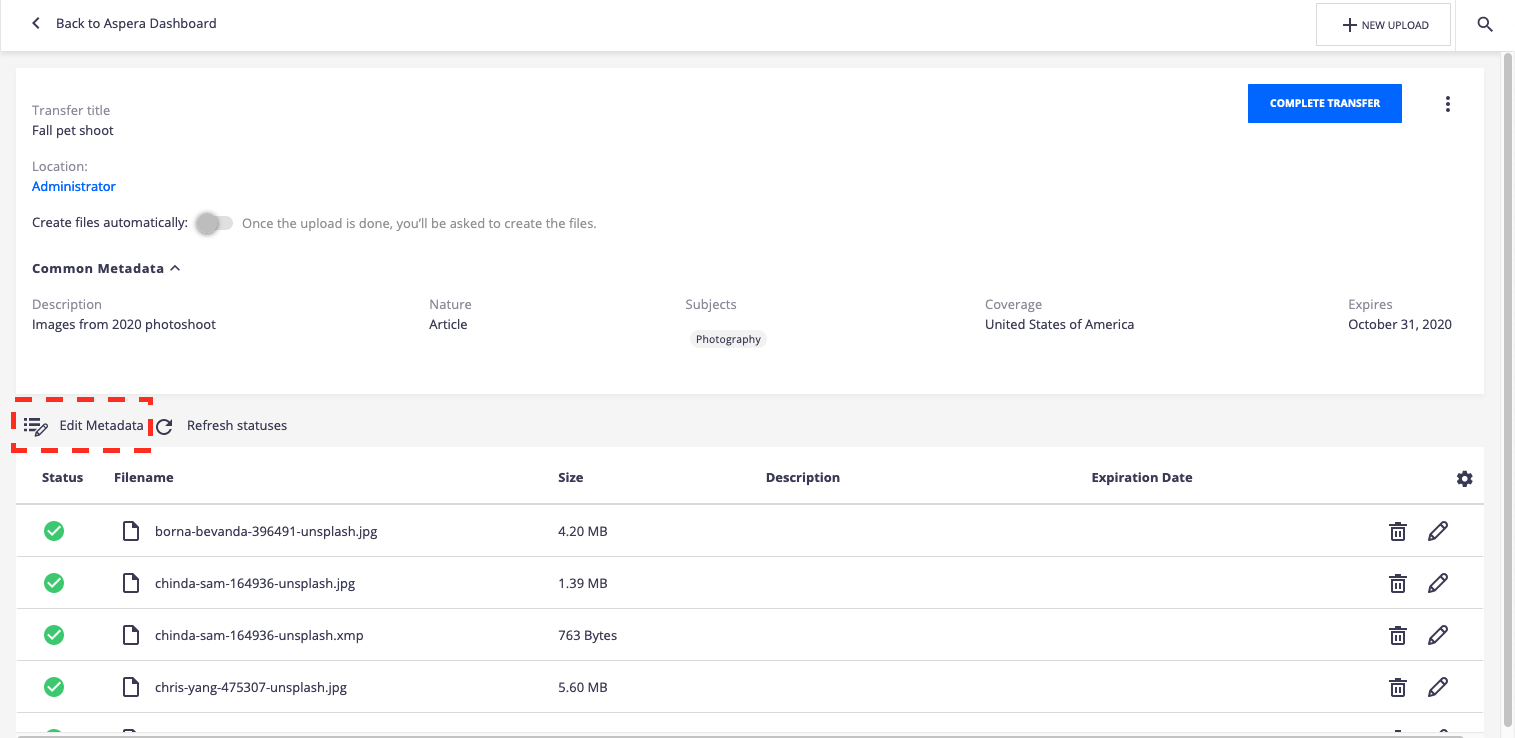
- Define/Edit the common metadata, including the “target document” or the destination of the current transfer (set of uploaded files) by clicking on the Edit button.

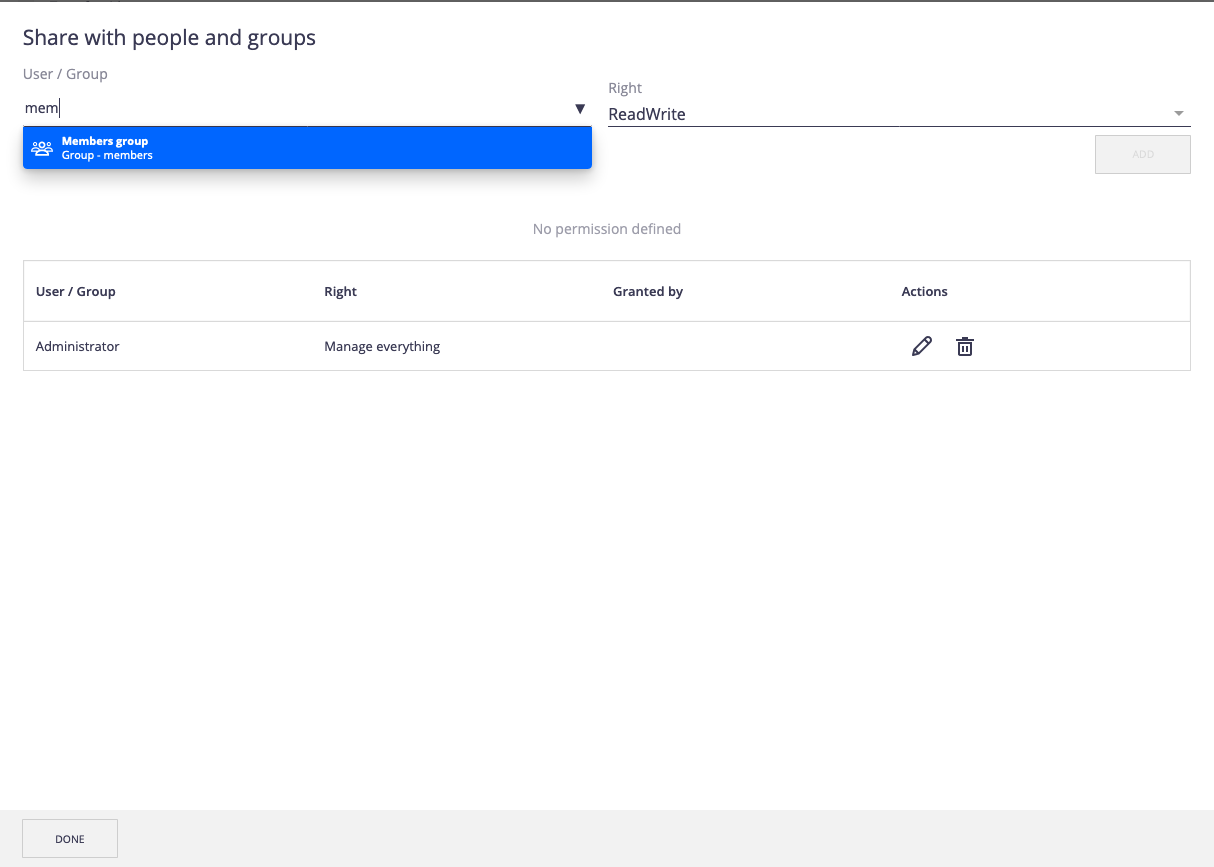
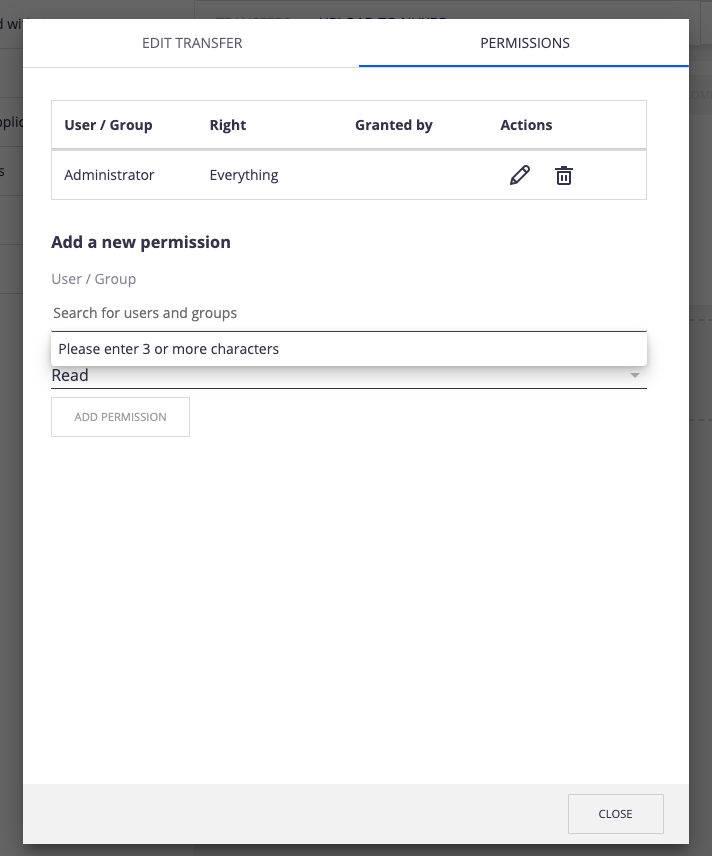
- Modify the permissions to share the transfer with other user(s) (e.g. another user is responsible for modifying the metadata).
- Edit/Delete individual files.
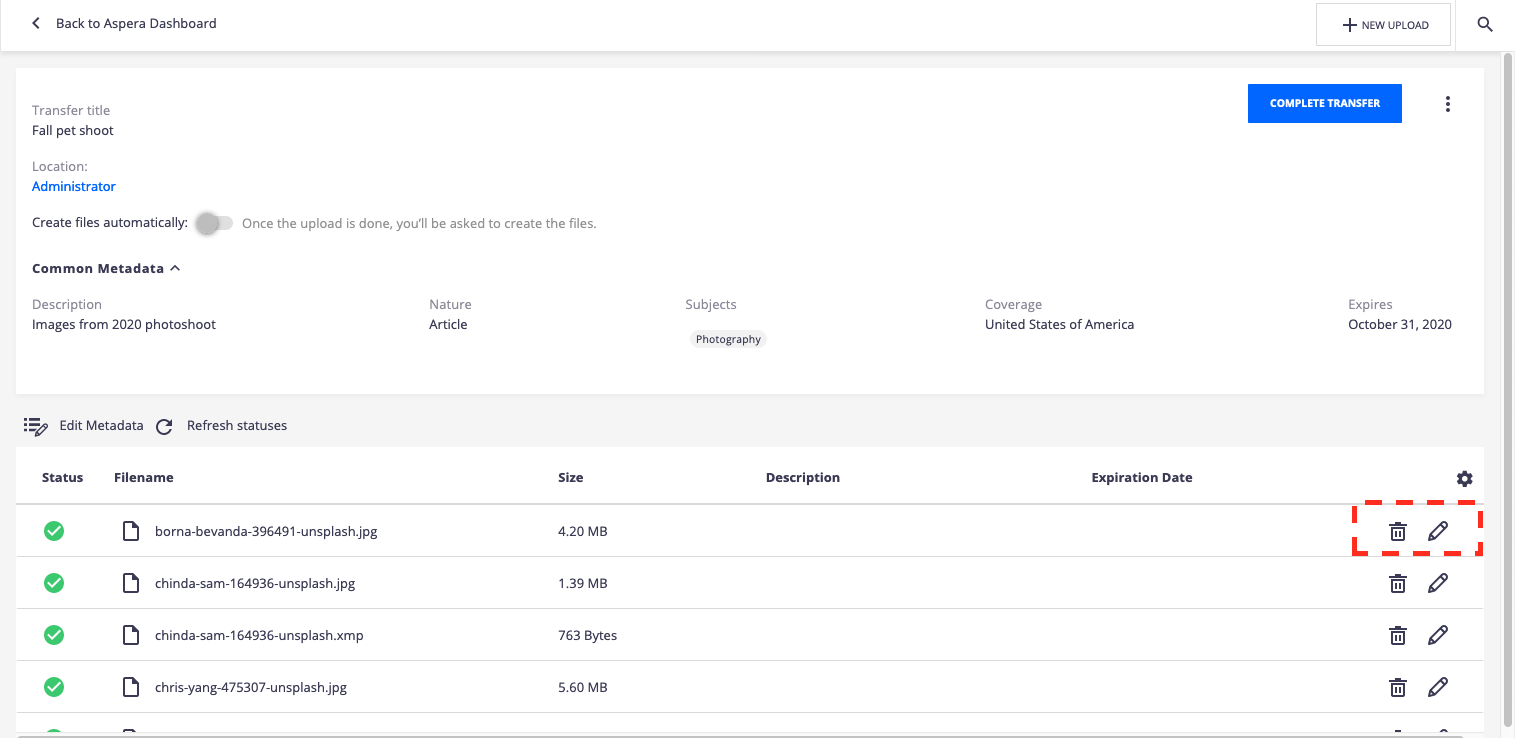
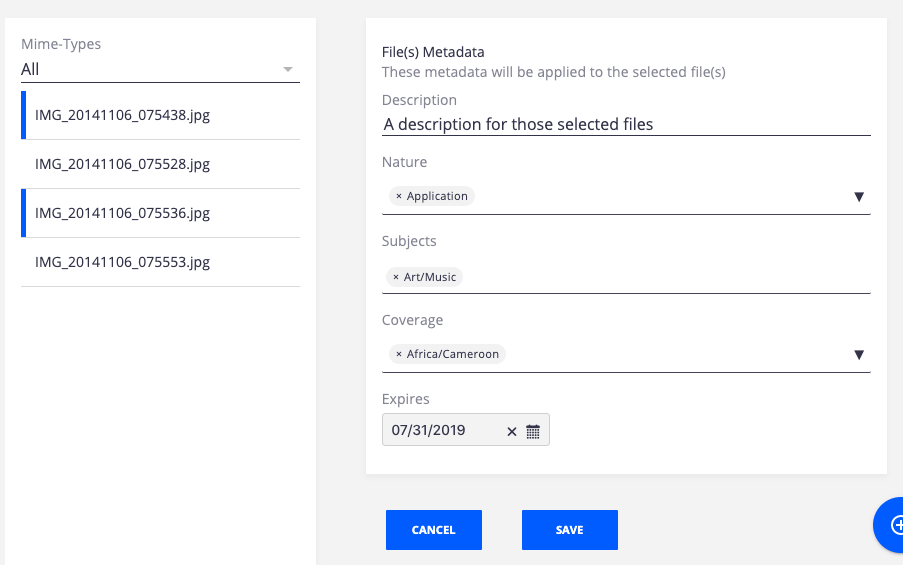
- Bulk edit selected files metadata.
- Complete transfer means to create the related documents in the Nuxeo application (once all content has been uploaded).
When completing a transfer, the "common metadata" is propagated to all Nuxeo documents (except where single/bulk metadata edits override them).
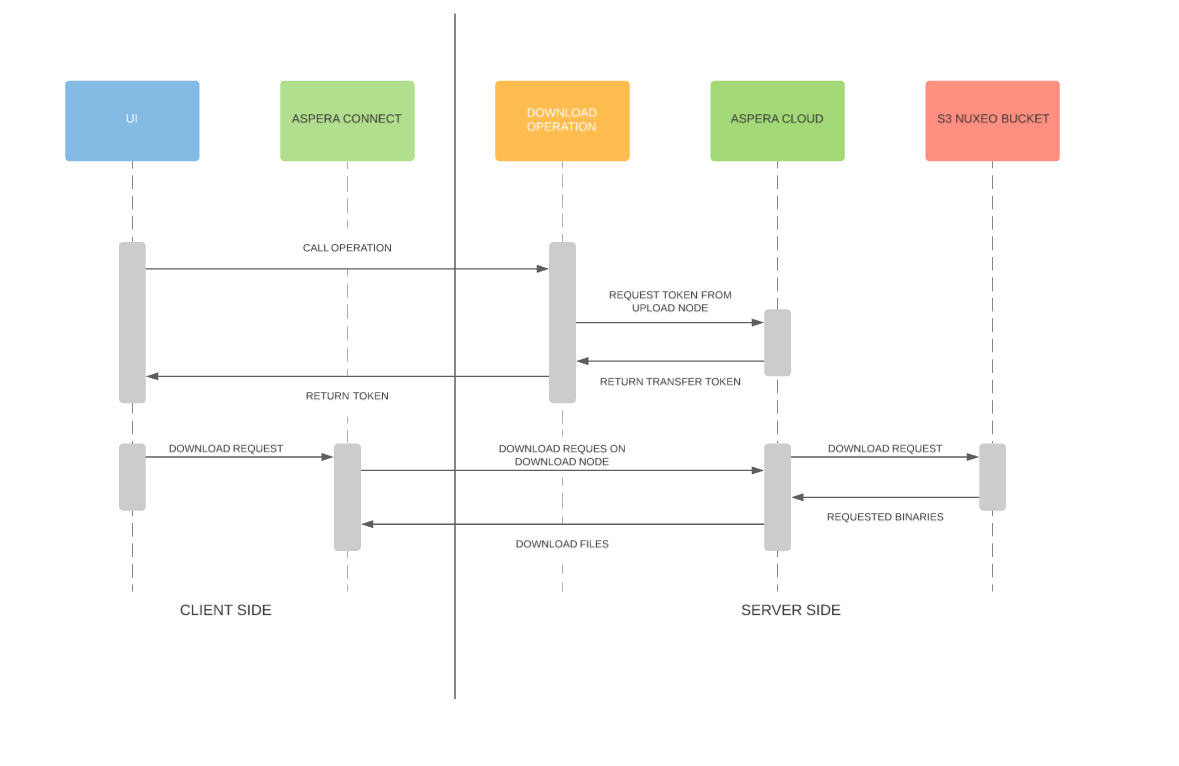
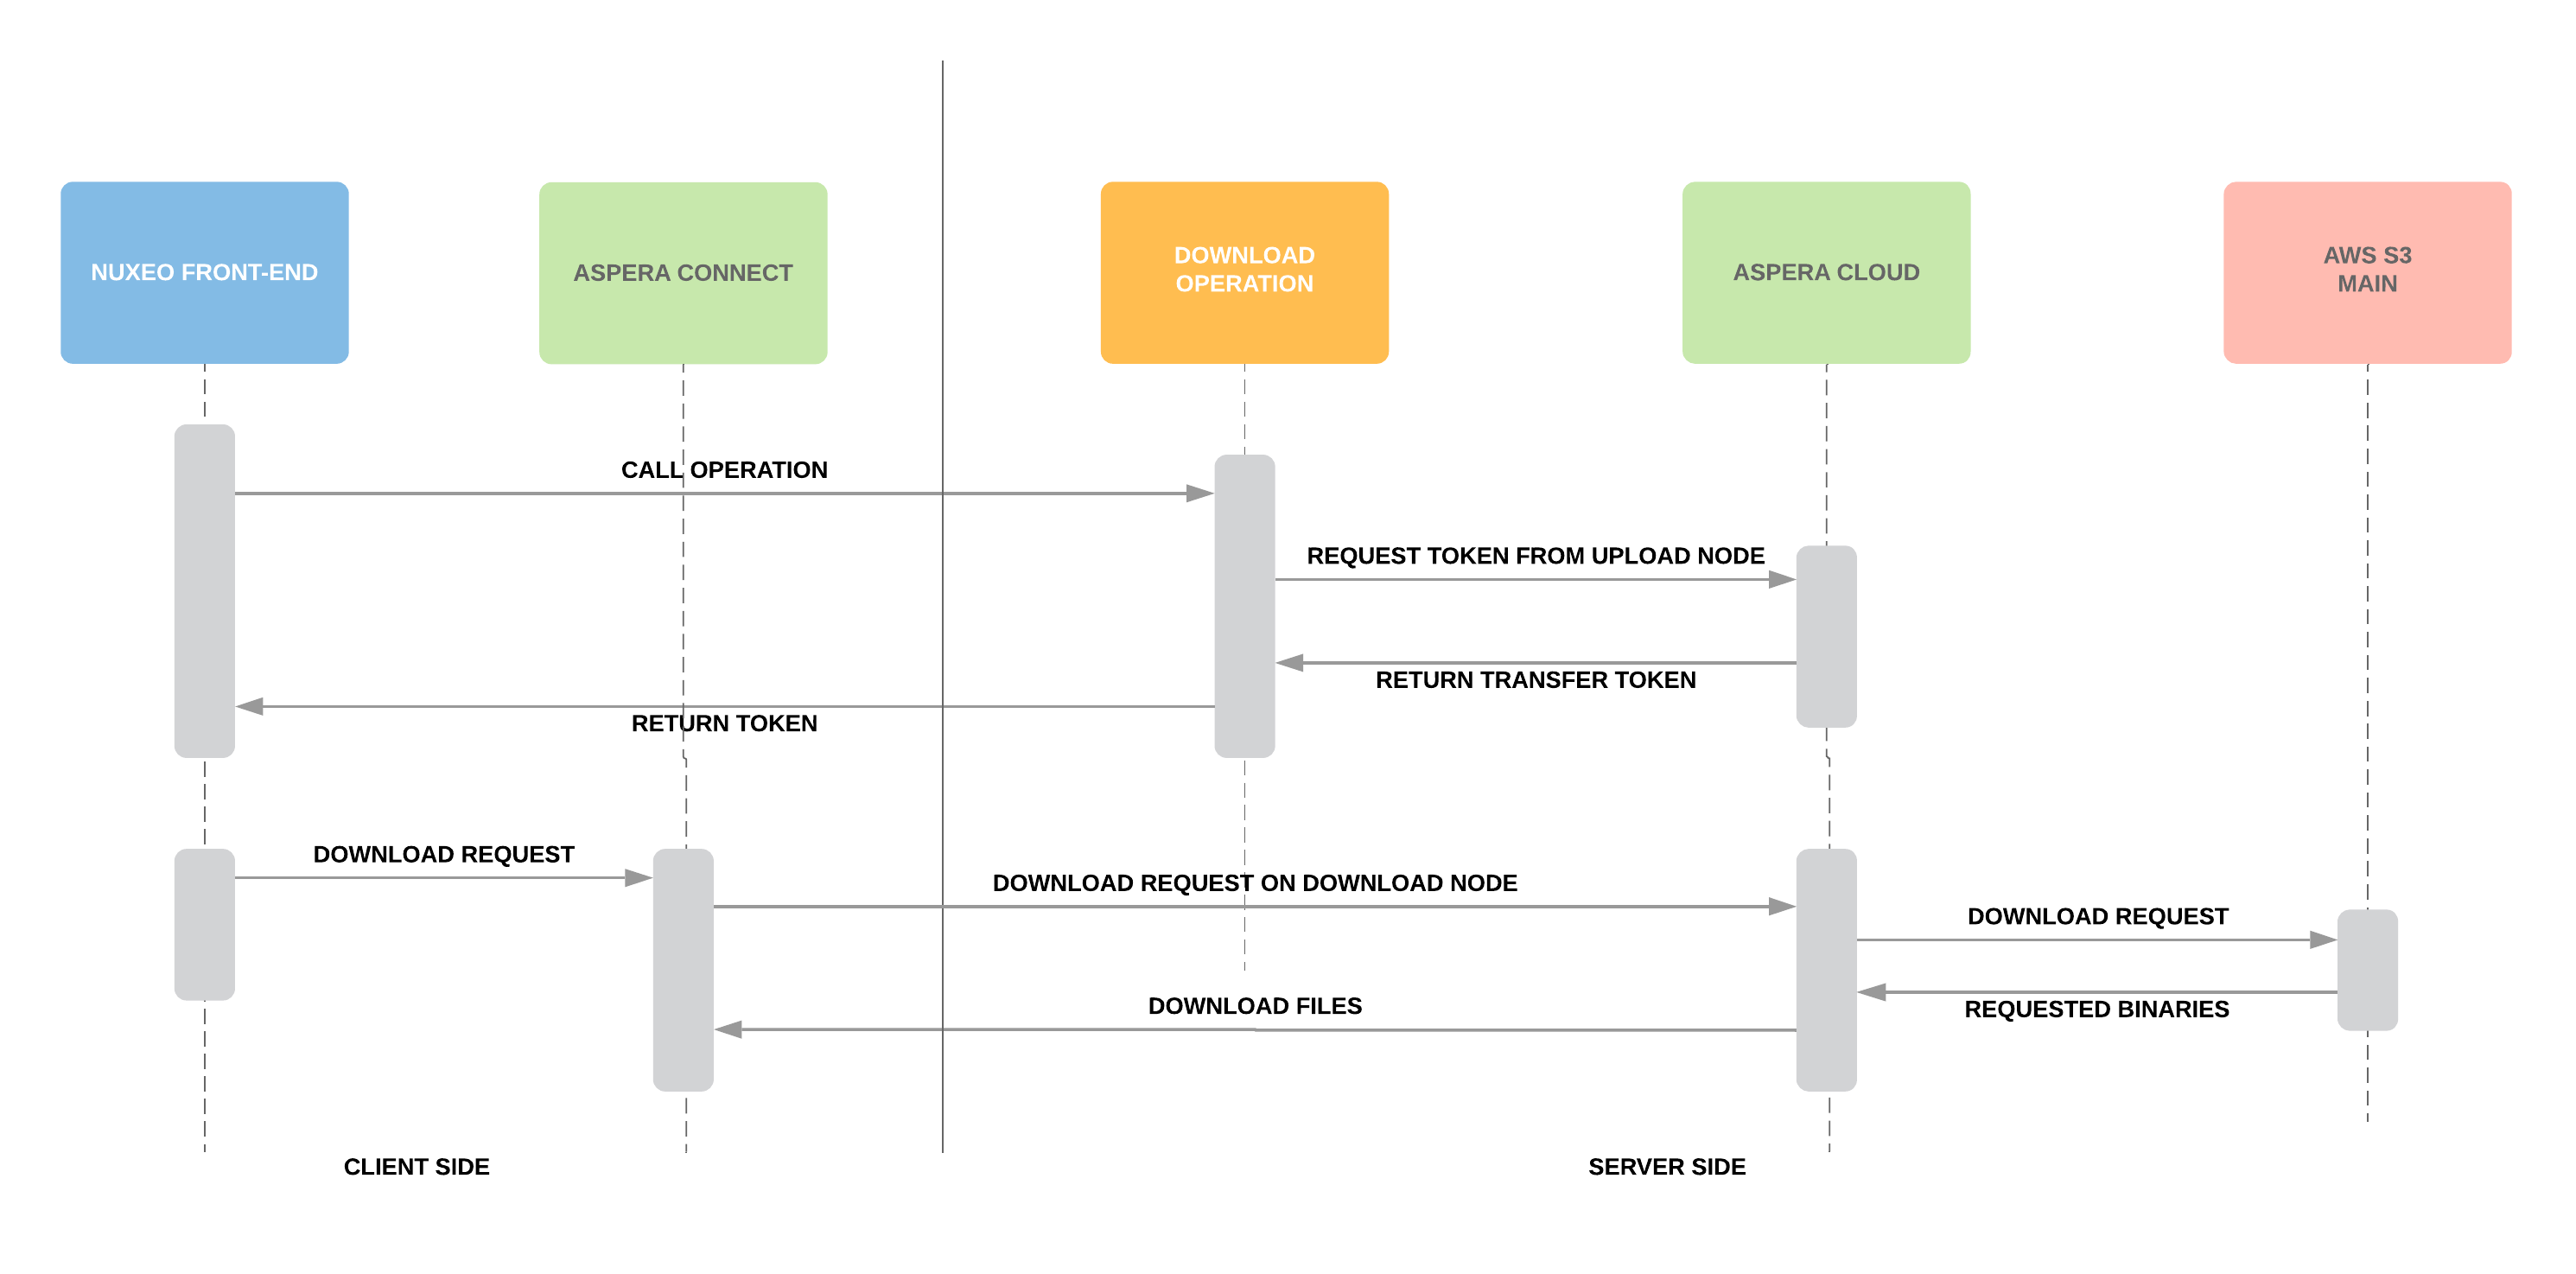
Aspera Download
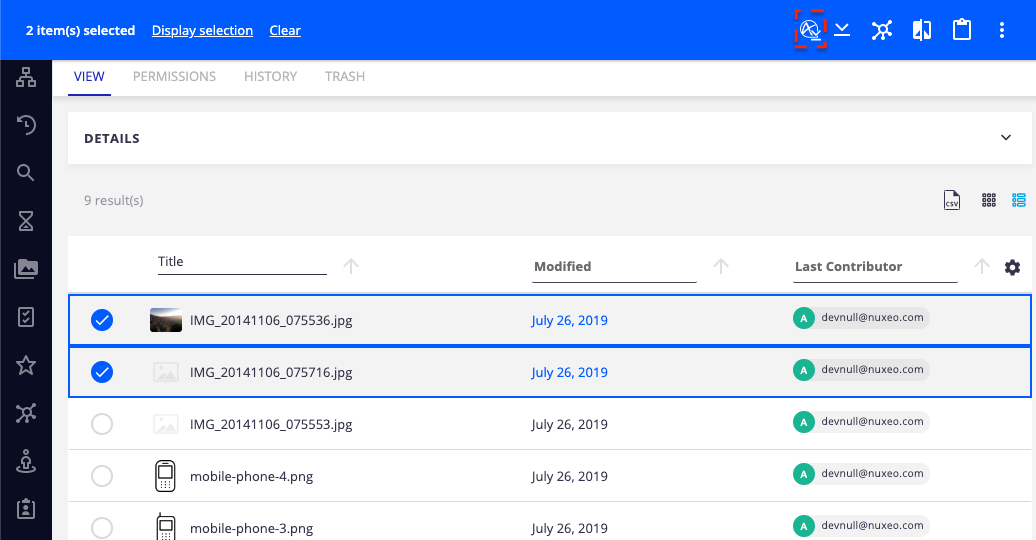
The Nuxeo Aspera Download action is accessible via a button displayed when selecting one or several documents in a "folderish" document view:
How It Works
File and Folder Type Definition
The Connector relies on the CreateFolder operation to create content in the Nuxeo repository. By default the Folder doctype is created for "folders" and File for "files".
If these types are acceptable, be sure that you have defined your content model to allow for appropriate parent/children document types as shown in our Nuxeo Studio documentation. However, if you have written a contribution to apply logic to assign types, then that will be used when using the Nuxeo Aspera Connector.
If your content model needs are more advanced, you may also contribute a custom FolderImporter class for your custom Folder and File doctypes. See FileManagerService on Nuxeo Explorer.
Aspera Upload
Aspera Download
Version 2.0.8
Requirements
- Aspera Desktop Client - latest version.
- Nuxeo Server LTS 2019 (10.10) with access to AWS S3 Storage.
Installation
Installation is made of two steps:
- Install the Nuxeo Package available from the marketplace.
- Install the Aspera desktop client.
Configuration
Aspera Configuration
We need to configure 2 Aspera nodes; one for upload and one for download.
Each node will be attached to one S3 bucket in Nuxeo:
- The main Nuxeo S3 bucket in Nuxeo for download purpose
- The S3 transient store bucket for upload purpose
Follow this Aspera documentation to attach S3 buckets to Aspera.
Please note that, in the documentation above, for Download the IAM role used by Aspera only needs READ permissions on the bucket.
The policy attached to this role can be added as shown in this sample:
{
  "Version": "2012-10-17",
  "Statement": [
    {
      "Sid": "VisualEditor0",
      "Effect": "Allow",
      "Action": [
        "s3:ListBucket",
        "s3:GetObject",
        "s3:GetBucketLocation"
      ],
      "Resource": [
        "arn:aws:s3:::bucket-name",
        "arn:aws:s3:::bucket-name/\*"
      ]
    }
  ]
}
The policy for Upload must be able to put and get objects from the S3 bucket:
{
  "Version": "2012-10-17",
  "Statement": [
  {
    "Sid": "VisualEditor0",
    "Effect": "Allow",
    "Action": [
    "s3:PutObject",
    "s3:GetObject",
        "s3:AbortMultipartUpload",
        "s3:DeleteObject",
        "s3:ListMultipartUploadParts"
      ],
      "Resource": "arn:aws:s3:::bucket-name/*"
    },
    {
      "Sid": "VisualEditor1",
      "Effect": "Allow",
      "Action": [
        "s3:ListBucketMultipartUploads",
        "s3:ListBucket",
        "s3:GetBucketLocation"
      ],
      "Resource": "arn:aws:s3:::bucket-name"
    }
  ]
}
Nuxeo Configuration
Transient Store on AWS
To use S3 direct upload with Nuxeo, you will need to add another policy to a new role:
{
    "Version": "2012-10-17",
    "Statement": [
        {
            "Effect": "Allow",
            "Action": [
                "s3:ListAllMyBuckets"
            ],
            "Resource": "arn:aws:s3:::*"
        },
        {
            "Effect": "Allow",
            "Action": [
                "s3:ListBucket",
                "s3:GetBucketLocation",
                "s3:AbortMultipartUpload",
                "s3:ListMultipartUploadParts",
                "s3:ListBucketMultipartUploads"
            ],
            "Resource": "arn:aws:s3:::yourbucketname"
        },
        {
            "Effect": "Allow",
            "Action": [
                "s3:PutObject",
                "s3:GetObject",
                "s3:DeleteObject",
                "s3:AbortMultipartUpload",
                "s3:ListMultipartUploadParts",
                "s3:ListBucketMultipartUploads"
            ],
            "Resource": "arn:aws:s3:::yourbucketname/*"
        }
    ]
}
Make sure that all configuration values are set in the nuxeo.conf:
nuxeo.s3storage.useDirectUpload=true
nuxeo.s3storage.transient.bucket=
nuxeo.s3storage.transient.roleArn=
nuxeo.aws.accessKeyId=
nuxeo.aws.secretKey=
nuxeo.aws.region=
nuxeo.s3storage.bucket=
Aspera Nuxeo Configuration
Add the Aspera access keys in nuxeo.conf:
Example:
## is the same for the 2 nodes
aspera.node.url=https://ats-aws-us-east-1.aspera.io
aspera.node.port=443

### ACCESS KEY ON UPLOAD NODE LINKED TO TS S3 BUCKET
aspera.access.key.id=
### SECRET KEY ON UPLOAD NODE LINKED TO TS S3 BUCKET
aspera.access.key.secret=

### ACCESS KEY ON DOWNLOAD NODE LINKED TO TMAIN S3 BUCKET
aspera.download.access.key.id=
### SECRET KEY ON DOWNLOAD NODE LINKED TO MAIN S3 BUCKET
aspera.download.access.key.secret=
Functional Overview
The Nuxeo Aspera Connector uses "Transfers" to add files to the system.
The process is divided into 2 steps: Upload and Create.
In the first step, the user uploads files to the transfer bucket. While in this step, a user can add files to the bucket and add properties that will apply to them. Properties can be added to all files at once (common metadata), to multiple files at once (bulk edit of metadata) and one at a time.
Once the metadata has been edited to fit the user's needs, the transfer can be completed and the content is then created in the system.
Transfers have 3 states:
- Draft: no content added yet
- In Progress: content added
- Completed: transfer has been completed and the content has been created in the system
Aspera Upload
Once in your instance, Nuxeo Aspera Upload can be accessed from two different ways:
- From the User Settings menu located on the left side:
- By clicking on the Aspera upload button displayed on every folderish document (workspace, folder, etc.)
The content uploaded by Aspera will be accessible in this folderish document (by default the target location is the user personal workspace)
Once on the Aspera Upload screen, you will be able to download the Aspera Desktop client via the following banner at the top:
Once on the Aspera menu, 2 tabs are available:
Transfers
This screen shows the status of all current transfers in your Nuxeo application.
You can:
- Access the transfer metadata and content's properties
- Complete transfers
- Share transfers
- Delete transfers (as long as they have not been completed)
Upload To Nuxeo
On this screen, different actions are available; you can:
- Drag and drop (or click to select) file(s) to upload with Aspera and follow the status of the uploads (whether you have the Aspera desktop client or not).
- Define/Edit the common metadata of the current transfer (set of uploaded content) by clicking on the Edit button.
- Modify the permissions to share the transfer with other user(s) (i.e. another user is responsible for modifying the metadata).
- Edit/Delete each file.
- Bulk edit selected files.
- Complete transfer means to create the related documents in the Nuxeo application (once all files have been uploaded).
Aspera Download
The Nuxeo Aspera Download action is accessible via a button displayed when selecting one or several documents:
How It Works
Aspera Upload
Aspera download
Customization
Model
The Transfer document type can be overridden to edit custom metadata needed for your Nuxeo documents created after Aspera uploads.
To do so:
- In Nuxeo Studio, go to Settings > Registries and add those schemas and this lifecycle.
- Create a new document type, name it
Transfer(id and label) that extends File document type. - Check the Hidden in navigation facet for this new document type and add the schemas
transfer-dcandcommon-aspera. - Select the life cycle
transfer_lifecyle. - Save and commit: you will be able now to add different schemas to your new
Transferdocument.
UI Layouts
After having overridden the Transfer document type, you can now override the different UI layouts in the Nuxeo View Designer to be able to edit those metadata:
The metadata layout
nuxeo-transfer-metadata-layout.html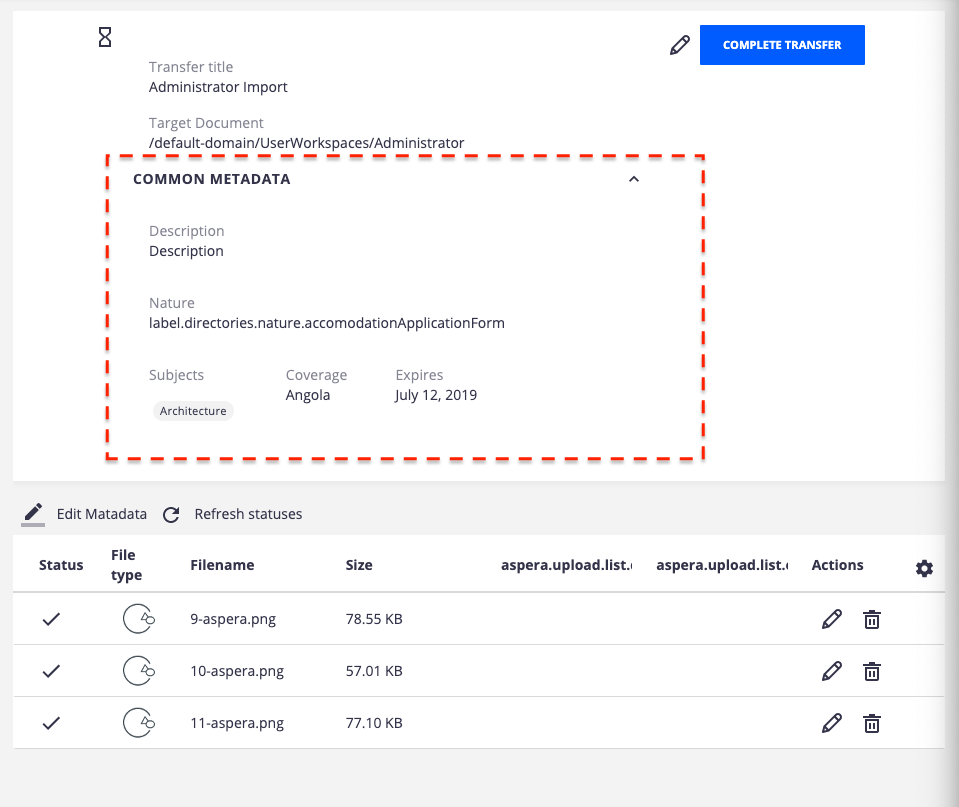
The edit layout
nuxeo-transfer-edit-layout.html
The import layout (for single/bulk metadata edition)
nuxeo-transfer-import-layout.html
The view layout
nuxeo-transfer-view-layout.html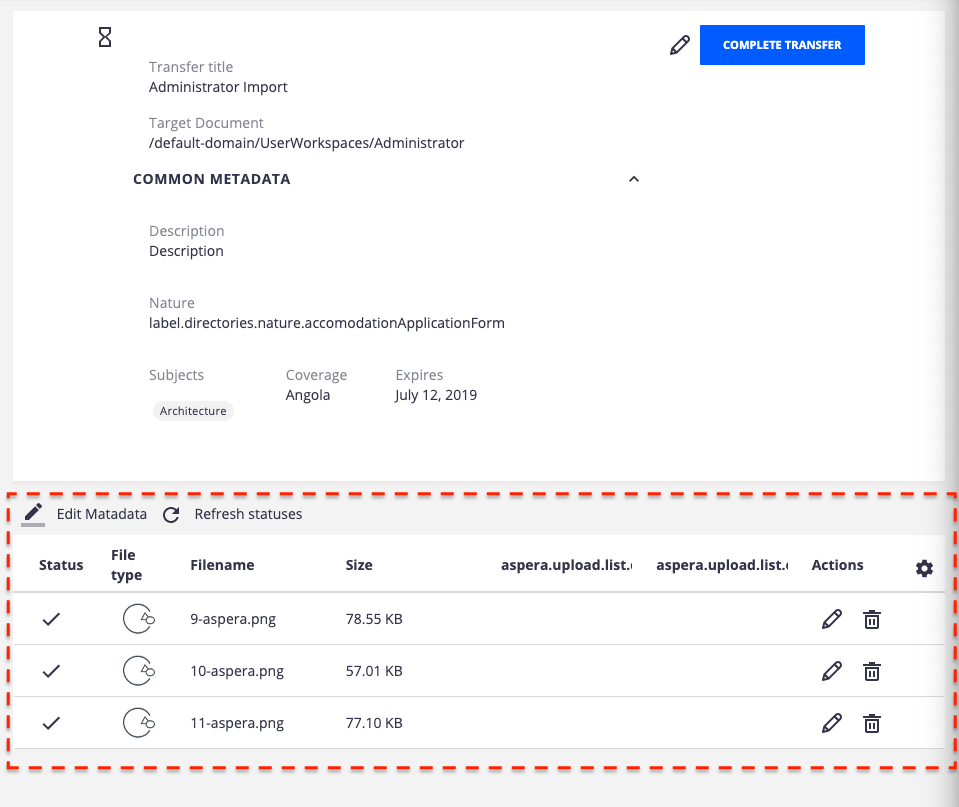
All those layouts can be found on GitHub.
Just copy/paste those layouts and you will be able to add or remove (custom) metadata.
ca:files/*/properties metadata of the Transfer document (the value is a JSON containing the properties you want to set).It means that you can add any metadata that you want (without creating any additional schemas inside Nuxeo Studio). It will propagate those properties to the different created files (except if those metadata doesn't exist in the schemas of those newly created files).
Polymer UI Custom Example
If you want to develop your custom UI rather than using the Nuxeo addon, you can build and deploy this maven project.
When running your instance, go to NUXEO_URL/nuxeo/app/ to get a simple UI example on how to use the Aspera connector:
- To upload a file in a given location via the connector
- To upload and add a file to a given document via the connector
- To list all documents with binaries and download them via the connector
Details:
my-appis the main page containing allpagesfolder pages.- In each page,
aspera-connectoris called to set Aspera authentication in place. aspera-connector.htmlis wrapping the Aspera API to be used for upload/download via the connector.- All Nuxeo operations used in this sample are used in the Addon itself