The Nuxeo Salesforce connector covers several use cases of integration between the Nuxeo Repository and Salesforce:
- binding a folder in Nuxeo and an object (opportunity, case, account, etc.) in Salesforce, for object-level document/media library
- presenting to salesforce users object-contextual lists of documents based on custom metadata queries
- general search across the Nuxeo repository
The Nuxeo Salesforce connector is currently designed to integrate more specifically Sales and Services apps of Salesforce with Nuxeo, as well as custom applications made using the Salesforce Lightning framework. The team in charge of the Salesforce connector is willing to add to the scope additional use cases such as Salesforce Marketing (to integrate Nuxeo DAM with the content authoring tool of Salesforce) and Salesforce Knowledge Base, for instance. Do not hesitate to contact your sales representative to get more information or present your requirements and expectations.
See GitHub Readme for the Dev project description.
Installation
Architecture
The Nuxeo Salesforce connector is made of:
- a server part, made available as a Nuxeo marketplace package
nuxeo-salesforcethat installs a Nuxeo Platform addon. - a Salesforce unlocked package that installs some Salesforce lightning components and a few more Salesforce resources
Nuxeo Marketplace Package Installation
The Nuxeo Marketplace package can be found here.
This addon requires no specific installation steps. It can be installed like any other package with nuxeoctl command line or from the Update Center.
Server requirements:
- You must be on HF-34 at least to benefit from all required bugfixes for an optimal experience with the Salesforce connector.
- Server must always be accessed in HTTPS.
- If you deploy with direct download enabled, you will have to deploy a CORS configuration on the S3 bucket to allow downloads from force.com type of URLs.
Salesforce Package Installation
Prerequisites:
- You must have installed the Salesforce CLI and have it authenticated against your Salesforce organization.
- Your Salesforce organization must be on Salesforce lightning, Salesforce Aurora is not supported.
The Nuxeo Salesforce package is currently made available as an unlocked package. Nuxeo will, longer-term, publish it as a managed package on the Salesforce marketplace.
To install the version of the unlocked salesforce package, that has been validated with the version of the Nuxeo marketplace package installed on your pre-production Nuxeo server instance, using sfdx client:
sfdx force:package:install -p SFpackageID -k nxapp@sfdc
SFpackageID is the salesforce package version ID. You can ask Nuxeo Support for getting the version ID required with the version of the Salesforce package you are installing. This documentation is for version 17 of the Salesforce package.
Post Installation Setup
After installing the package, you need to configure Salesforce to be able to use the Nuxeo application.
Add the Target Nuxeo Domain URL to CSP Trusted Sites
- Go to Setup > CSP Trusted Sites.
- Create a new Trusted Site using the base HTTPS URL of the target Nuxeo server, without the trailing
/nuxeopath. Example:https://your.nuxeo-instance.com. - Make sure to select all the sources.
Configure the Authentication
- Go to Setup > Certificate and Key Management
- Click on Create Self Signed Certificate
- Use
Nuxeoas a name - Download the certificate, you get a file
Nuxeo.crt
Go to Setup > Named Credential. Create a new named credential, like this one (see all attributes values)
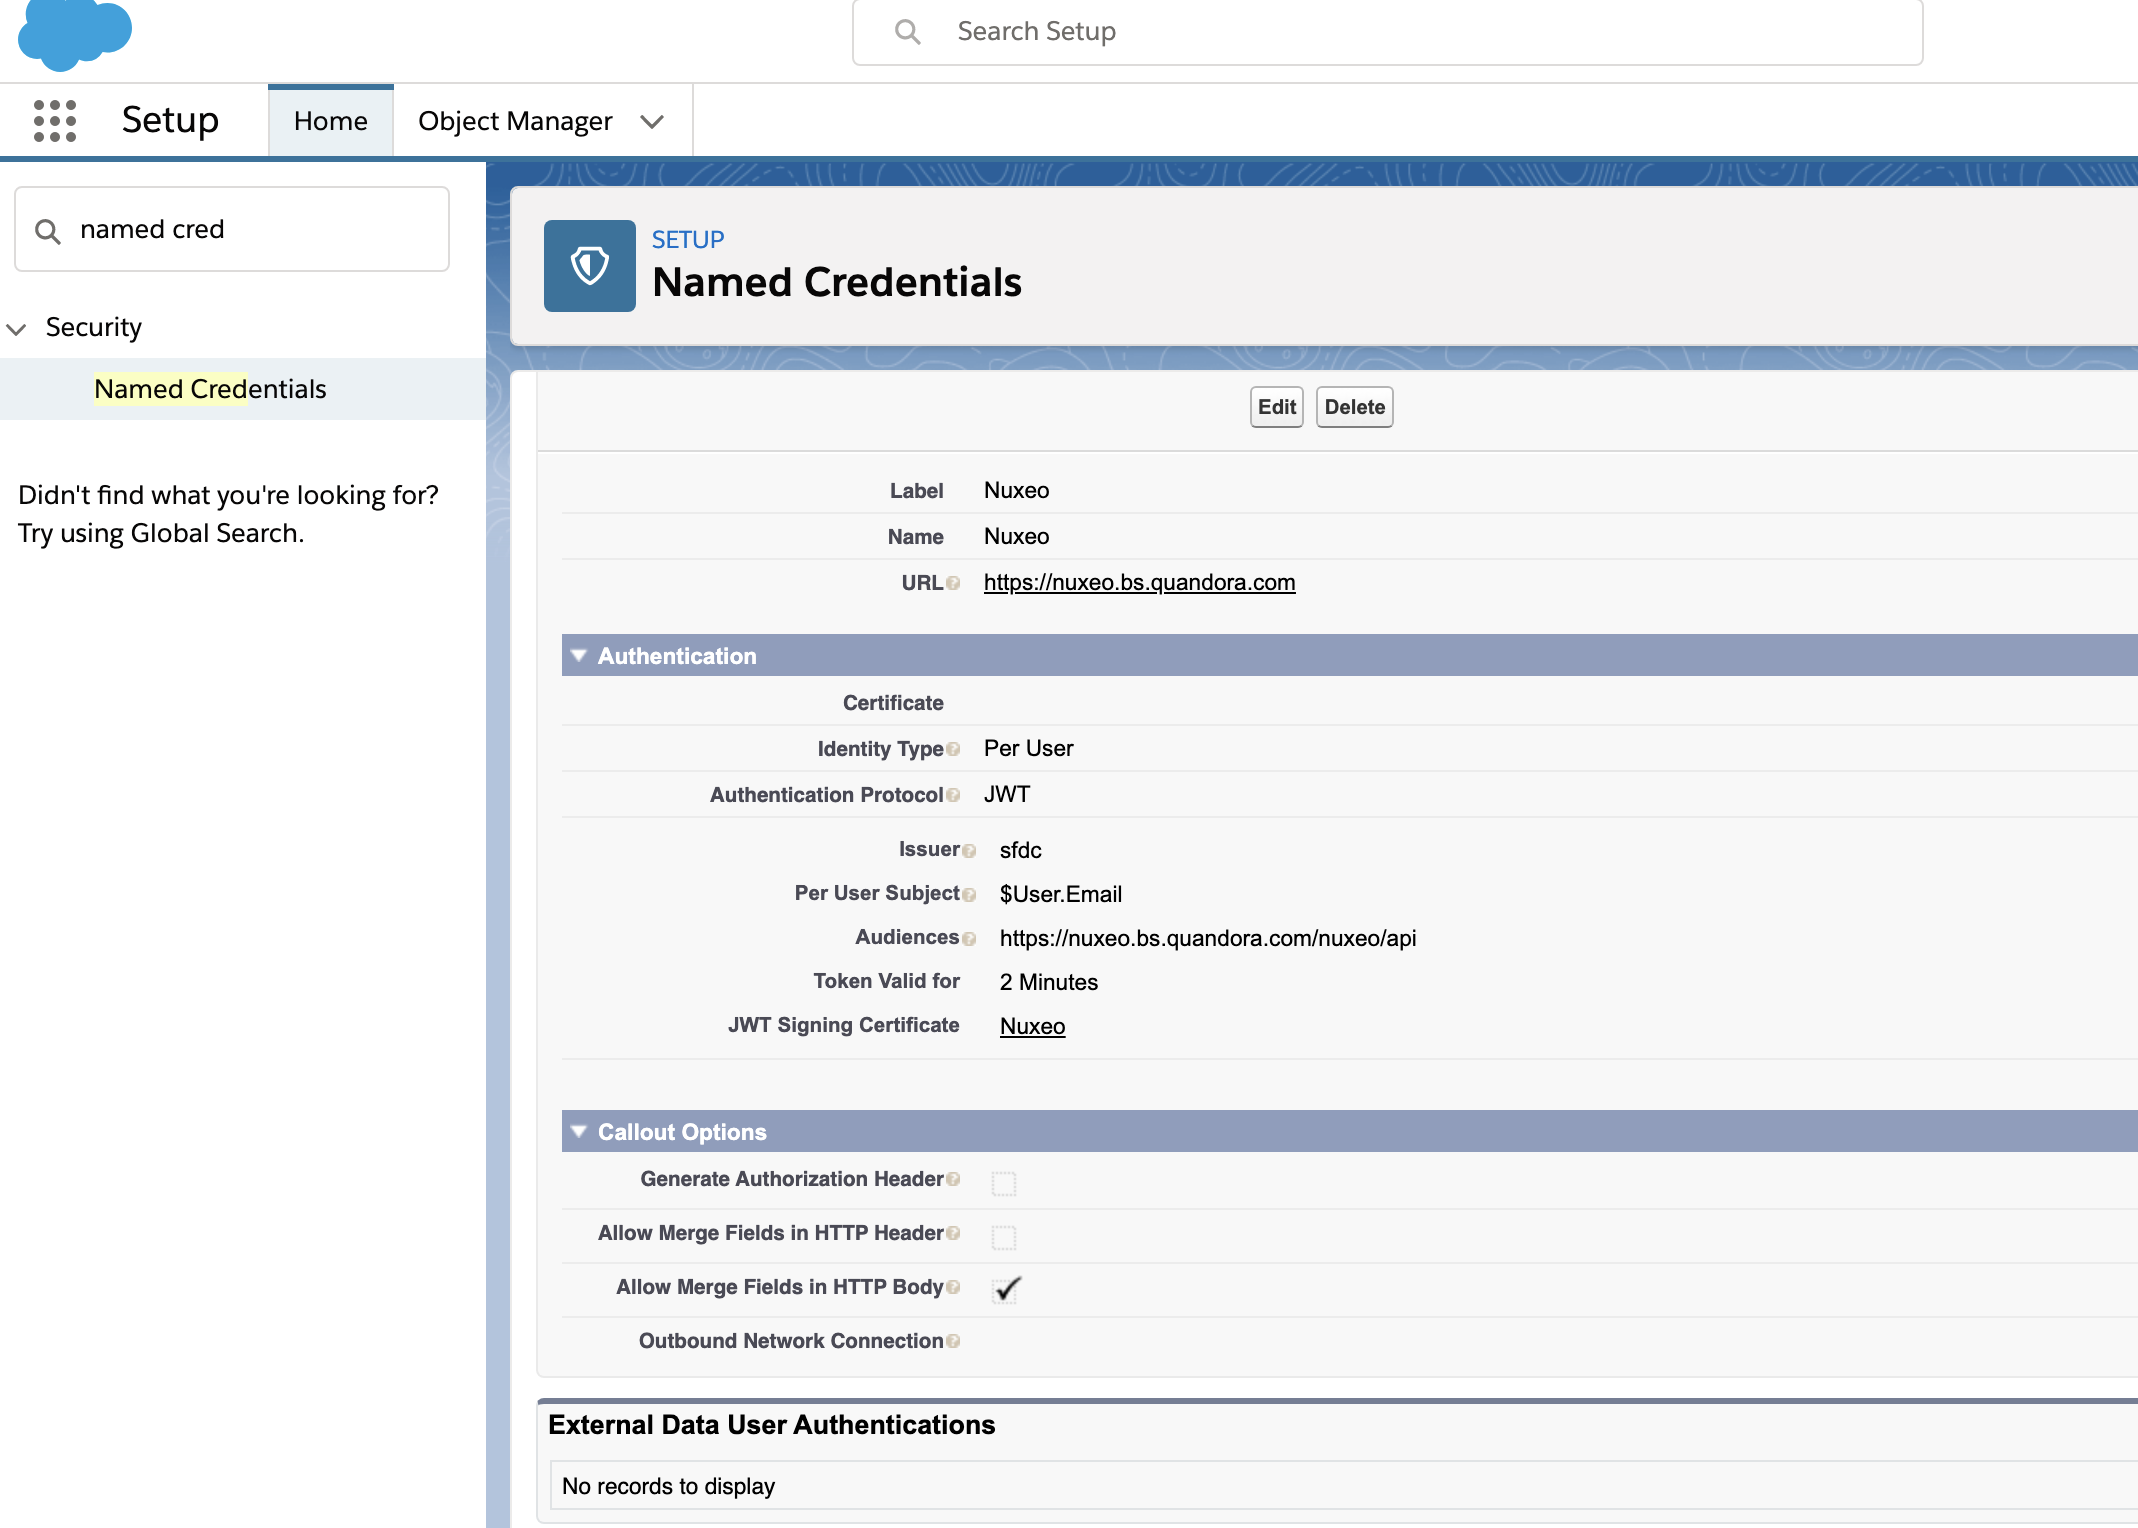 Pay attention to:
- Label: Nuxeo
- Name: Must be Nuxeo
- URL: the url of your Nuxeo repository
- Issuer: sfdc in this example, can be anything.
- JWT Signing Certificate: use the certificate you created at step 2.
- Callout Options: make sure to uncheck Generate Authorization Header that is checked by default, and to check Allow Merge Fields in HTTP Body.
Note: you need to make sure you chose an issuer string that doesn’t correspond to an existing OAuth client on the Nuxeo
oauth2Clientsdirectory. To list existing client IDs, you can do (adapt server name and user/password)curl -u "Administrator:Administrator" https://salesforce-preview-1010.napps.dev.nuxeo.com/nuxeo/api/v1/directory/oauth2ClientsIn a terminal run (adapt server name and user/password, as well as the path of the certificate you downloaded at step 2):
curl -u "Administrator:Administrator" -H "Content-Type:text/plain" -k -X POST --data-binary "@/Users/aescaffre/Downloads/Nuxeo.crt" https://salesforce-preview-1010.napps.dev.nuxeo.com/nuxeo/api/sfdc/issuers/sfdcThis command will upload the certificate into a protected Nuxeo directory dedicated to storing certificates.
- Pay attention to the @ before the path of your certificate (this is a curl instruction to post the referenced file and not the string that corresponds to the file name)
- Pay attention to what comes after
/api/sfdc/issuers/it is the issuer that you referenced at step 3 (sfdc in our example).
You can check that you correctly uploaded the certificate by listing existing certificates (adapt servername and user/password):
curl -u "Administrator:Administrator" https://salesforce-preview-1010.napps.dev.nuxeo.com/nuxeo/api/sfdc/keystore- You are done!
Validate Your Setup
You can validate that your setup is correct by using the Nuxeo Salesforce lightning component on a given SF object's page (ex: an Opportunity record):
- Browse an opportunity record (or create one if you have none).
- Click on Edit page with an admin user of the organization.
- On the Layout design page of the record view, drop the Nuxeo component somewhere inside the layout.
- Activate the configuration (select Desktop).
- Save.
- Go back to the record screen.
If all previous steps went ok, you should see the document library. You can then drop a document in the library, it will be created in the Nuxeo repository: everything is working!
Next Steps
You will see below that there are three modes for the Nuxeo component. You can use all of the modes in various places of your salesforce application, as many time as you need. We advise you to get familiar functionally with the various modes and their goals reading the generic functional documentation, and then to focus on configuring each component you need in regards to your business requirements, reading the configuration/ customization documentation.
Functional Overview
The Nuxeo Salesforce lightning component can behave in three different ways depending on its configuration:
Library: this mode exposes a content library browser with the ability for the user to drag and drop documents and create folders.
Content list: this mode exposes the result of a query in the Nuxeo repository matching the list of content required for a given business context, with an option for searching for additional documents to add to that list.
Search: this mode displays a simple search user interface to look for documents across all the Nuxeo repository, with respect to security.
In all of those modes, the user can open a given document and see many details on it. We will start by documenting that "content panel", and then review each of the modes to provide functional help on using them.
Note that it is possible by configuration to change the behavior so that instead of opening the "content panel", clicking on the document title opens a new browser tab to navigate to Nuxeo Web UI on the document view directly (see the configuration section).
Document Panel
The Nuxeo connector for Salesforce provides a way to access lists of documents, related to a search or the content of a folder. When clicking on the document title in the result, it opens a document panel organized by tabs and with some actions bars.
User can find the following fields in the document panel:
Document actions, all grouped on the top right of the panel. By order:
- Edit with Nuxeo Drive: displayed when the user has the permission Write on the document, it allows to open the document for editing it with its native editor, like MS Word, or MS Excel.
- Open in Nuxeo: open the document in the Web UI user interface.
- Download: performs a download of the main file (stored under the document property
file:content). - Upload file: available when the user has the Write permission on the document, to replace the main file (stored under the document property
file:content) - Lock: available when the user has the Write permission on the document, allows locking the document. See user documentation about locking.
- Maximise: maximize the document panel, usually for having more space to preview the open content.
- Close: closes the document panel.
Preview tab: opens a preview of the document. Office documents are rendered in PDF, images are displayed (including any content that renders as an image through the "Picture" facet, like a PSD for instance) and videos are displayed with a player, using a smaller rendition than the original file. You can configure the logic to use for the rendition of the preview. This is typically useful if your document is only metadata-based and you want to display a summary of the metadata values rendered in HTML.
Data tab: displays generic metadata of the document (version label, state, list of tags, date of creation and modification and creator), business metadata of the document, a list of renditions available on the doc (PDF, thumbnail, ...), additional attachments (as they can be attached from Web UI). The business metadata section shows by default some additional properties of the dublin core schema, you can configure it to display the custom metadata you configured on your repository.
History: displays the last five audit entries on the document. The audit tracks all events happening on a document (modifications, creation, move, copy, ...).
You can, by configuration, disable any of those sections when it doesn't fit your needs, to not display them to users.
Content Library
The Content library mode is ideal when you want to offer a minimalistic document management system for each Salesforce objects. A typical use case can be when you want to manage the documents you exchange both ways with a prospect or a customer, on an opportunity or a case.
When the Nuxeo component is configured on a record page for the content library use case, the first time a user drops content on a Salesforce record instance, the Nuxeo component will create a folder in the Nuxeo repository with the same name and title as the record title, and create the dropped file underneath. From there a user can create a set of folders and subfolders to organize the content the way he needs.
On the content library component, the user can:
- Create folders, clicking on New Folder.
- Upload new files, either by drag and drop (it supports multiple files at once) or using the "Upload files" action.
- Browse the hierarchy using the breadcrumb.
- Search within the folder. The executed search looks for content starting from the currently opened folder.
- On each listed documents, the user has a set of actions: main file download, Open in Nuxeo, Edit with Nuxeo Drive, Delete. You can also configure additional custom actions.
- Clicking on the document name opens the Document panel described in the previous section.
The created folder in Web UI holds a salesforce facet and some metadata are set automatically on the associated salesforce schema. By default, sf:objectId,sf:objectType, sf:objectAmount. See the configuration section to change that behavior.
It is possible by configuration to hide some columns of the content table. See the configuration section.
Content List
The Content list mode is ideal when you want to display to the user a specific list of content that comes from the Nuxeo repository. A typical use case is for instance to display a list of relevant knowledge articles based on the context defined by the metadata of your open case. The list of content is specified by configuration in Nuxeo Studio with a Page provider, the same way all documents lists and searches are specified in your customized Nuxeo Web UI. In the default behavior without customization, the query made lists all documents for which the dc:source metadata of the document contains the current Salesforce object record id. Additionally, user can filter the content of the list via a full-text-search.
Link content button on top of the documents list allows to search for some content within the whole Nuxeo repository, and then to "link" it. In the standard configuration, clicking on Link on a given document will add the reference of the current Salesforce record ID to the dc:source property of the document. This behavior is intended to be customized on your project. You can also decide to not display the Link action if you don't have any use case for it and only want to display a list of documents.
Without any configuration, you can use the Content list mode as a way for the user to search for a document in the repository and "bookmark" it on the object. Also, note that it is not possible to bookmark a proxy (= a published document).
It is possible by configuration to hide some columns of the content table.
Search
The Search mode provides a simple search interface with a search input field that performs a full-text search across the whole repository and returns documents the user has access to. The search result is made of tiles that display:
- the title of the document,
- modification date,
- text extract of the match of the search input, in the title, the description of the binary content, with highlight of the searched term.
You can configure the page provider (= the query) made when searching.
Utility Bar
In some situations, it is more comfortable for the user to display the content list or the content library in the utility bar section of Salesforce. One of the advantages is that the user can detach the window to display the content on a side screen. Even when detached, content is updated according to the Salesforce record browsed. Content List, Content Library and Content Search modes of the Nuxeo Lightning element can be used to configure new utility bar items.
Configuration / Customization
Salesforce UI Configuration
The Nuxeo Lightning Network component is available for being integrated into customized Salesforce UIs. You can drop it inside any Salesforce lightning container component (tabs, sections, panels, etc.). You can entitle it to Salesforce permission framework.
Once you dropped the component, you must choose the behavior type among:
- Library: this will expose a library browser with the ability to drag and drop documents.
- Content list: this will expose the result of a query, with the ability to do a mapping between the salesforce current record and the documents.
- Search: this will display a global search component.
You can also specify a custom configuration, see Nuxeo Salesforce service extension point in the section after.
Note that you can drop the Nuxeo component as many time as you need on a given page, and on as many different pages/Salesforce objects you need, there is no limitation.
Nuxeo Salesforce Service Extension Point
The Nuxeo Salesforce connector addon installed via the Nuxeo Salesforce connector marketplace package deploys a new "Salesforce configuration" service in the Nuxeo Platform with an extension point that allows to contributing various configurations.
When dropping the Nuxeo component on the page layout in the Lightning app builder, a configuration attribute allows specifying a configuration id (as a string). The lightning component, when being loaded, queries the configured configuration to Nuxeo server via an automation operation, which then asks the Salesforce configuration service for the specified configuration and returns it to the Salesforce lightning component.
This configuration object is used to configure several behaviors of the component: used page providers, custom salesforce properties/nuxeo properties mappings, enablement/disablement of some user actions, etc.
We provide below an example of such a configuration. You can contribute this extension from Nuxeo Studio.
<extension target="org.nuxeo.salesforce.SalesforceComponent"
      point="config">

      <library name="my">
        <title>My Library</title>
          <root>/default-domain/workspaces/salesforce</root>
          <nuxeo-drive>false</nuxeo-drive>
          <sobject type='Opportunity'>Name,Description,Amount</sobject>
      </library>
      <listing name="my">
          <title>My Listing</title>
          <upload>false</upload>
          <link-operation>Salesforce.MyLink</link-operation>
          <link-test>function(doc, recordId) { return doc.properties['dc:source'] === recordId }</link-test>
          <nuxeo-drive>true</nuxeo-drive>
          <sobject type='Opportunity'>Name,Description,Amount</sobject>
          <query>
          function(context, params) {
              params.pageProvider = "my-second-page-provider";
              params.customerName = context.record.Name;
          }
          </query>
      </listing>
      <search name="my">
          <title>My Search</title>
        <nuxeo-drive>true</nuxeo-drive>
          <page-provider>advanced_search</page-provider>
      </search>

  </extension>
Configuration Use Cases
Disabling the Opening Of the Content Panel
For all modes (listing, search, library), adding in the root configuration element:
<open-doc-in-nuxeo>true</open-doc-in-nuxeo>
will enable opening the document in Nuxeo instead of opening the content panel.
Disabling Nuxeo Drive Direct Edit action
You may want to disable the Edit user action if your users do not use Nuxeo Drive, to avoid confusing them. You can do so with the following element under the root configuration element:
<nuxeo-drive>true</nuxeo-drive>
Hiding Sections, Tabs and Actions
You can control which document tab, data section, document action or navigation actions are visible. If not specified or empty all items are visible.
To specify a custom display, add under the <library>, <Listing> or <search> configuration:
    <doc-tabs>preview,data,history</doc-tabs>
    <data-sections>metadata,business-metadata,attachments,renditions,mlt</data-sections>
    <doc-actions>edit,open,download,upload,lock</doc-actions>
    <nav-actions>download,open,edit,delete</nav-actions>
Adding Custom Actions
The custom actions are added to the built-in nav-actions. You should define a label, a Salesforce icon ID and an operation to be invoked by the action.
  <custom-nav-actions>
    <action name='myaction' label="My Action" icon="action:new_note" operation="Salesforce.MyAction" />
    ...
  </custom-nav-actions>
Configuring Renditions Used by the Content Panel Previewer
To configure the preview, add under the <library>, <Listing> or <search>:
    <preview>
          function(doc) {
              // the doc object is an instance of the FileDoc class from force-app/main/default/lwc/nuxeoClient/model.js
              // the doc.doc object is the Nuxeo document defined in nuxeo javascript client.
              // Refer to FileDoc for more on the API it expose.
              // You can return null (or falsy) to let the client use the default rendition detection.
              return {
                  viewer: "video" | "audio" | "image" | "pdf" | "html" | "text" | "binary",
                  rendition: renditionId
                  content: xpath
                  type: mime-type // optional mime type - must be specified for videos.
              }
          }
  </preview>
Configuring the Business Metadata Section Rendering
The business metadata section relies on calling a FreeMarker rendering using the automation script Salesforce.RenderBusinessMetadata.
You can override that script to change the display of that section. Or you can limit your effort to customize the default FreeMarker template used if you don't have any complex conditional logic. The default one has been designed on purpose to show various cases of complex metadata display situations (directories, lists, users, translations).
Changing the Root Path Where the Folders Are Created for the Library Behavior
When using the Content library mode, a folder will be created for each Salesforce object. It is possible to configure the Nuxeo repository path under which the folders will be created under the <library> element with the element:
<root>/default-domain/workspaces/salesforce</root>
Changing the Document Type of the Folder Created for the Library Behavior or More
The folder is creating calling an automation script named Salesforce.TouchSFLibrary. It is possible to override this automation script. See the source of the script for a better understanding of its behavior.
Changing Labels
The Nuxeo components are implemented using the internationalization framework of Salesforce. As a consequence by enabling the translation workbench, it is possible to change the label of any of the displayed labels in the component and translate it to any language.
The only label that is not translated with the Salesforce framework is the title of the component, which displays "Content Library" and "Content list". You can contribute another label using the element:
<title></title>
The string provided will also be looked up as a key in the translation workbench.
Updating the Page Provider and Properties Mapping for the Content List Behavior
The content list is designed for being able to configure the query used to fetch the documents it displays and allows to do a mapping between some of the properties of the Salesforce record and the parameters expected by the Nuxeo query. The following part of the configuration under the <listing> element does exactly this:
<query>
          function(context, params) {
              params.pageProvider = "list-of-procedures-provider";
              params.customerName = context.record.Name;
          }
</query>
In this example, the developer must have configured the list-of-procedures-provider page provider initially in Nuxeo Studio. Then the "record" object inside the "context" map is used to get access to the properties of the current salesforce object, while the page providers parameters are under the "params" map.
ecm:fulltext parameter. This is required for the full-text search input field to be operational.
User Object in the Context
You have access to the context in which the mapping is expected to a User object (context.user:).
Default user object fields are:
- Id,
- UserName,
- Type
- Name
- LastName
- FirstName
- RoleId
- TimeZone
- Locale
- Language
- ProfileId
- OrganizationId
- OrganizationName
You can configure the availability of custom fields by adding under the <library>, <Listing> or <search>:
<user-field>field1,field2</user-field>
Passing Through Additional Custom Values in the Context
External lightning components can inject properties using the global window._NUXEO_ property. This is useful if you want to use custom objects (not the main salesforce one of your page) for mapping values of the parameters of your content query.
window._NUXEO_ object is available in the client context as the env property: context.env.
When defining properties inside window._NUXEO_ you should avoid replacing the existing object if any (which can be set by other components).
Ex:
    const nuxeo = window._NUXEO_ || {};
    nuxeo.myProp = true;
    window._NUXEO_ = nuxeo;
Hiding Columns on Listing and Library Modes
For a given instance of the Nuxeo Lightning Element, you can hide the following columns: type, size, author, lastModified. By default the type column is hidden.
To do so, add the following to the extension point configuration of your component:
<doclist-hidden-columns>type,size</doclist-hidden-columns>
Defining a New Link Operation for the Content List Behavior
The Link Content action provides to the users the ability to click on a Link button on each document of the search result. The behavior associated with the Link/Unlink buttons can be changed by configuring another operation to call, the default one is Salesforce.LinkAsSource.
See the source of the operation.
There is also a configurable test made to know when to display the Link or the Unlink button, see the following contribution:
<link-test>function(doc, recordId) { return doc.properties['dc:source'] === recordId }</link-test>
Configuring a Utility Item
The nuxeoApp utility item component is named nuxeoAppUtility.
To install it, go to Setup > Apps > App Manager and select the application you want to customize (let's say we want to customize the Sales application). Note that you must use the Lightning Sales application.
Then on the dropdown menu associated with the lightning Sales application click on Edit.
- Then, open the Utility Items section and click on Add utility item. Select
nuxeoAppUtilityand then configure it as needed.
Configuring the "Open in Nuxeo" Link
To use a different link than the one opening the document view in Web UI, you can declare a custom enricher under the root element of the configuration:
<doc-url-enricher>myCustomDocumentURL</doc-url-enricher>
By default the documentURL enricher is used.