In this how-to we will see how to make it possible to process a list of document depending on a date parameter. An example would be how to display or do an operation on all documents expiring in less than 3 months.
This how-to requires knowledge about:
Customization done in this how-to relates to the Nuxeo Platform's JSF UI. Before continuing:
- Make sure to select JSF UI in Nuxeo Studio's application definition screen.
- Install the nuxeo-jsf-ui package in your Nuxeo Platform instance.
Creating Dedicated Properties
The first step is to add date-type properties to our document type. We will use these new properties as a landmark for our future queries. Let's say we want to recall the expiring date 3 months before it happens.
To know more about how to define a document type and add properties check out the page HOWTO: Define a Document Type.
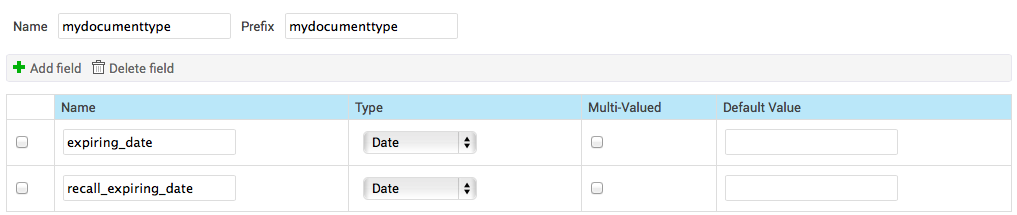
- Create a new document type called "mydocumenttype".
- In the Schema tab of the document type, add two date-type properties:
- "expiring_date",
- "recall_expiring_date".
- In the Creation Layout and Edit Layout tabs, add the expiring_date property. Make sure that the expiring date is mandatory during creation.
Filling in the Properties
It would be possible to let users fill the recall date manually. But it is more interesting to update it when the document is created or updated.
Filling in the Properties When the Document Is Created
Let's create an automation chain that first copies and saves the "expiring_date" to the "recall_expiring_date" property. Then the chain withdraws three months to the "recall_expiring_date".
Automation Chain
Create the following automation chain:
- Context.FetchDocument
- Document.SetProperty:
    xpath: "mydocumenttype:recall_expiring_date"
    save: "true"
    value: "@{Document[\"mydocumenttype:expiring_date\"].clone()}"
- Context.RunScript:
    script: "Document['mydocumenttype:recall_expiring_date'].add(2,-3);"
- Document.Save
Save time by pressing the "switch editor" button in your automation chain, paste the YAML definition provided earlier, and switch again to see the result.
For more informations on the add() parameter, you can take a look on the Calendar Java Class documentation.
Event Handler
You can then bind the automation chain to any event or action you want. For example, to fill in the "recall_expiring_date" when the document is created, create a new event handler with the following properties:
- Events: Document created
- Current document has one of the types: mydocumenttype
Updating the Property Automatically When the Document Is Modified
It is also possible to have the "recall_expiring_date" updated when a user modifies the document. The chain will be similar to the one used for the creation of the document, but will not include any "save" step.
A chain called upon the modification of a document should not include a save-related operation. A save operation calls document modification events and the chain would run into an infinite loop.
Automation Chain
Create the following automation chain:
- Context.FetchDocument
- Document.SetProperty:
    xpath: "mydocumenttype:recall_expiring_date"
    save: "false"
    value: "@{Document[\"mydocumenttype:expiring_date\"].clone()}"
- Context.RunScript:
    script: "Document['mydocumenttype:recall_expiring_date'].add(2,-3);"
Event Handler
Create a new event handler with the following properties:
- Events: Before document modification
- Current document has one of the types: mydocumenttype
Using the Property in a Query
The "recall_expiring_date" is most commonly useful in the two following cases:
- To display all documents expiring soon, using a content view;
- To launch operations on the documents after a predefined period of time, using automation chains.
Listing Expiring Documents Using a Content View
In content views the way to fetch all documents for which the "recall date" is outdated is to define the query filter.
On the Query & form tab of your content view, define your query filter.
ecm:mixinType != 'HiddenInNavigation' AND ecm:isVersion = 0 AND mydocumenttype:recall_expiring_date <= DATE ?Define the date query parameter:
#{currentDate.toString()}You will probably want to add other criteria to you query filter:
- Adding
ecm:currentLifeCycleStatewill only fetch documents in the appropriate lifecycle state. - Adding
ecm:pathwill only fetch documents located at the specified folder.
You may refer to the NXQL documentation for an exhaustive options list.
- Adding
Click on the Results tab and select the relevant information to display on the result table. For instance:
- Title with link,
- Expiring date,
- Recall expiring date,
- Lifecycle state.
You can then leverage this new content view in a tab on a custom folder document type for instance.

Processing Expiring Documents Using an Automation Chain
If you want to make an operation on all the documents that expire soon, you will use an automation chain. This chain will start with the Fetch > Document.Query operation It will produce a list of documents that operations accepting documents can use.
Let's take the example of an automation chain doing the following steps:
- Fetching all visible documents whose "expiring date" is outdated;
- Deleting these documents (moving them to the trash).
The chain will look like that:
- Document.Query:
    query: "SELECT * FROM Document WHERE ecm:mixinType != 'HiddenInNavigation' AND ecm:isVersion = 0 AND ecm:isTrashed = 0 AND mydocumenttype:expiring_date <= DATE '@{CurrentDate.format(\"yyyy-MM-dd\")}'"
    language: NXQL
- Document.SetLifeCycle:
    value: delete
- Seam.Refresh: {}