Angular by Google is the successor of the much used AngularJS. It was also built to bring front-end developers all the tools they may need to turn a website into a modern web application across all platforms. Angular is a great all-in-one framework that provides many features and answers your front-end and mobile needs.
But your application also needs a serious back end that will allow you to build your application quickly and concentrate on features without reinventing the wheel. This is what the Nuxeo Platform provides you with. When users browse your web application, it will actually call the Nuxeo Platform through its REST API in order to handle and retrieve content.
Angular has lots of different stacks, and it can be difficult to find the one that fits our needs. That's why we created a dedicated bootstrap in Nuxeo CLI.
Our angular bootstrap comes with plenty of helpful tools:
- Full webpack build module
- Proxy between the webpack dev server and a running Nuxeo
- TypeScript-based stack
- Nuxeo JS Client included
- All test and integration tooling
- Build command to package application as Nuxeo bundle.
The whole tooling suite is based on AngularClass work.
Bootstrapping an Angular Project
This section will help you to get started on an Angular project. This will be covered in three steps:
- Installing prerequisites
- Using Nuxeo CLI
- Building a Nuxeo Package that can be deployed on a Nuxeo Platform instance
Step 1 - Installing Prerequisites
In order to get a clean installation, we will make use of Nuxeo CLI. So let's install it along with its prerequisites:
- Install Git.
- Install node.js and ensure NPM is installed.
In a terminal, use NPM to install the CLI tool:
$ npm install -g nuxeo-cli
Step 2 - Bootstrap Nuxeo Bundle and Package
Create a new folder.
$ mkdir my-app && cd $_Call Nuxeo CLI to bootstrap Angular application with a Nuxeo Package modules.
$ nuxeo bootstrap angular2 packageYou'll be prompted for some Maven or Name information, then an
npm installcommand will be executed automatically to install dependencies.To start the built-in server to view your application:
$ npm run startNavigate to http://0.0.0.0:3000/.
Step 3 - Let's code
myapp-web: Contains Angular application modulemyapp-web/config: Contains all configuration files if you need to tweak some thingsmyapp-web/src/main/app: Contains base web directorymyapp-web/src/main/app/app: Contains application base directorymyapp-package: Contains Nuxeo Package moduleFrom here, you can now build your own Angular Component in the
myapp-web/src/main/app/app/folder, your own Angular Directives, you own Angular Services and whatever else you want.Nuxeo JS Client is available as a Service inside your Application. View how you can handle it in
myapp-web/src/main/app/app/search/search.component.ts:import { NuxeoService } from '../nuxeo.service'; constructor(public nuxeo: NuxeoService) { } searchDocument(value: String) { this.nuxeo.repository().query({ query: `Select * from Document where ecm:fulltext LIKE '${value}' or dc:title LIKE '%${value}%' and ecm:isProxy = 0 and ecm:currentLifeCycleState <> 'deleted'` }, { enrichers: {'document': ['thumbnail']} }).then((docs) => { this.documents = docs.entries; console.log(docs.entries[0]); this.loading = false; }) ... }
Step 4 - Understanding NPM Command List
All commands are accessible using the npm run base command. For instance, if you'd like to execute the start command:
$ npm run start
Take a deeper look at the package.json file to get them all; here is a list of commons ones:
start,server:dev: Start a dev server on the local port3000, initiate a proxy between/nuxeotohttp://NUXEO_SERVER/nuxeoand watch scripts files. The application is reloaded when the sources are modified.build:prod: Package application as Maven resources intargetfolderclean: Clean all webpack generated fileslint: Run the TypeScript linter on your sourcestest: Run Karma testse2e: Run integration tests (e2e) using Protractorci: Runlint,testande2e
Deployment Options
There are two possible ways to deploy your application:
Embedded mode: Having your Angular application in your Nuxeo Platform instance.
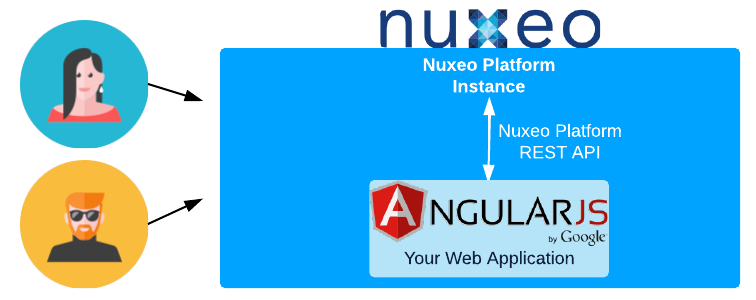
This setup is particularly interesting when using a Nuxeo Cloud instance. No setup, no administration needed, and full scalability. By configuring your Nuxeo Platform instance, people will be redirected to your custom interface and the overall setup is transparent.
If you bootstrapped your project with the Nuxeo's
package, simply go to the root of your project, then:$ cd <root_project> $ mvn packageYour package is built under
myapp-package/target/myapp-package.zip, and contains your Angular application.Otherwise, if you prefer to handle the Nuxeo Bundle by yourself, go to the root of your Angular module, then:
$ cd myapp-web
$ mvn package
The Nuxeo Bundle under
myapp-web/target/myapp-web-1.0-SNAPSHOT.jarcontains your Angular application and can be deployed inNUXEO_SERVER/nxserver/bundlesdirectly.Isolated mode: keep your Angular web application separated from your Nuxeo Platform instance.
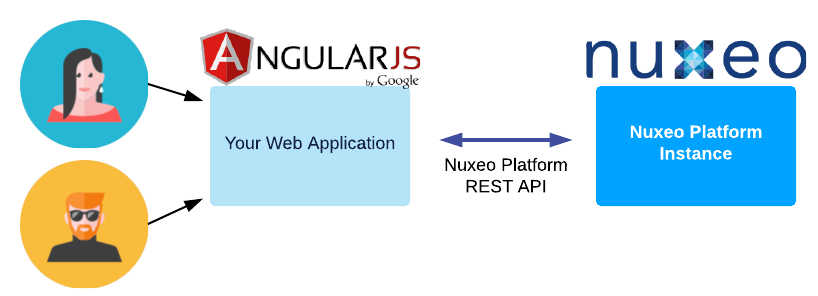
By doing so, you can put your web application wherever you want it to be; this can be on a totally separate server if need be.