As described on the page Managing Permissions, the Edit permission visible in the UI contains the permission to remove content. This means that you cannot grant the Edit permission and deny the Remove access right at the same level of the repository. So you need to override the default Write permission to be able to do that.
Procedure
Add a new contribution to remove the
Removepermission fromWritepermission.<extension target="org.nuxeo.ecm.core.security.SecurityService" point="permissions"> <permission name="Write"> <remove>Remove</remove> </permission> </extension>This change will make the permission
ReadWrite, displayed under the permission label "Edit" in the UI, act as wanted: it no longer includes the right to remove content.If you want users to be able to add and remove content, you must now grant them the Edit permission and the Remove permission. Or you can add a new permission that will behave like the default
ReadWritepermission used to.Define a new global permission to read, edit and remove content.
  <extension target="org.nuxeo.ecm.core.security.SecurityService"
    point="permissions">
   <permission name="ReadWriteAndRemove">
        <include>Read</include>
        <include>Write</include>
        <include>Remove</include>
    </permission>
  </extension>
Make the new
ReadWriteAndRemovepermission visible in the drop down list in the UI.<extension point="permissionsVisibility" target="org.nuxeo.ecm.core.security.SecurityService"> <visibility> <item order="10" show="true">Read</item> <item denyPermission="Write" order="50" show="true">ReadWrite</item> <item denyPermission="Write" order="55" show="true">ReadWriteAndRemove</item> <item denyPermission="Remove" order="60" show="true">ReadRemove</item> <item order="100" show="true">Everything</item> </visibility> </extension>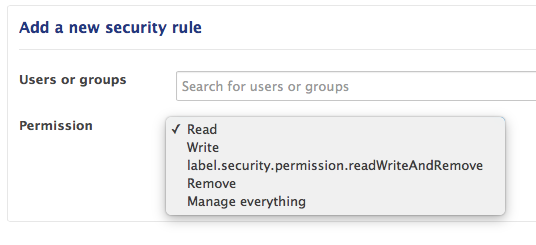
Add the new permission label to your internationalization files.
- Deploy your customizations.