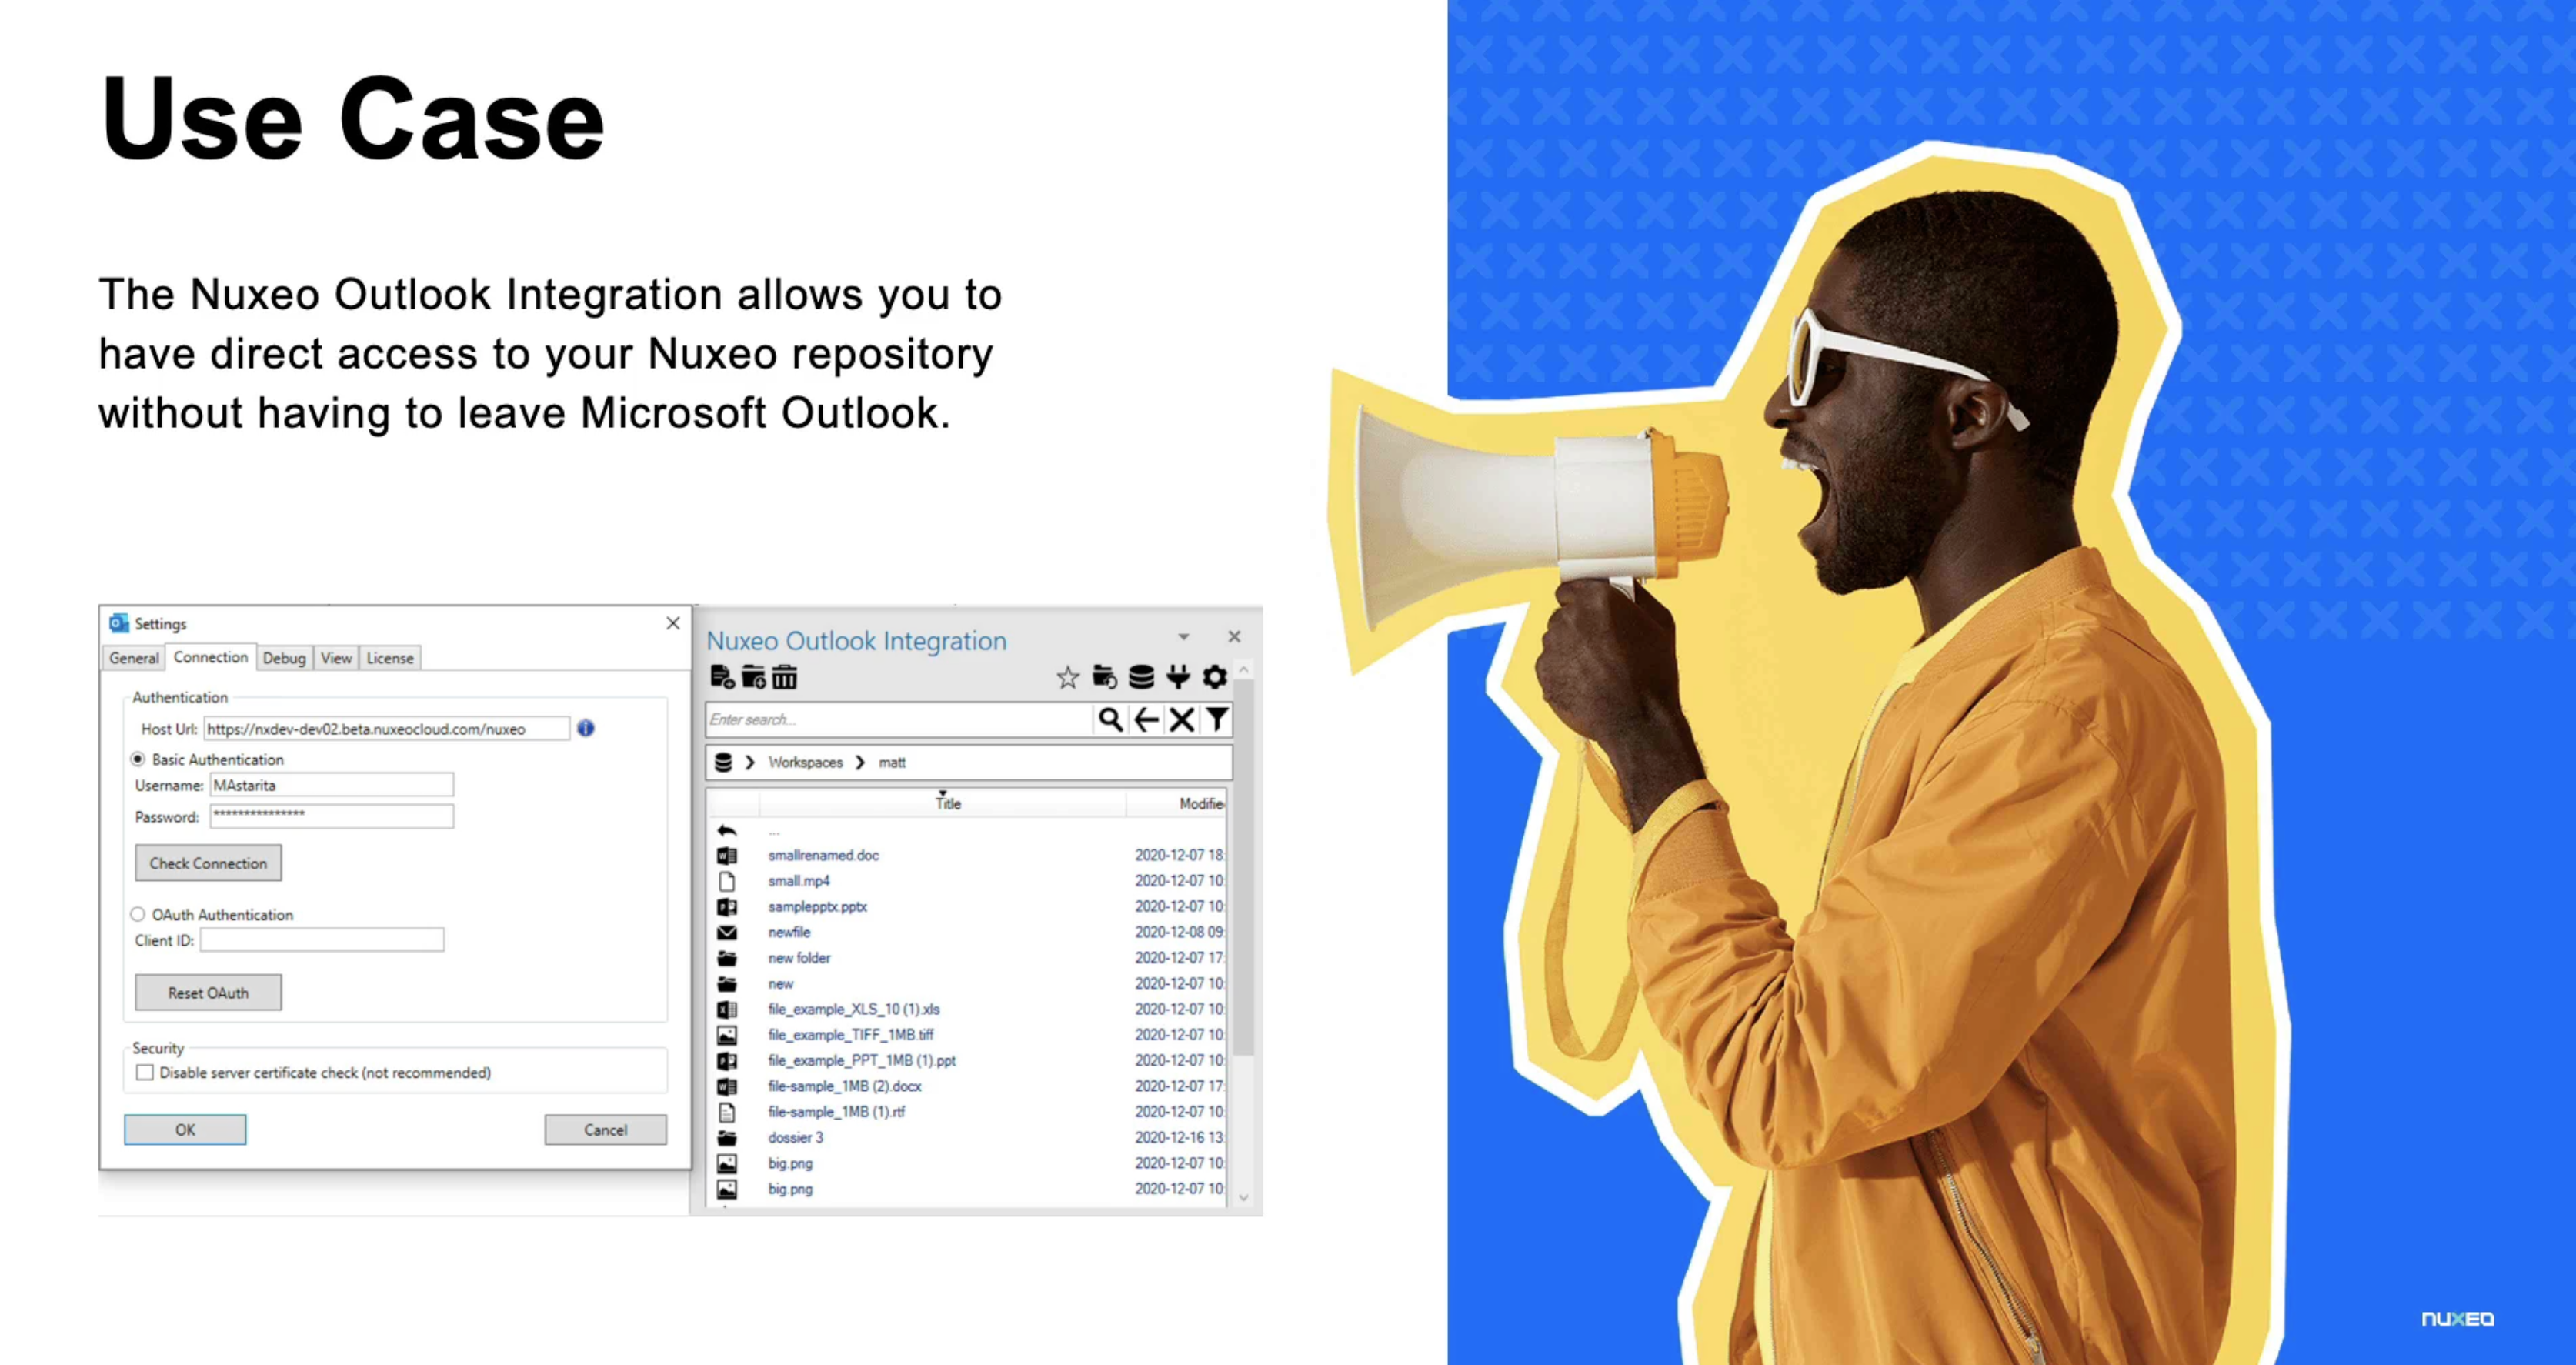
The Nuxeo Outlook Integration allows you to archive emails and files as documents to your Nuxeo instance and access the repository without leaving Microsoft Outlook.
Features of the Nuxeo Outlook Integration include:
- Archive Microsoft Outlook content (emails, meetings, and appointments) or files from the Windows file system as Nuxeo documents
- Browse and drag content from the repository to emails or your Windows desktop
Search inside your Nuxeo repository
- As option, automatically extract email attachments to make them accessible for the search engine
- Access your favorite documents
- Create new versions and replace files of your documents
- View a documents' version history and download older versions
Installation
Server-side
The Nuxeo Outlook Integration Server components are packaged altogether in the handy Nuxeo package zip format.
You can use the default Nuxeo Installation guide as described in here.
Apply Licenses on Server
The Nuxeo Outlook Integration needs to be purchased at Nuxeo. Please contact your sales representative for further information and subscription options.
With the subscription, you will be provided with two license files
- Server license file
- Client license file As a user with admin permissions, open the Admin Section within the Nuxeo Web UI.

Open the Outlook Integration page
Client license
You have two option regarding the application of the client license
Import the client license into the server
Click the Import Client License button, select your client license file and upload it.
The license string will be displayed.This option is helpful, if you are using automated software rollout to your clients, as the license will be applied to each client, once the Nuxeo repository is being accessed via the Nuxeo Outlook Integration.
Leave the section empty and provide the client license string to your users manually. This option can be used if your want to control the licensed clients "manually".
The user then needs to apply the license string manually, which is described in the settings documentation of the Nuxeo Outlook Client.
Server License
- Click the Import Server License button.
- Select your server License from your Explorer window and hit open to upload it.
- Once the license is validated, you will get your license detail displayed.
- If the license cannot be validated, an appropriate error message will be displayed instead.
Setting up OAuth 2
To use OAuth 2, your Nuxeo instance needs to be set up with a dedicated OAuth 2 client ID for the Outlook Integration. This can be done via REST or cURL. The client ID is configurable on client side so the name can be customized.
REST call: OAuth 2 add clientId to Nuxeo
POST http://localhost:8080/nuxeo/api/v1/directory/oauth2Clients

POST api/v1/directory/oauth2Clients
{
"entity-type": "directoryEntry",
"directoryName": "oauth2Clients",
"properties": {
"name": "Nuxeo Outlook Integration",
"clientId": "nuxeo-oi",
"redirectURIs": "webbrowser",
"autoGrant": "true",
"enabled": "true"
}
}
The redirect URL is not necessary as the Outlook Integration handles the return in an embedded browser.
cURL OAuth2 add clientId to Nuxeo via cURL
curl -u Administrator:xxxx\ -H 'Content-Type: application/json' \ -X POST https://ecm-2020.cloud.nuxeo.com/nuxeo/api/v1/directory/oauth2Clients \ -d @- << EOF { "entity-type": "directoryEntry", "directoryName": "oauth2Clients", "properties": { "name": "Nuxeo Salesforce Client", "clientId": "nuxeo-sfdc", "redirectURIs": "https://momentum-flow-9907-dev-ed.cs82.my.salesforce.com/apex/nuxeoauth", "autoGrant": "true", "enabled": "true" } }
Client-side
Requirements
The Nuxeo Outlook Connector requires Windows 10 with a local installation of Office 2019 or Office 365.
Settings Migration From Previous Versions
When installing a newer version of the Outlook Connector, the settings file (NuxeoClientSettings-x.x.x.xml in the %USERPROFILE% folder) will be migrated to a newer version. If possible, settings will be used from the previous version. The setup will try to migrate the most recent version if there are multiple older settings files.
An administrator can force overwrite parameters from a previous installation using the "FORCEOVERWRITE" parameter from the scripted installation.
Manual Installation
If you are distributing the Nuxeo Outlook Client across an organization, see Scripted Installation section.
Extract the contents of the archive (usually called
Nuxeo-EmailClientOutlookPlugin-x.x.x.zip) and choose the x86 or x64 version dependent on your current systemChoose either the
msiorexe(both will work, themsifile is needed for the scripted installation).
An installation wizard will open.Follow the installation process
Open Microsoft Outlook
You will see the Nuxeo Outlook Integration docked to the right. You can access the settings (i.e. to apply a license) by pressing the gear icon
Command-line Installation
This is useful for larger companies who do not want their single clients to run the installation by themselves. Besides the actual client, the installation will copy a configuration file into the user profile folder (alias in Windows Explorer: %USERPROFILE%). If there already is a user configuration present, the existing parameters will not be overwritten.
There are two ways client can be installed using CMD parameters:
- Interactive installation
- Quiet installation (performs in a silent mode w/o any user interaction).
In order to run an installation, you need to do the following steps:
Run the Command Prompt as an Administrator (even if you are an Administrator on the machine) to force all operations to be performed under administrative permissions.
Navigate to the folder where the
NuxeoOutlookIntegration....msifile is located. Depending on the OS running on the client machine, you have to choose between "x86" (32 bit) or "x64" (64 bit).
Optionally you can type the exact file-path instead.Execute the following command:
For interactive installation: msiexec /i NuxeoOutlookIntegration.msi LIST OF PARAMETERS (i.e. msiexec /i NuxeoOutlookIntegration.msi HOSTNAME="https://mynuxeoinstance.com/nuxeo" OAUTH2CLIENTID="nuxeo-oi")
For quiet installation: msiexec /i NuxeoOutlookIntegration.msi LIST OF PARAMETERS /quiet (i.e. msiexec /i NuxeoOutlookIntegration.msi HOSTNAME="https://mynuxeoinstance.com/nuxeo" OAUTH2CLIENTID="nuxeo-oi" /quiet)
Command line parameters:
- HOSTNAME - Sets Nuxeo server URL. (format:
:// ). The name has to point to the API endpoint, which is usually i.e. https://nuxeoserverinstance/nuxeo (but may differ on your installation). - OAUTH2CLIENTID - Set the name of the OAuth2 client Id used for authentication with OAuth2
- AUTH - Sets the type of authentication. "Basic" or "OAuth2"
- NUXEODRIVEENABLED - Enables or disables the context menu for "Edit with Nuxeo Drive" - default is false
- OFFICEONLINEENABLED - Enables or disables the context menu for "Edit with Office Online" - default is false
- LANGUAGE - Sets the language (format examples: "de-DE", "fr-FR", "en-US")
Culture settings, available languages:
- en-US = English
- fr-FR = French
- de-DE = German
Example:
- The URL of your Nuxeo instance is "https://mynuxeoinstance.com/nuxeo".
- Authentication should be set to OAuth2, your OAuth2 client Id is
nuxeo-oi. - Your company has set up the Nuxeo Drive for editing but has no Office Online integration.
- You want the default language to be french (can be changed by the user later)
It should look like this:
msiexec /i NuxeoOutlookIntegration.msi HOSTNAME="https://mynuxeoinstance.com/nuxeo" AUTH="OAuth2" OAUTH2CLIENTID="nuxeo-mi" NUXEODRIVEENABLED="true" LANGUAGE="fr-FR"
If you want the same installation to run quietly, you can just add /quiet:
msiexec /i NuxeoOutlookIntegration.msi HOSTNAME="https://mynuxeoinstance.com/nuxeo" AUTH="OAuth2" OAUTH2CLIENTID="nuxeo-mi" NUXEODRIVEENABLED="true" LANGUAGE="fr-FR" /quiet
Settings Migration From Previous Versions
When installing a newer version of the Outlook Connector, the settings file (NuxeoClientSettings-x.x.x.xml in the %USERPROFILE% folder) will be migrated to a newer version. If possible, settings will be used from the previous version. The setup will try to migrate the most recent version if there are multiple older settings files.
An administrator can force to overwrite parameters from a previous installation using the FORCEOVERWRITE parameter from the scripted installation.
Configuration
Settings Dialog
For configuring the Nuxeo Outlook Plugin open the settings dialog by clicking the gear wheel symbol in the menu bar.

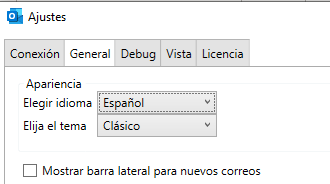
General Settings
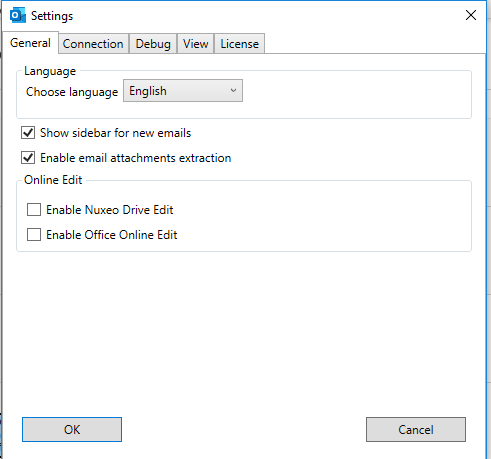
Language: choose your preferred language (currently available languages are English, French and German).
Show sidebar for new emails: Check this option if you want to access the Nuxeo repository directly from within a new email.
Enable email attachments extraction: Check this option if you want that attachments are extracted from the email and stored as separate content items within Nuxeo as attachment of the email content object.
Online edit options
Enable Nuxeo Drive Edit: Check this option if you have Nuxeo Drive installed on your local computer. You will be able to edit documents directly from within the Nuxeo Outlook Integration panel.
Requirement: Nuxeo Drive installation, for further information see the documentation.Enable Office Online Edit: Check this option if your Nuxeo environment is leveraging the Nuxeo Office Online Integration. You will be able to edit documents directly from within the Nuxeo Outlook Integration panel. Requirement: WOPI integration configured at your Nuxeo Server, valid MS Office 365 subscription, for further information see the documentation.
Please contact your Administrator if you are not sure which option is the appropriate one for your organization.
Connection Settings
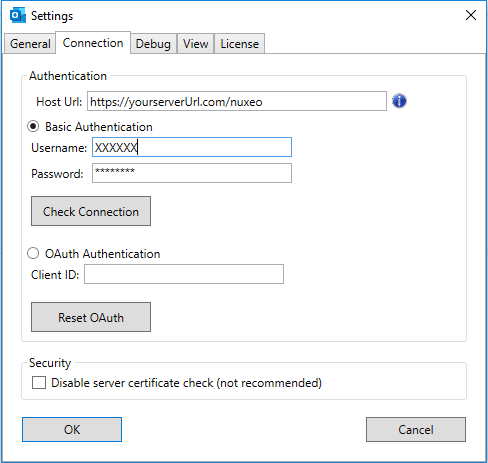
Host Url: The web address your Nuxeo server is reachable at and points to your API endpoint. URL usually ends with "/nuxeo".
Authentication options
Basic Authentication: Standard authentication with user and password
Check Connection: Click this button to determine whether you have entered the correct server URL and username / password combination
OAuth Authentication: Check this option, if your organization is using OAuth Authentication
Client ID: Enter your Client ID for OAuth Authentication
Reset OAuth: Click this button, in the case you need to change your authentication (change of user)
Security
Disable server certificate check: Check this option if your Nuxeo server does not have a valid certificate installed. This is not recommended and should not be necessary on a productive system, but often test systems do not have valid certificates.
Please contact your Administrator if you are not sure which option is the appropriate one for your organization.
Debug Settings
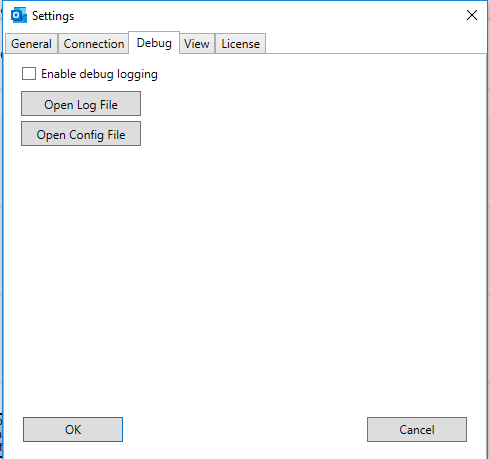
This tab is providing access to the log file and the config file of your Nuxeo Outlook Integration.
This is for support purpose and in general you will not have to change the settings.
Enable debug logging: Check this option if you require a deeper level of debug information. Please be aware, that this debug log file can become rather huge in a short time frame.
Open Log File: Click this button to view the log file. You can copy and paste this information for support purpose and share it with your Administrator.
Open Config File: Click this button to view the current settings file. You can copy and paste this information for support purpose and share it with your Administrator.
If any error occurs, while working with the integration, you will get this information immediately in a separate information tray underneath the browsing window of the Nuxeo Outlook Integration pane.
For the case, that you are encountering any errors, while working with the Nuxeo Outlook Integration, please contact your Administrator before changing the log settings.
View Settings
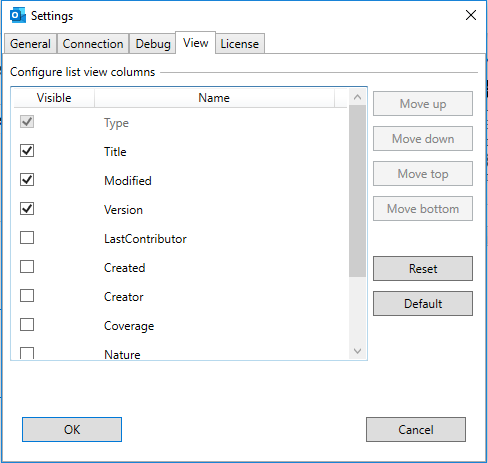
List view columns: Check any combination of attributes, you want to see in the list view.
Move buttons: Use these buttons to change the sort order of the selected columns in the list view.
Reset: Click this button to reset the columns to the settings you had when the settings dialog was started.
Default: Click this button to select the default columns for the list view.
License
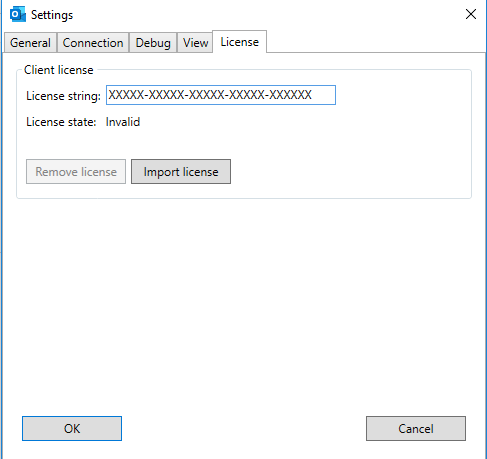
This section describes the process of applying a license for the Nuxeo Outlook Integration Client, for the case, that the client license is not provided by the Nuxeo server.
If your Administrator has set up a centralized client license provisioning, the license will be applied to your client upon first access to the Nuxeo server.
Please contact your Administrator to determine whether you have to apply the license on your own.
License String: Put the license string into this text field. The license string has the following pattern: XXXXX-XXXXX-XXXXX-XXXXX-XXXXXX
License state: Information whether license is valid or not
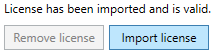
Import license: Click this button once you have entered the license string into the appropriate field
You will see the following information after the license is successfully imported
Remove license: Click this button in the case you need to apply a new license
Functional Overview
After installation and configuration of the Nuxeo Outlook Integration, you will see a new panel at the right hand side of your Outlook client.
This panel gives you access to the Nuxeo repository. You can search for content, upload emails and other content to the repository and work with existing content.
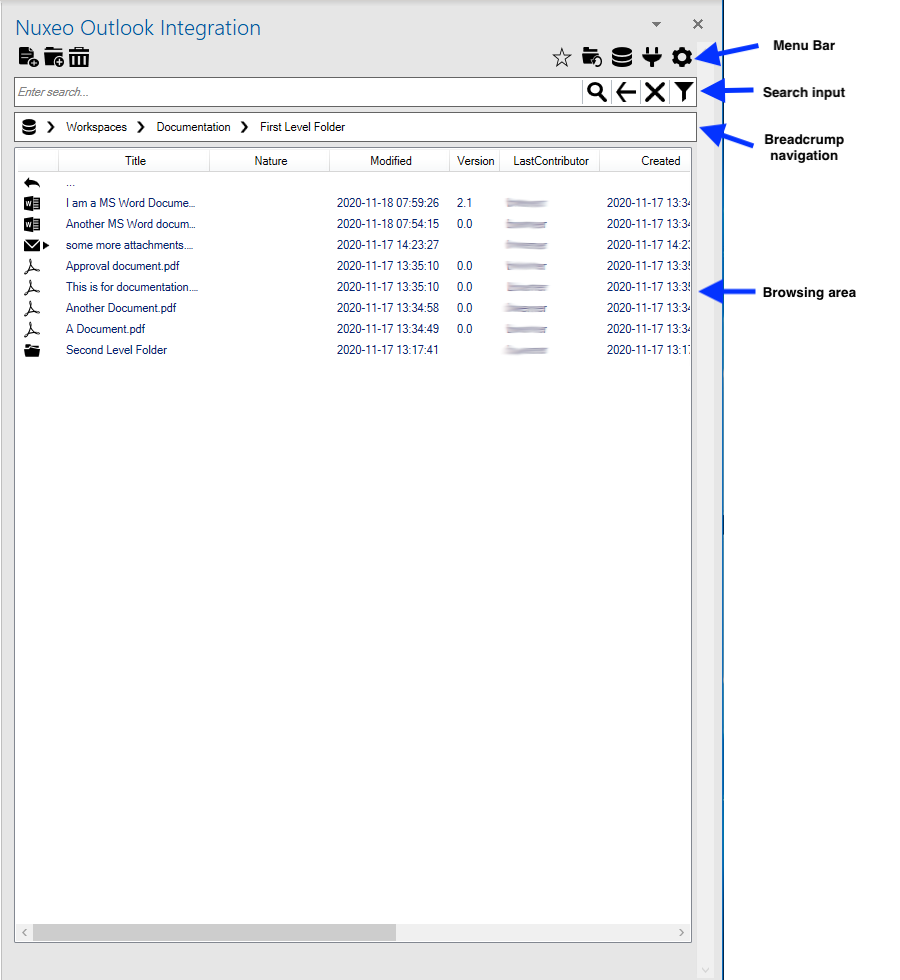
Menu Bar Functions
|
|
Upload new file(s) to current folder |
|
|
Create new folder underneath the current folder |
|
|
Delete selected item(s) - Hotkey: DELETE Key |
|
|
Display your favorite items |
|
|
Reload the current folder to display new items from other sources - Hotkey: F5 |
|
|
Back to root folder of your Nuxeo repository |
|
|
Reconnect your client without restarting Outlook, e.g. after changing the user for accessing the Nuxeo repository |
|
|
Open the settings dialog |
Browsing Content
The browsing area is giving you access to the structures and content items, according to your permissions within the Nuxeo repository.
From here you can navigate into folder structures, work with existing documents and upload new content into the current folder.
Breadcrumb Navigation
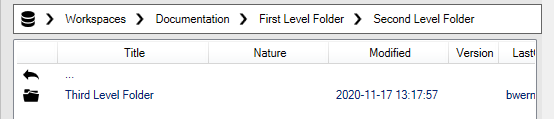
The breadcrumb navigation bar is displaying the path you are currently working in.
You can click on any folder within the displayed list to move directly to that folder.
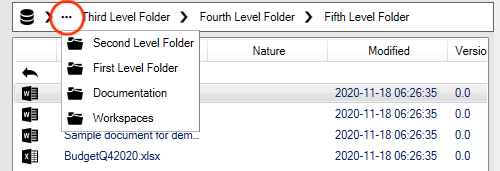
In this case the path you are currently working in is too long to be displayed within the bread crumb navigation bar. The list is being truncated (shrunk), so that the current folder is always visible.
If you want to access folders at a higher level, please click on the three dots, which appear once the list is getting truncated. This is opening the list of currently not displayed folders and you can now select from that list.
Searching Content
The Nuxeo Outlook Integration is providing you with access to the standard Nuxeo search capabilities.

|
|
Execute search with the entered keywords |
|
|
Back to search results, once you have navigated away from the results page |
|
|
Delete current keywords from search field and go back to the previous folder |
|
|
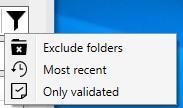
Displays the available filters |
Type your keywords into the search field and execute the search by hitting "Enter" or clicking the magnifier symbol.
You now can see the result list for your current search within the browsing area.
If you want to narrow down the results, you can open the list of available filters and apply them to your current search.
Managing Content
Upload Content From Within Your Inbox
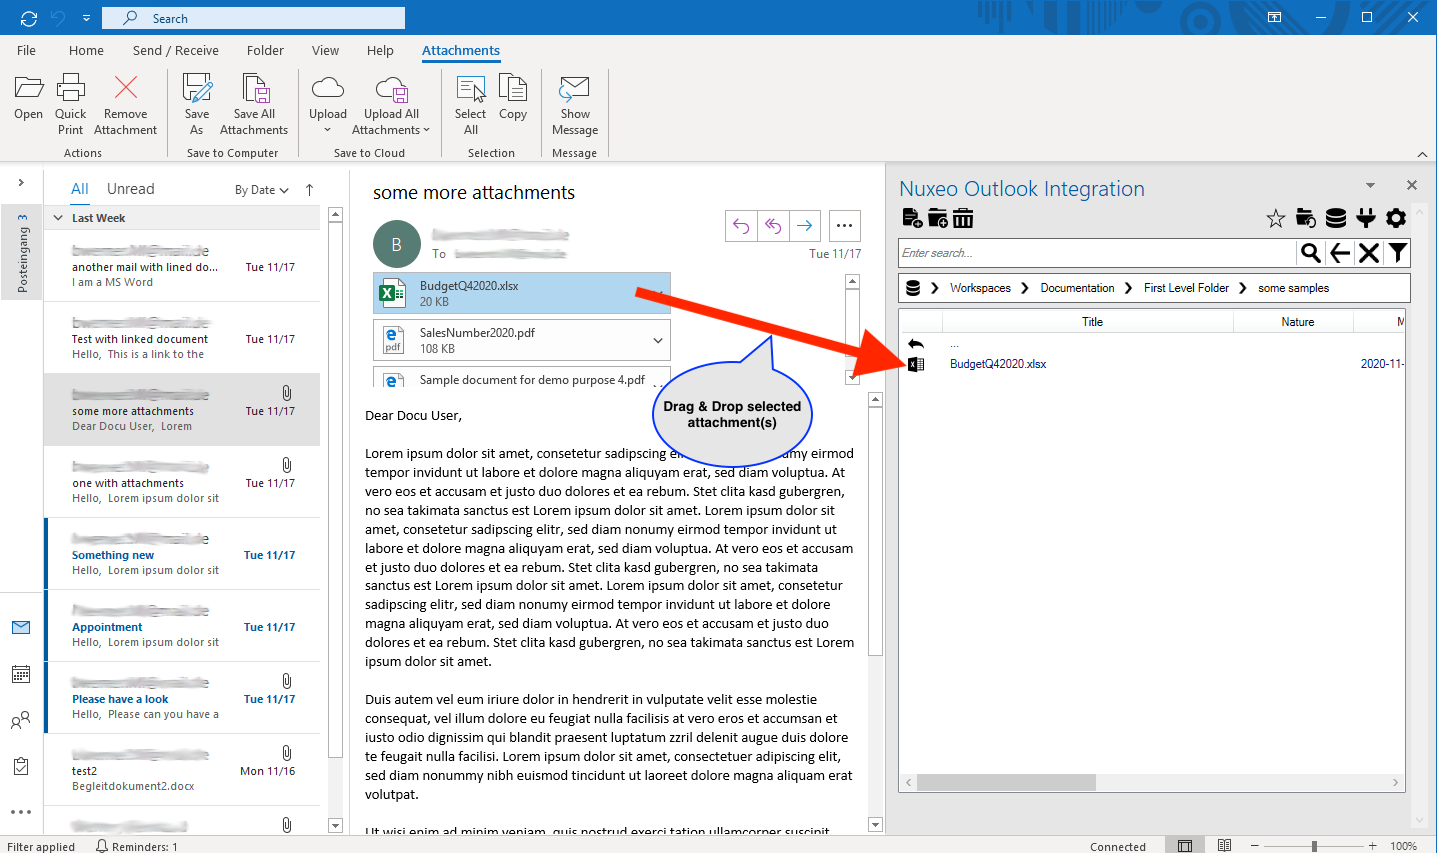
You can upload emails, attachments and calendar items form your inbox, by simply dragging & dropping the content items into the browsing area of the Nuxeo Outlook integration pane.
For an entire email please drag & drop the email onto the browsing area. Depending on your settings, the attachments will be extracted on the Nuxeo repository.
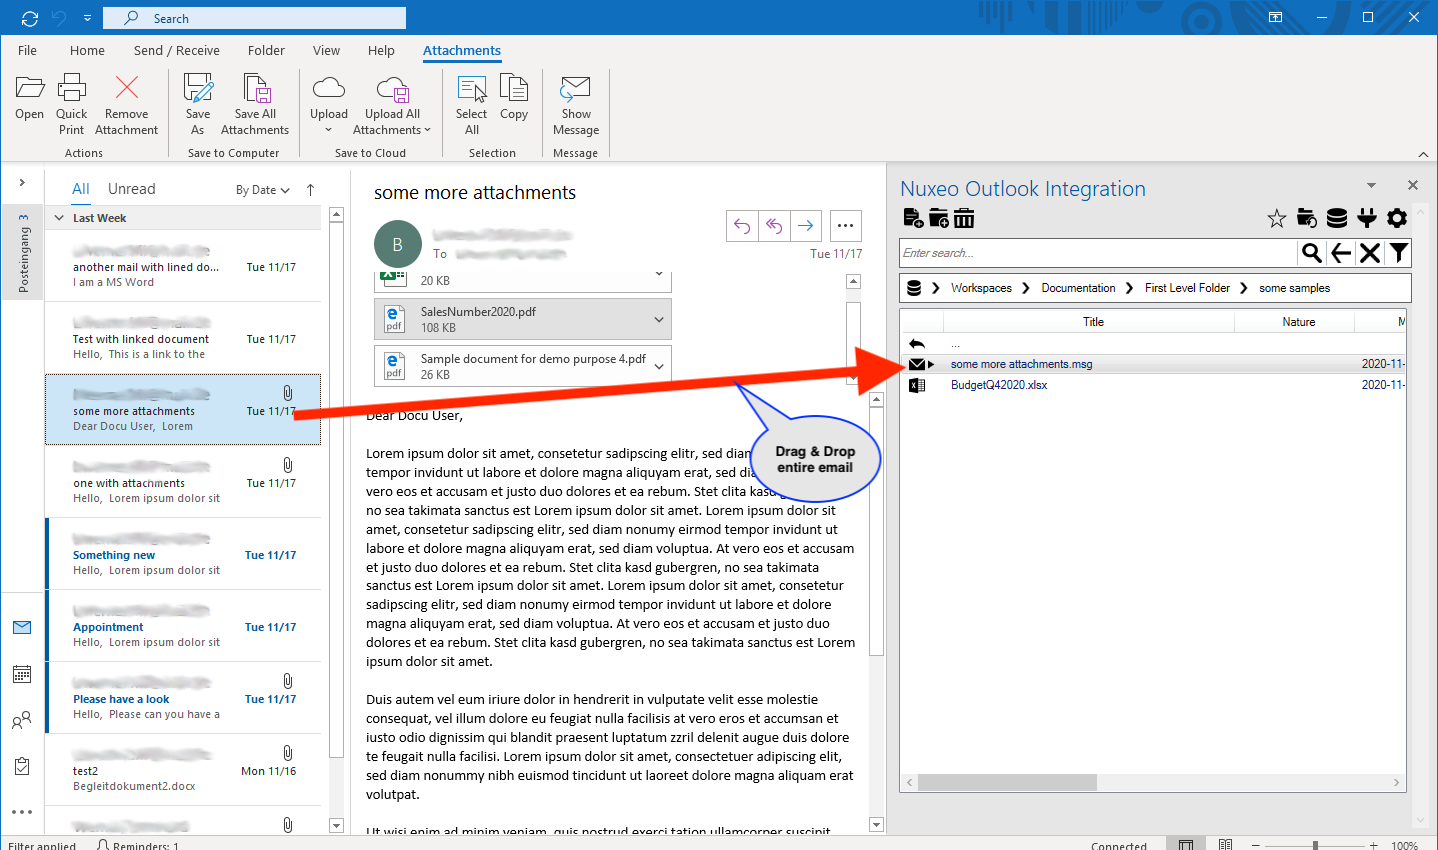
For the case that you want only to upload selected attachments, please select the mail to access the attachments and upload the desired ones by dragging & dropping them onto the browsing area.
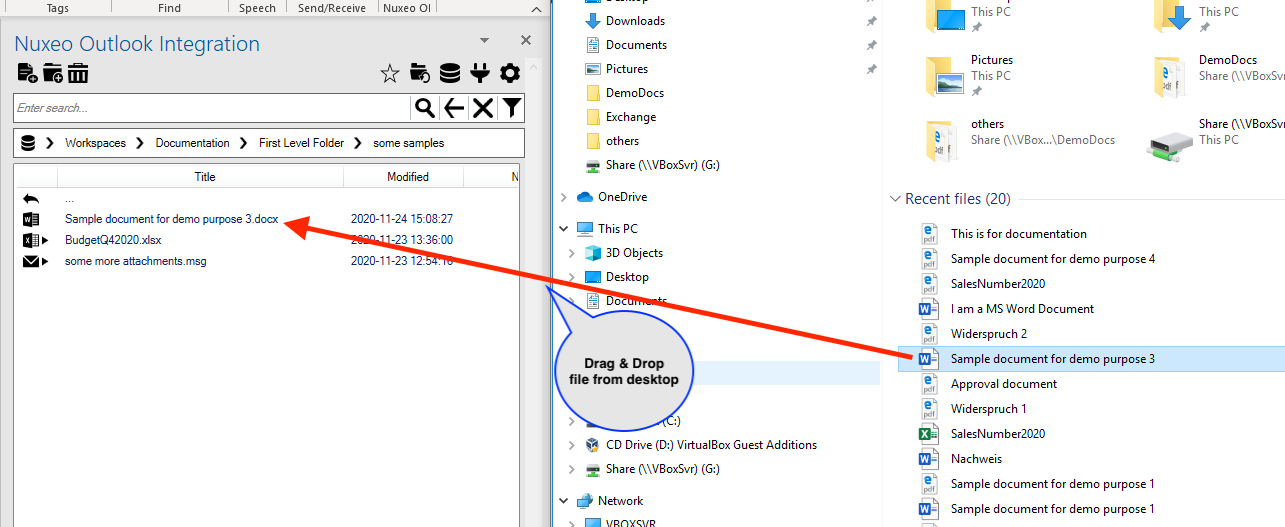
Upload Content From Your Desktop
You can upload documents from your desktop in the same way, by dragging & dropping from your explorer onto the browsing area of the Nuxeo Outlook Integration panel.
Alternatively you can click on the upload button ![]() in the menu bar, which will open an explorer window, from where you can select the file(s) to be uploaded.
in the menu bar, which will open an explorer window, from where you can select the file(s) to be uploaded.
Duplication Check for Emails
If you upload an email which is already stored within the Nuxeo repository, you will receive the following dialog:
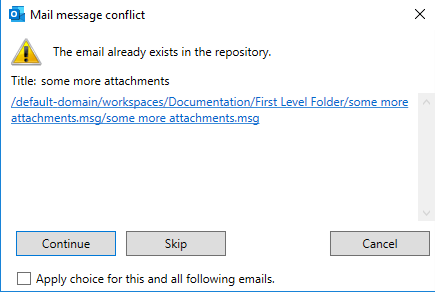
The link will guide you to the folder where the email already is stored.
- Continue: Upload the email anyway
- Skip: The current email will not be uploaded
- Cancel: Cancel the entire upload operation, even if you have selected multiple emails for upload
If you have selected multiple emails for upload, you can persist your decision (continue or skip) for all emails, by activation the option Apply choice for this and all following emails.
Creating New Folders
You can create new folders by either right clicking into a free space within the browsing area, where a dialog appears, asking you to enter a name for the new folder.
Alternatively you can click on the new folder button ![]() in the menu bar, to create a new folder.
in the menu bar, to create a new folder.
Working With Items in the Repository
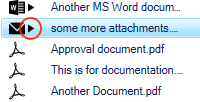
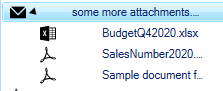
Accessing attachments
Each document which has attachments is being displayed with a small arrow behind the title. Once you click on this arrow, the view is expanded and you can browse through the attachments.
Clicking on the arrow again will close the attachment section.
Opening of documents
For opening a content item, please double click on the content item you want to access. It will be opened in the associated application.
Context Menu Actions
You can access the context menu by a right click on any selected item. The context menu will show you all available actions, depending on your permissions and the type of item you are accessing.
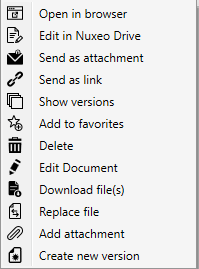
- Open: Downloads the document and opens it with the standard application (same as double click).
- Open in browser: Opens the document within the web application. This is giving your access to the full set of capabilities of your business application.
- Edit in Nuxeo Drive / Edit Online: Depending on your configuration the document will be opened in the associated application for editing the document directly.
Please refer to the Nuxeo documentation pages for further information: - Add to favorites: Adds the selected item to your list of favorites.
- Add attachment: Opens an explorer window from where you can choose the document(s) you want to attach to the selected document.
- Show Metadata: Opens an information window about the documents metadata.
- Edit Metadata: Opens a dialog where you can modify the tile and description of the selected document - Hotkey: F2
- Replace file: Opens an explorer window from where you can choose the document you want to replace the selected one with.
- Create new version: Opens a dialog, where you can choose to create a minor or major new version of the selected document.
- Show version: Gives you access to all versions of the selected document, where you can download older versions.
- Download files(s): Downloads the selected items to your desktop computer.
- Send as attachment: Opens a new message window with the file attached.
- Send as link: Opens a new message window with the link to the document in the email body.
- Copy & Paste: Adds documents to the clipboard to be copied later with the Paste option. This can also be done via drag & drop by holding the CTRL key while dragging one or multiple documents - Hotkey: CTRL + C, CTRL + V
- Cut & Paste: Adds documents to the clipboard to be moved later with the Paste option. This can also be done via drag & drop by dragging one or multiple documents onto a valid target - Hotkey: CTRL + X, CTRL + V
- Delete: Removes the selected item from the Nuxeo repository. Alternatively you can click on the delete button
 in the menu bar.
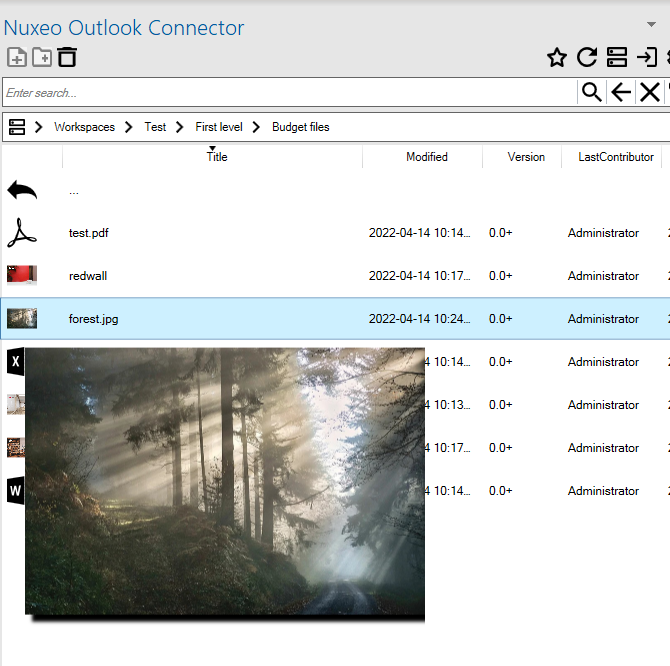
Thumbnail View
With version 1.2.0 and above you can enable thumbnails instead of fixed icons for your repository. To do this, go to Settings > View > Enable thumbnails.
Thumbnails for pictures and videos are enabled by default but you can also choose to show thumbnails for different mime types if your server generates these.
When hovering with your mouse over a thumbnail, a larger image will be displayed.
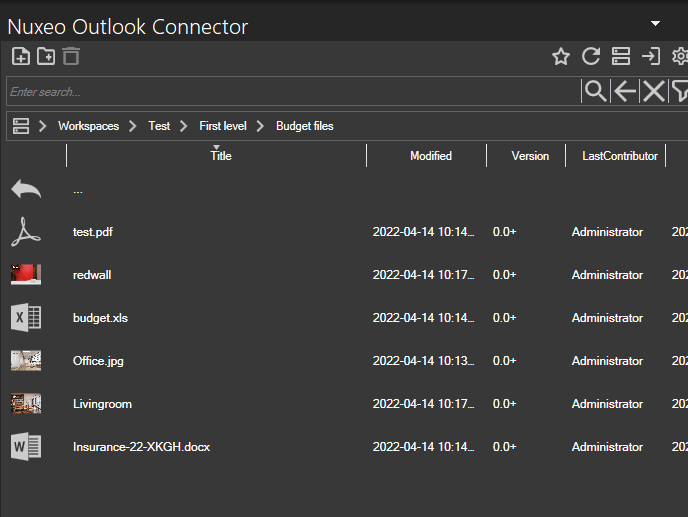
Dark Mode
Version 1.2.0 introduces a dark mode for the client which can be enabled in the settings (Settings → General → Choose Theme). After changing a new theme, Outlook has to be restarted.
View Emails in Nuxeo Web UI
The Nuxeo Outlook Integration adds some viewing capabilities to your Nuxeo Web Ui.
You can preview the content of the uploaded mails and access the extracted metadata like sender, addresses and subject of the mail.
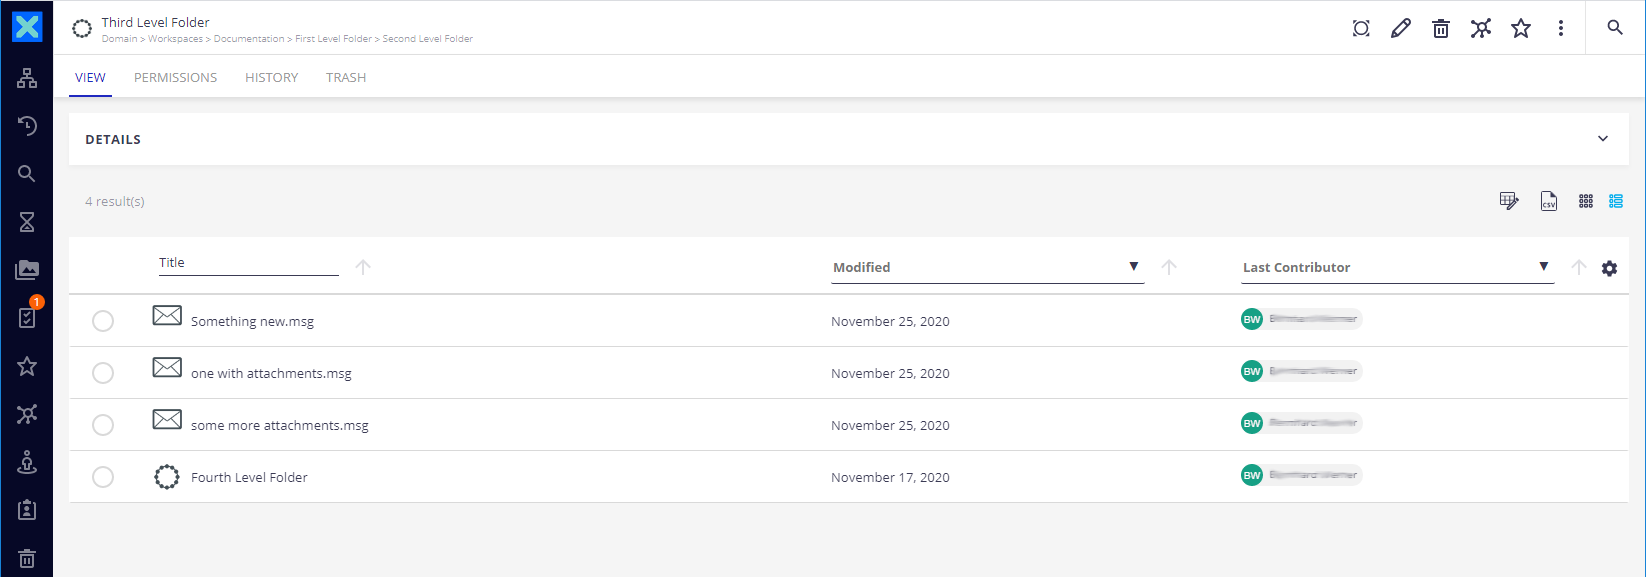
List view with email, marked with an envelope.
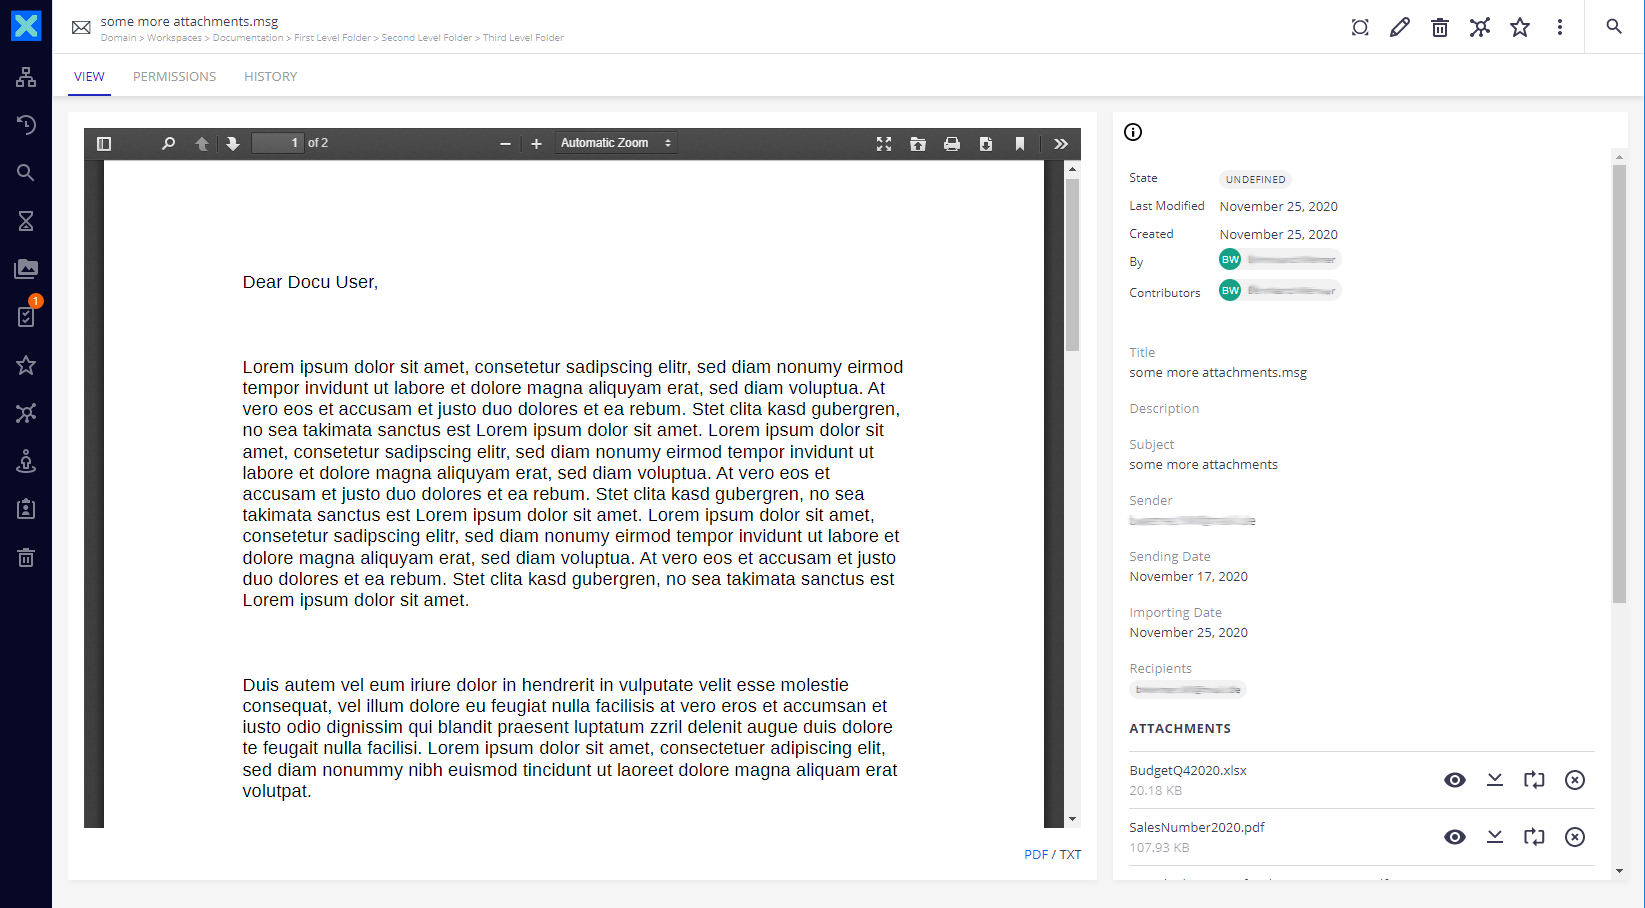
Details view with extracted metadata
Customization
Here are some templates available to customize your connector.
Customize Document Type of Uploaded Emails
Nuxeo Platform LTS 2019-HF55
Nuxeo Platform LTS 2021-HF12/2021.12.
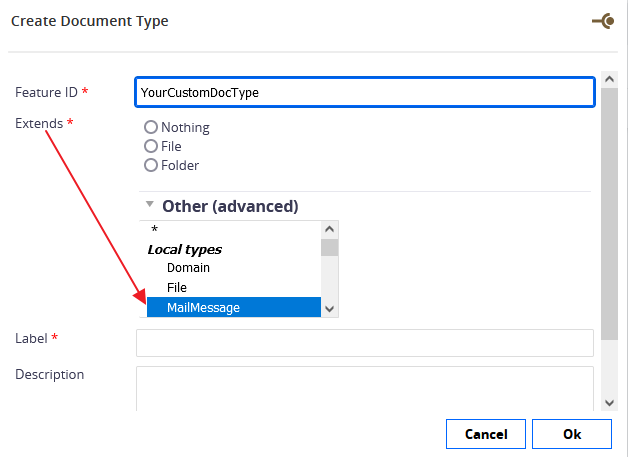
With version 1.1 of the Outlook Connector, the document type of an uploaded email can be changed from "MailMessage" to a different type by using one of the following procedures.
Make sure the new custom type extends "MailMessage" and also to create a new layout, otherwise there will be no preview, attachments or email metadata listed when opening the document in the browser.
Please see:
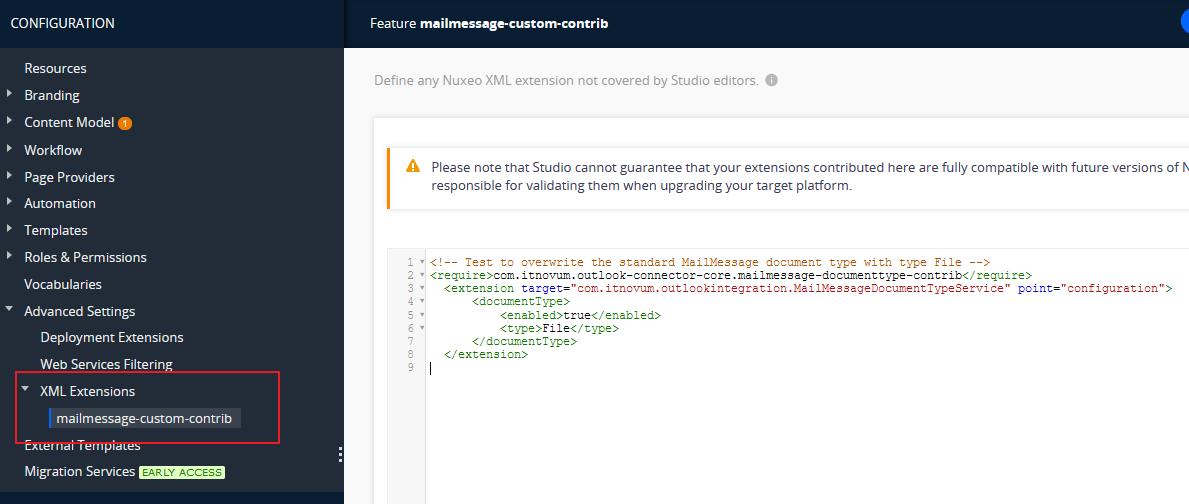
Create an XML Extension in Nuxeo Studio
- Go to your Nuxeo Studio project and go to the XML Extensions menu,
- Create a new extension and set the <type> for your emails.
Here is an example:
<!-- Test to overwrite the standard MailMessage document type with type YourCustomDocType -->
<require>com.itnovum.outlook-connector-core.mailmessage-documenttype-contrib</require>
  <extension target="com.itnovum.outlookintegration.MailMessageDocumentTypeService" point="configuration">
      <documentType>
          <enabled>true</enabled>
          <type>YourCustomDocType</type>
      </documentType>
  </extension>
Extend Nuxeo with you own component and overwrite the service that sets the email document type (requires coding)
First, deactivate that the document type is being loaded from the standard contribution. To do this, just add an XML extension similar to the one above but set the <enabled> tag to false.
<!-- Test to overwrite the standard MailMessage document type with type File -->
<require>com.itnovum.outlook-connector-core.mailmessage-documenttype-contrib</require>
<extension target="com.itnovum.outlookintegration.MailMessageDocumentTypeService" point="configuration">
    <documentType>
        <enabled>false</enabled>
        <type>MailMessage</type>
    </documentType>
</extension>
After being disabled, the implementation will now use the service implementation. If no override is found, the standard implementation will be used and return "MailMessage".
For a custom service implementation and how to override existing ones, please refer to the Nuxeo documentation
Customize Metadata Display
Description
To show metadata in Outlook, the Nuxeo Outlook Connector uses template rendering on the backend side. The Outlook Connector client then receives an HTML representation of the metadata and displays it to the user.
The templates depend on the document type. Currently there are two different templates in the Outlook Connector package, one default template which will be used if no special template is defined for requested document type and one template for type "MailMessage". The default template renders common properties which are provided by every document type. The "MailMessage" template provides special properties of the MailMessage document type.
If you want to create an additional template you have to use following naming format:
"outlook-" + docType + "-metadata".ftl
So for example the template name for MailMessage should be:
outlook-MailMessage-metadata.ftl
A new template can be added either through a Nuxeo package or Nuxeo Studio. In Nuxeo Studio you have to add it to Templates/Document Templates.
Use this example to add the template through a Nuxeo package as extension:
  <extension target="org.nuxeo.runtime.services.resource.ResourceService" point="resources">
    <resource name="outlook-basic-metadata">OSGI-INF/outlook-DocType1-metadata.ftl</resource>
    <resource name="outlook-MailMessage-metadata">OSGI-INF/outlook-DocType2-metadata.ftl</resource>
    ...
  </extension>
Template example
<#assign
LANG = Context.OUTLOOKCONNECT_LANG

_title = This['dc:title']
_modified = This['dc:modified']
_created = This['dc:created']
_creator = This['dc:creator']
_contributors = This['dc:contributors']
_sender = This['mail:sender']
_subject = This['dc:title']
_sending_date = This['mail:sending_date']
_recipients = This['mail:recipients']
_importing_date = This['dc:created']
_headerShowMetadata = Outlook.translate("outlook-connector/i18n/messages", "oi.template.header.title",LANG)
_titleKeyTranslation = Outlook.translate("outlook-connector/i18n/messages", "oi.template.key.title",LANG)
_modifiedKeyTranslation = Outlook.translate("outlook-connector/i18n/messages", "oi.template.key.modified",LANG)
_createdKeyTranslation = Outlook.translate("outlook-connector/i18n/messages", "oi.template.key.created",LANG)
_creatorKeyTranslation = Outlook.translate("outlook-connector/i18n/messages", "oi.template.key.creator",LANG)
_contributorsKeyTranslation = Outlook.translate("outlook-connector/i18n/messages", "oi.template.key.contributors",LANG)
_subjectKeyTranslation = Outlook.translate("outlook-connector/i18n/messages", "oi.template.key.subject",LANG)
_senderKeyTranslation = Outlook.translate("outlook-connector/i18n/messages", "oi.template.key.sender",LANG)
_sendingDateKeyTranslation = Outlook.translate("outlook-connector/i18n/messages", "oi.template.key.sendingdate",LANG)
_importingDateKeyTranslation = Outlook.translate("outlook-connector/i18n/messages", "oi.template.key.importingdate",LANG)
_recipientsKeyTranslation = Outlook.translate("outlook-connector/i18n/messages", "oi.template.key.recipients",LANG)
>
<#assign KEY_STYLE = "style='width:30%;font-weight:600;color: #444;'">
<meta http-equiv='Content-Type' content='text/html;charset=UTF-8'>
<table width='100%'>

    <tr>
        <td ${KEY_STYLE}>${_titleKeyTranslation}</td>
        <td>
            <#if _title?has_content>${_title}<#else>N/A</#if>
        </td>
    </tr>
    <tr>
        <td ${KEY_STYLE}>${_modifiedKeyTranslation}</td>
        <td>
            <#if _modified?has_content>${_modified}<#else>N/A</#if>
        </td>
    </tr>
    <tr>
        <td ${KEY_STYLE}>${_createdKeyTranslation}</td>
        <td>
            <#if _created?has_content>${_created}<#else>N/A</#if>
        </td>
    </tr>
    <tr>
        <td ${KEY_STYLE}>${_creatorKeyTranslation}</td>
        <td>
            <#if _creator?has_content>${_creator}<#else>N/A</#if>
        </td>
    </tr>
    <tr>
        <td ${KEY_STYLE}>${_contributorsKeyTranslation}</td>
        <td>
            <#if _contributors?has_content>${_contributors?join(", ")}<#else>N/A</#if>
        </td>
    </tr>
    <br>
    <tr>
        <td ${KEY_STYLE}>${_subjectKeyTranslation}</td>
        <td>
            <#if _subject?has_content>${_subject}<#else>N/A</#if>
        </td>
    </tr>
    <tr>
        <td ${KEY_STYLE}>${_senderKeyTranslation}</td>
        <td>
            <#if _sender?has_content>${_sender}<#else>N/A</#if>
        </td>
    </tr>
    <tr>
        <td ${KEY_STYLE}>${_sendingDateKeyTranslation}</td>
        <td>
            <#if _sending_date?has_content>${_sending_date}<#else>N/A</#if>
        </td>
    </tr>
    <tr>
        <td ${KEY_STYLE}>${_importingDateKeyTranslation}</td>
        <td>
            <#if _importing_date?has_content>${_importing_date}<#else>N/A</#if>
        </td>
    </tr>
    <tr>
        <td ${KEY_STYLE}>${_recipientsKeyTranslation}</td>
        <td>
            <#if _recipients?has_content>${_recipients?join(", ")}<#else>N/A</#if>
        </td>
    </tr>

</table>
If you want to use translations, the message files have to be added to the Nuxeo server.
API
To retrieve the rendered template from the backend, use following API end point:
api/v1/automation/OutlookConnect.RenderMetadata
Additional parameters have to be passed with the request:
{"params":{"DocType ":"DOC_TYPE","Lang":"LANGUAGE"},"input":"UID"}
The default language is English.
Translate column headers
For Outlook Connector v1.3 and above it is possible to translate the column headers. This requires a Nuxeo Studio connection and and a minor amount of work for the administrator.
First, go to the Nuxeo Studio instance connected to your server. Switch to the Designer mode and expand the "Translations". If no "messages" file is present, use the "+"-Button to create a file for your preferred language. Use the following naming pattern.
Standard file: "messages" French: "messages-fr-FR" German: "messages-de-DE" Spanish: "messages-es-ES" Italian: "messages-it-IT" Dutch: "messages-nl-NL" Swedish: "messages-sv-SE" Japanes: "messages-ja-JP" Please add the following labels and their preferred translation. Example for French:
{ "label.oi.title": "Titre", "label.oi.modified": "Modification", "label.oi.version": "Version", "label.oi.lastcontributor": "Dernier contributeur", "label.oi.created": "Création", "label.oi.creator": "Contributeur", "label.oi.coverage": "Couverture", "label.oi.nature": "Nature", "label.oi.subjects": "Sujets" } Save the file, update the project in your servers' update center. After the next restart, the translations will be available for the client to use.
The Connector will always try to find the translation file for the language selected in the "General" settings:
If no translation file is present it will fallback to the "messages" file. If this is also not present, it will fallback to the standard naming saved in the client itself.