Use Case
The company OhMyDoc has decided to set up a validation workflow for its press releases, with due dates and automatic escalation to the next step of the workflow after a defined period.
Here are the different steps of the use case:
- A user has to send a request to have his press release approved.
- The marketing manager (Jane) should review it within two days. She will be reminded every day that she still has this document to validate.
- If Jane has not reviewed the document within two days, then she is probably away: escalate the task to the general manager (Eric).
- Eric should review the document within two days.
- If Eric has not reviewed the document after two days, the workflow ends.
- If somebody validates the document, then publish it.
- If the document is rejected, the workflow ends.
How Will We Achieve This?
We will take advantage of the escalation rules functionality. Three escalation rules will be used:
- One will take care of sending a reminder email to the marketing manager every day as long as the task is not completed.
- In case the marketing manager does not do any action before the due date, another rule will escalate the task to the general manager.
- The final rule will end the workflow if the general manager does not complete the task before the due date.
Prerequisites
Before starting this tutorial, make sure you create two users on your platform with the following usernames: Jane, and Eric.
You also need a section called press releases, just below the Sections root (The Press Release section path should be /default-domain/sections/press releases).
If you want to receive the emails, make sure you have set up a test SMTP server.
Creating the Workflow
- Go to Workflow > Workflow definitions.
- Click on New, fill in your workflow ID and label (and optionally description) then click on Next.
Setting the Workflow's Availability
In our case, we want the workflow to be available only for File documents on which the user has the Edit permission. So we should do the following:
- Go to the Availability tab.
- "Current user has one of the permissions": select Edit.
- "Current document has one of the types": select File.
- Click on Save.
Starting Designing the Graph
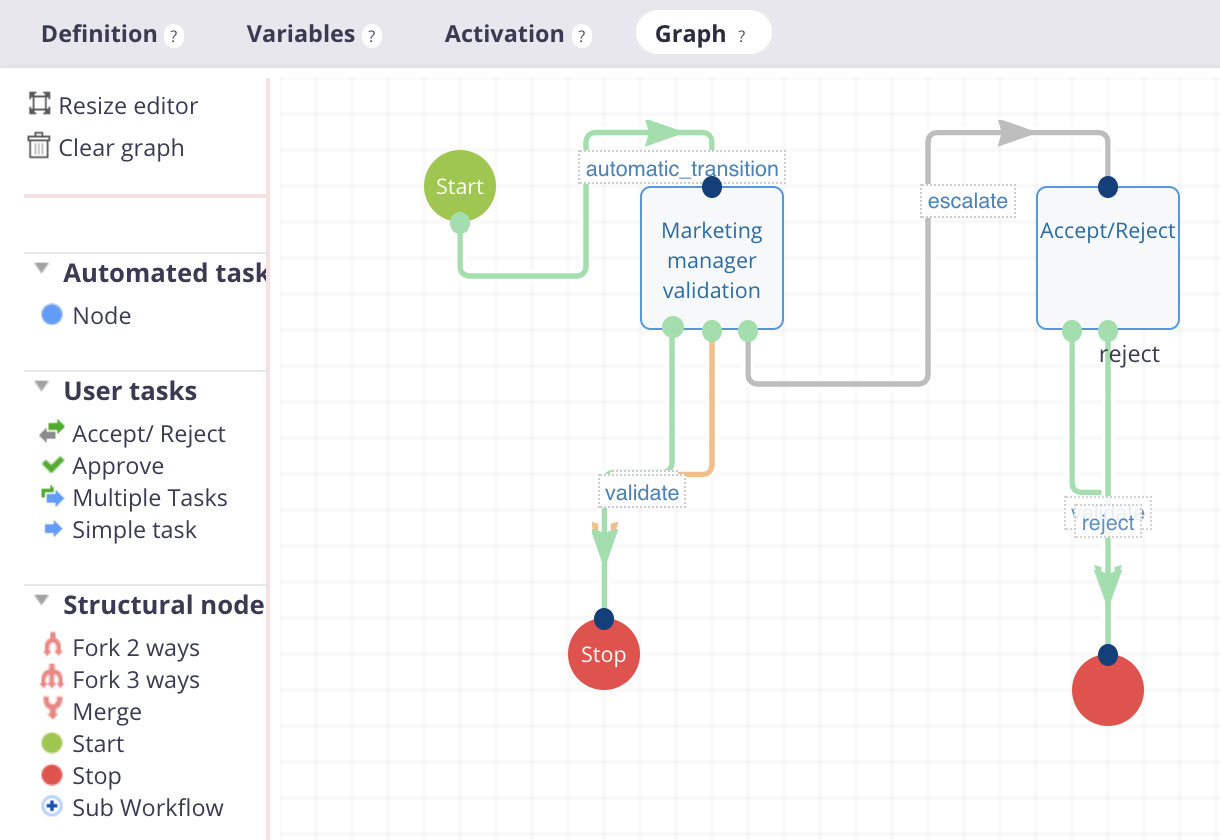
- Go the Graph tab.
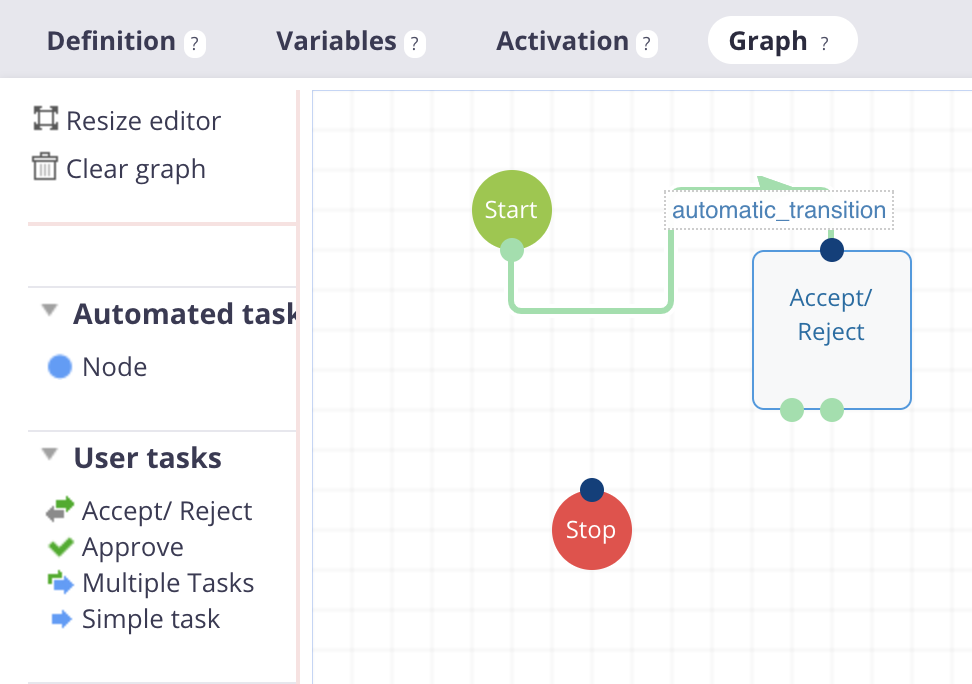
- All workflows start with a Start node, so drag and drop it on on your graph.
- Now drag and drop an Accept/Reject node from the User tasks. This will be used for the marketing manager's validation.
Your graph should now look like the image below.
Marketing Manager Validation Node
Let's define how the first step of the workflow, the marketing manager's approval, works.
General Tab
Edit the Accept/Reject node by hovering over it and click on the edit icon ![]() .
.
- Title:
Marketing manager validation. - Directive: "Please review this document for publication".
- Due date expression:
CurrentDate.days(2). - Assignees: Use the Add button to add "Jane" (the marketing manager's username).
- Grant permission to task assignee: "Edit", so Jane can possibly modify the document.
Result should look like the image below: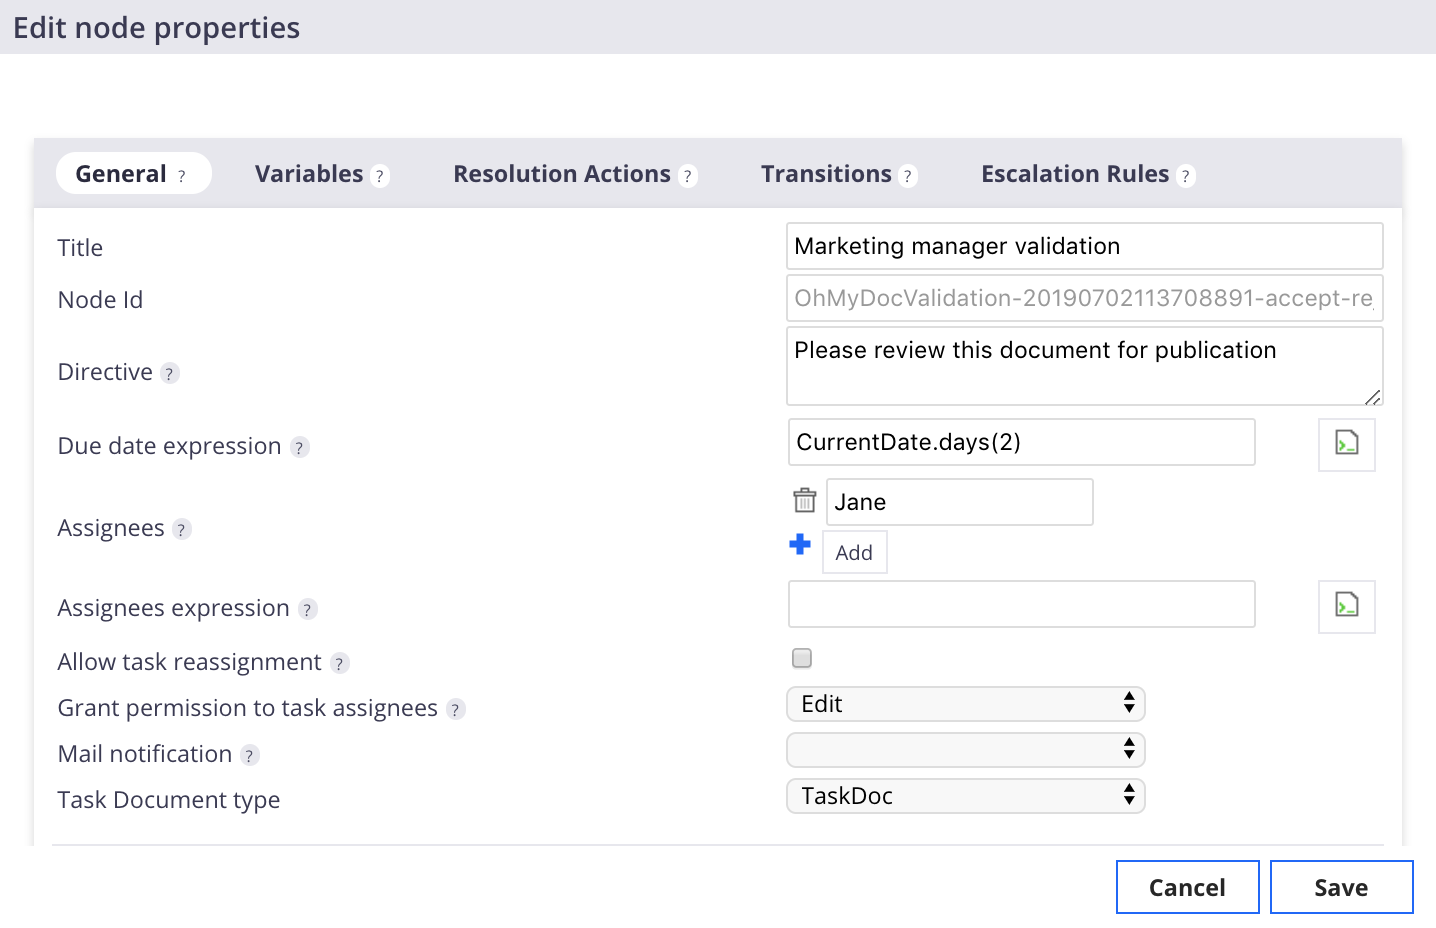
Transitions Tab
In this tab, we will create the automation chains corresponding to the button the user clicked on.
- Click on the Create button corresponding to the
validatetransition. The Create Operation Chain window pops up. - Name the chain:
validatePressRelease. - Fill the information like this:
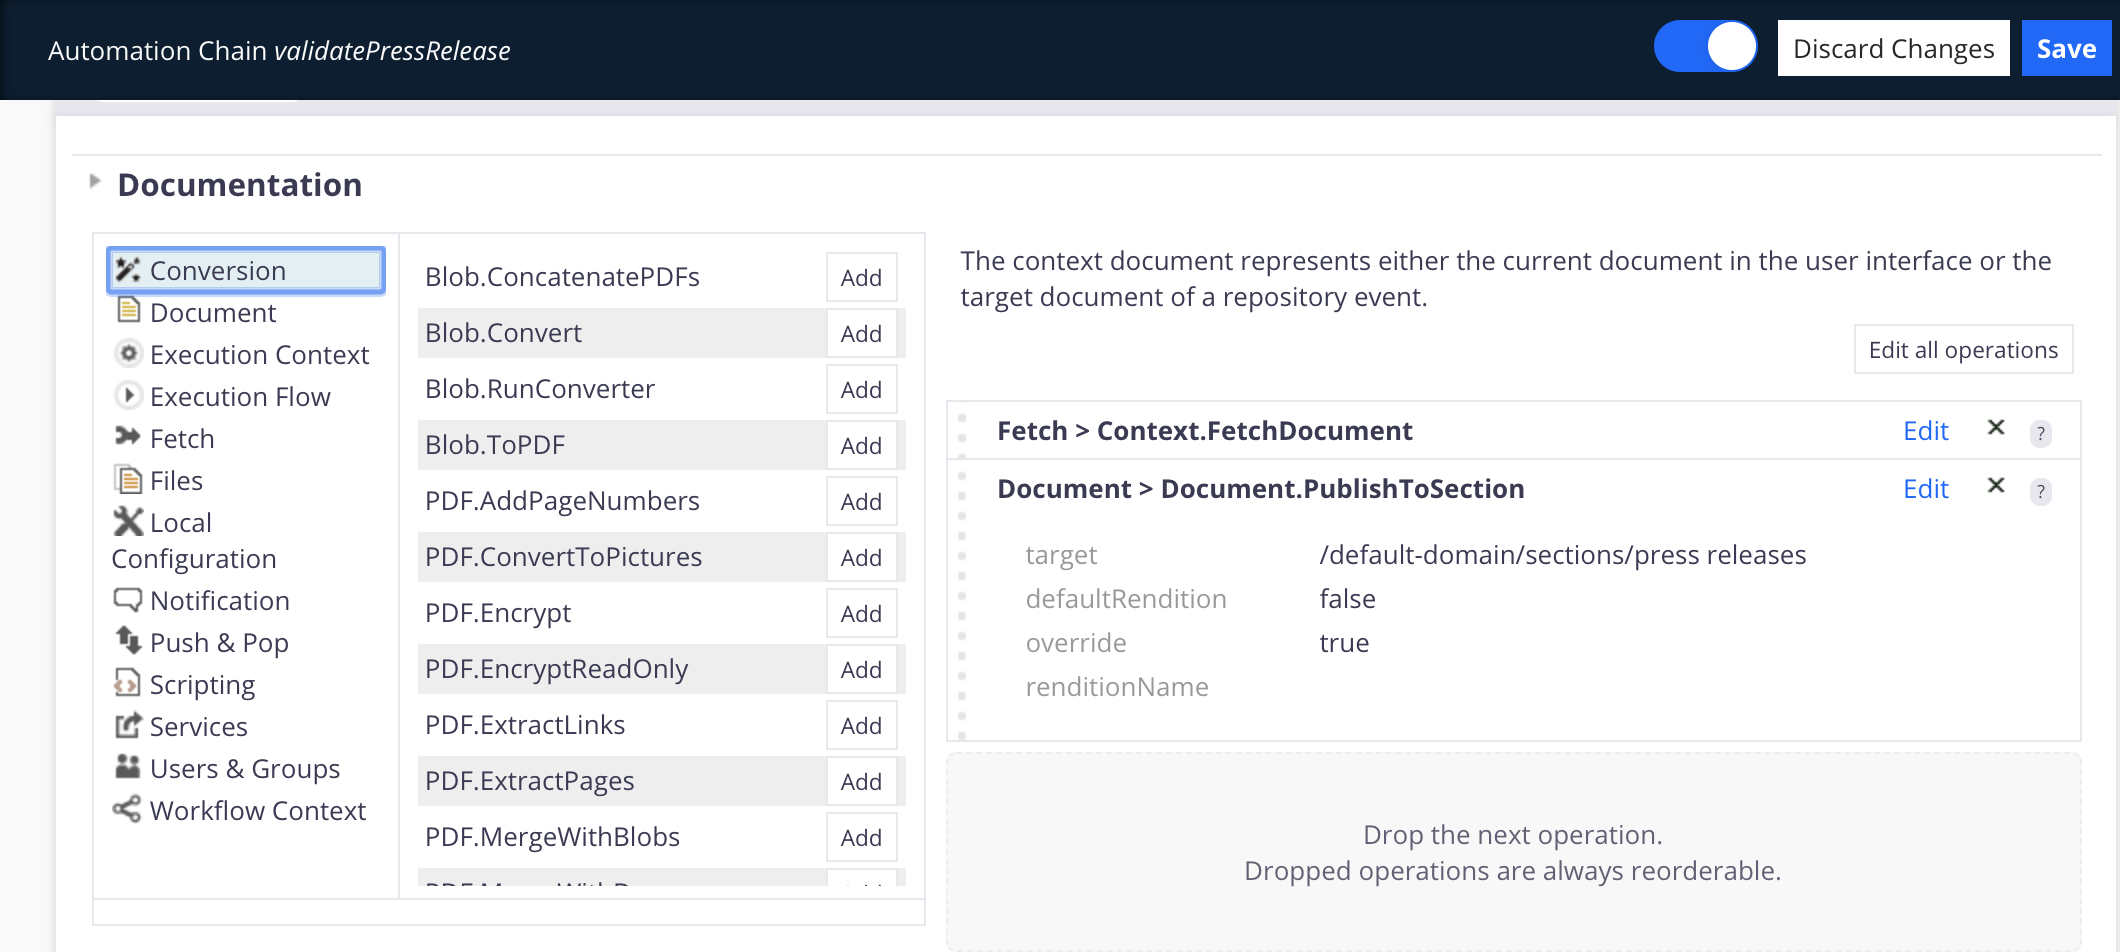
- Save your automation chain.
Updating the Graph
- Go back to your workflow, in the Graph tab.
- Link the Start node to the
marketing manager validationnode entry point. - Add an end node (Stop) on the graph.
- Link the
marketing manager validationnode'svalidateandrejecttransitions to this end node. - Add another Accept/Reject node on the graph. This will become the general manager validation node.
- Save your workflow.
Your graph should now look like this: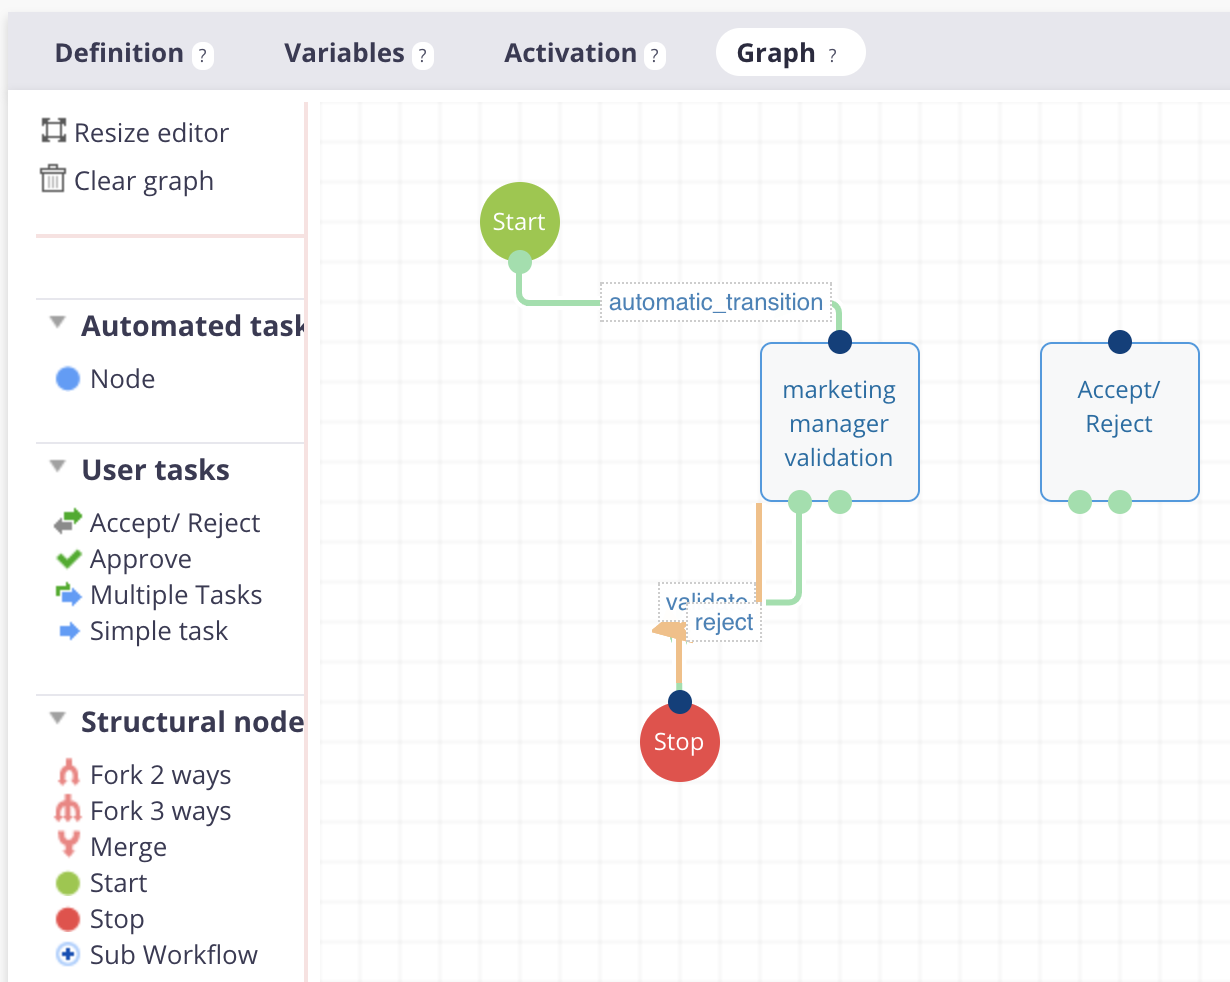
You may have realized that for now, we do not have any possibility to link the marketing manager's validation node to the general manager's one, or to have Jane be reminded to review the document. To handle this, we will need to add several elements:
- Another transition, so we can link the two nodes together. This transition should not have a corresponding button as it will be used only if the user is away.
- Escalation rules to remind Jane of her duty and, if needed, transfer the task to Eric.
- The automation chains that will be triggered by the escalation rules.
We will now see how to take care of these.
Defining the Escalation Rules
Transitions Tab
If you already created workflows, you may know that by going into the Form tab, it is possible to create a button the user can click on, and generate a corresponding transition so you can tell which node to go to when following it.
However, in this case, we need a transition but no button. How could the user click on it if he is away? Therefore, we will simply create a transition:
- Go back to the Marketing manager validation node and then to the Transitions tab.
- Click on the Add transition button.
- Name your new transition
escalate.
From now on, a third transition point is available on the marketing manager validation node.
You may see that the condition for this transition defaults to true. Every time a user completes a task by clicking on a button, the workflow engine will evaluate ALL transition conditions. ANY condition evaluated to true will be followed. Back to our example, this means that leaving the default value would end up in an escalation if the user clicks on a button, which is the exact contrary of what we want to achieve.
To avoid this situation, we need to activate the Exclusive node option. This option tells the node to follow only the first transition that has been evaluated to true. Back to our example, what does that imply?
- If the user clicks on a button, the condition for this button will be evaluated to
true. The workflow engine will follow this transition without evaluating the others. - If the user is away, when the escalation rule will be triggered, all conditions will be evaluated to
falseexcept for the escalation transition we just added. The workflow engine will then follow this transition.
Wow, this is perfectly adapted to our use case! Let's do it then!
Activating the Exclusive Node Option
- On the marketing manager's validation node, go to the Transitions tab.
- Check the Exclusive node option.
- Save the node properties and the graph.
That's it! Our transition is now secured.
Now, we should take care of transferring the task to the general manager if the user is away on to the escalation rules.
Creating the Escalation Rules
A little theory about escalation rules: this functionality is used on nodes that require a user action, when the user has not yet completed the task. It automatically executes automation chains depending on conditions you decide. A scheduler will check these rules every 5 minutes by default at a fixed time, when the minutes' number ends with 5 or 0 (thus not depending on when the server has been started). It will execute the rules once or multiple times depending on the parameters you have chosen.
We need two rules for this node: one that reminds Jane to review the document every day, and one that will transfer the task to Eric in case Jane is away. We will start off with the reminder.
Reminder Escalation Rule
Edit the Marketing managers validation node, go to the Escalation Rules tab and click on the Add escalation rule button:
- Id:
pressReleaseReviewReminder Condition: if you paid close attention to what we did with transitions, you probably already understood that this situation has similarities and that leaving the default condition (true) will cause the rule to be executed as soon as the scheduler will check it. In this case, we need to change it. Replacing "true" with an MVEL expression will do the trick. In our case, we will use the following:
Integer.parseInt(CurrentDate.format("Hm")) >= 2354 && Integer.parseInt(CurrentDate.format("Hm")) <= 2359This means that if the time of day is between 11:54 p.m. and 11:59 p.m. then we should execute the corresponding automation chain. The scheduler will be executed at 11:55PM and run the chain at this moment.
- Multiple execution: check this box, as this will make sure Jane will be reminded every day. Otherwise the chain would only be executed once.
- Chain: we will create a new chain for this, click on the Create button and and name it
pressReleaseReviewReminder. The chain should be configured as following:
Operation Parameters Fetch > Context document(s) Notification > Document.Mail From: [email protected]
Message: This is a friendly automated reminder. Please remember that you should review the following press release: ${Document['dc:title']}
Subject: [Reminder] Please review${Document['dc:title']}
To:@{Fn.getEmail("Jane")}
HTML:true- Click on Save.
That's it! Our first rule is ready.
Now we'll go for the second one.
Transfer Escalation Rule
Go back to the Marketing manager validation node, on the Escalation Rules tab and Add escalation rule button:
- Id:
pressReleaseReviewEscalation Condition: Once again we will replace
truewith an MVEL expression:@{CurrentDate.calendar.compareTo(Context["taskDueTime"])>0}This means that if today's date is superior to the task's due date, then we should execute the corresponding automation chain.
- Multiple execution: Leave this box unchecked, this time there is no need to execute it several times.
- Chain: we will create a new chain for this, click on Create and name it
pressReleaseReviewEscalation. The chain should be configured as following:
Operation Parameters Fetch > Context document(s) Workflow context > Workflow.GetOpenTasks Fetch > Repository.GetDocument Value: @{This.get(0).id}Workflow Context > Complete task It is not possible to simply change the assignee of a particular task. To do so we use:
- The Workflow context > Get open tasks operation to retrieve all open tasks for the current document.
- The Fetch > Document operation with a parameter returning only the first task found.
- The Workflow Context > Complete task operation to simulate a user action and resume the workflow. In our case, as we did not set any parameter to it, the workflow engine will review the possible transitions and execute the escalation transition since it is the only one set to "true".
Click on Save.
And we're done with this node.
Next in the list is the general manager validation node.
General Manager Validation Node
First things first: we haven't linked the nodes together. We will then take time to finalize the graph design.
Updating the Graph
- Link the
escalatetransition of theMarketing manager validationnode to the input point of the general manager validation node (Accept/Reject node). - Add an end node (Stop) to the graph.
- Link the general manager validation node output transitions to the end node you just added.
Your graph should now look like this:
- Save the graph.
Good! On to the node edition.
General Tab
Hover your mouse over the Accept/Reject node and click on the edit icon ![]() :
:
- Title:
General manager validation. - Directive: "Automatic task transfer: Please review this document for publication".
- Due date expression:
CurrentDate.days(2). - Assignees: Use the "Add" button to add "Eric" (the general manager's username).
- Grant permission to task assignee: "Edit", so Eric can modify the document if needed.
Result should look like the image below: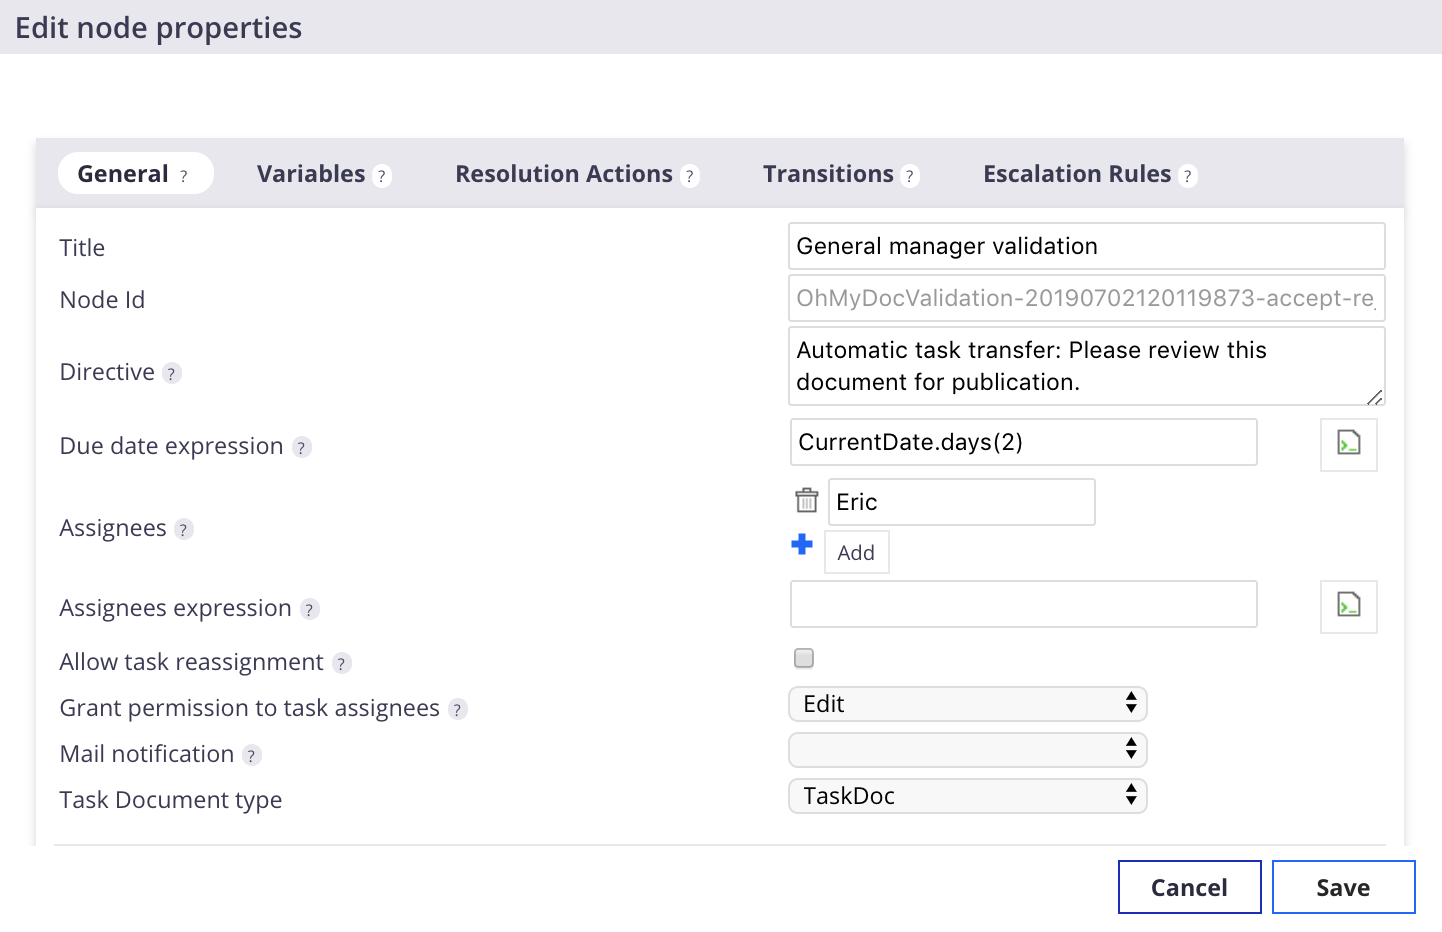
Transitions Tab
Similarly to the previous node, if Eric validates the document we want to have it published.
- Go to the Transitions tab.
- Check the exclusive node option.
- Select the
validatePressReleasechain for thevalidatetransition. - Add a new transition that you may call
endWorkflowand leave the default condition.
Escalation Rules Tab
This time if Eric is away or too busy, we want to end the review. Our escalation rule and the associated automation chain should reflect just this.
On the Escalation Rules tab, click on the Add escalation rule button:
- Id:
endReview - Condition: Same MVEL expression than in the previous node:
@{CurrentDate.calendar.compareTo(Context["taskDueTime"])>0} - Multiple execution: Leave this box unchecked.
- Chain: Select the
pressReleaseReviewEscalationchain previously created. This will end the task. The workflow engine will then follow theendWorkflowtransition which will be the only one evaluated to true by the escalation rule. - Save your modifications.
As you may have realized, the principle here is just the same than the one we used before: adding a transition, activating the exclusive node option and using an escalation rule to follow the added transition on to the next node. To make it fully functional though, we should take care of an important detail: linking the transition to the end node. A final update in our graph and we will be finished.
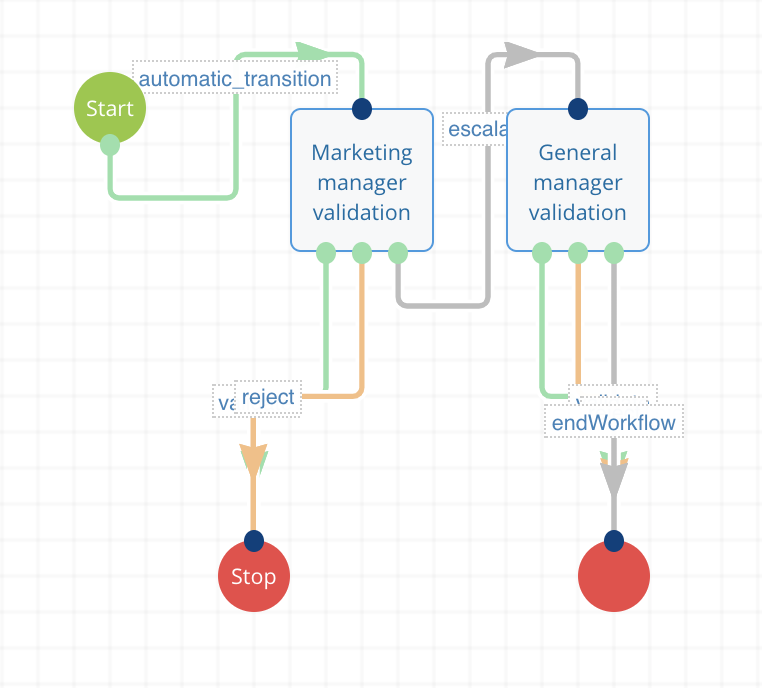
Final Graph Update
Now that you are back on your graph, link the general manager's node endWorkflow transition to the end node. Your graph should now look like this:
Configuring Workflow Layouts
The last step is to configure the layouts to be displayed on your interface, to do so:
- On the graph tab, click on Configure Layouts in Designer.
You arrive on thepressreleasevalidationworkflow screen on Designer side. - Click on Configure Missing Layouts.
- Save your changes.
You are all done! You can now deploy your Studio project on your instance and have fun with your brand new workflow!